SEARCH FINESCALE.COM

Enter keywords or a search phrase below:

Need Help W/ Academy M3 Bradley instructions

7348 views
19 replies
1 rating 2 rating 3 rating 4 rating 5 rating
  • Member since
    May 2003
  • From: Belgium
Need Help W/ Academy M3 Bradley instructions
Posted by Awood23 on Monday, September 6, 2004 7:43 PM
I bought this kit to use in the Backward/plane build and even know that group build kinda snowballed I still want to get started on this. Unfortunatly Ive run into a major problem. I bought this kit off ebay and had no idea the instructions were in Korean (I think) I was hoping someone has this kit in English and would mind either photocoping and mailinr or scanning and emailing then to me. Id be very grateful. This link shows the kit Im trying to build
http://forum.alanger.us/album_page.php?pic_id=199


Also if anybody has any refence photos and wouldnt mind sharing that would be great too. I plan on modeling this as a Bradley that would serve in Europe in the late 80's and 90's. I was thinking about doing up a OIF or Enduring Freedom Bradley but Ive seen to many of them lately both in real life and modeled.... :(
[img]http://img.photobucket.com/albums/v515/Awood23/DarkSideBadge.jpg "your' not trying if your not cheating" "no one ever won a war by dying for his country, he won it by making the other poor bugger die for his" 'never before have so many owed so much to so few" 1/48 Spitfire %80
  • Member since
    December 2002
  • From: PA
Posted by JWest21 on Monday, September 6, 2004 8:05 PM
I have the Acadamy M2 Bradley instructions. Not sure how much help it would be, but I could mail you a copy of those if you want. E-mail me if you want them
Jason "There is a very fine line between "hobby" and "mental illness." -D. Barry
  • Member since
    December 2002
  • From: Valrico, FL
Posted by HeavyArty on Monday, September 6, 2004 9:59 PM
Can't help with instructions, but here is some info that may be useful.
The Academy (Copy of Tamiya) M3 Bradley was an A nothing version. It would have been used up until about 1990. In early 1991, most units started swaping out their Bradleys for M2A2 and M3A2 versions. The newer version has the added side armor and other items. Here is a good site on the Bradley. http://www.fas.org/man/dod-101/sys/land/m2.htm And some photos:
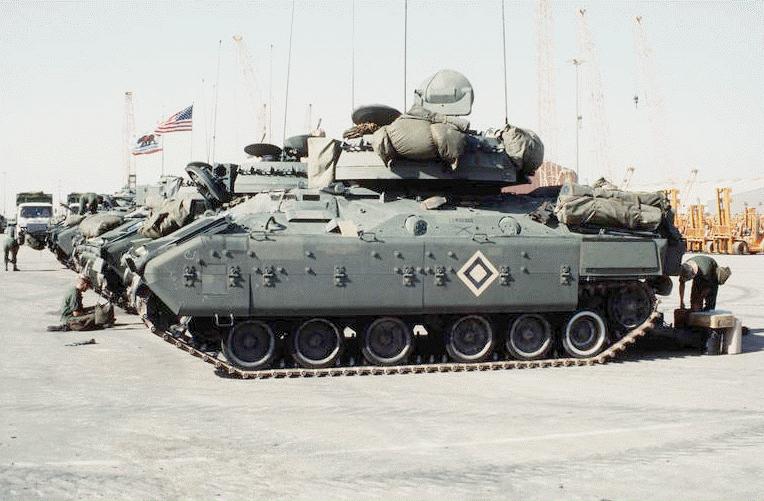
Original M2 or M3 Bradley

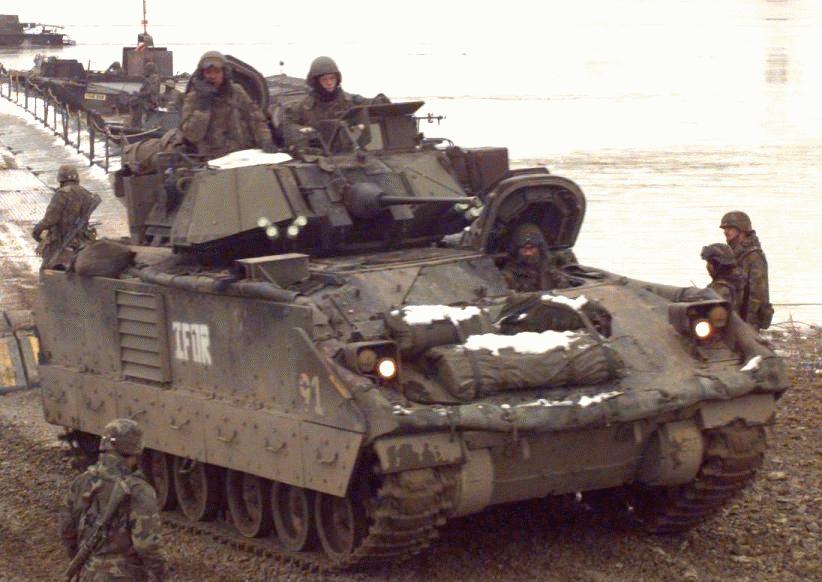
M2A2 or M3A2 Bradley


The latest version is the M2A2 ODS or M3A2 ODS. These have additions that were added from lessons learned in Operation Desert Storm, hence the ODS in the name. Tamiyas latest M2A2 ODS is a pretty good representation of this version.

Also of note, both the Academy and Tamiya M3 kit is not actually an M3 Cavalry Fighting Vehicle. It is an M2 Infantry Fighting Vehicle with the side gun ports blocked off like an M3. The M3 has a different set-up of the hull roof hatch and
vision ports on that hatch. Here is a photo showing the different hull roof hatch and vision ports.

Here is a good site of a build-up of an M3A2 CFV with some great links on updating the M2A2 Bradley as well. http://www.vodnik.net/pages/m3a2/m3a2.htm

Hope that cleared up the muddy water some.

Gino P. Quintiliani - Field Artillery - The KING of BATTLE!!!

Check out my Gallery: https://app.photobucket.com/u/HeavyArty

"People sleep peaceably in their beds at night only because rough men stand ready to do violence on their behalf." -- George Orwell

  • Member since
    May 2003
  • From: Belgium
Posted by Awood23 on Wednesday, September 8, 2004 11:47 AM
I appreciate the pics Heavy. They did give me some idea where I want this model to go. I know I'll probably catch for this but Im not too picky abut accuracy and this kit will be pretty much OOB with maybe some personal effects (rucksacks, Crew Tents and LSS) added. I just dont know enough about Bradleys or even other tracked vehicles to care about that much detail. Now my next non wingy thingy model is going to be a M1025 or 26. Fortunatly I have all the first hand knowledge I need about that kit. Any body have any recommendations for a good kit? I have academies 1/35 but going to run into the same problems with that kit as I am with the Bradley... the instructions are all in Korean :(


oh an Jwest, I fired off an email. Lemme know if you dont get it.
[img]http://img.photobucket.com/albums/v515/Awood23/DarkSideBadge.jpg "your' not trying if your not cheating" "no one ever won a war by dying for his country, he won it by making the other poor bugger die for his" 'never before have so many owed so much to so few" 1/48 Spitfire %80
  • Member since
    December 2002
  • From: PA
Posted by JWest21 on Wednesday, September 8, 2004 12:06 PM
I got it. I will first try to scan it. If that doesn't work, let me know and I can snail mail it
Jason "There is a very fine line between "hobby" and "mental illness." -D. Barry
  • Member since
    December 2002
  • From: Fort Knox
Posted by Rob Gronovius on Wednesday, September 8, 2004 12:43 PM
QUOTE: Originally posted by HeavyArty

Also of note, both the Academy and Tamiya M3 kit is not actually an M3 Cavalry Fighting Vehicle. It is an M2 Infantry Fighting Vehicle with the side gun ports blocked off like an M3. The M3 has a different set-up of the hull roof hatch and
vision ports on that hatch. Here is a photo showing the different hull roof hatch and vision ports....Hope that cleared up the muddy water some.
It does muddy the water because the Tamiya/Academy M3 is actually correct as is. The M3 had the same style hull roof hatch as the M2, M2A1 and M2A2. The redesigned hatch with the integrated vision ports did not appear until the M3A1. The roof hatch is one of the two main visual differences between an M3 and M3A1. The second visual difference is the M3 has the blocked off firing port bulges and the M3A1 has a flat piece of armor covering this area (no bulge visible).

You can e-mail me at rgronovius@hotmail.com I have the Tamiya M3 instructions. Since the Academy kit is a copy of the Tamiya kit, the instructions should help you. The Academy M2 instructions should help you just as well. I have some photos of a couple of the last remaining M3 A-nothings in my motor pool. Click the link in my signature to access the site.
  • Member since
    December 2002
  • From: PA
Posted by JWest21 on Wednesday, September 8, 2004 1:25 PM
I think Rob is going to be able to help you out even more that I could. I still will scan them, but you probably are going to have better luck with his Tamiya instructions.
Jason "There is a very fine line between "hobby" and "mental illness." -D. Barry
  • Member since
    December 2002
  • From: Valrico, FL
Posted by HeavyArty on Wednesday, September 8, 2004 4:41 PM
MAJ Rob,
Again, I stand (sit) corrected. I defer to the master of Bradleys. I knew you would come up if i got it wrong. Thanks for the clarification.

Gino P. Quintiliani - Field Artillery - The KING of BATTLE!!!

Check out my Gallery: https://app.photobucket.com/u/HeavyArty

"People sleep peaceably in their beds at night only because rough men stand ready to do violence on their behalf." -- George Orwell

  • Member since
    December 2002
  • From: Fort Knox
Posted by Rob Gronovius on Wednesday, September 8, 2004 7:17 PM
No problem. I did my Cav weapons course on the M3 Brad way back in 1987 and have served with many of the variants in the last 17 years.

The two plated off bulges are a recognition factor in determining an M3. An M2 would have operable firing ports. An M3A1 would have a solid piece of armor here without the two circular cutouts and the rectangular hatch would be the redesigned type with vision blocks incorporated in them.

Another distinguishing feature is the rear firing ports that are blanked off underneath the armor. Later M3A1/A2 variants have no evidence of firing ports.
  • Member since
    December 2002
  • From: PA
Posted by JWest21 on Wednesday, September 8, 2004 9:12 PM
I sent the e-mail with th instructions (from my little used home email). Let me know if you want photocopies. Also, note the file is REALLY large.
Jason "There is a very fine line between "hobby" and "mental illness." -D. Barry
  • Member since
    December 2002
  • From: PA
Posted by JWest21 on Wednesday, September 8, 2004 9:37 PM
I used the e-mail address you gave me and it came back undeliverable. I had this happen one other time when responding to a Forum e-mail. I re-sent it in a slightly different way, and haven't seen it bounce back yet. Let me know if you get it
Jason "There is a very fine line between "hobby" and "mental illness." -D. Barry
  • Member since
    December 2002
  • From: PA
Posted by JWest21 on Thursday, September 9, 2004 3:51 PM
I got your reply. I snail mailed a copy just incase
Jason "There is a very fine line between "hobby" and "mental illness." -D. Barry
  • Member since
    May 2003
  • From: Belgium
Posted by Awood23 on Friday, September 10, 2004 7:22 PM
Jason,

I finally got the emailed copy downloaded and it looks like these are going to work just fine. I'll let you know when I get the snailed mail copy. Thanks a bundle for the taking the time to help out. If you've built this kit any recomendations while building?

Thanks also to HeavyArt for the info and pics. May your rounds always be accurate and not land on my head though being a 95B - 31U now, I wouldnt be suprised if you were aiming at me :)
and not to Forget Maj Rob. Between the 3 of you guys I may be able to turn this into a decent looking Bradley. THanks again.
[img]http://img.photobucket.com/albums/v515/Awood23/DarkSideBadge.jpg "your' not trying if your not cheating" "no one ever won a war by dying for his country, he won it by making the other poor bugger die for his" 'never before have so many owed so much to so few" 1/48 Spitfire %80
  • Member since
    December 2002
  • From: PA
Posted by JWest21 on Friday, September 10, 2004 8:06 PM
Actually, I haven't built it yet. Tamiya came out with their OIF version shortly afterwards, so it went on the "to build" pile. Let me know if you need anything else.
Jason "There is a very fine line between "hobby" and "mental illness." -D. Barry
  • Member since
    May 2003
  • From: Belgium
Posted by Awood23 on Thursday, September 23, 2004 10:16 AM
Ok, I really trying to get started on this thing and getting more frustrated every time I look at it. The instructions Jwest sent me helped out being in english but here Im having alot of frusration. Im trying to assemble the road wheels which look at the instructions is a three part thing... front, back and a middle peice??? the middle peice isnt numbered and I cant find any thing that looks like it in the parts trees??? Ive tried dry fitting the wheels to the chase (sp) but they dont fit right and Im guessing that the third piece is the reason. Any body else know what Im talking about??? Im about ready to slop some glue on and paint it mostly rust and flat black with many pieces left of and use it for a diorama of a weapons range with an A-10 flying overhead.
[img]http://img.photobucket.com/albums/v515/Awood23/DarkSideBadge.jpg "your' not trying if your not cheating" "no one ever won a war by dying for his country, he won it by making the other poor bugger die for his" 'never before have so many owed so much to so few" 1/48 Spitfire %80
  • Member since
    December 2002
  • From: PA
Posted by JWest21 on Thursday, September 23, 2004 10:53 AM
That middle piece are those little black rubber grommets that allow the wheels to spin. The road wheel arms push into them and they hold the wheel on without glue. They come on a little black rubber tree, seperate from the kit parts. If yours doesn't have them, I can see if I have extras floating around. Not sure if I do
Jason "There is a very fine line between "hobby" and "mental illness." -D. Barry
  • Member since
    May 2003
  • From: Belgium
Posted by Awood23 on Friday, September 24, 2004 5:28 PM
Thanks Jwest. I now that I know what they are I sent an email to academy and got an almost instant reply. They're going to send a replacement set for but I appreciate the offer. I guess I should have asked for some instructions too while I was at it hu? :)
In all seriousness I appreciate the help you guys have given me. If I can get past these roadblocks I keep running into this thing may turn into a decent Bradley. Keeping my fingers crossed.
[img]http://img.photobucket.com/albums/v515/Awood23/DarkSideBadge.jpg "your' not trying if your not cheating" "no one ever won a war by dying for his country, he won it by making the other poor bugger die for his" 'never before have so many owed so much to so few" 1/48 Spitfire %80
  • Member since
    December 2002
  • From: PA
Posted by JWest21 on Friday, September 24, 2004 7:18 PM
No problem! I would like to seem some pics when you get it finished.
Jason "There is a very fine line between "hobby" and "mental illness." -D. Barry
  • Member since
    May 2003
  • From: Belgium
Posted by Awood23 on Friday, October 8, 2004 11:18 PM
ok guys... this build is almost done, down to painting and weathering. Ive never tried to do much weathering so this will be largely an experiment for me. Anybody having any suggestions would be appreciated. Also a question I was hoping Maj. Gronovius could help with (or anybody having knowledge of this could really help). This kit has a sighting mechanism over the main gun (looks like a TP with a flat roof) Many of the pics Ive seen of bradleys dont have em. The build in Heavy Arty's thread has one mounted. It spans from the main gun to the Commanders Coupla? Are these still used? or has a better sighting system been installed?

Again thanks for help guys. I'll post some pics as soon as she's battle ready :)
[img]http://img.photobucket.com/albums/v515/Awood23/DarkSideBadge.jpg "your' not trying if your not cheating" "no one ever won a war by dying for his country, he won it by making the other poor bugger die for his" 'never before have so many owed so much to so few" 1/48 Spitfire %80
  • Member since
    December 2002
  • From: Fort Knox
Posted by Rob Gronovius on Saturday, October 9, 2004 7:30 AM
That was an anti-aircraft sight on older Brads. I don't recall seeing any on there recently. Even back in the M3/M2 A-nothing days, they were usually left off. The sight arm was easily detached with quick release pins and stored somewhere in the vehicle.

This photograph shows where the sight arm attaches. There is one point to the right of the cannon housing and another that is at the botttom center of the photo.
JOIN OUR COMMUNITY!

Our community is FREE to join. To participate you must either login or register for an account.

SEARCH FORUMS
FREE NEWSLETTER
By signing up you may also receive reader surveys and occasional special offers. We do not sell, rent or trade our email lists. View our Privacy Policy.