SEARCH FINESCALE.COM

Enter keywords or a search phrase below:

More Morser Pics

1010 views
15 replies
1 rating 2 rating 3 rating 4 rating 5 rating
  • Member since
    July 2003
  • From: Dahlonega, Georgia
More Morser Pics
Posted by lizardqing on Thursday, September 23, 2004 7:15 PM
Finally got around to finishing the camo on the Morser. Had some problems with the red-brown paint I had so i lightly went over it with some burnt sierra. probally not 100% accurate, but oh well.


  • Member since
    April 2004
  • From: sunny imperial beach
Posted by yw18mc on Thursday, September 23, 2004 7:33 PM
You're camo looks just fine Chris. You've done a superb job on this huge platform. It's amazing such a monster was actually mobile. Looking forward too seeing the completed project. Pretty impressive at this point. Semper fi, mike
mike
  • Member since
    July 2003
  • From: Ozarks of Arkansas
Posted by diggeraone on Thursday, September 23, 2004 8:14 PM
It looks good to me camo and all.Digger
Put all your trust in the Lord,do not put confidence in man.PSALM 118:8 We are in the buisness to do the impossible..G.S.Patton
  • Member since
    August 2003
  • From: South Australia
Posted by South Aussie on Thursday, September 23, 2004 9:48 PM
Looks good Lizardging, I,m still in the process of building my kit, although I will be taking the easy way out and painting it grey.
Wayne I enjoy getting older, especially when I consider the alternative.
  • Member since
    July 2004
  • From: Texas
Posted by wbill76 on Thursday, September 23, 2004 11:28 PM
Looks good from here, Chris! Get the tracks on that beast and you'll be in business for sure. Wink [;)]
  • Member since
    March 2003
  • From: Rain USA, Vancouver WA
Posted by tigerman on Friday, September 24, 2004 12:03 AM
It looks great Chris. You know the builder is their own worst critic. Keep up the good work.

   http://i7.photobucket.com/albums/y269/wing_nut_5o/PANZERJAGERGB.jpg

 Eric 

  • Member since
    December 2009
  • From: West Grove, PA
Posted by wildwilliam on Friday, September 24, 2004 6:09 AM
Chris,
looking good.
is this the champion for road wheel count?
  • Member since
    November 2005
Posted by Anonymous on Friday, September 24, 2004 6:28 AM
Looking great so far Chris. Thanx for sharing it with us. Bryan
  • Member since
    May 2004
  • From: Dallas
Posted by KINGTHAD on Friday, September 24, 2004 8:10 AM
Like the camo, Thanks for the pics

Thad
  • Member since
    November 2005
Posted by Anonymous on Friday, September 24, 2004 8:22 AM
lizardqing, really nice looking build. What an huge machine. That has always been on my list of models to build. The camo looks great from here.

  • Member since
    December 2003
  • From: Southern Maine
Posted by spector822002 on Friday, September 24, 2004 10:12 AM
Chris that is a fun kit to build huh , lots of big pieces , nice change of pace to create and impressive model ! Weather that baby and put a crew in her and this will be a great dio . The tracks suck , you will find this out soon nuff . I would have prefered indy for that whole track unit . ( they give you long link sections a big part of it )
  • Member since
    July 2003
  • From: Dahlonega, Georgia
Posted by lizardqing on Friday, September 24, 2004 8:02 PM
Thanks guys. Should be ready to roll by weekends end. I hope.

Ed- The road wheels are not really all that bad. Aside fromt he return rollers, there is no rubber to paint. Had they not been mostly steel, I think I may have come up with my own version with steel wheels and caled it the 1954 year model or something. Big Smile [:D]

Spector- Allready know about the tracks. Have one side complete and waiting for paint and the other side about half built. I actually cheated and found a review with the count for putting the tracks on it. Worked out pretty good. And I suppose I could be a nice guy and share that with the rest of the gang.

First off this is how the instructions say to do it. Yes this is the only step showing tracks and yes I suppose they assume you will be able to just slide them on. Sure thing.


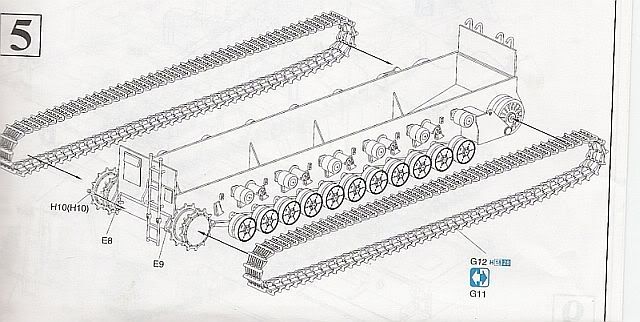
Now, this is how I found worked pretty good.

- Six of the track "lengths" were used for the lower track run.

- Two of the "lengths" were used on the top run - one at the front and one at the back.

- 36 individual links were used around the drive sprocket and idler wheel, plus to fill in the gap in the top track run.
-Those further broke down into 28 between top lengths, 5 around the idler wheel and 4 around the drive pulley.

Hope someone can find that useful.

  • Member since
    September 2011
Posted by fightnjoe on Saturday, September 25, 2004 1:20 AM
chris wow. awesome talent.


joe

Veterans,

Thank You For Your Sacrifices,

Never To Be Forgotten

Where you can find me:

Workbench on FaceBook  Google Plus  YouTube

  • Member since
    March 2003
  • From: Newport News VA
Posted by Buddho on Saturday, September 25, 2004 8:16 AM
Very nice, Chris! I love the camo....great job...

Regards, Dan

  • Member since
    July 2003
  • From: Dahlonega, Georgia
Posted by lizardqing on Saturday, September 25, 2004 7:12 PM
Thanks guys.
  • Member since
    August 2003
  • From: Alice Springs Australia
Posted by tweety1 on Saturday, September 25, 2004 7:29 PM
Nice looking build Chris.

As for the accuracy in the paint colour, I feel that if it looks good to you, than thats enough.

Some people take the accuracy thing a touch too far sometimes.
Should be proud of that rig, I would be!
--Sean-- If you are driving at the speed of light and you turn on the headlights, what happens???
JOIN OUR COMMUNITY!

Our community is FREE to join. To participate you must either login or register for an account.

SEARCH FORUMS
FREE NEWSLETTER
By signing up you may also receive reader surveys and occasional special offers. We do not sell, rent or trade our email lists. View our Privacy Policy.