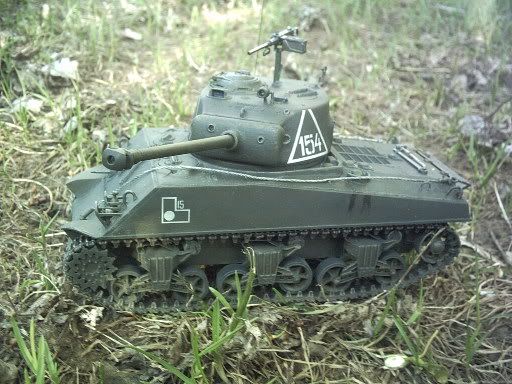
Hey, 293, how are you doing??
I am just finishing up the Tamiya kit after about a year and a half. It's the model that inspired me to get back into active modeling. I got jumped up by an article in Finescale modeler about this kit. When I got into it, I found out the Eduard photo etch kit mentioned in the article was no longer in production. Bummer, but they do have a newer set for it. It was more advanced, easier in many ways, but they left out the rings for the idler wheels. One of the parts that impressed me the most about the original set. :-(
The tracks set suggested in the article is the Model Kasten SK25. The article said that the tracks wouldn't fit around the drive sprockets correctly. He wound up trimming off the teeth under the track and then using plastic card to put them back in from the outside once the tracks were on. I opted to use the Fruil set. They also will not fit the teeth spacing on the kit sprockets. I wound up buying their metal drive sprocket set. The biggest problem I had with them was getting the plastic wheel mounts to stay in them. I glued them in three times with thick CA before they finally held. My next attempt was going to be with epoxy! But they look good in the end, and between them and the metal tracks, wow! is that tank heavy (for a little, bitty thing!!) I would recomend getting the Fruil sprocket set if you are going with either the Fruil or the Model Kasten set.
The Furil set it's self went together very well. The big problem with them is that there was a lot of metal "flash" on the links. I wound up drilling out the holes for the wires on both ends of every link. But it really wasn't that bad. I also made a big boo boo in that the I missed when pushing one of the wires through one set of the links and it wasn't inside the holes at the back of the links. That wouldn't have been too bad, but I didn't notice it until I'd glued up about 20 more links. I wound up soaking that portion of the track run in CA debonder and the pin came out without any trouble.
My method for these tracks was to drill out about 10 links, then hold two of them together, take a length of the wire provided and push it into the mated links, trim off the wire about an eigth of an inch out from the end of the link, then attach another link until I had the 10 links together. Then I'd take a brass wire, dip it in thick CA (thin CA runs too far into the links and binds them up!!), then touch the brass wire with the CA to the end of the wire holding the links together, getting a little more CA for each link. I'd do up these sets of 10 link runs and let them set up for a half hour (or longer!) while working on another run. Then I'd go back and trim off the excess wire as close to the end of each link as possible. Eventually, I'd pin the runs together. If you try to do a bunch of them at once, the run gets very heavy! Amazing how much those little links weigh together.
I've never tried the Model Kasten sets, so can't comment on them, but they sure look nice!
This is a very long answer to your question, but hope it helps. I had a lot of fun turning my $8.50 kit into a $170 model (including reference books)! Someday, maybe I'll get brave (and smart) and get some pictures of it posted on the forum somewhere.
Bill
==========================================================

DML M4A2 Red Army
==========================================================


==========================================================
-- There is a fine line between "hobby" and "mental illness". (Author unknown)