SEARCH FINESCALE.COM

Enter keywords or a search phrase below:

My first auto - Rusty Pony WIP

7184 views
24 replies
1 rating 2 rating 3 rating 4 rating 5 rating
  • Member since
    June 2009
  • From: MEXICO
Posted by ALEX GAROLI on Tuesday, June 2, 2009 6:30 PM
Wow really good job, the rust looks real!!
If you think you can, or you nast, you will be allways right about it
  • Member since
    December 2003
  • From: Colorado
Posted by psstoff995 on Tuesday, June 2, 2009 5:47 PM
Now that looks awesome!

-Chris

US Army Infantryman

  • Member since
    March 2006
Posted by marevic1 on Tuesday, June 2, 2009 5:03 AM
A bit of work on the base now.
I've added some ground work ontop of some styro, some static grass and a couple tyres.


After a little ground work and dust painting.


A now with where the car will be sitting.


I'm going to try and source some tools, maybe a toolbox to spread around the base.

Jurgen
  • Member since
    December 2003
  • From: Colorado
Posted by psstoff995 on Friday, May 29, 2009 3:28 PM
Wow!! Very nice, even the tree looks amazing

-Chris

US Army Infantryman

  • Member since
    January 2009
  • From: clinton twp, michigan
Posted by camo junkie on Friday, May 29, 2009 10:32 AM
looks convincing enough for me. right now i want to save it and take it in to have it restored!! are u planning on making a beat up battery and or cables lying around?? i think it would add to the scene even more?!?! just a thought! if mine were to ever get this way just shoot me will ya!! Boohoo [BH]
"An idea is only as good as the person who thought of it...and only as brilliant as the person who makes it!!"
  • Member since
    March 2006
Posted by marevic1 on Friday, May 29, 2009 6:34 AM
Still a bit of work to do but it's starting to come together now.
Just playing around with the placement of the Pony and junk yard bits and pieces.


Jurgen
  • Member since
    March 2006
Posted by marevic1 on Friday, May 29, 2009 1:59 AM
I'm using a bonnet, door and a couple other parts to add some interest to the scene.
The bonnet and door were done the same way as the Mustang body using the salt technique.
The bumper is another kit part and was given a black oil wash. The deep rust marks were added using a dark brown, followed by some MIG Dark Rust oil paint. The oil was then dabbed with a brush dampened with white spirits.


I've also finished the engine. It was given a black oil wash, dusted down with earth coloured pigments, with the final touch being oil stains were thinned black enamel with humbrol gloss.


Jurgen.
  • Member since
    March 2006
Posted by marevic1 on Thursday, May 28, 2009 7:24 PM

Thanks heaps Matt. Not sure it's up to the standards of what you auto guys are churning out, but I appreciate the complimentSmile [:)]

To be honest, this project was never supposed to get this far.
It was more about trying a few new techniques. Saying that, I'm having an a ball with this.
I fully intend on doing more after this one is done and taking more time and care the next time.

Thinking about it more, I should have scribed/thinned the sections that would be rusted like you suggest. Will definitely get the dremel out next time.

Jurgen.

No9
  • Member since
    April 2009
Posted by No9 on Thursday, May 28, 2009 6:54 PM

Marevic this is looking really good. Looks real. You need to take a shot at a model car show with this. I bet you would do well. I have won some awards for my beaters. They are starting to get more respect at the car end of the hobby.

You might not need this now, but a little tip for you in doing rust holes. What I did with the model I post up above. I would take my dremel tool with a barrel sander and slowly grine the plastic from behind till I got the plastic so thing. When you hold it up to the light, you can just about see through it. Then I take a pic or somethign sharp and start pocking through the plastic. It has a great effect for rust holes.

Very Nice Work

Matt

www.denconresin.com
  • Member since
    March 2006
Posted by marevic1 on Thursday, May 28, 2009 5:31 AM
Thanks Chris Smile [:)]

A little more progress to report.
The interior has been given a splash of paint using the base colour for the interior colour and white for the Pony trim. I've also modified the kit seat to make it appear in the folded position. This has then had a brown wash applied to get it nice a dirty. The engine bay and firewall were then finished off in black.


Next came the engine basics. The colours (except for the extractors) are still really bright.
These will eventually be toned down and weathered.


I've been playing around with the vehicle placement and possible base. This is sort of where it's heading at the moment.


Any comments, feedback or advice appreciated.

thanks for looking.
Jurgen.
  • Member since
    December 2003
  • From: Colorado
Posted by psstoff995 on Monday, May 25, 2009 11:28 AM
Love the rusty edges and that tissue paper looks dead on- nice work!

-Chris

US Army Infantryman

  • Member since
    March 2006
Posted by marevic1 on Monday, May 25, 2009 12:45 AM

J.Warnell - thank you. Good luck with you freight car Smile [:)]

Mitchum - thanks for the kind words. I've actually got a full size version of this one sitting in
              my garage. Luckily it's in much better condition than this one
Wink [;)]

Using a mini hand drill, I added some more rusted out bits. I treated them with a dark wash and then added some rust coloured pigments.


I've added the headliner using some cut down kleenex, fixed into place with white glue thinned with water. I also tore parts of the Kleenex to get a ratty look.


Again, any and all feedback and advice welcome.

Jurgen.

  • Member since
    August 2008
  • From: Fort Worth, Texas USA
Posted by J.Warnell on Sunday, May 24, 2009 6:45 PM
   The technique you used obviously works quite well. The rust looks very realistic. I am now wanting to try your method on an HO scale freight car. Thanks.
  • Member since
    October 2003
Posted by mitchum on Sunday, May 24, 2009 4:27 PM

Jurgen,

   I own two real full size '64 Galaxie parts cars in about that same condition and you NAILED the look. Mine are also both light blue and could be triplets of yours. I take my hat off to a true artist

  • Member since
    March 2006
Posted by marevic1 on Sunday, May 24, 2009 12:03 AM
Thank you all so much for the postive feedback.
Never really having done an auto before, I wasn't too sure how it was turning out.
It's also the first time I've tried the salt technique, and have to admit it's easier than I thought it would be.

Camo Junkie - I know what you mean about it being a shame that the Mustang is rusty, but the one in the garage is nice an shineyWink [;)]

Matt - Thanks for the feedback and vote of confidence. Looking at you work, you obviously know what your doing, so  any feedback or tips would be great!!! Especially on the interior.

Chris - this has provided a quick and enjoyable distraction from my current armor projects. I can thoroughly recommend it
Smile [:)]

Just another little update. I've re-added some of the base colour using a 10/0 brush by dabbing small amounts of paint on some of the lighter portions of the body work to enhance the chipping effect.


This process was repeated around various parts of the car.


Jurgen.
  • Member since
    December 2003
  • From: Colorado
Posted by psstoff995 on Saturday, May 23, 2009 5:26 PM
marevic- nice work!! I've always wanted to do one of these, I'm 1:35 armor and 1:35/1:16 scale figures mostly, but I have build a few cars, no abandoned ones, but I've done some custom EMS vehicle work.

Hopefully with great tips and step by step WIPs like this one and Karl’s great rabbit home diorama, I think I should be good to go as soon as I find a nice looking older car kit.

Looking forward to watching this WIP

-Chris

US Army Infantryman

No9
  • Member since
    April 2009
Posted by No9 on Saturday, May 23, 2009 1:59 PM

Nice Work! I love it. I am a car modeler all the way, and I build my share of weathers cars like this. This is why I love seeing a crossover of modelers like this. I love getting tips from you armor guys to help me with my "Beaters" as we call them over on the car side of the hobby. It is even better to see one of you armoro guys take your building tech and use it on a car model. THANKS!

 I have seen and heard about this salt thing. I have been wanting to do it but have never found or seen a demo on how. Thanks for posting it here.

 Here are a few of my beaters.


Matt

www.denconresin.com
  • Member since
    January 2009
  • From: clinton twp, michigan
Posted by camo junkie on Saturday, May 23, 2009 9:37 AM

nice! while i too dont make it here all that often...anything mustang will catch my attention. what's a shame (while u did a great job) is the fact that its rusted. Boohoo [BH] Laugh [(-D]

"An idea is only as good as the person who thought of it...and only as brilliant as the person who makes it!!"
  • Member since
    March 2006
Posted by marevic1 on Saturday, May 23, 2009 9:15 AM
Thanks guys Smile [:)]

Hi smeagol. The salt chipping is one layer, whereas the application of rust pigments and dampening with white spirits was done twice.


Jurgen
  • Member since
    April 2008
  • From: Philadelphia PA
Posted by smeagol the vile on Saturday, May 23, 2009 8:47 AM
Im guessing he did multiple coats with layered salt paint chipping type weathering, thats what it looks like atleast


  • Member since
    August 2008
  • From: Tuscaloosa, AL
Posted by wingform84 on Saturday, May 23, 2009 8:46 AM
All I can say is wow really.  The rust is so realistic, can't wait to see what you do with the rest.
If you have a deviantart account, come join my model building club! http://model-buildersanon.deviantart.com/
  • Member since
    March 2006
Posted by marevic1 on Saturday, May 23, 2009 8:05 AM
Thanks lexesbenz and Marc.Smile [:)]

Sorry Marc, I should have added more detail of what I did in the original post
Confused [%-)].
I've gone back and added a description of what was done
Smile [:)].

cheers,
Jurgen
  • Member since
    April 2005
  • From: Piscataway, NJ!
Posted by wing_nut on Saturday, May 23, 2009 5:09 AM
I don't make it to the auto section too often but the "first auto" title caught my eye.  Glad it did.  That looks nice.  Some great looking effects going on there.  You may as well start typing up the explanation of how you did it since someone will ask and it may as well be me. So...?  Wink [;)]

Marc  

  • Member since
    December 2005
  • From: Syracuse, NY
Posted by lexesbenz on Saturday, May 23, 2009 3:32 AM
Wow very nice!
The flying hamster of doom rains coconuts on your pitiful city!!!!
  • Member since
    March 2006
My first auto - Rusty Pony WIP
Posted by marevic1 on Saturday, May 23, 2009 2:04 AM
Hi all.

I normally only build 1:35 armour, but have decided to try my hand at something different.
This is my first attempt at doing a car. This is a kit I started many years ago, and never got anywhere near to completing. It just sat in the box for years.

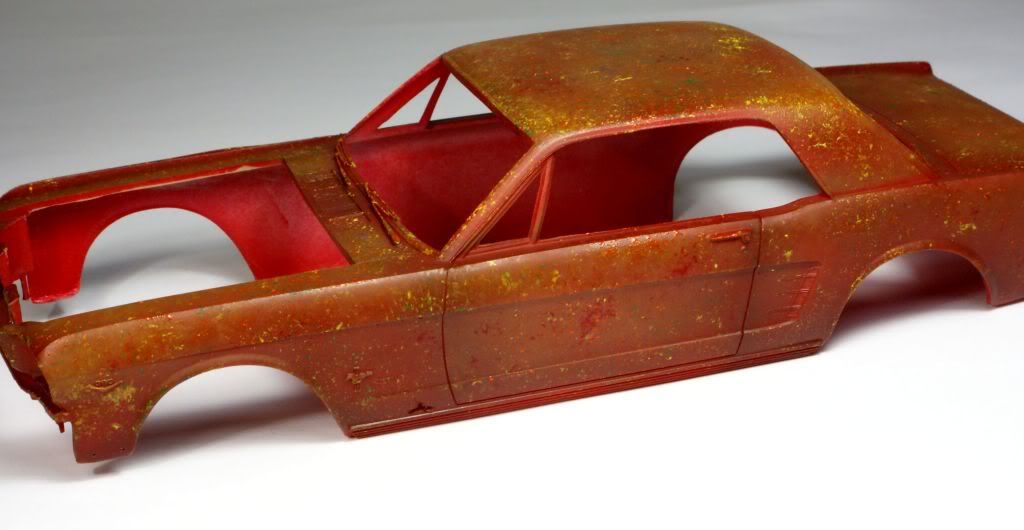
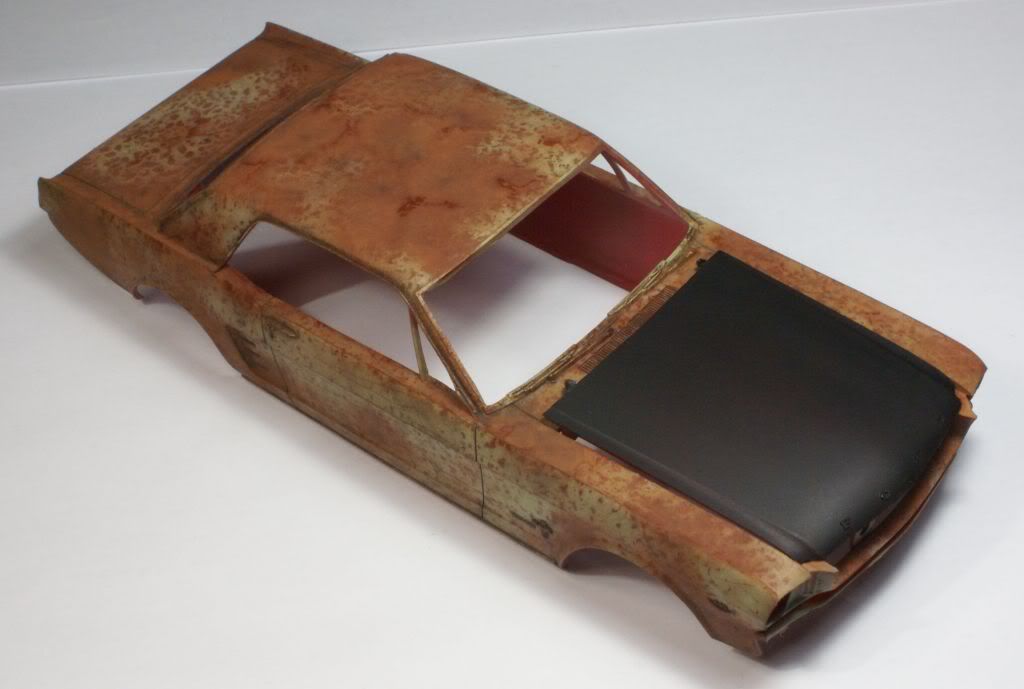
I want to depict an old rusted Mustang, possibly in a wreckers yard or abandoned in a paddock. This is still a WIP and there's a lot more work to come.

The base colour is a mixture of Hull Red, Flat Red and Orange with a touch of Red Brown added for good measure. Once dry, I added dots of oil paint. The colours used were a bright green, yellow, blue, red and orange. These were dabbed on using the tough dark green side of a scotch brite pad.


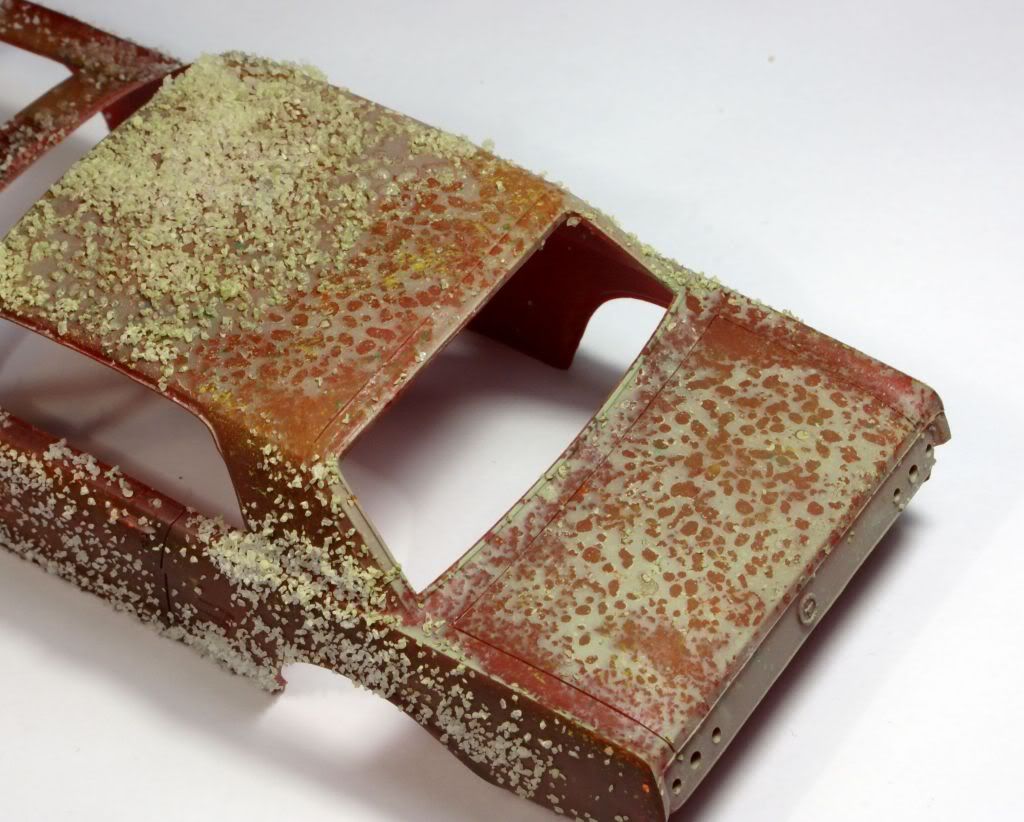
When completely dry, I brushed water onto the car and sprinkled salt around various part of the body, concentrating on sections I wanted to rust up more than others.
The next step was to add the paint. The colour I decided on was Tamiya Sky, which would give me a nice faded look. This was sprayed over the entire model. After 24 hours, using a stiff old brush, I removed all of the salt, exposing the underlying rust red colour.


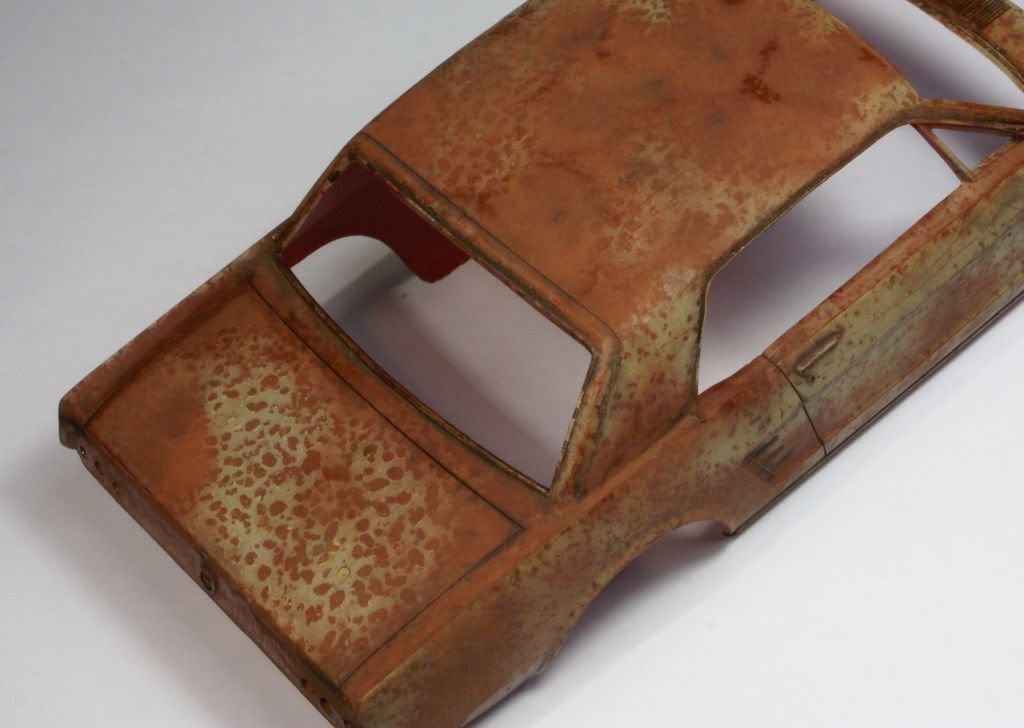
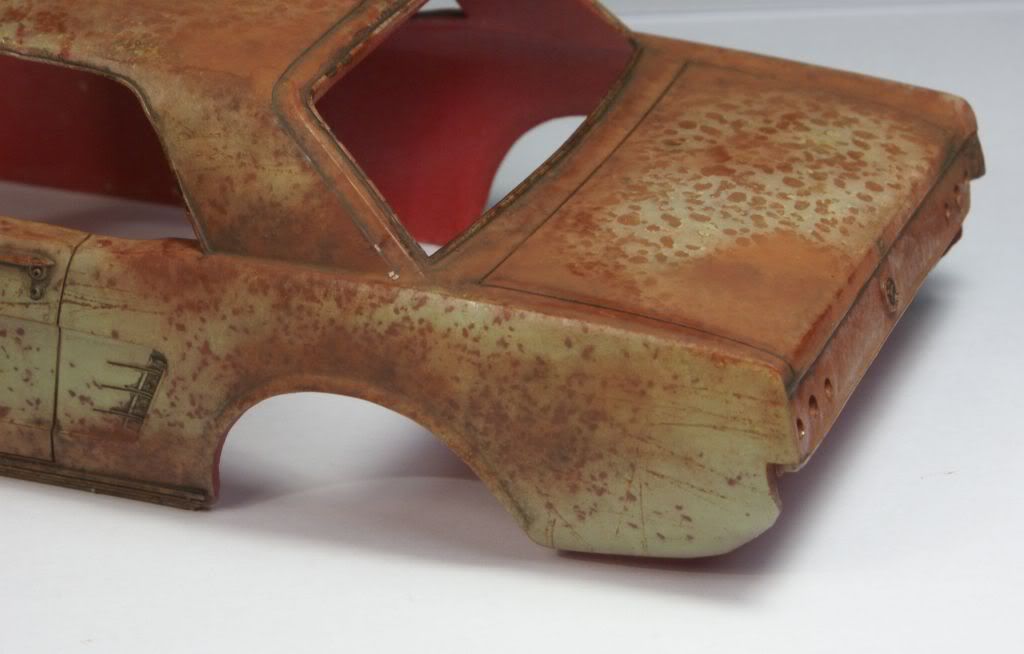
Light rust and old rust pigment were added to the areas depicting more rust and dampened with a brush loaded with white spirit. I then added a dark pin wash around the edges and crevices of all the details. I've also painted the bonnet Flat Black just to add a bit more variation to the colours.


Any comments, feedback or advice would be greatly appreciated.

thanks for looking.

Jurgen.
JOIN OUR COMMUNITY!

Our community is FREE to join. To participate you must either login or register for an account.

SEARCH FORUMS
FREE NEWSLETTER
By signing up you may also receive reader surveys and occasional special offers. We do not sell, rent or trade our email lists. View our Privacy Policy.