SEARCH FINESCALE.COM

Enter keywords or a search phrase below:

Tamiya 1:12 Yamaha M1 2009

18187 views
20 replies
1 rating 2 rating 3 rating 4 rating 5 rating
  • Member since
    July 2006
  • From: South Africa
Tamiya 1:12 Yamaha M1 2009
Posted by Bushpig on Sunday, October 10, 2010 3:08 AM

The long wait is finally over! My 2009 Yamaha M1 kit arrived this week (thank you Mediamix Hobby) and I cant wait to get stuck into a new variant again. I also got the Tamiya fork set to complete the build.

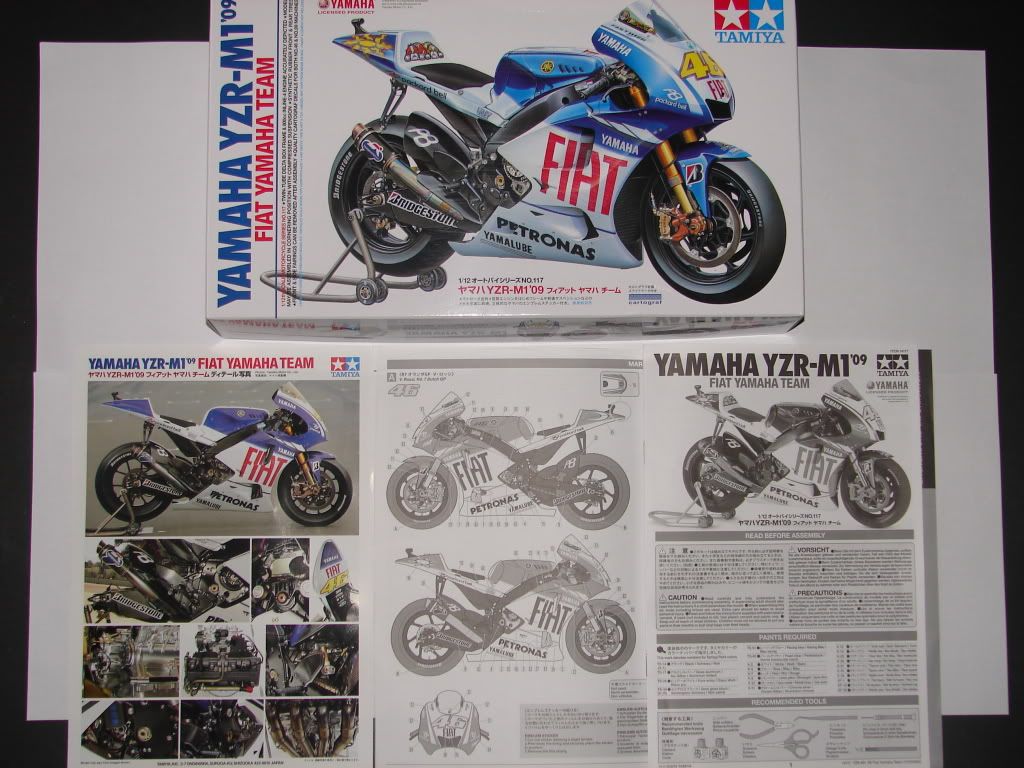
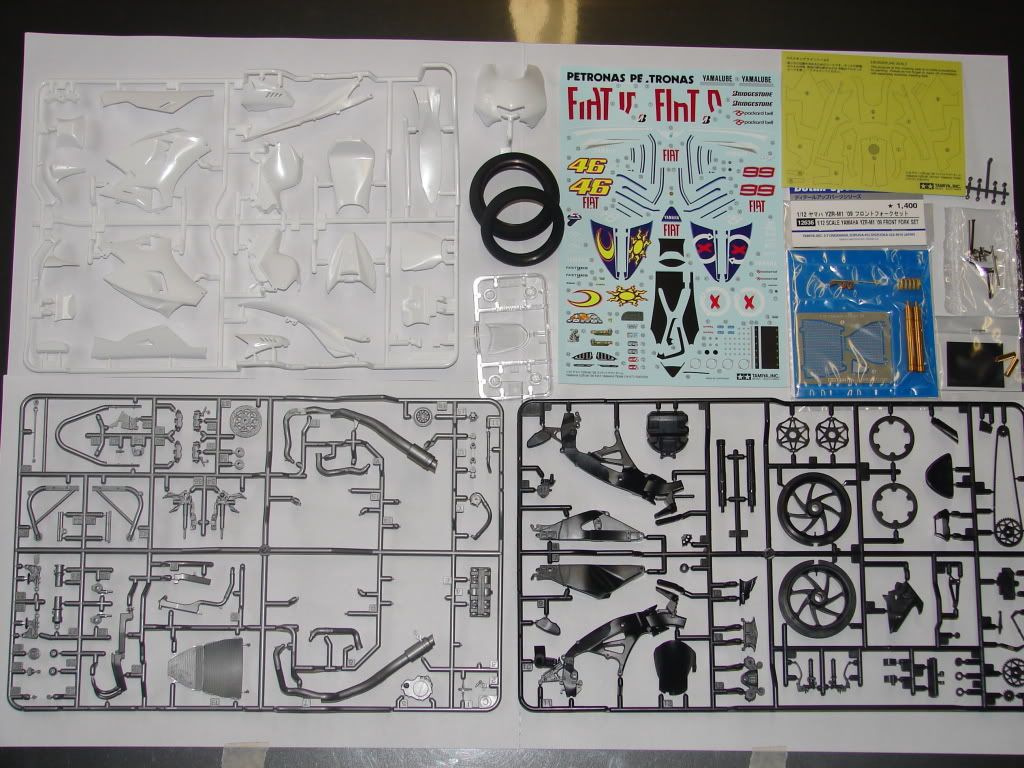
So what are my first impressions? It looks like Tamiya have taken their game to a new level (are they feeling the pressure from other companies like Top Studio???), the new kit looks absolutley awesome. The level of detail is excellent and all detail is up to Tamiya's usual standard, if not better. There is a nice full colour, double sided sheet with detail photos which will help for detailing etc The decal sheet is comprehensive and crisp as ever. The instruction sheet is good as always. There is markings for both Rossi and Lorenzo for the 2009 season.

Interestingly there is different suspension pieces should you wish to build the model in a tight cornering pose with the separate rider figure which is a very neat attention to detail.

I think I will build this one straight out of the box just to get the hang of how it all comes together before trying variants and also whilst waiting for the usual PE sets that are sure to appear soon.

I have the Nicolecron decal set to do the 2009 Estoril version but will save this for my next build.

Will keep updating as I progress

  • Member since
    August 2009
  • From: Borlando Fla home of the rat
Posted by TREYZX10R on Sunday, October 10, 2010 9:29 PM

looking forward to watching this build


Trey

  • Member since
    July 2006
  • From: South Africa
Posted by Bushpig on Friday, October 29, 2010 12:52 AM

A quick update. It is coming together with no issues so far.

Body parts have been glued, filled and sanded where needed and the inside done with X18 (on a future build I would do the visible bits with CF decal)

Have then done a primer coat and the parts are now ready for the pearl white base coat

I have also made progress with the initial engine assembly, will share pics once it is complete

  • Member since
    July 2006
  • From: South Africa
Posted by Bushpig on Sunday, November 7, 2010 10:46 AM

I have completed the paint work on the fairings, now just need to clear coat and add decals before doing the final clean up and clear coating.

Also completed the engine build as far as possible at this stage, I added CF to the clutch cover. Now begins the attachment to the frame and further assembly

  • Member since
    July 2006
  • From: South Africa
Posted by Bushpig on Saturday, December 4, 2010 1:33 AM

Making good progress now, just a bit slower than I would have liked due to work pressures! I have finished the bodywork and put all the panels to one side to really cure nicely before handling them to do the final assembly.

One thing I will say is that the decals need a lot of MicroSet laid down before you apply them due to the fact that once you lay them down they are just about impossible to move into position. I don't know if cartograph have changed their formula but it did take me by surprise on the first ones I laid down. But as I say with a good load of MicroSet under the decal first you can maneuvre them into position fairly easily. I make sure I don't go anywhere near the decals with MicroSol till I am 100% happy with their position as they stick so well you would damage them once they have softened up from the MicroSol

I have a lot of the usual small detail bits to work through now before I can begin final assembly but should be able to get this one done in the next few weeks

  • Member since
    May 2003
  • From: fort mill SC
Posted by Robert92562 on Saturday, December 4, 2010 11:48 AM

The paint work on the body parts looks great, as well as the motor work. I have built about 6 different Tamiya bikes before discovering armor models. after seeing this I may have to pull a bike out of the stash. I will follow this to see the final product

Bob

  • Member since
    August 2009
  • From: Borlando Fla home of the rat
Posted by TREYZX10R on Saturday, December 4, 2010 7:53 PM

coming along nicely, great work keep it up!

  • Member since
    July 2006
  • From: South Africa
Posted by Bushpig on Sunday, December 19, 2010 6:06 AM

Complete! It has come together with the usual ease one expects from Tamiya. I think in summary they have raised their game nicely, nice detail has been added and there is a lot of scope for super-detailing.

One issue I did pick up is that they did not include attachment points for tubing on the brake fluid reservoirs, quite strange. I added bits of wire which is easy enough to do, but I am surprised.

Next I will tackle the same kit but with the Estoril markings.

Adios

  • Member since
    May 2003
  • From: fort mill SC
Posted by Robert92562 on Sunday, December 19, 2010 10:19 AM

Very nice build....nice images....nice decal work...I'm looking forword to the next bike

Bob

  • Member since
    August 2009
  • From: Borlando Fla home of the rat
Posted by TREYZX10R on Sunday, December 19, 2010 3:42 PM

Awesome job,very clean and nicely detailed

  • Member since
    July 2006
  • From: South Africa
Posted by Bushpig on Monday, December 20, 2010 1:02 PM

Thank you guys I appreciate your comments.

So I have started to research the next version and have a question to pose. This is the Estoril version I will be making

Now one thing I am curious about is the piece that is added to the rear of the fuel tank, as shown below

The Tamiya kit has this part included, does anyone know what this is and why it is only on Rossi's bike. (looking at the 2 lined up)

I have not seen this on any of the other photos I have seen from the 2009 season but maybe have just missed it before.

  • Member since
    March 2010
  • From: Democratic Peoples Republic of Illinois
Posted by Hercmech on Monday, December 20, 2010 1:45 PM

WOW. I have never done a motorcycle but I can respect the wrok done to this. I think if you posted it anywhere else people would be hardpressed to tell it was not a 1:1 real deal.


Great Work!

Thanks for sharing.


13151015

  • Member since
    February 2003
  • From: Niagara Falls NY
Posted by Butz on Tuesday, December 21, 2010 12:39 AM

Howdy Bp,

 Wow she really did come out most excellent..!! Rock solid build all around and the finish is superb!! One question though, how did you get the burnt effect on the exhaust?

 I really like the second version of Fiat as well.. Thank you for sharing

Flaps up,

 Mike

Rangers Lead The Way

  If you would listen to everybody about the inaccuracies, most of the kits on your shelf would not have been built Too Close For Guns, Switching To Finger

  • Member since
    July 2006
  • From: South Africa
Posted by Bushpig on Tuesday, December 21, 2010 10:21 AM

Mike

The heat stain is done with my trusty Badger airbrush. The method is quite simple once you get the hang of it. Start with the metal undercoat (either tamiya X32 Titanium or Alclad Chrome if you want a more metal appearance).

I then mask off the lines to replicate the weld seams in very thinly cut masking tape. Then switch to a fine nozzle and needle on the airbrush and use a mixture of X19 smoke and a bit of X26 clear orange to create the burnt / welded area around the weld. Try to spray very lightly and only onto the masking tape, this way the overspray on either side gives a soft edge (hope this makes sense!) I also use this mix to spray the end of the exhaust pipe / muffler.

 Next tackle the areas that have the heat stain effect (from pictures I have seen this is generally around the manifold area and the exposed pipe before the muffler.) Start with Tamiya X23 clear blue. Try to build up the colour slowly and in uneven patches, layer onto this X27 clear red, again layer slowly and in patches. You should start to get some overlap now which creates a nice mottled blue / red / purple appearance. You can then add a bit of the X19 / X26 mix just to give a burnt metal appearance here and there. I finish off with a VERY fine misting of the original X32 titianium which just restores the metallic look, do this very lightly though otherwise you lose the whole effect.

Hope this explains clearly. You can also take a look on Top Studios website, under the tips section where they have a step by step guide. http://www.topstudiohobby.com/

  • Member since
    January 2011
Posted by 500era on Wednesday, January 5, 2011 4:29 PM

Hi all,

Just back to this forum after a long break from model-making. Had to create a new login cos my old one wouldnt work ! Anyway, looking forward to getting back into this - I was midway thru making an Aprilia RSW500 last time I was here. Speaking of which - what happened to the Motogp Group Build thread ?

And while Im here, I'll post this up as some of you might be interested in it.

www.zazzle.com/nick31*

 Hope you'll forgive me for it being not model-related but theres a good bit of motorcycle and racing stuff here, all designed by me. Hope you like.

  • Member since
    February 2004
  • From: Quantico, VA
Posted by Yamafreak72 on Friday, January 7, 2011 9:46 PM

Nice build, BP.  I also am back after a long absence/foray into helicopter modeling.  How many years have we been waiting for a new MotoGP model?  This one sure did turn out beautiful, I admire your efforts and the results.  As a fellow veteran of the MotoGP build, I'm also wondering what ever happened over there.

Status: Nastro Azzurro NSR 500- finis!
  • Member since
    July 2006
  • From: South Africa
Posted by Bushpig on Saturday, January 8, 2011 12:02 AM

Hi Guys.

The Moto GP build you were all part of kind of just fizzled out eventually and stopped, I am sure we all enjoyed it while it lasted (and the predecessor that Pingtang had started) so much great info was exchanged there.

Maybe it's time to refresh and get something going now that Tamiya have started to release kits again? I havent seen posts by guys like Seabee and Andrew Collodel (fellow South Africans!) and Joel etc for ages, where is everyone?

Whilst people are reading this thread still, does anyone have any input to the query I posted a little way up regarding the extra bit at the back of Rossi's fuel tank? Interestingly since posting this I have seen one or two other shots of his bike with it attached but it certainly was not always on the bike. Just curious to know what it is and what is does!

  • Member since
    July 2006
  • From: South Africa
Posted by Bushpig on Sunday, February 13, 2011 10:29 AM

The Estoril version is finally complete. I am pretty happy with the results.

I have a few other decal sets to carry on with the 2009 kit but also have a few other part complete builds that I think I will finish first.

Adios

  • Member since
    July 2006
  • From: South Africa
Posted by Bushpig on Monday, February 28, 2011 11:21 PM

Hi All

I have seen that Tamiya are brining out their own version of this Estoril bike. It is available as a pre-order from most of the on-line companies.

I wonder if Tamiya will ever get into selling various version decal sets to try and compete with the aftermarket guys or is the perceived market just too small? I suppose their view is they a kit sale whether they go to the trouble of making an additonal decal set or not.

happy modelling

  • Member since
    May 2012
Posted by dragonflyyy on Wednesday, May 23, 2012 11:03 PM

Sorry to dig up an old post. Can you or anyone else answer my question?

Im currently doing the 09 m-1 too. The instructions and some reference pics i saw shows the engine in different 3 colours. My question is, how do you mask the engine? There are many intricate details on the engine that masking it with tamiya tape wont get through to all the ridges. And using liquid mask i assume will not get a clean line. So, how do yiu guys do it????

Any replies will be appreciated!!!

  • Member since
    July 2019
Posted by Stalker6Recon on Monday, August 12, 2019 7:17 AM
Hope you still are here on the forums, beautiful builds, save one thing. You should have used Jorge Lorenzo markings, rossi has turned into a clown over the last couple of years, starting with the conspiracy to let Jorge win the 2016 championship, finalized by the "kick heard around the world". Aisde from that, the finish is gorgeous on both bikes. I have the latest R1M from Tamiya (TM14133) with upgraded forks and detail set from Top Studio. My wife will do her first model build of the Ducati Panigale, I also set her up with the same upgrades, should be fun. Anyway, I took you exhaust advice, copied it and dropped it into a document for use during the build, so thanks for that. I hope that by the time we have all the parts, there will also be decals made for both kits with Lorenzo #99, I am hunting the entire internet for such markings, but no luck yet. The kits are too new I guess. I am considering just buying some decals for other kits, but maybe you can help me out. Do you still have the decal sheets with #99 on them? Would you be willing to send them to a disabled veteran living in the Philippines? Hope this message finds you well, cheers, Anthony

It's never too late to learn a new skill, the only one you can't master, is the one you are unwilling to try!

Anthony D'Agostino

JOIN OUR COMMUNITY!

Our community is FREE to join. To participate you must either login or register for an account.

SEARCH FORUMS
FREE NEWSLETTER
By signing up you may also receive reader surveys and occasional special offers. We do not sell, rent or trade our email lists. View our Privacy Policy.