SEARCH FINESCALE.COM

Enter keywords or a search phrase below:

Revell's 69 Nova Finally Completed

3090 views
19 replies
1 rating 2 rating 3 rating 4 rating 5 rating
  • Member since
    April 2014
Posted by r13b20 on Monday, July 28, 2014 2:04 PM

Butz, check my avatar. I figured that would be quickest / easiest. Still needs work, but then, so do I. :) Bob

P.S. Thank you for the information on the paint!

  • Member since
    February 2003
  • From: Niagara Falls NY
Posted by Butz on Sunday, July 27, 2014 9:28 PM

Good evening Bones,

 I am really glad that you liked the build and thank you for the compliment!! In regards to your build, is that the Amt/Ertl kit that they did for Eddie Murphys ride in 48 Hrs?

 What color are you going to use and if I am not mistaken, you were going to start applying the 1st coat last night right? How is that going for you?

 Any photos of the build?

Here there Bob,

 Oohh a 75 Duster?!?! Would you be able to post a pic if you do not mind?? I'd likt to see your car! Eh Alclad is decent to work with.

 Out of all the color choices, the chrome paint has to be applied on top of Alclads black(base coat) paint first. Not sure why but I tried rattle canning Tamiya's black and the chrome would eventually rub off..

 Believe me the chrome looks outstanding when the Tamiya black has been applied yet again, I do not like that it rubs off at the slightest touch.

 All the other colors have no issues so there has to be some sort of chemical make up between the alclad chrome and the alclad black.. Going to have to practice a bit more I see..

 And you are most welcome about the additional pics, glad that they were of help!

Thank you again gents for stopping by!

Flaps up,

 Mike


  If you would listen to everybody about the inaccuracies, most of the kits on your shelf would not have been built Too Close For Guns, Switching To Finger

  • Member since
    April 2014
Posted by r13b20 on Saturday, July 26, 2014 12:57 PM

Those are better than my 1/1 '75 Duster's bumpers. :) My thanks for the pictures. Alclad's not bad looking stuff is it? One day I'll have to try it out.

I can almost pick one example from any car company to like. ALMOST! Of course, I'm a strange one. ;) Bob  

  • Member since
    July 2014
Posted by ENS. "Bones" on Saturday, July 26, 2014 1:51 AM
Damn that looks good!
Im working on a 72' Nova by AMT right now. Just finished the body paint tonight. Gotta lay down the clear still.
  • Member since
    February 2003
  • From: Niagara Falls NY
Posted by Butz on Friday, July 25, 2014 2:00 AM

Hey RD,

 I really love the lines of this particular year.. She looks mean no matter how you look at it!! Haha thank you!! As you can tell, I am avid aircraft builderStick out tongue

 Just something about muscle carsYes

Flaps up,

 Mike


  If you would listen to everybody about the inaccuracies, most of the kits on your shelf would not have been built Too Close For Guns, Switching To Finger

  • Member since
    February 2011
  • From: St louis
Posted by Raualduke on Friday, July 25, 2014 1:11 AM

Wow, love it even more seeing the from and rear views.your stash is impressive as well

  • Member since
    February 2003
  • From: Niagara Falls NY
Posted by Butz on Friday, July 25, 2014 12:56 AM

Howdy Les,

 Sshhhh I cannot lie... Yes I am expecting to be for the next 2-3 decades Bang Head

Flaps up,

 Mike

  If you would listen to everybody about the inaccuracies, most of the kits on your shelf would not have been built Too Close For Guns, Switching To Finger

  • Member since
    September 2013
Posted by Les.61 on Thursday, July 24, 2014 9:17 PM

Is the far wall in the last picture all you unbuilt models? Should keep you busy for a while.

  • Member since
    February 2003
  • From: Niagara Falls NY
Posted by Butz on Thursday, July 24, 2014 8:41 PM

Hey Bob,

 Thank you for stopping by and liking a particular Chevy aint so bad Wink  I like Mopar as well as Chevy but I have a cousin who has restored a few early Stangs( 66 hypo, 70 Hypo & a 70 Mach 1) and he got me to like them lol

 Especially when I helped restore them like anything, spend enough time with em you fall for em.... Anywho I am glad that you liked my build as well for the paint job! Now to answer your question about if I had pics of the bumpers...

 Well I do but they are not the best quality as I was just messing around.. So I have a couple pictures of the front bumper on the car as I was just test fitting it and a pic each of both the front and rear bumpers on the completed build..

 Again the quality of the photos are not so good so the true appearance does not work in these shots.. Pictures you asked for and pictures you shall receive..


 Hopefully these pictures will be to your liking and I will see if I have any more shots for you. Again thank you for stopping by Bob as I appreciate the compliment!

 Flaps up,

 Mike

  If you would listen to everybody about the inaccuracies, most of the kits on your shelf would not have been built Too Close For Guns, Switching To Finger

  • Member since
    February 2003
  • From: Niagara Falls NY
Posted by Butz on Thursday, July 24, 2014 8:23 PM

Good evening RD,

 Very cool and I am glad that I could answer your question for you. Anytime my friend!

Flaps up,

Mike

  If you would listen to everybody about the inaccuracies, most of the kits on your shelf would not have been built Too Close For Guns, Switching To Finger

  • Member since
    April 2014
Posted by r13b20 on Thursday, July 24, 2014 1:22 PM

That's very nice, for a Chevy. Actually I like Novas, even though I'm really a Mopar guy. (nobody's perfect) Do you have any shots of the front or rear? I'd like to see how the alclad turned out on the bumpers. Thanks and nice paint. Bob

  • Member since
    February 2011
  • From: St louis
Posted by Raualduke on Thursday, July 24, 2014 2:21 AM

That was pretty clear. Thank you for taking the time to reply

  • Member since
    February 2003
  • From: Niagara Falls NY
Posted by Butz on Wednesday, July 23, 2014 11:22 PM

Howdy RD,

 That's a really good question that you asked! The Novus kit that I used comes with three 2 FL oz bottles labeled 1, 2 & 3. It also comes with a very nice cottony soft cloth so that you can apply the Novus as well as for buffing usage.

 I actually got two sets since Micro Mark was having a sale on these.. So with that being said, I have one cloth for applying and one for the buffing which works out rather nicely.

 I am going to start with the #3 bottle which is for heavy scratches.. This one I tend not to use only a couple of times on the bare plastic model before painting to remove the heavier scratches.

 Per the directions, you apply and rub in with a firm back and forth motion at right angles to the scratches that you are targeting. Re-apply as needed. The texture is more of a gritty liquid paste almost like baking soda tooth paste..

 The #2 bottle is for fine scratches and this is what I use 90% of the time when I build car models. When you apply this, you apply it in a circualr motion until it is dry.. Then you will need to buff it out and repete the process if necessay.

 The # 1 is essentially to clean & shine the plastic/paint.  Here they do not mention how to apply as the other two bottles do.

 I make sure I apply in small amounts but I make sure that I cover the entire surface.. Once dry I will buff it out till I get the sheen that I want..

 I know RD I went above and beyond in regards to your question but it is actually easy to work with. I would practice on an old body or get evergreen sheet stock and use that as your working surface.

 To be honest, I do not believe you can really mess up with using this system. If you do not like how the clean & shine application looks, just wet sand it with either 6,000 or 8,000 grit sand paper and re apply the #1 bottles formula

 Actually be careful when you apply  #'s 2 or 3 to any edges or surfaces that have curves and or detail.. You could remove the paint on the high spots.. Other than that it is pretty easy to use but like anything, practice on an old build..

 If you have any questions Rd, please let me know and I'd be more than happy to help you out the best I can.

 Also before I forget, you can use this on clear plastic as well and it works great!! I use this stuff on the canopies when I buold aircraft especially with the F-16, F-15 & A-10s as they have seam down the canopies center lines..

 I used #2 & 1 on the Nova's windows


 Flaps up,

 Mike


  If you would listen to everybody about the inaccuracies, most of the kits on your shelf would not have been built Too Close For Guns, Switching To Finger

  • Member since
    February 2011
  • From: St louis
Posted by Raualduke on Wednesday, July 23, 2014 10:18 PM

Obviously that novuses stuff works great. I've seen it in the micro mark catalog. How is it to work with?

  • Member since
    February 2003
  • From: Niagara Falls NY
Posted by Butz on Wednesday, July 23, 2014 10:13 PM

Hello Raualduke,

 Thank you and I am glad that you liked my Nova!

Howdy Jim,

 Thank you to kindly sir!! I have a couple car guys in my club that I look up to so I definitely picked their brains on how to acheive such a finish..

 It took a lot of time and patience but I am pretty stoked on how  the finish turned out... Thank oyu again!

Hi Midnightprowler,

 Thank you for the compliment as it is greatly appreciated

Hey Miss,

 How I explained to Jim, I picked a couple of guys brains who are in my model club.. More so I took my time and really paid attention to sites where they did body off resto on the Nova..

 If I am not mistaken, I air brushed 4 light to medium coats of gloss plastikote.. Once I let the body dry for a week or so I wet sanded it with 3200 to 8000 grit sand pads.

 In between light coats of plastikote.. Finished off with 12000 grit and Novus polishing kit. I know for a fact I spent more time on the body then I did on the over all build..

 My family thinks I am nuts lol

 Again thank you to all that stopped and checked out my build!

Flaps up,

 Mike


  If you would listen to everybody about the inaccuracies, most of the kits on your shelf would not have been built Too Close For Guns, Switching To Finger

  • Member since
    November 2003
  • From: State of Mississippi. State motto: Virtute et armis (By valor and arms)
Posted by mississippivol on Wednesday, July 23, 2014 6:15 PM

Man, that paint job is smooth!

  • Member since
    February 2003
  • From: East Bethel, MN
Posted by midnightprowler on Wednesday, July 23, 2014 4:47 PM

Very nice!

Hi, I am Lee, I am a plastiholic.

Co. A, 682 Engineers, Ltchfield, MN, 1980-1986

1 Thessalonians 4:13-18 1 Corinthians 15:51-54

Ask me about Speedway Decals

fox
  • Member since
    January 2007
  • From: Narvon, Pa.
Posted by fox on Wednesday, July 23, 2014 12:27 PM

Mike, that paint job is OUTSTANDING. Bow Down Bow Down Bow Down 

Jim Captain

 Main WIP: 

   On the Bench: Artesania Latina  (aka) Artists in the Latrine 1/75 Bluenose II

I keep hitting "escape", but I'm still here.

  • Member since
    February 2011
  • From: St louis
Posted by Raualduke on Wednesday, July 23, 2014 4:13 AM

Looks fantastic.very nice job

  • Member since
    February 2003
  • From: Niagara Falls NY
Revell's 69 Nova Finally Completed
Posted by Butz on Wednesday, July 23, 2014 1:00 AM

Early morning all,

 I have not been on here in quite some time due to work details but I am pretty stoked that I am finding more time at the bench along with my son within the last couple months Big Smile

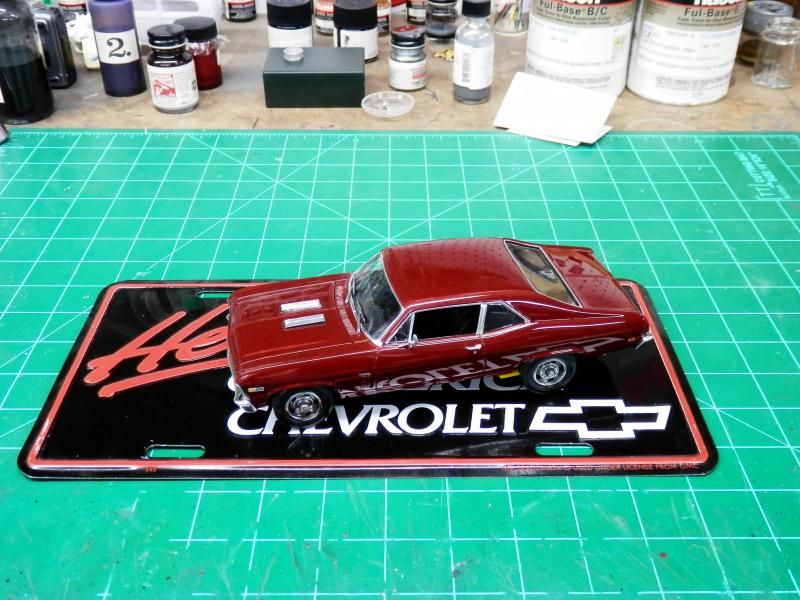
 When I initially started this Nova build back in 08, this was one of the first Revell brand new "Special Edition" Kits.

 I did not actually take me what 6 years to complete but the build was on and off again in between other builds so maybe all together 3 years combined lol

 Overall the kit went together rather well with a few exceptions such as the front seats did not fit properly. There was some tlc involved with light sanding in order to get the halfs to fit right when joined.

 The other notable fit issue was when the tires were mounted in place onto the front suspension/rear axle.  Revell supplied you with metal push pins that slipped through the rear inner wheel from behind.  Which at that point made the tires droop a lot when the chassis was picked up.

 Again a little work and some evergreen plastic rod did the trick by placing some of the plastic rod in the locator holes. Afer that the tires actually had more of a "natural sag" look if model was ever picked up.

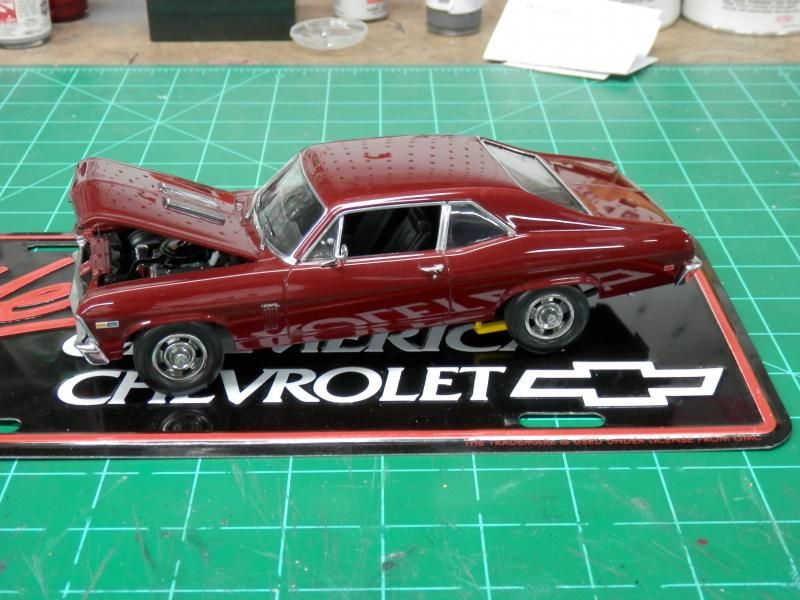
 Other than that the engine, interior and under carriage assemblies went together very well with really no fit issues.

 I moved on to the chrome plated parts which I used amonia to strip off the chrome down to bare plastic. Once this process was taken care of, I base coated both the front and rear bumpers, door handles, side mirror, wipers and rallys with alclad gloss black.

 After a few coats were applied and the paint had a drying time of about a week, I applied alclad chrome to the above mentioned parts except for the rallys. I used airframe aluminum on the rallys which produces a very nice deep chrome sheen which I really liked.

 Then came the tedious work of using bare metal foil on the window trims... I have heard horror stories of how the new stuff is very hard to work with yet bare metals original formula was easy..

 Well I wish I had their original bare metal because wow talk about a slow process to apply.. And yes this was my first time using this stuff. I have mixed emotions on this method at the moment..

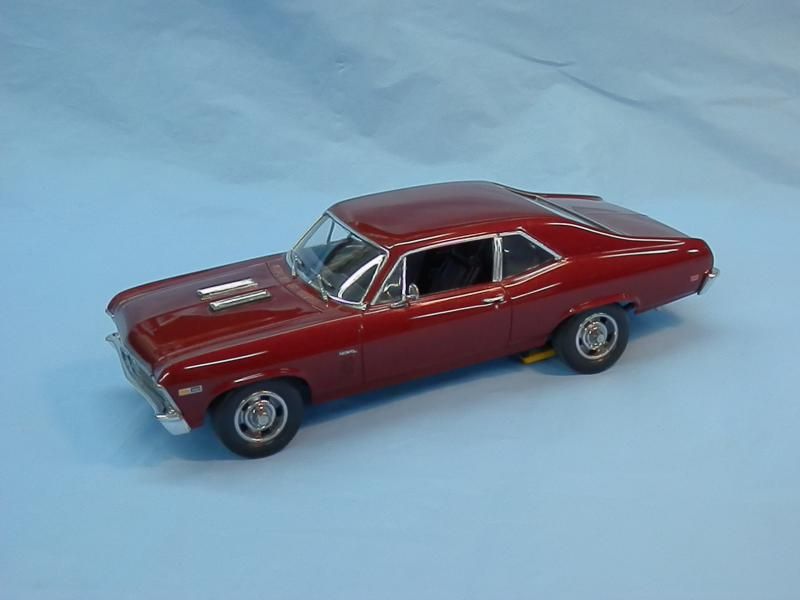
 Finally after looking reseaching all the color specs for the 69 Nova, I decided to go with a color that was used on the 66-67 Chevelle and the color I chose was Madeira Maroon Poly(color code NN).

 I know that this color was not the right color option for the 69 model year but I figured it could of been a special order paint.. Yeah yeah I am sticking with that theory Wink

 Once the I was happy with the over all finished, I ab'd plastikote gloss with wet sanding and buffing in between coats..

 I used Novus's two stage polishing kit as the final coat to finish off my Nova!

 For my first true car build I am pretty happy with the over all outcome and I hope you like this build as well.

 Thank you for looking and comments/questions welcomed!!


Flaps up,

 Mike

  If you would listen to everybody about the inaccuracies, most of the kits on your shelf would not have been built Too Close For Guns, Switching To Finger

JOIN OUR COMMUNITY!

Our community is FREE to join. To participate you must either login or register for an account.

SEARCH FORUMS
FREE NEWSLETTER
By signing up you may also receive reader surveys and occasional special offers. We do not sell, rent or trade our email lists. View our Privacy Policy.