SEARCH FINESCALE.COM

Enter keywords or a search phrase below:

AMT Der Beetle Bus-OOB Version Completed

13136 views
153 replies
1 rating 2 rating 3 rating 4 rating 5 rating
  • Member since
    June 2014
  • From: New Braunfels , Texas
Posted by Tanker - Builder on Sunday, September 18, 2016 8:02 AM

Veddy Interesting ! T.B.

  • Member since
    December 2006
  • From: N. Georgia
Posted by Jester75 on Sunday, September 18, 2016 9:05 AM

Well this should be fun! Reminds me of one of Gas Monkey's creations.

Eric


  • Member since
    May 2013
  • From: Indiana, USA
Posted by Greg on Sunday, September 18, 2016 10:03 AM

No rest for the weary, eh buddy? Smile

  • Member since
    August 2009
  • From: MOAB, UTAH
Posted by JOE RIX on Sunday, September 18, 2016 10:51 AM

Oh, this is too funny Joe. heh, heh, heh..."I'm not going to get as crazy as on the '54 Chevy"..Ha Ha Ho Ho...So, you're immediately going start off by buying 2 kits and chopping the body to extend and chassis to get exactly what you want! WAHAHAHA...Oh my God! You're killing me here! WAHAHAHA...whatever! I'm sorry Joe, but I'm about to pee my pants. You will not be able to resist detailing this to the nines. I know you all too well.Wink

"Not only do I not know what's going on, I wouldn't know what to do about it if I did". George Carlin

  • Member since
    March 2012
  • From: Corpus Christi, Tx
Posted by mustang1989 on Sunday, September 18, 2016 12:12 PM

Thanks fellas! Yes

Eric: We'll see where this all goes.

Greg: No rest....lol

Joe: Man that has got to be one of the most hilarious replies I've ever read!! lol. I dunno about detailing it all out "to the nines" though. Money and another project are dictating that doesn't happen. I'll pull something out of the hat for you though. lol


 Forum | Modelers Social Club Forum (proboards.com) 

  • Member since
    August 2009
  • From: MOAB, UTAH
Posted by JOE RIX on Sunday, September 18, 2016 1:14 PM

Glad I could give you a chuckle today my friend. I have to admit, I am a bit disappointed in the fact that your choosing not to detail it out because, as you well know, I have what is likely one of the greatest sources of reference to be found.

If I'm not mistaken, we're down to about 250 VW's left.

"Not only do I not know what's going on, I wouldn't know what to do about it if I did". George Carlin

  • Member since
    March 2012
  • From: Corpus Christi, Tx
Posted by mustang1989 on Sunday, September 18, 2016 1:18 PM

Wow!! Now that's alot of VW's!!!

Just so you know. The sectioning out and joining the halves only took about one hour and that's including sanding to fine tune the fit and to true everything up.Wink


 Forum | Modelers Social Club Forum (proboards.com) 

  • Member since
    November 2003
  • From: State of Mississippi. State motto: Virtute et armis (By valor and arms)
Posted by mississippivol on Sunday, September 18, 2016 2:40 PM
Now you know that when you change the proportions of the body, that it causes unexpected changes elsewhere. Meaning you're going to have to fix the antennae on the roof. 8P
  • Member since
    May 2009
  • From: Poland
Posted by Pawel on Sunday, September 18, 2016 4:34 PM

Hello Joe!

Funny thing - now we're both working on a Beetle bus - remember? Now mine isn't as cut up as yours, but it still isn't done. It's getting there, I think I'm going to post that build in a separate thread (not in the group build).

Now I think you and i we lost the ability to build OOB and do quick and easy projects... It happens, so to say...

Funny thing about that bus, though... Currently I'm working for VW in Poland, but many times I have been inside the old German VW works - Wolfsburg, where they developed the Bug bus out of a motorized platform used to carry parts around the plant (it's really big - bigger than the town of Wolfsburg itself) - and Hannover where they have built over a million of them busses.

Good luck with your build and have a nice day

Paweł

All comments and critique welcomed. Thanks for your honest opinions!

www.vietnam.net.pl

  • Member since
    March 2012
  • From: Corpus Christi, Tx
Posted by mustang1989 on Monday, September 19, 2016 8:29 AM

mississippi: Yeah I know. I'm fairly worried about all those extra mods that come with the first one.Indifferent

Pawel: Now that you mention it I do remember. Say, the Red Hot and Rollin' GB has been extended if you want to build it in there.Wink


 Forum | Modelers Social Club Forum (proboards.com) 

  • Member since
    August 2015
  • From: the redlands Fl
Posted by crown r n7 on Monday, September 19, 2016 3:37 PM

This is going to be coolYes


 Nick.

  • Member since
    March 2012
  • From: Corpus Christi, Tx
Posted by mustang1989 on Tuesday, September 20, 2016 5:05 AM

Thanks Nick.

Started on the chassis this morning. Here's what we had to work with OOB:

Image

A couple of cuts and some trimming later yielded the correction:

Image

Again, clean up will happen soon but I've gotta make sure this all works before any cosmetic work gets done. I did, however, get rid of those bumps for foot pedals. I think I can come up with something better than that.


 Forum | Modelers Social Club Forum (proboards.com) 

  • Member since
    March 2012
  • From: Corpus Christi, Tx
Posted by mustang1989 on Friday, September 23, 2016 8:06 AM

Ok. That extra long rectangular opening in the floor is gonna mandate an engine that'll fill it. Don't think I haven't "been there" in thought. I'll be using Rick Dobbertin's blown, turbo'd and nitrous fed small block 350 for this using the Revell Pro Street J2000 kit:

1986 Rick Dobbertin&#39;s Radical <b>J-2000</b> Pontiac <b>Pro</b> <b>Street</b> (1/25) (fs)

The engine looks somthing like this:


 Forum | Modelers Social Club Forum (proboards.com) 

  • Member since
    August 2009
  • From: MOAB, UTAH
Posted by JOE RIX on Friday, September 23, 2016 8:54 AM

Holy Crap Joe! OK, for someone who claims that they are NOT going to go all out on this, well..this seems to me to be along the lines of not only an epic conversion but, also an epic level of engine detailing. I'm just simply making an observation my ambitious little friend.Big Smile

"Not only do I not know what's going on, I wouldn't know what to do about it if I did". George Carlin

  • Member since
    March 2012
  • From: Corpus Christi, Tx
Posted by mustang1989 on Friday, September 23, 2016 9:21 AM

You know.......................................somehow I just knew you were the first one that was gonna respond to that. lol.  Thanks Joe. Yes


 Forum | Modelers Social Club Forum (proboards.com) 

  • Member since
    August 2014
  • From: Willamette Valley, Oregon
Posted by goldhammer on Friday, September 23, 2016 1:26 PM

SBC?????  Man this thing is just crying for a nitro blown big block to put some sting to go with the antennas and make them stand up straight.Cool

  • Member since
    March 2012
  • From: Corpus Christi, Tx
Posted by mustang1989 on Friday, September 23, 2016 2:16 PM

LOL!! With two blowers, two turbo's and nitrous plummed into it it's practically two big blocks plus!! Wink


 Forum | Modelers Social Club Forum (proboards.com) 

  • Member since
    August 2009
  • From: MOAB, UTAH
Posted by JOE RIX on Friday, September 23, 2016 3:04 PM

mustang1989

You know.......................................somehow I just knew you were the first one that was gonna respond to that. lol.  Thanks Joe. Yes


Yeah, I know but,...well...I just couldn't help myself.

"Not only do I not know what's going on, I wouldn't know what to do about it if I did". George Carlin

  • Member since
    March 2012
  • From: Corpus Christi, Tx
Posted by mustang1989 on Friday, September 23, 2016 3:37 PM

I don't think there's laugh emoticon drastic enough for that comment Joe. All I've gotta say is............................you were right. lol


 Forum | Modelers Social Club Forum (proboards.com) 

  • Member since
    August 2009
  • From: MOAB, UTAH
Posted by JOE RIX on Saturday, September 24, 2016 12:02 AM

mustang1989

I don't think there's laugh emoticon drastic enough for that comment Joe. All I've gotta say is............................you were right. lol


Aaaand I'm sporting a grin the size of Milwaukee. You crack me up Joe.

"Not only do I not know what's going on, I wouldn't know what to do about it if I did". George Carlin

  • Member since
    February 2003
  • From: East Bethel, MN
Posted by midnightprowler on Saturday, September 24, 2016 7:37 AM

If I were you Joe, I'd put a slant 6 in it.Whistling

Hi, I am Lee, I am a plastiholic.

Co. A, 682 Engineers, Ltchfield, MN, 1980-1986

1 Thessalonians 4:13-18 1 Corinthians 15:51-54

Ask me about Speedway Decals

  • Member since
    March 2012
  • From: Corpus Christi, Tx
Posted by mustang1989 on Saturday, September 24, 2016 8:15 AM

Joe : I'll just bet you are. lol

Lee: If I were to do that it would end up with a dual turbo set up on that for sure. lol

Today I cut the roof to the desired length. Here's the two bodies side by side to show the length added and the difference:

Test fitted into place on the body:

and a couple of overall mock up shots:


 Forum | Modelers Social Club Forum (proboards.com) 

  • Member since
    February 2003
  • From: East Bethel, MN
Posted by midnightprowler on Saturday, September 24, 2016 12:09 PM

Dual  turbo slant 6, cool. 

Hi, I am Lee, I am a plastiholic.

Co. A, 682 Engineers, Ltchfield, MN, 1980-1986

1 Thessalonians 4:13-18 1 Corinthians 15:51-54

Ask me about Speedway Decals

  • Member since
    March 2012
  • From: Corpus Christi, Tx
Posted by mustang1989 on Saturday, September 24, 2016 2:44 PM

It won't be for this build but a twin turbo slant 6 does sound like an interesting project. I'm getting to where engine builds are my most favorite part of the build. The more wild I can get and the more detail the better.


 Forum | Modelers Social Club Forum (proboards.com) 

  • Member since
    March 2012
  • From: Corpus Christi, Tx
Posted by mustang1989 on Tuesday, September 27, 2016 9:01 AM

SNAGGED IT!!! $22.00 off of ebay!! Looks like we're movin' forward with that engine build!!!!

.


 Forum | Modelers Social Club Forum (proboards.com) 

  • Member since
    August 2009
  • From: MOAB, UTAH
Posted by JOE RIX on Wednesday, September 28, 2016 10:09 PM

NICE!!! Very nice indeed.Big Smile

"Not only do I not know what's going on, I wouldn't know what to do about it if I did". George Carlin

  • Member since
    August 2007
  • From: back country of SO-CAL, at the birth place of Naval Aviation
Posted by DUSTER on Thursday, September 29, 2016 12:30 AM


JOE

OK I finally found your new build-(OK I was out of town and have just got back-geesh)


Any way as I see your OOB idea is shot to dbl hockey sticks, the progress so far is looking real good.


Hope you are going to install the antennas; I have a soft spot for bugs with bug ears. In my misspent youth I worked for a pest control company and we had antenna on the service trucks and after I moved into inspections I drove a VW bug with mouse ears, nose and tail.  Cut quite a fine figure if I say so myself (you do eventually get used to the stares and the good looking girls smile at you- so not too bad)

  and


HUMMM Wonder if this had any effect on my development????---Naw

Steve

Building the perfect model---just not quite yet  Confused

  • Member since
    June 2014
  • From: New Braunfels , Texas
Posted by Tanker - Builder on Thursday, September 29, 2016 9:23 AM

AHA !

 Caught you in a fib LOL ! I also knew you wouldn't settle for second best . Now that says you're gonna put in as much as you do in other builds . Nice choice , by the way . Watching You !  T.B.

  • Member since
    March 2012
  • From: Corpus Christi, Tx
Posted by mustang1989 on Thursday, September 29, 2016 11:09 AM

Steve: I dunno bout those antennas. lol

T.B.: True I'm going to put more than I first thought into this build but what's also true is that I've learned alot since my 56 F-100 build on just how crazy and how much cash I want to put into any given build.


 Forum | Modelers Social Club Forum (proboards.com) 

  • Member since
    March 2012
  • From: Corpus Christi, Tx
Posted by mustang1989 on Friday, September 30, 2016 4:37 PM

I'm going to try something out here. I was brain storming for a different look than the vehicle being "jacked up" in the back. I want more of a lowered looking stance so I've got this spare '54 Chevy Panel Wagon body and decided to check something out. What if I cut the rear wheel opening out like so,

and then trimmed the bottom up so that it evened out at the body line on both sides of the wheel opening. I think I might be able to flatten this out a bit to get away from the body curvature and graph this in because l like the way this is lookin' so far.


 Forum | Modelers Social Club Forum (proboards.com) 

  • Member since
    August 2007
  • From: back country of SO-CAL, at the birth place of Naval Aviation
Posted by DUSTER on Friday, September 30, 2016 7:00 PM

Soo besides bein' cool as H.... amburgers ....Confused

Now your gonna have a Volk-Chev-Tiac  Vroom vroom

YaHoo! burnin' rubber now!!!

Steve

Building the perfect model---just not quite yet  Confused

  • Member since
    January 2015
  • From: Tumwater, WA.
Posted by M. Brindos on Friday, September 30, 2016 10:54 PM

Wow. Okay this is going to be extreme.

What colors do you imagine this thing in? I'm seeing it in a two-tone white over baby blue - surfer style. With white or baby blue matching rims. Or both lol.

However this turns out, its going to be epic, I'm sure of that.


- Mike Brindos "Lost Boy"

  • Member since
    March 2012
  • From: Corpus Christi, Tx
Posted by mustang1989 on Saturday, October 1, 2016 4:30 AM

Thanks Steve! Hopefully I can pull all this off. I'll be a loooooong while on the engine build for this one, that's for dang sure.

I appreciate your comments as well Mike. As far as color goes I think I'll be going with MM's De Ja Blue for this one. I was wanting something like Duplicolors Electron Blue and this is really close to it.


 Forum | Modelers Social Club Forum (proboards.com) 

  • Member since
    January 2015
  • From: Tumwater, WA.
Posted by M. Brindos on Saturday, October 1, 2016 11:58 AM

Ooooo!. Yeah, that's going to be purdy! I'm behind you on that one.  :)

- Mike Brindos "Lost Boy"

  • Member since
    March 2012
  • From: Corpus Christi, Tx
Posted by mustang1989 on Saturday, October 1, 2016 4:02 PM

Thanks and I almost forgot. I may go with GM Chameleon just because it's just a cool color. Look at it in one direction and you get a green, another and it'll be blue and another and it'll turn purple.


 Forum | Modelers Social Club Forum (proboards.com) 

  • Member since
    March 2012
  • From: Corpus Christi, Tx
Posted by mustang1989 on Saturday, October 1, 2016 10:06 PM

Chameleon it is! Paint code 79U-Mystic Teal Metallic. I'll be getting some mixed up at my old dealership body shop this week.


 Forum | Modelers Social Club Forum (proboards.com) 

  • Member since
    March 2012
  • From: Corpus Christi, Tx
Posted by mustang1989 on Sunday, October 2, 2016 6:06 AM
I've got the R/H side graphed in. I still have to do some body work and trimming but it's in there. I've got it mocked up here with my spun aluminum Weld Draglites. I may have to order a 5 lug version with a deeper offset in the back for that deep dish effect.Although initially not trued up , I'll get it all ironed out in the body work process. I think I've got my color selection down too. I'll be going with GM paint code 79U- Mystic Teal Metallic -a.k.a. Chameleon. Yeah...............this look suits me a whole lot better!

Image

Image

Image
 
This picture captures the Mystic Teal Metallic paint color change fairly well. The sides look green and the hood has a purple hue to it. Other areas will appear blue. I've always liked this color and can't wait to put it on this van.
Image


 Forum | Modelers Social Club Forum (proboards.com) 

  • Member since
    February 2003
  • From: East Bethel, MN
Posted by midnightprowler on Sunday, October 2, 2016 7:07 AM

Joe, have you been tested for insanity?WhistlingStick out tongueCool Love that color!

Hi, I am Lee, I am a plastiholic.

Co. A, 682 Engineers, Ltchfield, MN, 1980-1986

1 Thessalonians 4:13-18 1 Corinthians 15:51-54

Ask me about Speedway Decals

  • Member since
    August 2009
  • From: MOAB, UTAH
Posted by JOE RIX on Sunday, October 2, 2016 8:14 AM

Okay, Okay , Okay...whew...It has taken me a couple of days to recover from the rolling on the floor, tears running out of my eyes, uncontrollable belly laughter that has been brought on by your veiled attempts to not go all out on this.  But, I've gathered myself together and now I can pay you the due homage that your VW deserves. Doing the full on body surgery is very cool Joe. I like your vision for the bus and, so far, it looks like you are pulling it off superbly. I had a good friend who had a Camaro painted in poly chromatic paint similar to that and it was boss. Love the choice. 

"Not only do I not know what's going on, I wouldn't know what to do about it if I did". George Carlin

  • Member since
    March 2012
  • From: Corpus Christi, Tx
Posted by mustang1989 on Sunday, October 2, 2016 12:49 PM

Lee: Sometimes I wonder. lol. Thanks buddy! Yes

Joe: Yeah I know. Stuck my foot right in the ol' kisser yet again. Next time remind me so I can get a big kick in the a$$.   Thanks for the kudos and yes.............that's probably the best color I've ever seen on a factory build.


 Forum | Modelers Social Club Forum (proboards.com) 

  • Member since
    January 2006
  • From: California
Posted by SprueOne on Sunday, October 2, 2016 2:18 PM

This thing is looking real mean with your modjustments...

Anyone with a good car don't need to be justified - Hazel Motes


Iron Rails 2015 by Wayne Cassell Weekend Madness sprueone

  • Member since
    March 2012
  • From: Corpus Christi, Tx
Posted by mustang1989 on Tuesday, October 4, 2016 1:53 PM

Thanks Bob. Hopefully I can pull this one off. lol


 Forum | Modelers Social Club Forum (proboards.com) 

  • Member since
    March 2012
  • From: Corpus Christi, Tx
Posted by mustang1989 on Friday, October 7, 2016 7:46 AM

Today I graphed in the L/H fender skirt and got it glued in. I've got ALOT and I mean ALOT of body work to do to get this to look good. I also cut out the rear wheel tub section so I can widen the wheel tubs and narrow the center section. Again LOTS of work to do. Paint is being mixed up at the dealership that I used to work at so that should be ready in the coming week or so. Of interest is the fact that it's acrylic paint that's used in the body shops now.

Here's where I'm at as of now:

Image


 Forum | Modelers Social Club Forum (proboards.com) 

  • Member since
    March 2012
  • From: Corpus Christi, Tx
Posted by mustang1989 on Sunday, October 9, 2016 6:54 AM

Folks this doesn't look like a whole lot of progress but rest assured that it's huge for me because of all the work involved but I feel pretty good about the outcome. I've still got to relocate the spring perches and use a different rear axle and suspension but I'll get to that a little later. Here's some progress pics of the wheel tub and center section mods...........

Before:

During.....

I also managed to clean up the header exit cut out holes on the sides of the engine/ transmission cutout area. Here's the results. Still have some sanding and filling to go on the wheel tubs but it's minimal.

I'm also still working on the clean up around the rear wheel opening on the body. It'll be a bit before I post any substantial progress. Right now it's all in the idea and development part of the build.


 Forum | Modelers Social Club Forum (proboards.com) 

  • Member since
    August 2009
  • From: MOAB, UTAH
Posted by JOE RIX on Sunday, October 9, 2016 8:39 PM

It appears that all your surgical efforts are turning out just fine. Regardless of the time you feel is required it is going to be wonderful. Great work so far. I like where you are going with it.

"Not only do I not know what's going on, I wouldn't know what to do about it if I did". George Carlin

  • Member since
    August 2015
  • From: the redlands Fl
Posted by crown r n7 on Monday, October 10, 2016 6:18 AM

I like that color also and the fender skirts too cool 


 Nick.

  • Member since
    March 2012
  • From: Corpus Christi, Tx
Posted by mustang1989 on Monday, October 10, 2016 8:35 AM

Thanks Joe and Nick. Won't be on this one again until Friday morning and as of now that's a good thing. It gives me time to plan out my next move.


 Forum | Modelers Social Club Forum (proboards.com) 

  • Member since
    January 2006
  • From: California
Posted by SprueOne on Monday, October 10, 2016 5:52 PM

All that work is paying off in killer results Idea Yes

Anyone with a good car don't need to be justified - Hazel Motes


Iron Rails 2015 by Wayne Cassell Weekend Madness sprueone

  • Member since
    March 2012
  • From: Corpus Christi, Tx
Posted by mustang1989 on Wednesday, October 12, 2016 2:39 PM

 Man thanks Bob! I'll be back on this one again this Friday. I've about got my system worked out between the two builds that I'm doing right now. Monday thru Thursday I'm on my Arado 234 "Blitz" and Friday thru Sunday I've got extended benchtime per day on my VW.


 Forum | Modelers Social Club Forum (proboards.com) 

  • Member since
    March 2012
  • From: Corpus Christi, Tx
Posted by mustang1989 on Friday, October 14, 2016 5:51 AM

I've been all over this thing like a rat on a cheeto filling and sanding and more filling and sanding on the body, roof and the wheel tub area of the chassis. Posting pictures would be a complete waste of time as it all looks about the same but this is the point at which I have to spend most of my time ensuring that this is all going to come together without looking like "Frankenstien". There'll be a payoff in the end I know but I sure wished this part went quicker because I can't stand body work.:bored:


 Forum | Modelers Social Club Forum (proboards.com) 

  • Member since
    March 2012
  • From: Corpus Christi, Tx
Posted by mustang1989 on Friday, October 14, 2016 10:38 AM

Ok I got a little more benchtime during the day and I think I've got the rear suspension about figured out to where I can put the wheel in just the right place. I turned to AMT's 67 Chevelle SS396 for that. I sectioned out the framework for the axle well and graphed it into place. I had to shave some off of the axle mounts themselves so I could position the tire /wheel up into the wheel well a little but I think I've got it about where I want it right now. Still gotta figure out the chassis frame work and fabricate rear springs but those shouldn't be too big of an issue. Getting the rear suspension/ differential combo was the hardest part I thought.

Image


 Forum | Modelers Social Club Forum (proboards.com) 

  • Member since
    August 2007
  • From: back country of SO-CAL, at the birth place of Naval Aviation
Posted by DUSTER on Friday, October 14, 2016 3:45 PM

This is another great example of your "imag-eering" skills.

Sorta like Darryl Starbird meets Harley Earl.

Model On Brother!  we await your next revelation with baited breath


Steve

Building the perfect model---just not quite yet  Confused

  • Member since
    March 2012
  • From: Corpus Christi, Tx
Posted by mustang1989 on Saturday, October 15, 2016 7:24 AM

Thanks Steve. "Baited breath" lol. That's a good one!

Well .......I got the primer coat applied and so far it looks pretty good. I've still got some work to do as there are a couple of things that didn't show up under the wipe down prior to priming but it looks like it's all manageable, but hey, a guy can't do all this cutting and hacking and NOT have any body work left over to do you know.  Wink There are a few bubbles in the primer and I couldn't for the life of me figure that out until.............I let my dog outside and found out that it was raining lightly. There aint that many thankfully and a little sanding outta get rid of the few that are there. Whew!! Got by with that one! 

Image


 Forum | Modelers Social Club Forum (proboards.com) 

  • Member since
    January 2006
  • From: California
Posted by SprueOne on Saturday, October 15, 2016 9:19 AM

yup, that primer stage. When it ties it all together.

Anyone with a good car don't need to be justified - Hazel Motes


Iron Rails 2015 by Wayne Cassell Weekend Madness sprueone

  • Member since
    March 2012
  • From: Corpus Christi, Tx
Posted by mustang1989 on Saturday, October 15, 2016 9:17 PM

SprueOne

yup, that primer stage. When it ties it all together.


Thanks Bob. Hopefully it all stays together. Huh?


 Forum | Modelers Social Club Forum (proboards.com) 

  • Member since
    March 2012
  • From: Corpus Christi, Tx
Posted by mustang1989 on Sunday, October 16, 2016 6:41 AM

More sanding on the body this morning after yesterdays priming stage. Just didn't like how the R/H side turned out and I had to dump the front fender flares as they didn't coincide with the flareless rear wheel openings so I got rid of them. No pics today but made what I feel like was alot of progress in the way of body work. I'm feeling pretty good about it so far. Next weekends push will be on the roof to smooth that all out. Till then.............it's back to the Arado............


 Forum | Modelers Social Club Forum (proboards.com) 

  • Member since
    August 2009
  • From: MOAB, UTAH
Posted by JOE RIX on Sunday, October 16, 2016 10:40 PM

The modifcations are looking terrific Joe. Given the extent of body surgery you did having a few flaws seems like an epic success to me. Super work my friend.

"Not only do I not know what's going on, I wouldn't know what to do about it if I did". George Carlin

  • Member since
    May 2013
  • From: Indiana, USA
Posted by Greg on Monday, October 17, 2016 10:51 AM

Coming right along, Joe. You're an ambitious fella.

  • Member since
    March 2012
  • From: Corpus Christi, Tx
Posted by mustang1989 on Wednesday, October 19, 2016 12:28 PM

Thanks Joe and Greg. I spoke with Rick Dobbertin today on the phone ( the owner of the J2000) and he's going to send me some engine detail photos on the engine so I can get all the hose and harness routing correct so I'll be looking forward to that.


 Forum | Modelers Social Club Forum (proboards.com) 

  • Member since
    August 2015
  • From: the redlands Fl
Posted by crown r n7 on Wednesday, October 19, 2016 5:16 PM

Hey looking good any ideas on color 


 Nick.

  • Member since
    March 2012
  • From: Corpus Christi, Tx
Posted by mustang1989 on Wednesday, October 19, 2016 10:07 PM

Thanks Nick. I'm looking at Mystic Teal Metallic. It's chameleon kind of color like this:

Image


 Forum | Modelers Social Club Forum (proboards.com) 

  • Member since
    August 2015
  • From: the redlands Fl
Posted by crown r n7 on Thursday, October 20, 2016 5:28 AM

Do you have the paint already


 Nick.

  • Member since
    March 2012
  • From: Corpus Christi, Tx
Posted by mustang1989 on Thursday, October 20, 2016 6:21 AM

Not yet. Getting it mixed up at the dealership I used to work at.


 Forum | Modelers Social Club Forum (proboards.com) 

  • Member since
    March 2012
  • From: Corpus Christi, Tx
Posted by mustang1989 on Friday, October 21, 2016 3:12 PM

 I just ordered a Pro Stock Camaro with the wheels that I want that are a 5 bolt pattern instead of a 4 bolt pattern Weld Draglites. This Camaro kit's got a bunch of other "goodies" in it that I'll use as well. The aluminum wheels I've been mocking everything up with are a "special treat" for my Street Stock 1990 Mustang LX I'll be tackling in the future.

Here's the kit:

Image

and a picture of what the wheels will look like outside of an artists box top art representation ( Say......... :hmm: I like that "Chevrolet Power" decal on the side of that hood scoop! That'll be going on the VW somewhere alright) :

Image


 Forum | Modelers Social Club Forum (proboards.com) 

  • Member since
    March 2012
  • From: Corpus Christi, Tx
Posted by mustang1989 on Saturday, October 22, 2016 8:31 AM

The first thing that I had to do to get the engine / transmission to fit was to get rid of the Lenco 4 speed transmission and replace it with a Turbo TH350 automatic transmission. I went to work by cutting the Lenco from the engine assy.

Image

After some sanding and dry fitting to make sure everything would line up flush , I mated the two together:

Image

This morning has been nothing but planning and fitting to make sure all these mods are gonna jive with each other. I cut the flooring out another 1/2" at the front to allow the engine/ transmission to fit in nicely. I think this'll be ok:

Image

I've got a lot of work ahead of me to include rear chassis framework fabrication, engine and transmission mounting and figuring out where I want the radiator to wind up as well as figuring out how I want to do the seating arrangement because the OOB stuff is now shot all to Hell. :hmm:


 Forum | Modelers Social Club Forum (proboards.com) 

  • Member since
    August 2009
  • From: MOAB, UTAH
Posted by JOE RIX on Sunday, October 23, 2016 8:26 AM

Good to see that the "Mad Doctor" is firmly in his realm. I have to admit that you have my head spinning on how this is all going to go together. But, given your past work, I am not doubting your process one bit. Now, your mental stability, mmm...maybe a tetch.Wink With that said, I am impressed and hang with it. I've got to see this to the end.

You're awesome Bro!!! 

"Not only do I not know what's going on, I wouldn't know what to do about it if I did". George Carlin

  • Member since
    March 2012
  • From: Corpus Christi, Tx
Posted by mustang1989 on Monday, October 24, 2016 4:26 PM

Hell my head's spinning Joe. Mental stability? Meh...........that's overrated.


 Forum | Modelers Social Club Forum (proboards.com) 

  • Member since
    March 2012
  • From: Corpus Christi, Tx
Posted by mustang1989 on Thursday, October 27, 2016 8:37 PM

Here's the latest so far with the body work on the main body complete and the roofline about 80% complete. Still gotta work out the roof to body fit a little but it's pretty clean other than that and I'm feeling really good about the way that it turned out. Got the Camaro kit in so here's the wheels from that kit. I have another set coming from Revell though. A few blems on these but you get the picture of the shiny rims. Just couldn't risk screwing the resin ones up with my limited Alclad experience and besides, I need a break on at least one portion of this build. :wink:

Image

Image

Image


 Forum | Modelers Social Club Forum (proboards.com) 

  • Member since
    August 2009
  • From: MOAB, UTAH
Posted by JOE RIX on Thursday, October 27, 2016 10:27 PM

Oh Heck Yeah! Outstanding body work Joe. Looks as though you got that all to line up quite nicely. Although the wheels look sorta cool, they are nowhere near the uber boss touch that the lego bumper is. I mean seriously, You're putting some definite creative thought into this.Big Smile

"Not only do I not know what's going on, I wouldn't know what to do about it if I did". George Carlin

  • Member since
    November 2008
  • From: Central Florida
Posted by plasticjunkie on Friday, October 28, 2016 4:18 PM

Jester75

Reminds me of one of Gas Monkey's creation


LOL about to post the same thing till I saw your post.

 GIFMaker.org_jy_Ayj_O


Too many models to build, not enough time in a lifetime!!

  • Member since
    March 2012
  • From: Corpus Christi, Tx
Posted by mustang1989 on Saturday, October 29, 2016 7:48 AM

Thanks fellas. No Joe I aint gonna use that bumper. lol

Ok folks. Today I did some interior tinkering because I've got to figure out the seating and with that comes the question of how much of the forward part of the engine will be visible when the seating area is installed. I mean look..................this is the OOB seating:

Image

The whole front of the engine will not be visible at all given that arrangement. So I got to thinking :What if I recline the firewall a few degrees and stick some better seats in there and widen the distance between the seats? This will allow the whole center section to have a clear panel in which to display everything up there since the engine is pretty much the showcase of this build AND what the entire build is constructed around. So I mocked everything up using the seats from the J2000 kit. Imagine this, with racing seat harnesses and everything in the middle clear.

Image

I've got to move the seats back just a tad which means the firewall is going to have to be scooted back about 1/8-3/16 of an inch. Additionally I'll have to relocate the steering column to the drivers side to line up with the seats. Everything seems to clear the roofline as well:

Image

While I'm on modifications, I had to correct a boo-boo. It seems when I tried to make the transmission cut out a little deeper the dremel got away from me and marred the cut out somewhat and I tried to correct it by widening it across the face panel:

Remember I started here:

Image

and ended up here. See how the cut out is now more of an arc than a half moon shape?

Image

the only way around this was to cut the whole panel out:

Image

and drill a whole in some styrene sheet stock and cut a new panel out.

Image

This is the kind of stuff that I really enjoy about custom builds. It seems like when I change one thing then it bleeds over into something else and then something else again and again. The vision I start out with on any given custom auto project often gets changed several times and dictates to me how it's going to go and before I know it's happening the build takes on a while new direction and life of its own. It's really a cool thing to watch unfold.


 Forum | Modelers Social Club Forum (proboards.com) 

  • Member since
    January 2010
Posted by CrashTestDummy on Monday, October 31, 2016 12:49 PM

Awesome work!  The term 'surgical' popped up earlier in this thread, referring to your cuts and joins, especially for the floor pan.  I was thinking that before I read it.  So, with the exception of the runaway Dremel, how are you making those incredible straight cuts?!?

Gene Beaird,
Pearland, Texas

G. Beaird,

Pearland, Texas

  • Member since
    August 2007
  • From: back country of SO-CAL, at the birth place of Naval Aviation
Posted by DUSTER on Tuesday, November 1, 2016 12:01 AM

Good recovery on the trans pnl

Looks better than the original did, even before the gremlins  snuck in and messed it up  


Steve

Building the perfect model---just not quite yet  Confused

  • Member since
    March 2012
  • From: Corpus Christi, Tx
Posted by mustang1989 on Tuesday, November 1, 2016 6:29 AM

Thanks Gene and Steve. I'll see if I can throw together a small tutorial of how I do things in regards to seams there Gene.

Ok folks. I've got my next automotive build lined up after I get through with "The VW Bus Project". I've been wanting to do a 460 Big Block Ford powered Fox Body Mustang for a while now. Initially I wanted to do the 1990 Model LX but now that I've acquired an older Fox Bodied car that just looked too cool to pass up I think I'll go with this one. I've already got the wheels and tires to make all this happen so here's where we're at:

Image

and I just ordered a Big Block Ford (actually a 572 but we'll go ahead and label it a 460) for it:

Image

It's already got an automatic transmission behind it so that's a plus. I didn't like the carburetor that was on top of it so we'll go with an 800cfm double pumper carburetor for the fuel induction side of things: I'll be using the one on the left hand side here:

Image

After this VW deal I'll be making it a point to stick to just detailing the engine compartment and getting a set of "GT 460" stripes made for the lower rockers like the old GT 350's and 500's used to have. I think I will have had all the deep mods I want for a while after this bus. :headslap:


 Forum | Modelers Social Club Forum (proboards.com) 

  • Member since
    August 2009
  • From: MOAB, UTAH
Posted by JOE RIX on Tuesday, November 1, 2016 6:36 AM

The beauty of your builds Joe is that for every new development that crops up you meet it with creative and well thought out solutions. Very admirable.

"Not only do I not know what's going on, I wouldn't know what to do about it if I did". George Carlin

  • Member since
    August 2015
  • From: the redlands Fl
Posted by crown r n7 on Tuesday, November 1, 2016 7:22 AM

I'm still WATCHING !! . Geeked


 Nick.

  • Member since
    January 2010
Posted by CrashTestDummy on Tuesday, November 1, 2016 9:53 AM

A tutorial would be awesome.  What's the kit number for that Revell Mustang Street Machine?  That's very close to an 86 model GT a friend has that I'd like to reproduce in scale form.  All I'm finding when looking for a Revell Street Machine Mustang are the Mustang II kits.  Thanks.

Gene Beaird,
Pearland, Texas

G. Beaird,

Pearland, Texas

  • Member since
    August 2007
  • From: back country of SO-CAL, at the birth place of Naval Aviation
Posted by DUSTER on Thursday, November 3, 2016 3:14 PM

mustang1989

 
Image


This looks like an awesome mustang build.

mustang1989

 
I think I will have had all the deep mods I want for a while after this bus. :headslap:


I also like your sense of hummor ….. 


Steve

Building the perfect model---just not quite yet  Confused

  • Member since
    May 2009
  • From: Poland
Posted by Pawel on Thursday, November 3, 2016 3:47 PM

DUSTER
mustang1989 I think I will have had all the deep mods I want for a while after this bus. :headslap: I also like your sense of hummor …..

Yeah! Like - look at this modest, quick out of the box build!

Good luck with your pprojects and have a nice day

Paweł

All comments and critique welcomed. Thanks for your honest opinions!

www.vietnam.net.pl

  • Member since
    March 2012
  • From: Corpus Christi, Tx
Posted by mustang1989 on Thursday, November 3, 2016 5:59 PM

Ok...............let's face it...................I'm addicted.


 Forum | Modelers Social Club Forum (proboards.com) 

  • Member since
    May 2009
  • From: Poland
Posted by Pawel on Thursday, November 3, 2016 6:32 PM

Awright brother Joe! While this is a serious condition, there are many things that are/could be worse! At least you have us to help you get along...

Good luck with your builds and have a nice day!

Paweł

All comments and critique welcomed. Thanks for your honest opinions!

www.vietnam.net.pl

  • Member since
    March 2012
  • From: Corpus Christi, Tx
Posted by mustang1989 on Saturday, November 5, 2016 3:06 PM

I appreciate that Pawel.

 I've got where I want the radiator to go planned out. First I robbed the radiator out of my Pro Stock Thunderbird kit and then robbed the cooling fans from the Pontiac J2000 kit. I sanded the back of the cooling fan assy to where I could cut the area between the fan blades out to give them more of a realistic look. I'll be cutting the floor of the chassis on the drivers side to allow me to install the radiator and cooling fan assy there. I'll also be drilling holes in the cooling fan "platform" in which to run the supply and return cooling system hoses through into the radiator underneath.
Here's the parts:
Image

and here's where they're going to wind up when installed:

Image

More cutting on the way......................


 Forum | Modelers Social Club Forum (proboards.com) 

  • Member since
    February 2003
  • From: East Bethel, MN
Posted by midnightprowler on Sunday, November 6, 2016 8:09 AM

Joe, you are on the edge of insanity!Stick out tongue great work! Where is that TH350 transmission from?

Hi, I am Lee, I am a plastiholic.

Co. A, 682 Engineers, Ltchfield, MN, 1980-1986

1 Thessalonians 4:13-18 1 Corinthians 15:51-54

Ask me about Speedway Decals

  • Member since
    March 2012
  • From: Corpus Christi, Tx
Posted by mustang1989 on Sunday, November 6, 2016 8:25 AM

Thanks Lee. Yes

No I'm ok ............................really. lol .

I got the transmission from ebay but it's from Perry's Resin. Speaking of which I've gotta call him still on my 1980 Malibu Station Wagon progress. Lemme tell you, if you want a resin body casted you might as well go to the patience bank and withdraw alot of it. I'm just working around it right now but man it takes a long time. If his body casting is anything like his transmission turned out then I'm going to be very happy with it.


 Forum | Modelers Social Club Forum (proboards.com) 

  • Member since
    August 2009
  • From: MOAB, UTAH
Posted by JOE RIX on Sunday, November 6, 2016 8:25 AM

Excellent creativity my friend. Love that Mustang kit. That's Boss!

Joe, I do believe you ARE the crossroads of ambition and addiction.Wink

"Not only do I not know what's going on, I wouldn't know what to do about it if I did". George Carlin

  • Member since
    April 2016
  • From: Parsons Kansas
Posted by Hodakamax on Sunday, November 6, 2016 8:26 AM

Being a VW nut and old Hotrodder in the day, I enjoy this post a lot. Fun project! Fortunately after many sessions at Volkswagen Anyonomus, I'm almost back to normal and can drive cross country without all those stops inspecting VW carcasses in fields and behind barns.

Keep up the good work!

Max

  • Member since
    March 2012
  • From: Corpus Christi, Tx
Posted by mustang1989 on Monday, November 7, 2016 5:22 AM

Thanks Joe and Max.

I made some headway by cutting out the floor for the cooling fan installation. Good 'ol Gene seemed interested in a tutorial so I'll do that here.

It's really hard to cut the sides that arent accessible by the sides like the center of the floor. I start by making consecutive holes in line by drilling them out with my pin vise like so:

Then I just connect the dots with the X-acto knife to make the "line". Then I cut out whatever I'm going to cut out, like this floor, smaller than what I need it with a razor saw. See, its just a tad smaller than the radiator:

Then you can safely file away at the sides until you get the dimensions that you want:

and then everything fits in there, once trued up, perfectly:


 Forum | Modelers Social Club Forum (proboards.com) 

  • Member since
    March 2012
  • From: Corpus Christi, Tx
Posted by mustang1989 on Monday, November 7, 2016 5:23 AM

I also worked on the seating platforms some by cutting the whole bench into two sections so the engine'll be able to fit . I've got the dimensions down but I'm going to have to work a little more on the specifics of how I want the seat platforms braced and "fastened". :hmm: I've also gotta move the steering column towards the drivers door just a little bit due to relocating the seats.

Image

Looks like I'll need some seat belts as well. I'll be going with these (which I'll be ordering on my next payday):

Image


 Forum | Modelers Social Club Forum (proboards.com) 

  • Member since
    August 2009
  • From: MOAB, UTAH
Posted by JOE RIX on Monday, November 7, 2016 6:10 AM

That's some solid progress Joe. Nicely done. I like those seatbelts. Guess I never considered Eduard making automotive PE stuff. Very cool.

"Not only do I not know what's going on, I wouldn't know what to do about it if I did". George Carlin

  • Member since
    January 2010
Posted by CrashTestDummy on Wednesday, November 9, 2016 2:26 PM

mustang1989

Thanks Gene and Steve. I'll see if I can throw together a small tutorial of how I do things in regards to seams there Gene.

Ok folks. I've got my next automotive build lined up after I get through with "The VW Bus Project". I've been wanting to do a 460 Big Block Ford powered Fox Body Mustang for a while now. Initially I wanted to do the 1990 Model LX but now that I've acquired an older Fox Bodied car that just looked too cool to pass up I think I'll go with this one. I've already got the wheels and tires to make all this happen so here's where we're at:

Image
<SNIP>

Thanks for the tutorial, Joe.  It does help.  I do similar work when cutting things out, but guess I'm just not as steady as you are. 

Please get me the kit number for this kit.  It's very close to a 1:1 car a good friend has, and I'd like to replicate it for him.

Gene Beaird,
Pearland, Texas


G. Beaird,

Pearland, Texas

  • Member since
    March 2012
  • From: Corpus Christi, Tx
Posted by mustang1989 on Wednesday, November 9, 2016 3:14 PM

No problem Gene and I'll get that number to you.


 Forum | Modelers Social Club Forum (proboards.com) 

  • Member since
    March 2012
  • From: Corpus Christi, Tx
Posted by mustang1989 on Friday, November 11, 2016 7:34 AM

Gene: That Revell Mustang Street Machine kit number is 7115.

I'm so immersed in theory and planning right now I don't know when this thing'll ever start to progress. I'm hanging in there and taking it one day at a time and sooner or later I'll end up making a bus out of it one way or another.


Here we are right now with the engine/ transmission with the cylinder heads installed, seating and center cluster pod test fit into place so I've got an idea of how this is all going to turn out and what I still need to do to get things to "behave". As you can see, there's a lot of work and "repositioning" left to do concerning the seating arrangement :


This is about where the transmission tail housing is going to wind up. Hopefully I can scoot it all to the rear another 1-2mm but this is a good spot for now.

and I'm currently working on relocating the steering column over towards the drivers door to line it up with the drivers seat.


 Forum | Modelers Social Club Forum (proboards.com) 

  • Member since
    May 2009
  • From: Poland
Posted by Pawel on Friday, November 11, 2016 1:32 PM

Hello!

I've got an idea for you - maybe it would make sense to mount the seats (why are there actually two of them?) to a tubular inner frame? That could be made from sprue or stuff like that, and that's how it probably would be done in real life. Also it would make sense to move the seats back some. It is said the driver has a better feel for the car if he seats near the center of gravity. Also, I don't know if you ever drove a van like this, or a cabover, or a big bus, but it's a funny feeleing, sitting in front of the front axle, so moving the seat back would make theoretical driving of this baby a lot more natural and probably easier.

Good luck with your build and have a nice day

Paweł

All comments and critique welcomed. Thanks for your honest opinions!

www.vietnam.net.pl

  • Member since
    March 2012
  • From: Corpus Christi, Tx
Posted by mustang1989 on Friday, November 11, 2016 1:53 PM

Thanks Pawel. I did actually think of that but the dang wheel well would get right in the way. The thought process aint over yet and all but my options for seat positioning are very limited with this vehicle.


 Forum | Modelers Social Club Forum (proboards.com) 

  • Member since
    March 2012
  • From: Corpus Christi, Tx
Posted by mustang1989 on Friday, November 11, 2016 2:16 PM

I went out today to pick one of these up from Hobby Lobby because I wanted to one to build OOB (yes.....it's going to happen) just to display my modified one next to an OOB version when finished and got that 1 in 12 that's supposed to be green. Cool color is all I've gotta say. I'm happier than a pig in slop!


 Forum | Modelers Social Club Forum (proboards.com) 

  • Member since
    March 2012
  • From: Corpus Christi, Tx
Posted by mustang1989 on Saturday, November 12, 2016 4:34 AM

I did check some seating options out for this thing and it's going to require more than I have planned for so I'll be sticking with the the current seat location. To pull this off would mean scrapping the whole chassis build idea and starting from scratch. I've gotta say "when" at some point with all of this and this is one of those times.

This video shows what could be done  in regards to seating:

https://search.yahoo.com/search;_ylc=X3oDMTFiN25laTRvBF9TAzIwMjM1MzgwNzUEaXRjAzEEc2VjA3NyY2hfcWEEc2xrA3NyY2h3ZWI-?p=volkswagen+bus+drag+racing&fr=yfp-t&fp=1&toggle=1&cop=mss&ei=UTF-8


 Forum | Modelers Social Club Forum (proboards.com) 

  • Member since
    August 2015
  • From: the redlands Fl
Posted by crown r n7 on Saturday, November 12, 2016 5:11 PM

 Translucent Nice !!!


 Nick.

  • Member since
    August 2007
  • From: back country of SO-CAL, at the birth place of Naval Aviation
Posted by DUSTER on Saturday, November 12, 2016 10:49 PM

Oh Good. Now we can see through the transulant green to see that  seat placement lots better.........


Ok, I'll  just sit over here and be quiet now............for a while

Steve

Building the perfect model---just not quite yet  Confused

  • Member since
    March 2012
  • From: Corpus Christi, Tx
Posted by mustang1989 on Saturday, November 19, 2016 9:55 AM

Thanks for the comments Nick and Steve.

  I received my fuel cell yesterday for the XL version that I'm building. This is gonna work out nicely is all I've gotta say....


aaaaand I got the inside of the OOB body shot with gold this morning and that's gonna work out well also!


I've got some work to do on the top though. There's those to optional cut out impressions for adding....................antennas????????????    I've got some sanding to do to get not only those to look right but the ejector pin marks all over the inside of the roof as well. No problem.....................we'll get there.    


 Forum | Modelers Social Club Forum (proboards.com) 

  • Member since
    April 2016
  • From: Parsons Kansas
Posted by Hodakamax on Saturday, November 19, 2016 10:24 AM

Ok, I'm an aircraft guy, but this is a fun one to watch. Early life exposure to hot cars and VWs keeps bringing back me to your posts! LOL! Still watching!

Max

A big supercharger would look good under dual quads! Just thinking.

  • Member since
    March 2012
  • From: Corpus Christi, Tx
Posted by mustang1989 on Saturday, November 19, 2016 10:37 AM

Thanks Max.

Just one supercharger? This one's got two...............and two turbo's............and Nitrous. I think that'll blow the competition away.....


 Forum | Modelers Social Club Forum (proboards.com) 

  • Member since
    April 2016
  • From: Parsons Kansas
Posted by Hodakamax on Saturday, November 19, 2016 11:25 AM

Excellent my friend! Carry on!

Max

  • Member since
    May 2009
  • From: Poland
Posted by Pawel on Sunday, November 20, 2016 7:20 AM

Of course they added the antennae - after all this is a beetle, a bug! In Poland they call those old VW busses/vans a "cucumber" because of it's rounded shape. Good luck with that OOB baby and have a nice day

Paweł

All comments and critique welcomed. Thanks for your honest opinions!

www.vietnam.net.pl

  • Member since
    August 2009
  • From: MOAB, UTAH
Posted by JOE RIX on Sunday, November 20, 2016 8:50 AM

Definitely some outstanding progress Joe. The gold on your transluscent body sure came out nice. Well done. I am so looking forward to you building up that motor. That is just going to be epic.

"Not only do I not know what's going on, I wouldn't know what to do about it if I did". George Carlin

  • Member since
    March 2012
  • From: Corpus Christi, Tx
Posted by mustang1989 on Monday, November 21, 2016 5:09 AM

Pawel: LOL. Thanks bud. A cucumber. LOL!

Joe: Thank you as well. I may strip the paint on the bottom of the oil pan and start over. Got a little unfinished seam work business to tend to.

I'll be changing the front wheels and tires up on the "OOB" build just because the more I look at the front wheels and tires the more I don't like 'em.


 Forum | Modelers Social Club Forum (proboards.com) 

  • Member since
    March 2012
  • From: Corpus Christi, Tx
Posted by mustang1989 on Friday, November 25, 2016 1:10 PM

I managed to work on my "OOB" build this morning. I didn't like the front tires from this kit so I used the one's from the AMT '67 Chevelle kit. I chucked a 12mm socket up in my cordless drill and mounted each of the four tires up, one at a time on to the socket and spun the tires up on some sandpaper to rough up the tread araas some. I also treated each of the wheels to a coat of X-22 Smoke for that true metal/ chrome look. After that I installed all four wheel and tires.

Here's the progress so far:

Image


 Forum | Modelers Social Club Forum (proboards.com) 

  • Member since
    August 2009
  • From: MOAB, UTAH
Posted by JOE RIX on Saturday, November 26, 2016 8:28 AM

Hey, now that's looking pretty cool. You move along right smartly when your not rebuilding the entire kit with using only 2 of original parts.Wink

"Not only do I not know what's going on, I wouldn't know what to do about it if I did". George Carlin

  • Member since
    March 2012
  • From: Corpus Christi, Tx
Posted by mustang1989 on Saturday, November 26, 2016 1:09 PM

Thanks Joe! .........smarty!!Wink

Ok I'm back with today's update. Folks I had to ditch the front wheels as well. First off , I just didn't like the way they looked. Secondly , these things, no matter how much I cut them down on the back of the wheel where they mounted up to the axle just stuck out way to far outside of the body.

Here's where I started at this morning when test fitting the body onto the chassis to see if everything was going to work out ok. I'm glad I did because I wouldn't have been very happy with this..........

Image

After cutting the backs of the OOB wheels down it wasn't too much better...........

Image

So I scrapped the OOB front wheels and went with some Cragar SS's I had in the spares bin. Now THAT'S more like it!!!!!!!!!

Image

The engine? Well it's probably the most primitive Hemi engine I've seen but there aint no way in HELL I'm going to use my Ross/Gibson Hemi on THIS build! lol

I painted the engine metal flake blue , drilled some holes in the rocker covers for ignition wires and while I was on the rocker covers , applied a little Tamiya Smoke to them.

Engine progress for this morning.......

Image

After looking at it for a while I don't know if I'll use this 426 Hemi or another OOB Hemi from 30 years ago. Will be thinking on this part.... :hmm:


 Forum | Modelers Social Club Forum (proboards.com) 

  • Member since
    March 2012
  • From: Corpus Christi, Tx
Posted by mustang1989 on Saturday, November 26, 2016 1:11 PM

OK! Done thinking!!!

After some re-thinking and internal debate... I'll be going with a 30+ year old Hemi that I've got in the stash. I'll be taking all of the peripherals off like the blower, belts and I'll be replacing the rocker covers but the base engine just has so much more detail than the OOB one in this kit. (Yeah I know, the pink is a little hard to take but you've gotta remember I was going to put this in a Panther Pink Cuda that I built back then as a teenager). That thread for ignition wires'll go too. Hey....It's all I could think of 30 years ago that would work ya know.

I'll be painting this engine the same blue that I did in the pics above....

Image


 Forum | Modelers Social Club Forum (proboards.com) 

  • Member since
    August 2009
  • From: MOAB, UTAH
Posted by JOE RIX on Saturday, November 26, 2016 1:25 PM

And the whole OOB concept? Out the door like a bad habit. That's the Joe I know and love. HaHa..HAHAHAHA!!!!! I knew you couldn't do it.

You do know that I am just having fun at your expense right?Wink

"Not only do I not know what's going on, I wouldn't know what to do about it if I did". George Carlin

  • Member since
    March 2012
  • From: Corpus Christi, Tx
Posted by mustang1989 on Saturday, November 26, 2016 1:35 PM

JOE RIX

And the whole OOB concept? Out the door like a bad habit. That's the Joe I know and love. HaHa..HAHAHAHA!!!!! I knew you couldn't do it.

You do know that I am just having fun at your expense right?Wink


No worries Joe. It shouldn't be too far out of line.Big Smile


 Forum | Modelers Social Club Forum (proboards.com) 

  • Member since
    May 2009
  • From: Poland
Posted by Pawel on Saturday, November 26, 2016 3:04 PM

Hello!

Let's just face it - the kit OOB is just plain ugly! Anybody with a little skill and good taste is bound to modify it! Our Mustang Joe could build it OOB, but what's the point building an ugly model?

Good luck with your Hemi Joe, and have a nice day

Paweł

All comments and critique welcomed. Thanks for your honest opinions!

www.vietnam.net.pl

  • Member since
    August 2007
  • From: back country of SO-CAL, at the birth place of Naval Aviation
Posted by DUSTER on Saturday, November 26, 2016 11:31 PM

Have to say, you have worked your magic on this one.

Steve

Building the perfect model---just not quite yet  Confused

  • Member since
    March 2012
  • From: Corpus Christi, Tx
Posted by mustang1989 on Sunday, November 27, 2016 6:18 AM

Thanks for the kudos Pawel and Steve!

Ok fellas. I started tearing the pink Hemi down to prepare it for the install and it literally flew apart. I was able to remove the timing cover from the front of the pink engine, sand the backside of it and cut and carve until I had the dimensions of the base timing cover and it's now in a bath of brake fluid where the paint will be stripped and then painted with a coat of the metal flake blue so it looks like I'll be able to use the OOB engine on this thing after all. That means less modification and re-work later.

I pulled the completed chassis down now that the front wheels are set from the glue drying and mocked up my custom VW along with the OOB build. The differences are dramatically different (even more so than I thought they would be with what I thought wasn't much of an extension in the body):


 Forum | Modelers Social Club Forum (proboards.com) 

  • Member since
    May 2009
  • From: Poland
Posted by Pawel on Sunday, November 27, 2016 2:14 PM

Hello!

Like I thought, your modified looks a lot nicer. But it's a lot of work. Like always - quality has to be paid for, it's never free! Good luck with your "Transporters" and have a nice day

Paweł

All comments and critique welcomed. Thanks for your honest opinions!

www.vietnam.net.pl

  • Member since
    August 2009
  • From: MOAB, UTAH
Posted by JOE RIX on Sunday, November 27, 2016 5:20 PM

Both of your buses are looking awesome. You're sure enough right about the difference you've made in the modified one. The cool thing about it is that you have done such a remarkable job on the modifications that you cannot even tell that it was once the original that you are working up. Really tremendous work Joe. Also, good to here that you will be able to salvage the engine.

"Not only do I not know what's going on, I wouldn't know what to do about it if I did". George Carlin

  • Member since
    March 2012
  • From: Corpus Christi, Tx
Posted by mustang1989 on Sunday, December 4, 2016 7:12 AM

Thanks guys.

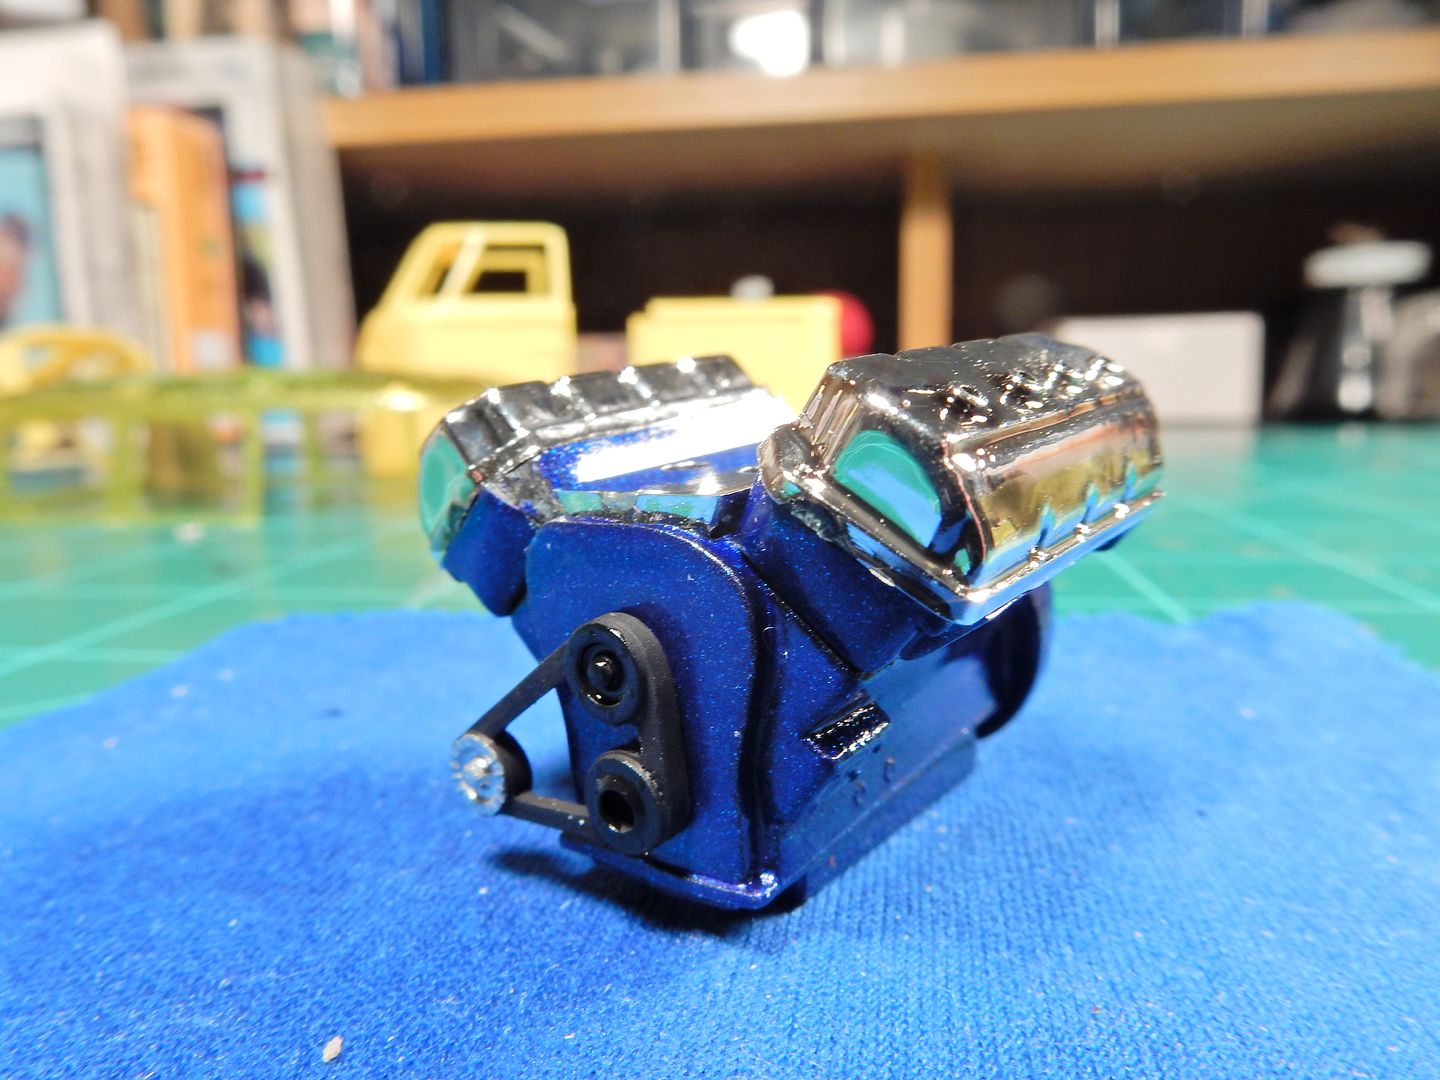
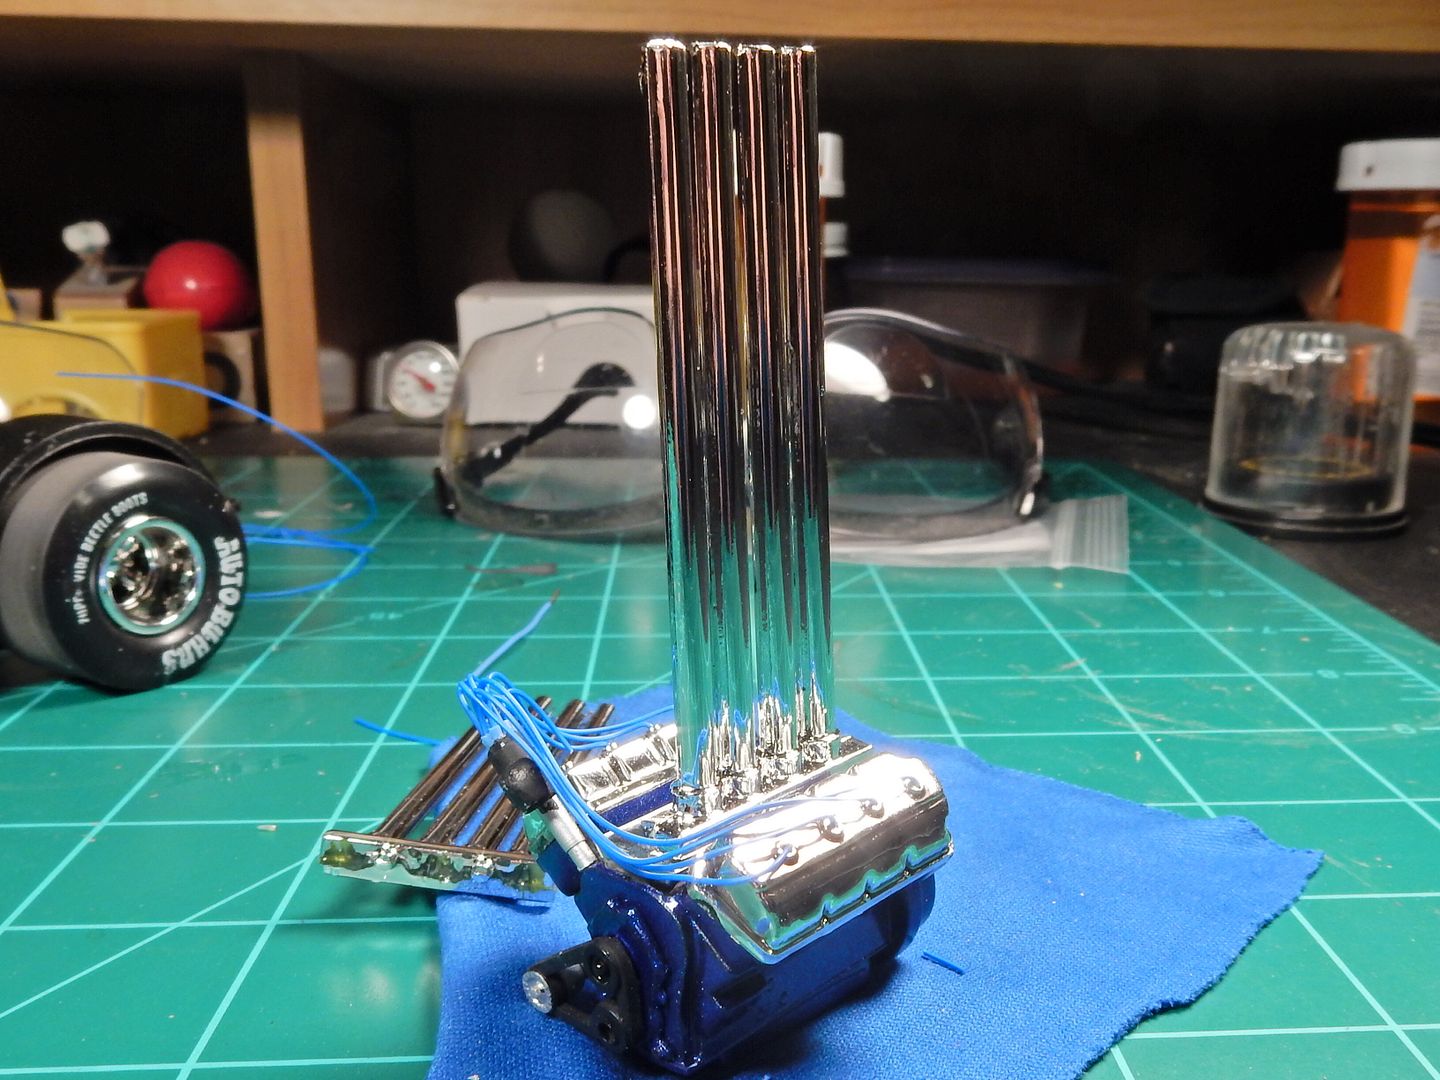
Okeedokee folks. Progress onthe OOB build. I left off with the engine that had no timing cover, water pump....nothin'. Man did that look blank! I was initially going with a Hemi that I built as a kid and then backed out of that one just because of all the mods I would have to do to get it looking right and fitting. So I took the timing cover and water pump from that engine and put over onto this engine first of all. Secondly, I couldn't leave the engine with now ignition system given all this effort I'm going through to "enhance" things a bit so I added some wire's from Lex's after drilling out the distributor cap and going through the usual process of installing wires into the cap and routing and all. 


A before recap shot:


and the current progress with the L/H OOB injector stack test fitted


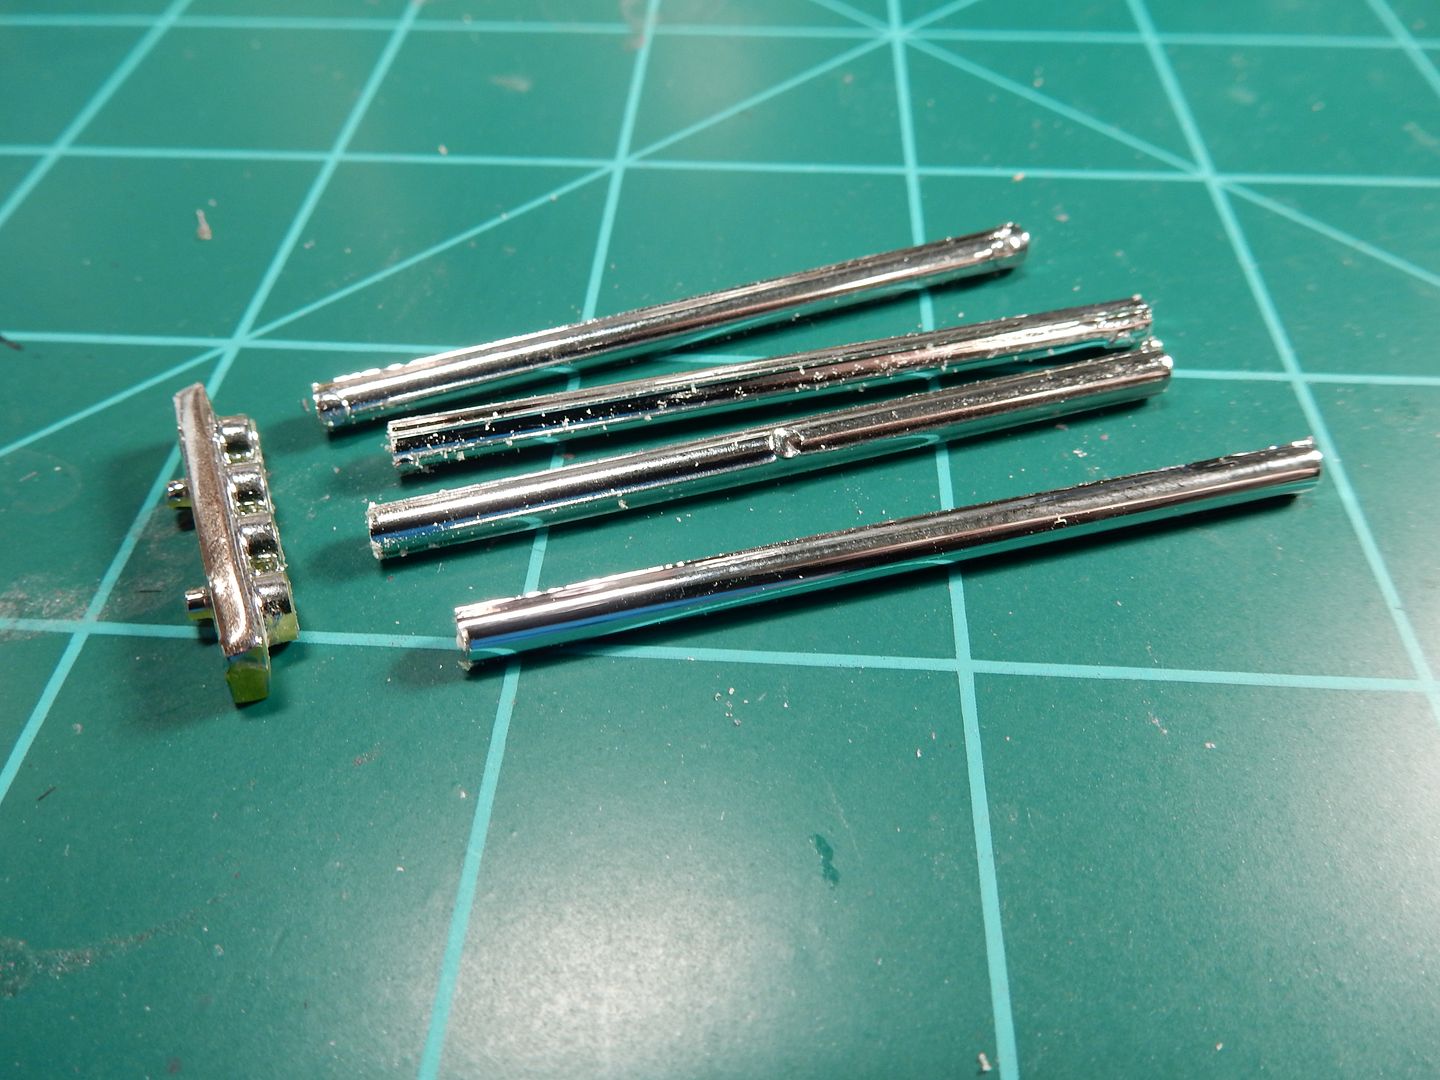
 Lastly, speaking of injector stacks,  while I like the idea of those on this kit I strongly dislike all the seam lines and flash associated with the parts that AMT used. From a distance they look great and the stacks are at least not molded together but close up they are a complete disaster that would require total reworking to straighten out!


Let's zoom in a little closer....


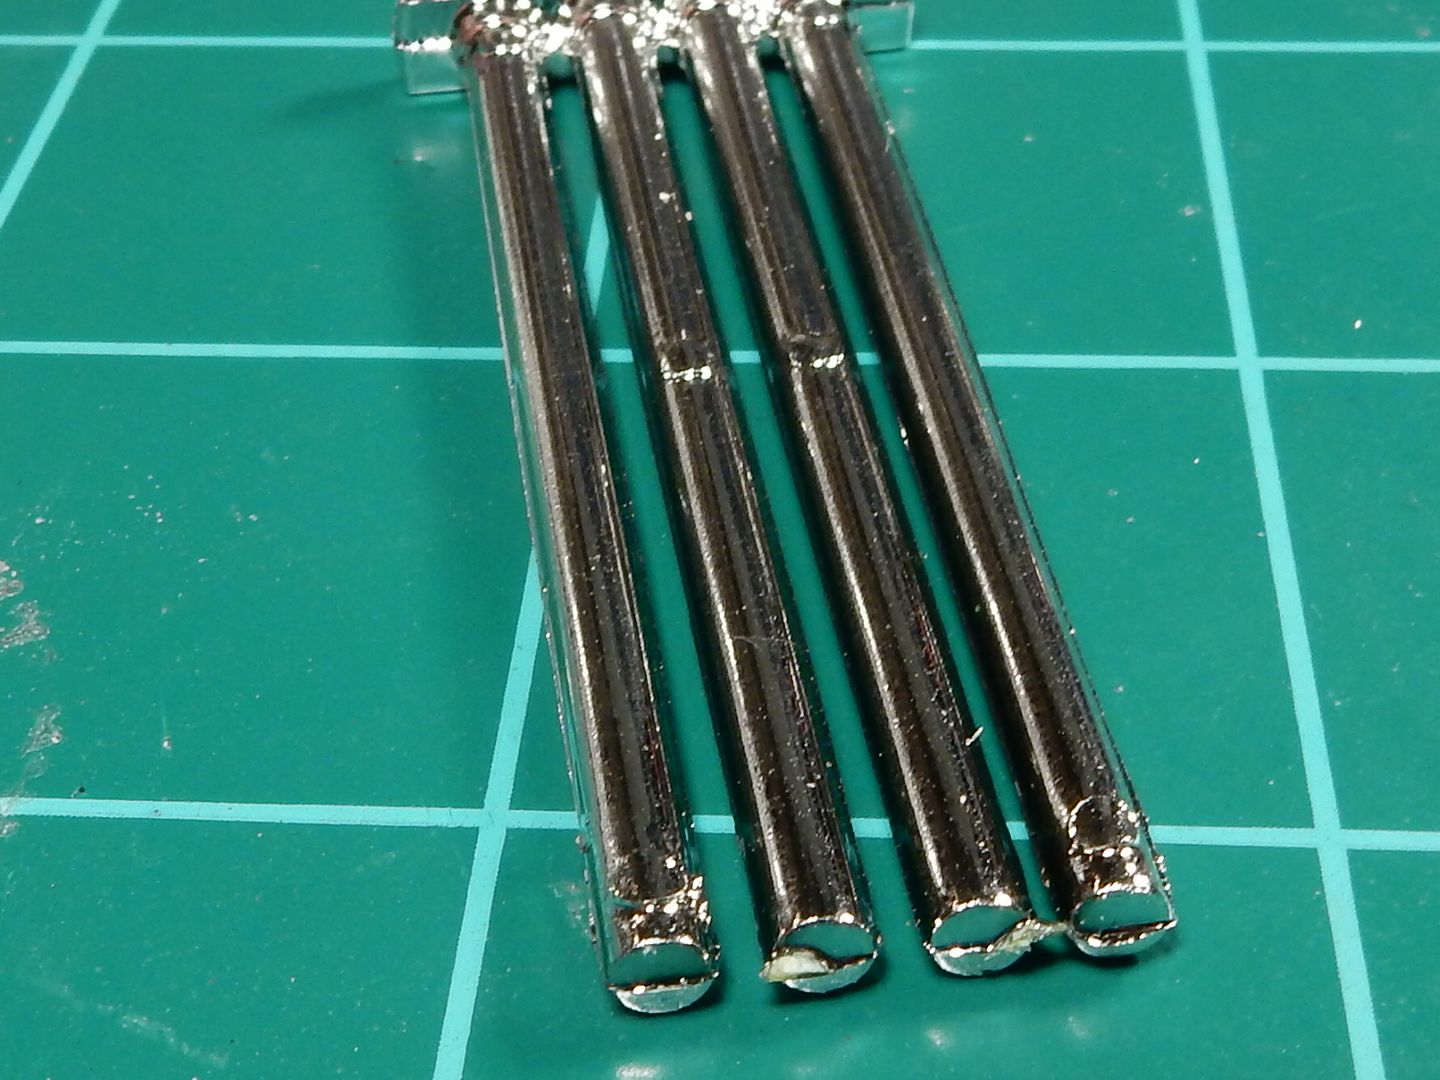
So I'll start fixing that by cutting off the stacks from the bases....


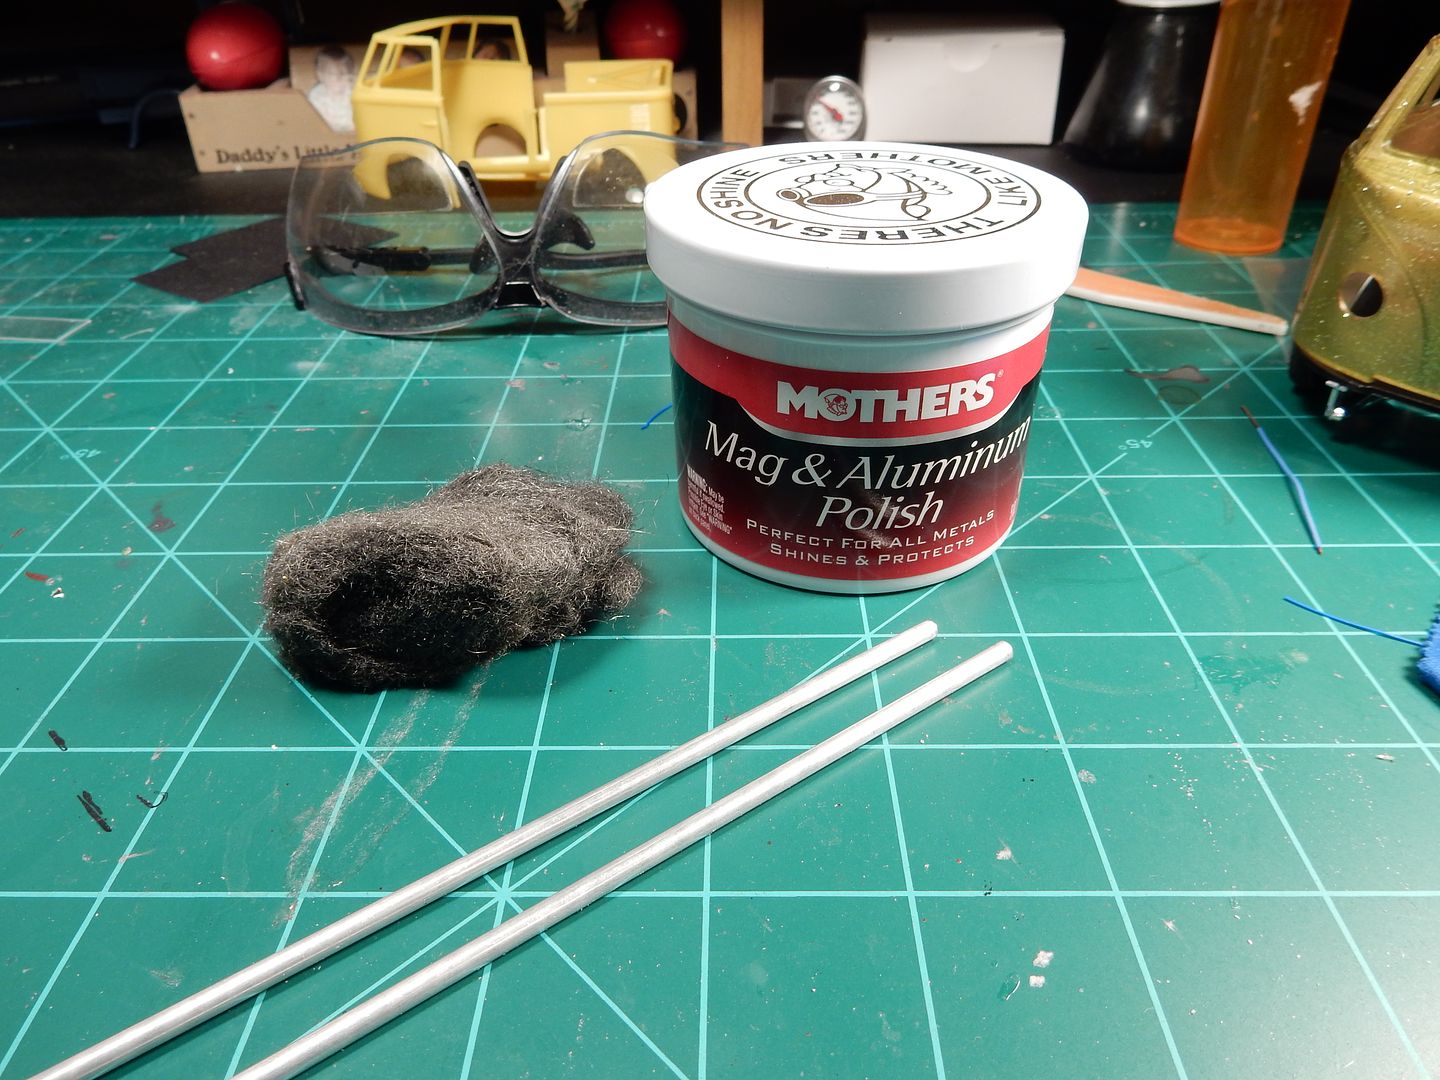
Here's what I'm going to use instead. I picked up some aluminum tube from HL and will cut each stalk in half, chuck it up in a drill and spin it up in the steel wool there beside the stalk here to start a base for the shining process and then switch over to spinning it up in a polishing cloth with some Mothers Aluminum polish to "polish" things off. Sorry...............couldn't help the pun. sorry%20bout%20dat_zps1nny96hw


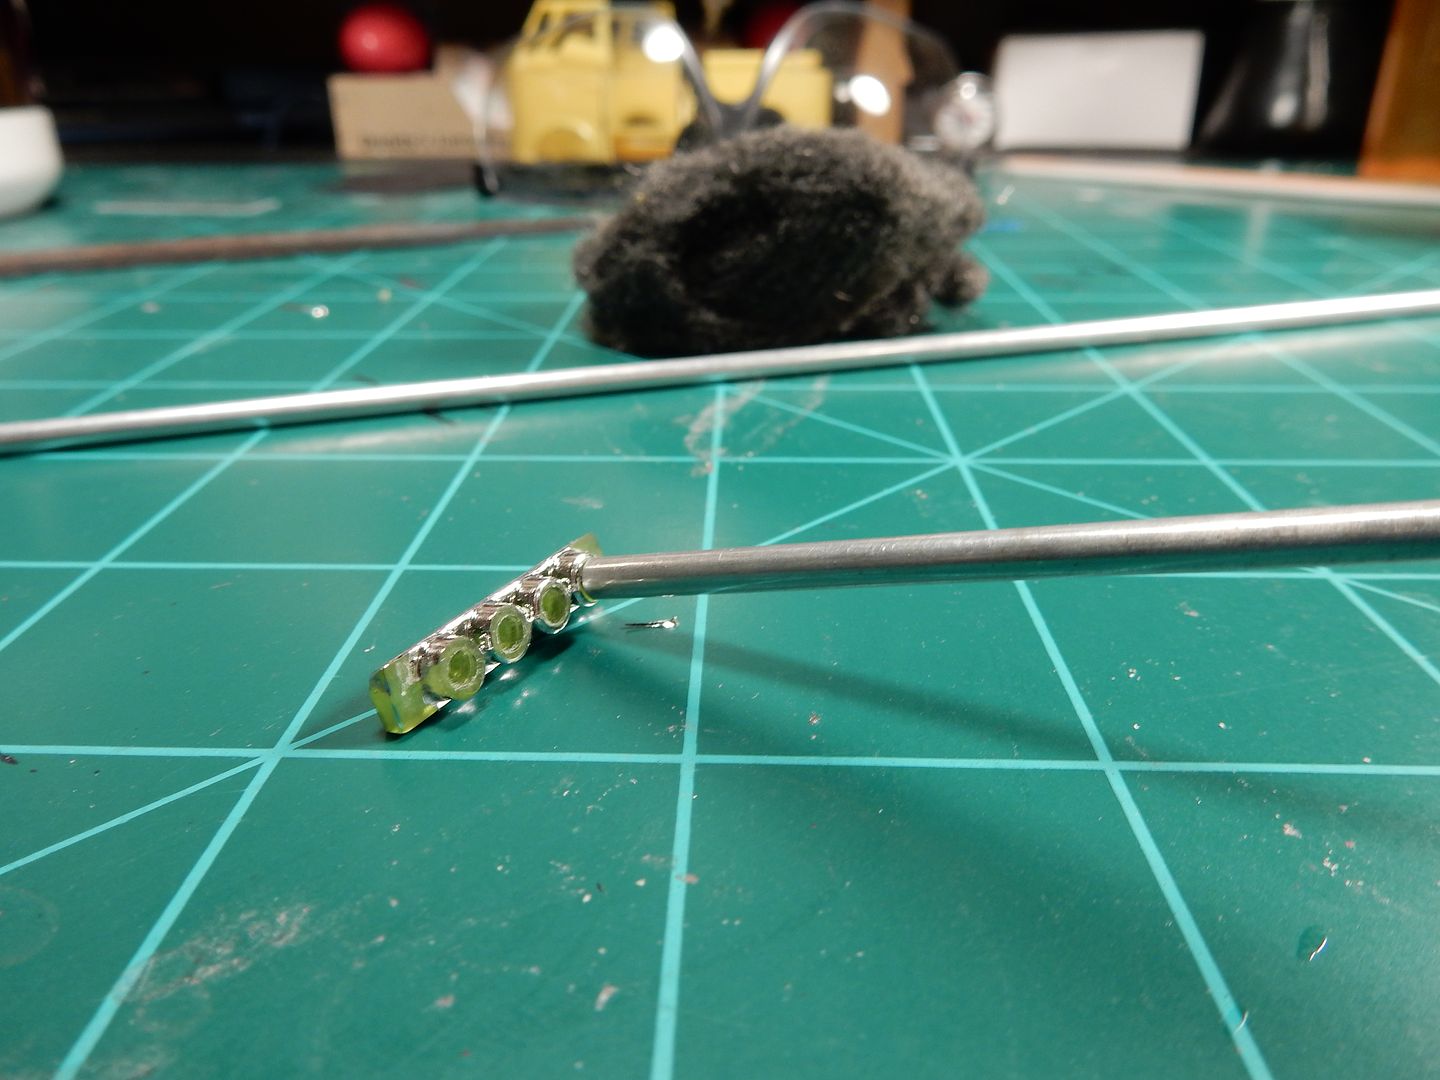
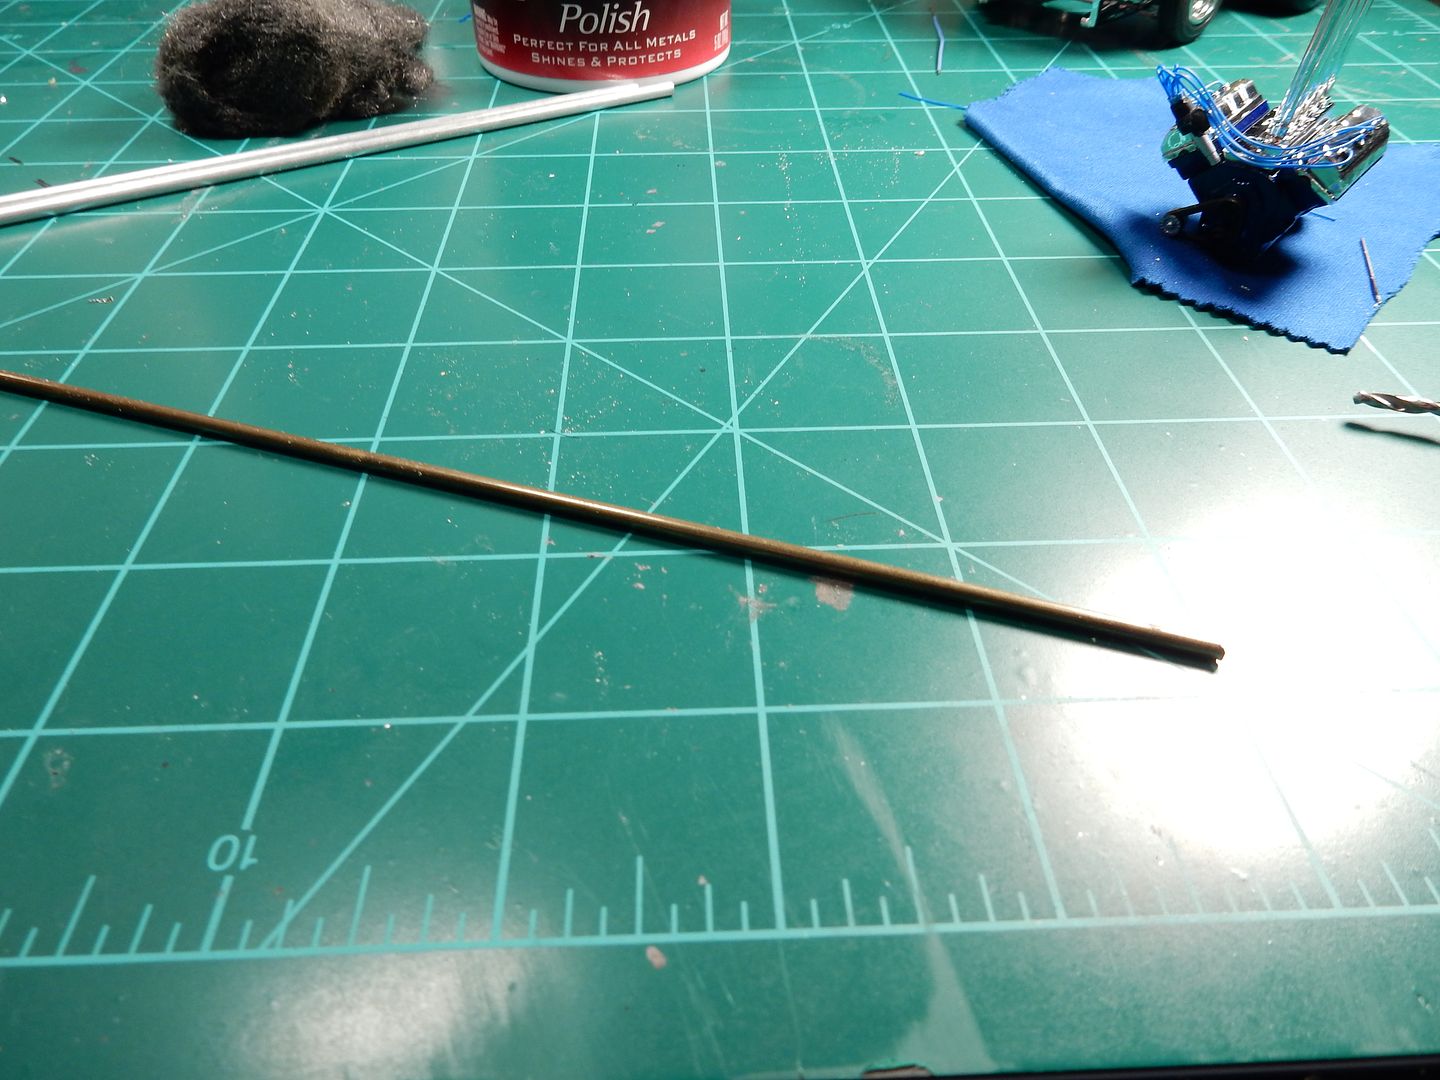
I needed locators in which to create a strong adhesion and to help line everything up so I chose some smaller diameter brass rod that slips right into the aluminum rod perfectly.


and in one photo I'll illustrate the process. I drilled into the injector stack base at each outlet to create a pilot hole for the brass rod which fits snugly inside each hole, then will slip the aluminum rod over the short lengths of brass rod like so.............


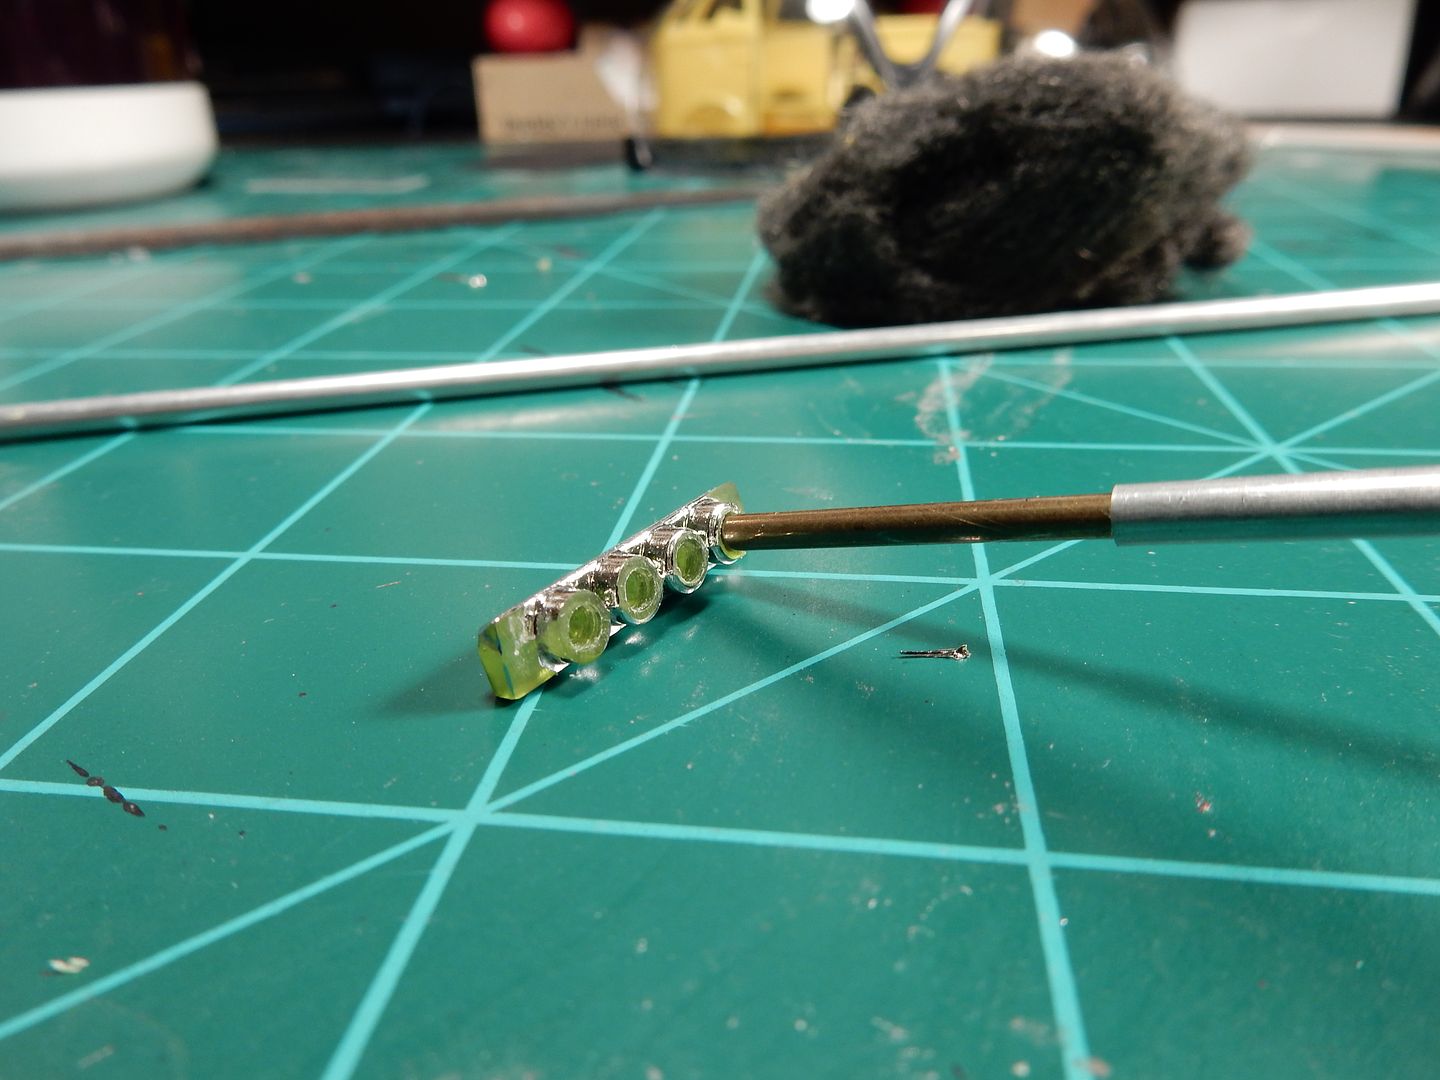
and then slid it on down to it's "home" position like so..............and do 7 more like that and I'll be home free with a lot better looking stacks than  I started out with.


 Forum | Modelers Social Club Forum (proboards.com) 

  • Member since
    March 2015
  • From: Streetsboro, Ohio
Posted by Toshi on Sunday, December 4, 2016 7:57 AM

I'm fashionably late to this party lol, but this beetle build is amazing!  I'd love to see more, much more!

Toshi

On The Bench: Revell 1/48 B-25 Mitchell


Married to the most caring, loving, understanding, and beautiful wife in the world.  Mrs. Toshi


  • Member since
    May 2009
  • From: Poland
Posted by Pawel on Sunday, December 4, 2016 10:02 AM

Hello!

Somehow everybody likes Polish things here on the forums - I like that :-)))

Joe - you're oficially unable to build OOB anymore - get that in writing from a doctor or something, man...

I'd do the same thing, personally - on those old kits it's easier, in case of some parts, to build the thing from scratch than to clean up the OOB part. Even the Hasegawa Bus I'm building has that - it was easier to scratchbuild the mirrors that to clean up the seams on the OOB ones.

Good luck with your builds and have a nice day

Paweł

All comments and critique welcomed. Thanks for your honest opinions!

www.vietnam.net.pl

  • Member since
    May 2013
  • From: Indiana, USA
Posted by Greg on Sunday, December 4, 2016 10:24 AM

Fun to follow along ......keep on keepin' on, Joe.

  • Member since
    August 2015
  • From: the redlands Fl
Posted by crown r n7 on Sunday, December 4, 2016 10:40 AM

 Beautiful 


 Nick.

  • Member since
    March 2012
  • From: Corpus Christi, Tx
Posted by mustang1989 on Sunday, December 4, 2016 4:28 PM

Thank you guys.

I've shined up two like this so far....


The top one is untouched and the bottom one is after 10 minutes of polishing with the wool first then the Mothers.


 Forum | Modelers Social Club Forum (proboards.com) 

  • Member since
    August 2009
  • From: MOAB, UTAH
Posted by JOE RIX on Sunday, December 4, 2016 7:02 PM

Very awesome work on the pipes Joe. Yup, that was a must.

Pawel
Joe - you're oficially unable to build OOB anymore - get that in writing from a doctor or something, man...

Pawel- What did you think I was trying to tell you all along? He can't do it. LOL!

"Not only do I not know what's going on, I wouldn't know what to do about it if I did". George Carlin

  • Member since
    March 2012
  • From: Corpus Christi, Tx
Posted by mustang1989 on Sunday, December 4, 2016 8:47 PM

JOE RIX

Very awesome work on the pipes Joe. Yup, that was a must.

 
Pawel
Joe - you're oficially unable to build OOB anymore - get that in writing from a doctor or something, man...


Pawel- What did you think I was trying to tell you all along? He can't do it. LOL!


Joe: Thank you very much and I'll have you know that it's 80% or better OOB!!! Wink


 Forum | Modelers Social Club Forum (proboards.com) 

  • Member since
    August 2007
  • From: back country of SO-CAL, at the birth place of Naval Aviation
Posted by DUSTER on Wednesday, December 7, 2016 12:13 AM

Gotta say your “Polish polish” ( sorry Pawel  Wink   ) has “lead” to a heavyweight result. 

OHH my widdle brain hurts; I go nap now. Hmm


Steve

Building the perfect model---just not quite yet  Confused

  • Member since
    March 2012
  • From: Corpus Christi, Tx
Posted by mustang1989 on Friday, December 9, 2016 11:55 AM

'Preciate it Steve.

I got the engine installed this morning but before I did I mounted the cooling fan up and made some minor adjustments to the radiator. I've never seen a cooling fan installed..........on the crankshaft pulley???? Too weird and I didn't like it and besides, the OOB fan was too dang bulky and big anyhow. I went with a cooling fan from Revell's Pro Stock Thunderbird kit and it worked great AND I installed it in the "normal" position at the water pump pulley. Criminy! 4fvgdaq_th

I'm also in the process of stripping all the chrome from the fuel injector stack bases so I can apply gloss black to them and shoot a coat of Alclad chrome over them.

Anyhow here's this morning's progress report...............


001_zpswe3lrboj.jpg

002_zpszzb1ektq.jpg


 Forum | Modelers Social Club Forum (proboards.com) 

  • Member since
    August 2015
  • From: the redlands Fl
Posted by crown r n7 on Saturday, December 10, 2016 5:01 AM

way to go !! Yes


 Nick.

  • Member since
    March 2012
  • From: Corpus Christi, Tx
Posted by mustang1989 on Saturday, December 10, 2016 6:14 AM

Thanks Nick!

I managed to get some things done today on the interior and I got a gloss black coat over the injector stack bases. After that dries I'll shoot some Alclad over them and start working on installation of the stacks.

While the injector stacks were drying I couldn't help myself any longer. I had primed a spare roof section from my cut up bus a couple of days ago and decided to spray the base coat yesterday followed up with the clear this morning. The results are EXACTLY what I was after. In the pictures below you'll see the teal base color but you'll also be able to pick out the blue and purple on the curves and angles. This color has always been one of my favorites due to the sheer wickedness of its look.............


 Forum | Modelers Social Club Forum (proboards.com) 

  • Member since
    February 2003
  • From: East Bethel, MN
Posted by midnightprowler on Saturday, December 10, 2016 6:37 AM

Joe, instead of a pully driven fan I think a electric fan would be more in order for this. Just a thought.

Hi, I am Lee, I am a plastiholic.

Co. A, 682 Engineers, Ltchfield, MN, 1980-1986

1 Thessalonians 4:13-18 1 Corinthians 15:51-54

Ask me about Speedway Decals

  • Member since
    March 2012
  • From: Corpus Christi, Tx
Posted by mustang1989 on Saturday, December 10, 2016 6:40 AM

midnightprowler

Joe, instead of a pully driven fan I think a electric fan would be more in order for this. Just a thought.


LOL. I would but there's a couple of things to consider, 1.) You can't see that area very well at all when assembled , and 2.) I'm fresh out of electric fans and I'm not going to spend any more money on this build.

 I hear you loud and clear though which is why I opted for the electric fans on the modded build. Thanks Lee. Yes


 Forum | Modelers Social Club Forum (proboards.com) 

  • Member since
    August 2009
  • From: MOAB, UTAH
Posted by JOE RIX on Saturday, December 10, 2016 7:14 AM

Great progress Joe. That paint is definitely going to be boss.

"Not only do I not know what's going on, I wouldn't know what to do about it if I did". George Carlin

  • Member since
    March 2012
  • From: Corpus Christi, Tx
Posted by mustang1989 on Sunday, December 11, 2016 7:47 AM

   I didn't get a whole lot of bench time in this morning (1 hour) like I usually get on the weekend (3+ hours) as I've been really tired the last few days and it caught up with me yesterday so I slept in a little bit longer this morning. I did get my injector stack bases coated with some Alclad II this morning and started working on a replacement fuel cell for the OOB build.

  On the left and in the back ground is the OOB fuel cell which to me just looks TOTALLY ridiculous so I opted for one from my Camaro Pro Stock kit which looks less toy like (like that whole kit doesn't look that way already right?) plus I get to detail it a little bit more than the OOB one. Got it glued together and I'll be working on the seam line and detailing in the days to come.


 Forum | Modelers Social Club Forum (proboards.com) 

  • Member since
    January 2006
  • From: California
Posted by SprueOne on Sunday, December 11, 2016 9:57 AM

Some sick progress results going on in here. Yes

Anyone with a good car don't need to be justified - Hazel Motes


Iron Rails 2015 by Wayne Cassell Weekend Madness sprueone

  • Member since
    February 2003
  • From: East Bethel, MN
Posted by midnightprowler on Sunday, December 11, 2016 9:57 AM

I may have a spare electric fan if you want it.

Hi, I am Lee, I am a plastiholic.

Co. A, 682 Engineers, Ltchfield, MN, 1980-1986

1 Thessalonians 4:13-18 1 Corinthians 15:51-54

Ask me about Speedway Decals

  • Member since
    March 2012
  • From: Corpus Christi, Tx
Posted by mustang1989 on Sunday, December 11, 2016 10:56 AM

midnightprowler

I may have a spare electric fan if you want it.


Lee: Oh hell yeah!! PM Sent....


Sprue: Thanks buddy! Yes


 Forum | Modelers Social Club Forum (proboards.com) 

  • Member since
    August 2007
  • From: back country of SO-CAL, at the birth place of Naval Aviation
Posted by DUSTER on Sunday, December 11, 2016 11:12 PM

Oh, that color is bit--er---Boss,  yeah, that’s the word;  since we're dealing with a 60s era model DevilBig Smile


Steve

Building the perfect model---just not quite yet  Confused

  • Member since
    March 2012
  • From: Corpus Christi, Tx
Posted by mustang1989 on Saturday, December 17, 2016 6:55 AM

Thanks Steve. lol


I  got all the sanding done on the inside of the roofline and decided to add a little individuality to the body. The kit actually comes with some pretty cool and fun decals.


001_zpsrwnb26sw.jpg


002_zps9dmiqtcs.jpg


 Forum | Modelers Social Club Forum (proboards.com) 

  • Member since
    August 2009
  • From: MOAB, UTAH
Posted by JOE RIX on Tuesday, December 20, 2016 6:16 AM

Wow! That is looking awesome Joe. I love the effects created with the decals. 

"Not only do I not know what's going on, I wouldn't know what to do about it if I did". George Carlin

  • Member since
    March 2012
  • From: Corpus Christi, Tx
Posted by mustang1989 on Thursday, December 22, 2016 3:49 AM

Thanks Joe! I'm putting all of my efforts into getting this one finished so I can move on to the other one.


 Forum | Modelers Social Club Forum (proboards.com) 

  • Member since
    March 2012
  • From: Corpus Christi, Tx
Posted by mustang1989 on Friday, December 23, 2016 6:40 AM

Ok folks. I'm going to call the motor done. Had to do a small amount of tweaking to get the stacks to sit in the right place but I think we've got 'er down. I also managed to mount that replacement fuel cell to replace that ridiculous looking one that the kit had. I know it's kind of a cartoonish kit and all but that fuel cell was a little over the top for me. I got the exhaust pipes painted with Alclad and the ends have been drilled out to match the intake tubes. Those exhaust pipes were a BEAR to get all lined up and keep straight.


 Forum | Modelers Social Club Forum (proboards.com) 

  • Member since
    August 2009
  • From: MOAB, UTAH
Posted by JOE RIX on Friday, December 23, 2016 7:35 AM

That is some Bad A outstanding! Great job on the pipes. They turned out great. Looks like you're getting mighty close to finishing this one up my friend.

"Not only do I not know what's going on, I wouldn't know what to do about it if I did". George Carlin

  • Member since
    March 2015
  • From: Streetsboro, Ohio
Posted by Toshi on Sunday, December 25, 2016 7:31 AM

Great job.  The stacks remind me of those old school calliope stacks.  You're doing a fantastic job on this kit.

Toshi

On The Bench: Revell 1/48 B-25 Mitchell


Married to the most caring, loving, understanding, and beautiful wife in the world.  Mrs. Toshi


  • Member since
    March 2012
  • From: Corpus Christi, Tx
Posted by mustang1989 on Tuesday, December 27, 2016 9:10 PM

Thanks Joe and Toshi. Still on this one. It's down to the windows, head and tail lights and bumpers for the parts list. I've still got to gloss the body and polish it up and then hit all the trim areas with BMF. With any luck I'll be back on the modded build by mid January or sooner.


 Forum | Modelers Social Club Forum (proboards.com) 

  • Member since
    January 2010
Posted by CrashTestDummy on Friday, December 30, 2016 9:38 AM

Heh, I did the same thing for the injector stacks on my Boot Hill Express.  IIRC, I kinda had to, as one was either broken (it was an old, partially-assembled kit), or I screwed one up trying to drill out the top.  I grabbed some aluminum tubing, polished it up, and even belled out the top of each stack a little.  Much more convincing than the chrome-plated sticks the kit came with.

Nice work, so far!

Gene Beaird,
Pearland, Texas

G. Beaird,

Pearland, Texas

  • Member since
    March 2012
  • From: Corpus Christi, Tx
Posted by mustang1989 on Monday, January 2, 2017 1:14 PM

Initially I wasn't going to build this rascal out of the box. I thought it was hideous when I opened the box but quickly developed a new idea for it which entailed lengthening the body, chassis and roof and using Rick Dobbertin's SBC from the Pontiac J2000 Pro Street kit. Although that idea is now under way, I thought it only fitting that I should build an OOB version in which to display next to the modified one when it was completed to show the contrast between the two builds given that they are the same kit.

  I spent roughly the last two months building this version of the kit up and although it's mostly OOB , there were a couple of drastic departures from the OOB ideas. First off the front wheels stuck outside of the front fenders by almost 1/4" which was waaaaaaaaaaaay too far outside for my tastes. I shaved the ends off of the front axle, used a set of AMT Cragar wheels which I shaved a little off the backside to put the wheel and tire assy back under the fender where it belonged and used a set of AMT "skinny" tires I had in the stash to round out the look at the front. I added a timing cover and a smaller cooling fan to the engine (I wouldn't have wasted my time had I known that none of that could be seen when finished). Next up I trashed the OOB injector stacks and went with aluminum tubing which I polished and installed of the terrible looking plastic chrome pieces. The OOB fuel cell also "exited stage left" and was replaced by something with a little more detail and (for what this is worth given the overall look of the build) realistic. The exhaust pipes didn't look right so I drilled the ends out to give a more true hollow pipe look to them. I chose to ditch the "wheelie bars" as I didn't like those either.


I just so happened to get the "luck of the draw" and got a clear GREEN molded kit with the metal flakes suspended in the molding. I chose to paint the inside of the body gold to give a green tinted gold look as shown through the body looking from the outside. The decals in this kit are IMO just AWESOME!! Plenty of humor to go round with these and I had a blast with 'em! I used some automotive clear to top things off with the finish and I was really happy with the results. This kit was a lot of fun with a few pitfalls here and there but they were fairly easy to overcome. The front bumper fit was about the only real trouble I had with it.

N E ways here are the completed photos of the OOB version ----now it's off to the modded one once again.

The kit:

and lastly.....a mock up of the box art shot:


 Forum | Modelers Social Club Forum (proboards.com) 

  • Member since
    May 2009
  • From: Poland
Posted by Pawel on Monday, January 2, 2017 2:41 PM

Hello!

Congratulations, you got this one finished as close to OOB as you were physically capable of! :-)) It looks quite OK, but I like the modified one better. Thanks for sharing and good luck with the modded one! Have a nice day

Paweł

All comments and critique welcomed. Thanks for your honest opinions!

www.vietnam.net.pl

  • Member since
    August 2007
  • From: back country of SO-CAL, at the birth place of Naval Aviation
Posted by DUSTER on Monday, January 2, 2017 4:38 PM

 HAPPY NEW YEAR


Gee, it is an amazing piece of craftsmanship.

  You defiantly brought the model into the new millennium. Proving once again it ain’t the model,  it’s the modeler that make a success  of a build.


I’ll go now over into my corner, with all of the empty Champaign bottles and damp confetti and pout, wail and moan  about the unfairness of it all- I’m so good looking, why, why can’t I build a decent  model…..
 

Steve

Building the perfect model---just not quite yet  Confused

  • Member since
    March 2012
  • From: Corpus Christi, Tx
Posted by mustang1989 on Monday, January 2, 2017 7:02 PM

Thanks Pawel and Steve. YesYesYesYes


 Forum | Modelers Social Club Forum (proboards.com) 

  • Member since
    August 2009
  • From: MOAB, UTAH
Posted by JOE RIX on Monday, January 2, 2017 9:07 PM

First, Happy New Year Bro. and you sure know how to ring it in. Fabulous finish on your OOB project. The extras you added are incrediblely well done as weel as the overall finish. It really is a smart little project and you did marvelous job. Now, I'm really looking forward to your highly modified project. Thanks for sharing this very fun build with us.

"Not only do I not know what's going on, I wouldn't know what to do about it if I did". George Carlin

  • Member since
    March 2012
  • From: Corpus Christi, Tx
Posted by mustang1989 on Tuesday, January 3, 2017 3:27 PM

'Preciate that Joe! Yes


 Forum | Modelers Social Club Forum (proboards.com) 

  • Member since
    April 2016
  • From: Parsons Kansas
Posted by Hodakamax on Friday, January 6, 2017 2:16 PM

Well, that was fun to watch and giggle each time! Good job on the model and your innovation! Fun factor=High!

Max

  • Member since
    August 2015
  • From: the redlands Fl
Posted by crown r n7 on Friday, January 6, 2017 6:37 PM

That's an awesome  VW ! 


 Nick.

  • Member since
    March 2012
  • From: Corpus Christi, Tx
Posted by mustang1989 on Tuesday, January 10, 2017 11:40 AM

Thanks Max and Nick! I appreciate the good word. Yes


 Forum | Modelers Social Club Forum (proboards.com) 

JOIN OUR COMMUNITY!

Our community is FREE to join. To participate you must either login or register for an account.

SEARCH FORUMS
FREE NEWSLETTER
By signing up you may also receive reader surveys and occasional special offers. We do not sell, rent or trade our email lists. View our Privacy Policy.