SEARCH FINESCALE.COM

Enter keywords or a search phrase below:

AMT Meyers Manx

1860 views
11 replies
1 rating 2 rating 3 rating 4 rating 5 rating
  • Member since
    December 2008
  • From: UK
AMT Meyers Manx
Posted by PatW on Tuesday, August 21, 2018 4:55 PM

This is my eighth Manx (I wish I afford a real one!). Having seen the results of Hydro-Dip painting and researched and found the method on YouTube, I've tried it with this build.    I've also used all of the covers/hoods and tops for this build that are supplied in the kit.    I've also built the card diorama supplied in the kit.

I've also raised the body on the chassis.


Remember , common sense is not common.

  • Member since
    July 2014
  • From: Franklin Wi
Posted by Bakster on Tuesday, August 21, 2018 5:58 PM

Hey Pat...it looks good. Smiling here. Tell me about this hydro dipping. Edumecate me.

fox
  • Member since
    January 2007
  • From: Narvon, Pa.
Posted by fox on Tuesday, August 21, 2018 8:28 PM

Wild paint job Pat. Looks like it would raise eyebrows at any show. 

Jim  Captain


 Main WIP: 

   On the Bench: Artesania Latina  (aka) Artists in the Latrine 1/75 Bluenose II

I keep hitting "escape", but I'm still here.

  • Member since
    April 2003
  • From: USA
Posted by keavdog on Wednesday, August 22, 2018 12:48 AM

Looks cool Pat!  I want to grab a burger and a coke and hit the dunes!  Also interested in the hydrodipping.

Thanks,

John

  • Member since
    December 2008
  • From: UK
Posted by PatW on Wednesday, August 22, 2018 5:03 AM

Thanks guys. Firstly search youtube for hydro-dip or swirl painting.

 You can use either enamel or acrylic paints. I used a small 5 litre ice cream tub and rattle can sprayed yellow and red onto cold water, and you must ensure that you have enough water to fully submerge the part you want to paint.                                  

I've dipped my Manx bodyshell still attached to the sprue, or you can use thin plastic/vynil gloves holding the part.                                                                    Lower the part into the paint/water mix and slowly move around and withdraw the part allowing any excess paint to drip back into the water bath. I've allowed most of the day to let it dry as using acrylic paint I think it dries faster than enamel. 

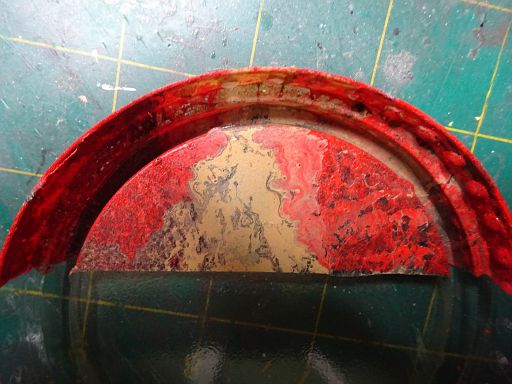
Some test pieces, using yogurt pot lids.............
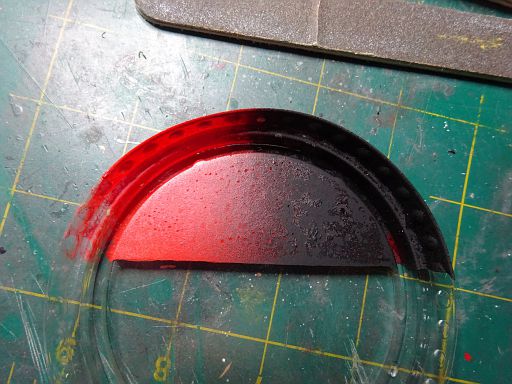
  

as you can see you can obtain any finish using what ever mix of colours you want.

and the body from above after assembly........

But as I said above search on youtube first so that you can choose a water base with enamels or acrylics and do some test pieces first before committing an expensive kit or parts to a new pianting method.


Remember , common sense is not common.

  • Member since
    November 2009
  • From: Twin Cities of Minnesota
Posted by Don Stauffer on Wednesday, August 22, 2018 8:32 AM

Hydro dip kind of reminds me of microfilm that we used to use to cover indoor flying model airplanes.  Never could get the hang of it.  You poured clear lacquer over the surface of a basin of water.  You dipped a coat hanger warped into an oval into the water near the edge of the basin and brought it up through the lacquer film that formed on the water. Sort of looked like soap bubble frame with film of soap inside.

Then you moved the balsa frame of wing or tail through the hoop  and the film stuck to the frame to make a thin and light transparent covering.


Don Stauffer in Minnesota

  • Member since
    December 2008
  • From: UK
Posted by PatW on Wednesday, August 22, 2018 9:36 AM

Yes Don a very similar process giving the same effect.

Remember , common sense is not common.

  • Member since
    July 2014
  • From: Franklin Wi
Posted by Bakster on Wednesday, August 22, 2018 10:56 AM

Hey Pat.. Thanks for the detailed process. That is very cool. I had not heard of this. I am learning something new here. I will see what I can find on YouTube for more info as well

Thanks again!


Steve

  • Member since
    May 2013
  • From: Indiana, USA
Posted by Greg on Wednesday, August 22, 2018 3:09 PM

Very cool buggy and dio, Pat.

And yes, thanks much for sharing some details on the dipping. I too was curious, and your results look great!

  • Member since
    December 2008
  • From: UK
Posted by PatW on Wednesday, August 22, 2018 3:24 PM

Thanks guys. I might have just past the big 7 Oh but modelling still gives me a buzz, especially when new/different things come along!

Remember , common sense is not common.

  • Member since
    February 2003
  • From: East Bethel, MN
Posted by midnightprowler on Wednesday, August 22, 2018 5:04 PM

Very cool. I read about that technique either in SAE or car modeler in the 90s but I haven't tried it yet.

Hi, I am Lee, I am a plastiholic.

Co. A, 682 Engineers, Ltchfield, MN, 1980-1986

1 Thessalonians 4:13-18 1 Corinthians 15:51-54

Ask me about Speedway Decals

  • Member since
    December 2008
  • From: UK
Posted by PatW on Thursday, August 23, 2018 2:20 AM

Thanks Lee.

Remember , common sense is not common.

JOIN OUR COMMUNITY!

Our community is FREE to join. To participate you must either login or register for an account.

SEARCH FORUMS
FREE NEWSLETTER
By signing up you may also receive reader surveys and occasional special offers. We do not sell, rent or trade our email lists. View our Privacy Policy.