SEARCH FINESCALE.COM

Enter keywords or a search phrase below:

1/12 Tamiya Mclaren M23

5652 views
22 replies
1 rating 2 rating 3 rating 4 rating 5 rating
  • Member since
    February 2020
1/12 Tamiya Mclaren M23
Posted by wards model builder on Sunday, April 5, 2020 4:04 PM

Hi all, this is going to be the build thread for my new commission project. A Tamiya 1/12 Mclaren M23 


The build is going to include quite extensive detailing, especially around the engine with all the rubber hoses included in the kit replaced with braided hoses and aftermarket connections. 


I have made an initial start on the project, putting together the tub which was painted in Alclad II polished Aluminum. Regular aluminum for the gear lever. I have also added some thin modeling tin on the floor of the tub for a little contrast.


The seatbelts are standard from the kit as are the PH fitting. 


Very early stages of this one but I hope to have some further updates very soon.


Thanks

Chris

www.wardsmodelbuilder.com

wardsmodelbuilder@outlook.com

  • Member since
    March 2007
  • From: Northeast WA State
Posted by armornut on Sunday, April 5, 2020 4:54 PM

   Ohh so cool,  I have 2 Tyrell 6 wheelers in my stash, one is original boxing and the other is a recent re-release. Very nice kits indeed. I will try to watch this build....may bump me to build one of mine.

we're modelers it's what we do

  • Member since
    January 2015
Posted by TheMongoose on Monday, April 6, 2020 5:42 AM

Ohh I'm looking forward to this! Have always wanted to build one so will plan on doing that through your build as I'm not adding to my stash anytime soon Wink

In the pattern: Scale Shipyard's 1/48 Balao Class Sub! leaning out the list...NOT! Ha, added to it again - Viper MkVii, 1/32 THUD & F-15J plus a weekend madness build!

  • Member since
    May 2011
  • From: Honolulu, Hawaii
Posted by Real G on Monday, April 6, 2020 4:53 PM

Neato!  I bought the 1/20 version after watching "Rush", starring Geddy Lee, no I mean Thor, no I mean Chris Helmsworth.  Stick out tongue

Definitely watching this thread with great interest!

“Ya ya ya, unicorn papoi!”

  • Member since
    April 2003
  • From: USA
Posted by keavdog on Monday, April 6, 2020 4:57 PM

Coooool.   Nice work so far.  I'll be watching!

Thanks,

John

  • Member since
    May 2013
  • From: Indiana, USA
Posted by Greg on Monday, April 6, 2020 6:49 PM

Another fan eager to watch this, and you're off to a fine start.

I've had a return of interest in these race cars (do we still call them formula cars or is there some new-fangled name now?), and have added a couple to my stash so far.

Thanks in a advance for sharing your work here.

  • Member since
    July 2008
  • From: Summerville, SC
Posted by jeffpez on Tuesday, April 7, 2020 6:04 AM

I love the Tamiya 1/12 F-1 cars and can't wait to see how yours turns out. I built the McClaren and the Williams severals years ago and enjoyed every minute of it. Best of luck and don't forghet to keep us up to date.

  • Member since
    February 2020
Posted by wards model builder on Friday, April 17, 2020 5:52 AM

Little update for you on the progress of the M23. I got the lower half of the body work cleared, wet sanded and polished which then allowed me to start the front end suspension, which is going together well. Next step is to build  the bottom wishbones and hubs. Going to run a brake line along the bottom wishbone attached with some zip straps for extra detailing. 


I have added some lines from the cylinders for a little extra detailing.


Also I have made a start on the upper half of the body. Primed and painted, still to be clear coated.


Thanks

Chris

http://www.wardsmodelbuilder.com

wardsmodelbuilder@outlook.com

  • Member since
    February 2020
Posted by wards model builder on Friday, May 8, 2020 4:38 PM

Hello everyone, hope you are all well and staying safe.  Here is a progress report on the Tamiya Mclaren M23 build. 


The front end chassis/suspension is just about finished now. I added two brake lines running on the lower wishbones attached with a couple of MFH zip clips. The nose frame is attached and I've added some further detailed wiring to the battery. I've gone with kit instructions for positioning of the battery, rather than what I believe was the historically correct position as I just prefer it this way.  


Now the front end is complete I've started to work on the engine and gearbox, painting them and using line paint to highlight the lower areas.  These will go together next then the rear suspension will be built off those. I've repainted the engine trumpet stacks and roll hoop in alclad chrome and polished aluminum as the pre chromed kit pieces just didn't look very good. The plug wiring and clear tubes are both from the kit, these will be the only kit parts used around the engine for plumbing/detailing. 


That's all the works up to date, hopefully in the next batch of photos I will have the rear end finished. 


Thanks

Chris

http://www.wardsmodelbuilder.com

wardsmodelbuilder@outlook.com

  • Member since
    March 2007
  • From: Northeast WA State
Posted by armornut on Friday, May 8, 2020 5:24 PM

   Just keep fanning those flamesBig Smile nice work so far, thanks for the update.

we're modelers it's what we do

  • Member since
    June 2008
Posted by lewbud on Friday, May 8, 2020 6:39 PM

That's looking good Chris! How old is this molding?  The reason I ask is that I'm building a 1/24 Mini Cooper and have run into a problem with the decals The kit I'm building is at least five years old (most likely older) and the decal I was using wouldn't release from the backing paper (soaked it for over four hours by accident, still wouldn't move). This isn't the first time this has happened to me with old Tamiya decals, just a heads up. If needed, aftermarket decals should be easy to source.  Looking forward to more.

Buddy- Those who say there are no stupid questions have never worked in customer service.

  • Member since
    February 2020
Posted by wards model builder on Sunday, May 17, 2020 2:53 PM

The decals for this kit are in perfect condition. I didnt purchase the kit as its a commission build and the kit was supplied by the customer. 

I might have a little trick for you with your old decals. Ive had the problems you mentioned many times and this usually works. 


Soak them for 10-15 minutes, take them out and place them face down on a clean surface, very carefully with a new sharpe blade lightly scrap away at the paper from the back of the decal. Be careful not to go through but you will need to start to tear the wet paper away. This will unlock the glue that has set into the paper. Place them back in the water and they should release, you might need to go through the process a couple of times. Hope it works for you. 

  • Member since
    February 2020
Posted by wards model builder on Sunday, May 17, 2020 2:54 PM

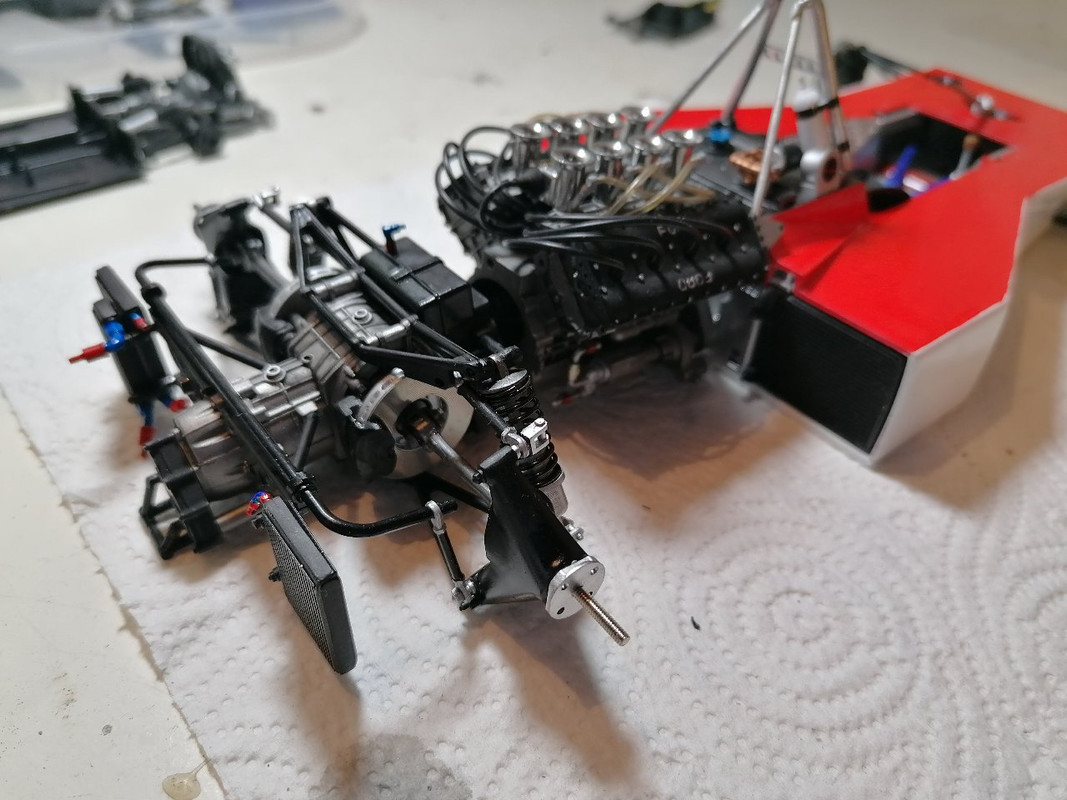
Here is the next update on the M23 project. Moving along pretty nicely and getting close to the end. 


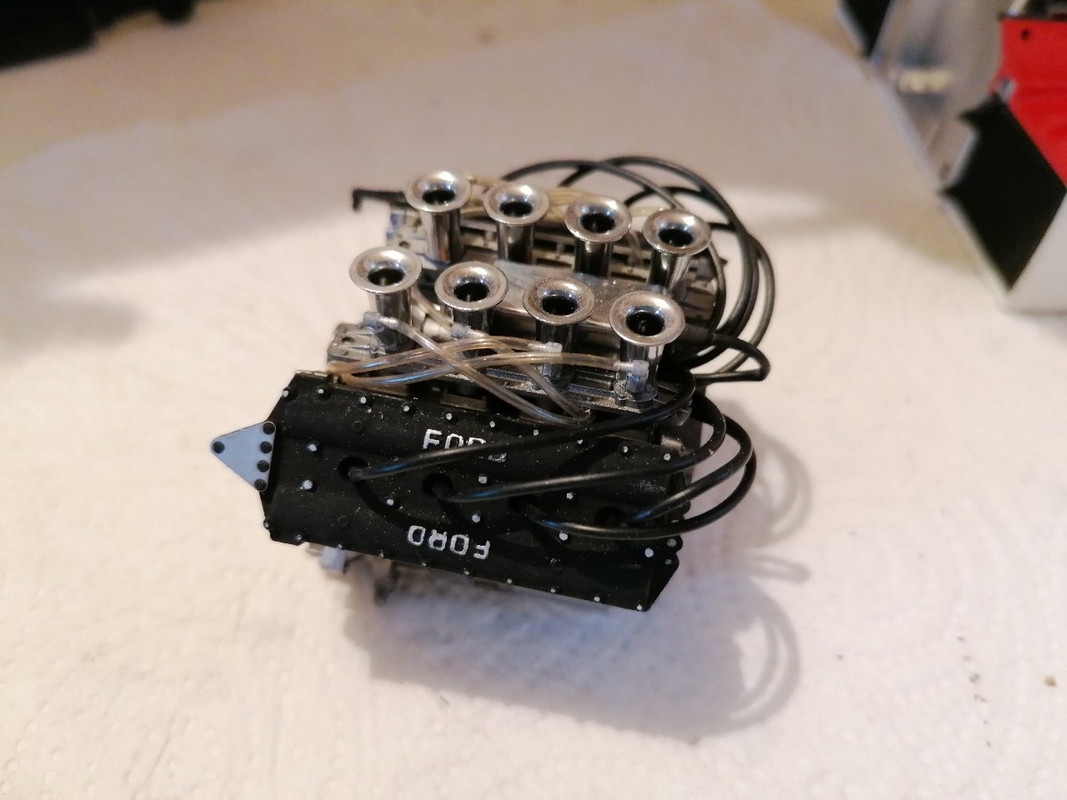
Engine is now finished with kit tubing parts, trumpets have been repainted in Alclad II chrome over gloss black.  All that is left are the exhausts which i'm currently working on, quite a lot of mould lines on those parts which need to be removed.   


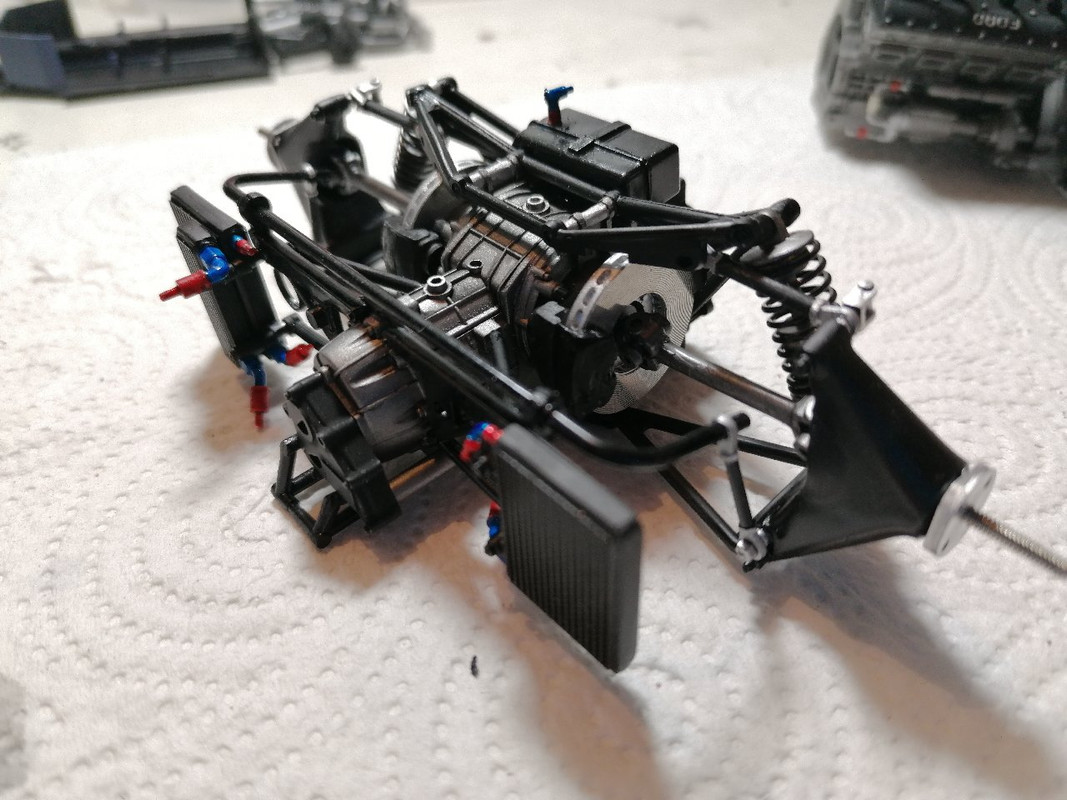
The rear suspension has been added to the gearbox, along with the rear brake discs and drive shafts. I've added some Top Studio hose fitting to the rear radiators which will have braided hose replacing the kit tubing here.  


Looking forward to getting the gearbox and engine together and attached to the chassis so final detailing of plumbing and wiring can begin, maybe not so close to the end after all!!!!!
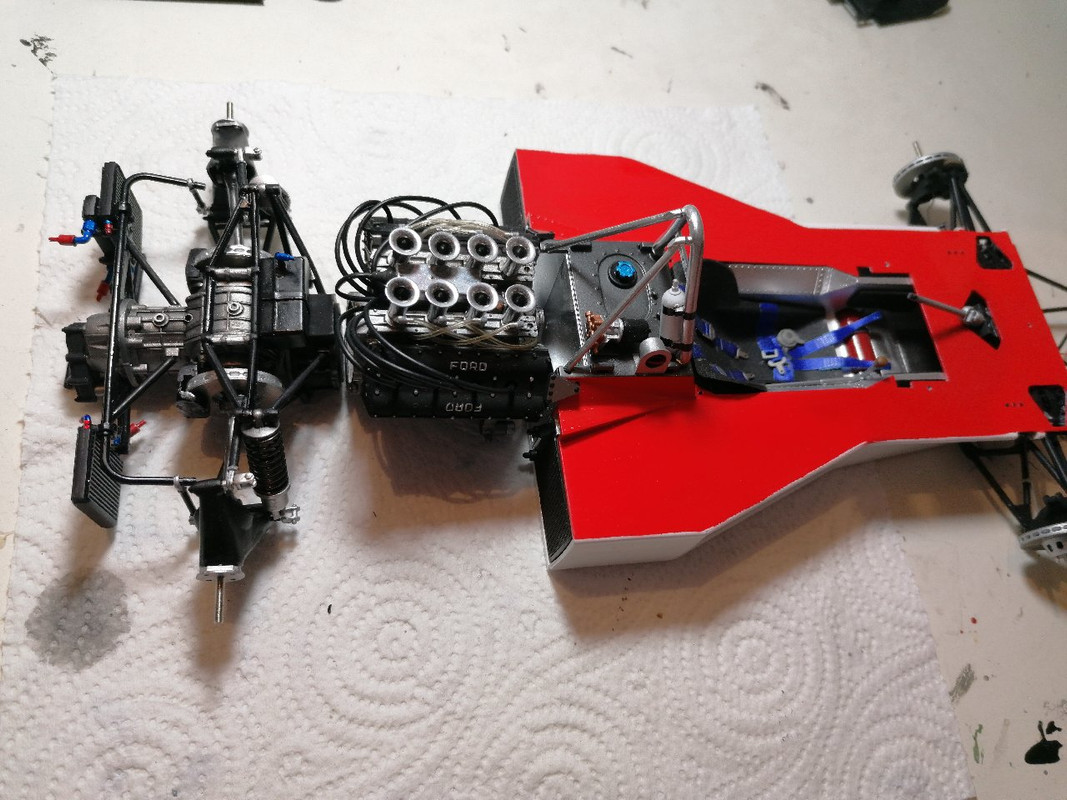


I have the final bodywork pieces in prime, so next update will have those finished and then the decals can go on which should really bring it to life. Im really enjoying this one, its a great kit, a little tricky in places but i would highly recommend it. 


All for now. 


Thanks

Chris

  • Member since
    June 2008
Posted by lewbud on Sunday, May 17, 2020 3:01 PM

Chris,

Thanks for the tip. I'll try to remember it the next time it happens.  Nice process on the build!

Buddy- Those who say there are no stupid questions have never worked in customer service.

  • Member since
    March 2015
  • From: Close to Chicago
Posted by JohnnyK on Monday, May 25, 2020 4:08 PM

Nice progress on your build. I'm working on a 1/2 scale ELF six wheeler. It is amazing how many hundreds of parts there are in 1/12 scale kits. Every part needs to be individually painted. Sometimes I work on the kit for a couple of hours and it looks like I accomplished nothing. I always need to get into a certain mindset before working on that kit. 

Your comments and questions are always welcome.

  • Member since
    April 2003
  • From: USA
Posted by keavdog on Monday, May 25, 2020 5:37 PM

Really cool subject.  The clear fuel lines are awesome.  

Thanks,

John

  • Member since
    February 2020
Posted by wards model builder on Friday, June 5, 2020 3:26 AM

Here are some further progress photos on the commission M23 build. 


Gearbox, engine and chassis all together now, with some detailing started. 


Further detailing to be done, and general tidying up, still WIP but getting there. 


Chris

www.wardsmodelbuilder.com

wardsmodelbuilder@outlook.com

  • Member since
    March 2007
  • From: Northeast WA State
Posted by armornut on Friday, June 5, 2020 4:40 PM

  Looking forward to seeing it finished. Amazing detail added to an already detailed kit. Really make me wanna parallel my ELF. Forge on good sir.

we're modelers it's what we do

  • Member since
    October 2019
  • From: New Braunfels, Texas
Posted by Tanker-Builder on Saturday, June 6, 2020 3:11 PM

Uh Oh!

      Don't drop a screwdriver in there! NICE !

  • Member since
    February 2020
Posted by wards model builder on Thursday, July 2, 2020 2:50 PM

Here are some photos of the commissioned M23 now fully completed and ready to send out. 


Everything went together pretty well in the final part of the build, I added some extra wiring behind the dash. 


The seat, steering wheel and gear level have been left loose as per customer request, i'm assuming he will be added a driver figure.


Thanks

Chris

www.wardsmodelbuilder.com

wardsmodelbuilder@outlook.com

  • Member since
    March 2007
  • From: Northeast WA State
Posted by armornut on Thursday, July 2, 2020 3:59 PM

   If your client is not happy with your awesome effort...call me... I'll be happy to slap some sense into him. Holy smokes that is one good looking race car.  WELL DONEBow Down

we're modelers it's what we do

  • Member since
    May 2011
  • From: Honolulu, Hawaii
Posted by Real G on Thursday, July 2, 2020 10:43 PM

That is sweet.  Well done!  I'm sure your client will be thrilled.  YesYes

“Ya ya ya, unicorn papoi!”

  • Member since
    June 2018
  • From: Ohio (USA)
Posted by DRUMS01 on Friday, July 3, 2020 6:44 PM

Very nice and clean work, great detail and paint, nice one here!

Good job!

Ben

"Everyones the normal until you get to know them" (Unknown)

LAST COMPLETED:

1/35 Churchill Mk IV AVRE with bridge - DONE

NEXT PROJECT:

1/35 CH-54A Tarhe Helicopter


JOIN OUR COMMUNITY!

Our community is FREE to join. To participate you must either login or register for an account.

SEARCH FORUMS
FREE NEWSLETTER
By signing up you may also receive reader surveys and occasional special offers. We do not sell, rent or trade our email lists. View our Privacy Policy.