SEARCH FINESCALE.COM

Enter keywords or a search phrase below:

Charger conversion

802 views
3 replies
1 rating 2 rating 3 rating 4 rating 5 rating
  • Member since
    January 2005
  • From: Atlanta
Charger conversion
Posted by Jamantmat on Sunday, December 10, 2006 9:36 AM

I'm in the midst of converting AMT's 71 Charger into a '73 SE, trying to replicate a good friend's first car. I started working with the old MPC '74 kit, which had the correct roof line, but other than that the newer AMT was much more accurate and provided a better starting point.

This is the current state of the conversion:
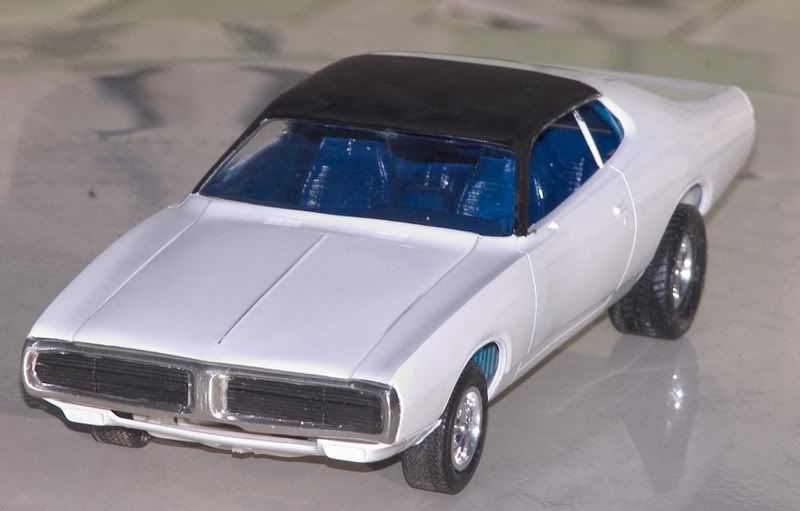
and here's a couple of shots with a stock model body to illustrate the changes. Mainly the roof line, cutting out the power bulge on the hood and filling it in for the stock hood, and simulating the partial vinyl top. After cutting out the hood bulge and filling in the hole with sheet styren and getting the countours sanded right, I scored a deep line down the center and inserted a length of guitar string, half buried in the groove, to represent the hood crease. That made it easy to blend it in and sand it smooth without obliterating the detail I was trying to add. I did the same thing with the deliiating ridge at the rear of the vinyl top.

Lastly the hidden headlight grill. The new inserts are scratchbuilt from sheet styrene.

Can anyone tell me if there are photo etched Charger emblems avialable? I think I remember reading that they were included in a fairly recent Charger offering, but now I can't remember which one.


  • Member since
    September 2006
Posted by aussiemuscle308 on Sunday, December 10, 2006 11:47 PM

very nice looking charger. well done.

the only PE set i know of is model car garage 71 charger set

http://www.modelcargarage.com/store/pc/viewPrd.asp?idcategory=11&idproduct=290

have a look and see if its any use

  • Member since
    January 2004
  • From: Westland. MI USA
Posted by mkhoot on Wednesday, December 13, 2006 7:29 PM
Looking great so far I used to own a 73 Charger SE with a 440. I've been wanting to do this conversion. so I'll be watching yours. How do you plan on doing the louvered quarter windows  
When in doubt just build it. Mark http://www.ipmslivonia.org/ipms/
  • Member since
    January 2005
  • From: Atlanta
Posted by Jamantmat on Thursday, December 14, 2006 6:34 PM

Actually, the car I'm modelling didn't have the louvres. I've done some work on similar pieces for other models though, mainly reproducing my first ride, a 76 Volare Road Runner. I'll post some pictures of that process as soon as I get my digital camera back from the shop. I tried a few different methods- carved directly from a solid block of .060 styrene, too tedious and inacurate, assembled from many tiny thin bits of carved styrene, see above, and my first foray into vacuum forming, which worked pretty well. And of course right after I spent all this time and effort carving bucks for forming, I finally aquired the old MPC kit of the Road Runner that had representations of the louvers that were clunky used as is, but near perfect bucks for vacuum forming!

I may do the louvres for the charger anyway, though. I like the look better and I may knock off a few castings of the body shell when I get it finished so I can do a few different versions, like I did with the Volare.

JOIN OUR COMMUNITY!

Our community is FREE to join. To participate you must either login or register for an account.

SEARCH FORUMS
FREE NEWSLETTER
By signing up you may also receive reader surveys and occasional special offers. We do not sell, rent or trade our email lists. View our Privacy Policy.