SEARCH FINESCALE.COM

Enter keywords or a search phrase below:

Weathering Exhaust pipes?

4905 views
5 replies
1 rating 2 rating 3 rating 4 rating 5 rating
  • Member since
    February 2007
  • From: Bend Oregon
Weathering Exhaust pipes?
Posted by Shogun on Sunday, March 4, 2007 12:25 PM

Anyone have any techniques they can share to simulate heat weathering on exhaust pipes?  I am working on a Ducati Monster Motorcycle and am doing limited weathering but would like to have the realistic look of pipes that have been heated an cooled several times giving it the blue weathered look.

Travis

Travis Parker On the Bench: - F4G/F Phantom II "Wild Weasel" (Testors) - Ducati Monster S4 motorcycle (Italeri)
  • Member since
    January 2006
  • From: Central Florida
Posted by wolfpac on Sunday, March 4, 2007 7:58 PM

Should be the 8th post down.  He gives some finished photos and an explanation as to how he did his pipes.


/forums/26/466185/ShowPost.aspx#466185


If you love your bike let it go. If it comes back to you, you've highsided. http://public.fotki.com/luke76/
  • Member since
    November 2005
Posted by Anonymous on Tuesday, March 6, 2007 9:04 AM

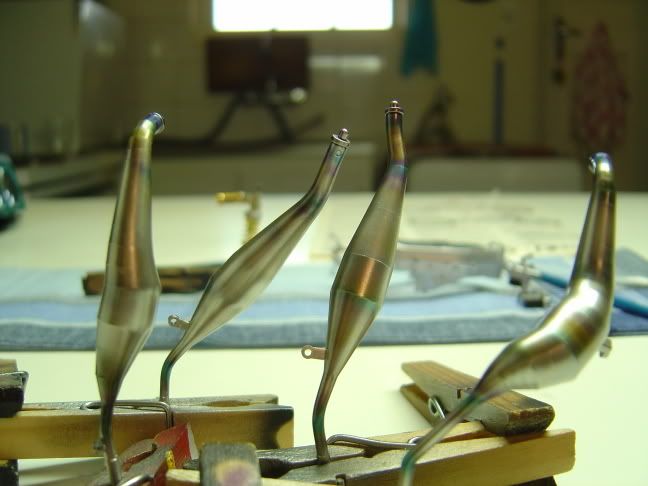
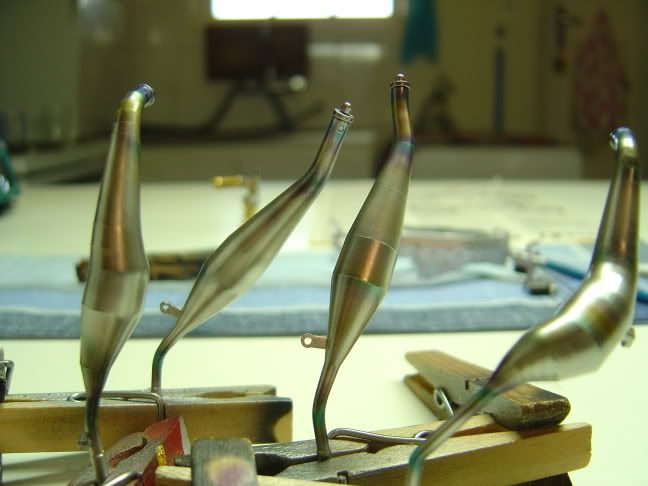
The colours that I used were all from the Tamiya Enamel range and the process that I used was as follows:

  • X32 Titanium Silver Base coat
  • X23 Clear blue around the main areas where the staining is found
  • X16 Purple in bands next to the clear blue and blending in the blue/purple
  • X24 Clear yellow bands next to the purple again blending in the yellow/purple
  • X19 Smoke spray a fairly dark coat over all the bands etc to just tone down the colours a bit
  • At this stage it really looks more like Joseph's Technicolor coat that a Suzuki exhaust pipe!
  • "Mist" coat X32 Titanium Silver this time very diluted about 1 part X32 to 20 parts thinners (Enamel thinners)

I misted the silver by looking a pictures of the Suzuki exhausts and where there was heavy discoloration I did not apply any X32 and where the exhausts should be silver I put down a heavy coat of X32 but again keeping it light here and there to let the blues and yellows shine through in some areas Smile <img src=" border="0" width="15" height="15" />

I think the end result was a "lot of luck" and not sure if I can get it right again, sometimes with modeling you have really good days and sometimes off days where nothing works?
  • Member since
    January 2006
  • From: Baton Rouge, Snake Central
Posted by PatlaborUnit1 on Tuesday, March 6, 2007 12:02 PM

This is pretty much how I have done the pipes on both my 'busas and my YZR500, great results, very lifelike (to me). 

These pipes look NICE!


David

Build to please yourself, and don't worry about what others think! TI 4019 Jolly Roger Squadron, 501st Legion
  • Member since
    February 2007
  • From: Bend Oregon
Posted by Shogun on Tuesday, March 6, 2007 12:20 PM

Andrew,

Thanks so much for sharing this.  Those exhaust pipes look awsome!  I will give this a try.  Are you using a narrow tip like 1 or 3 on your airbrush?  Thanks again for the information.

Travis 

Travis Parker On the Bench: - F4G/F Phantom II "Wild Weasel" (Testors) - Ducati Monster S4 motorcycle (Italeri)
  • Member since
    November 2005
Posted by Anonymous on Wednesday, March 7, 2007 3:07 AM

Hi Travis 

I use a Badger 200IL airbrush with the standard nozzle. I try and keep the air pressure low about 14 PSI and I thin the paint quite a bit. Hope this helps

JOIN OUR COMMUNITY!

Our community is FREE to join. To participate you must either login or register for an account.

SEARCH FORUMS
FREE NEWSLETTER
By signing up you may also receive reader surveys and occasional special offers. We do not sell, rent or trade our email lists. View our Privacy Policy.