SEARCH FINESCALE.COM

Enter keywords or a search phrase below:

Steel Navy Scratchbuild 3

1927 views
13 replies
1 rating 2 rating 3 rating 4 rating 5 rating
  • Member since
    May 2009
  • From: Michigan
Steel Navy Scratchbuild 3
Posted by TimQuinlan on Wednesday, May 27, 2009 6:48 PM

I hope I'm not boring anybody with these posts, but I enjoy the process of posting info, now that I know how to load images into them, so I will just keep moving along with my Iowa build.  I welcome any comments, and I will gladly answer any questions.  I have been following some threads, especially Dan Cooper's Dandalo, with interest!  I think scratchbuilding is the most rewarding modelling I have ever done, and I hope sharing techniques and stealing some will make it better! 

Well, here goes.  After I have a wooden armature for the hull and it has been coated with epoxy, I rough it up with some coarse sandpaper to give it some tooth for the layer of Bondo body filler that goes over the top.  The Bondo is great because you can sand it to a very smooth finish.  The whole outer surface of the hull is completely covered in about 1/8 to 1/4 of an inch of Bondo.  Once that is completed, the prop shafts are postitioned and secured with epoxy.  I use body putty to deal with the small imperfections in the hull and around the shafts and their supports.  You can see the red body putty in many of the pictures that I have taken of the build.

Incidentally, I buy all my running gear at Battlersconnection.com.  I used to make it all, but these guys have really good quality stuff even for scale projects.

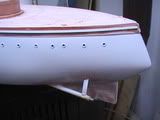
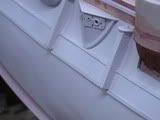
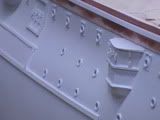
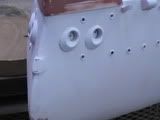
After sanding things pretty smooth, I check the hull for the correct shape using cardboard templates cut from the plans.  I get my plans at Marylandsilver.com, and they copy them straight from the National Archives.  When I am content with the shape of the hull, it gets a coat of flat white automotive primer from a can.   I then begin to build the gun sponsons on the hull.  These are made primarily of aspen, and are cyano-ed and screwed to the hull with screws I get from the local hardware store.  The CA just holds the sponsons in place until you can screw them down.  It holds OK against Bondo, but I like to be sure, hence the screws.  The sponsons are then sheeted with sheet styrene, given styrene armored doors and hinges.  Eyelets serve as scuttles, and I use various sizes.  On the armored casemate covers in the pictures, the larger eyelets will serve to accept the gun barrels when I make them.

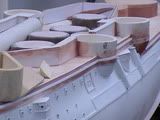
I then build the various hull structures and add hawse holes (from Model Expo in this case), torpedo tubes etc.  The final shape of the prow and forefoot has not yet been achieve, but it is close.

More as I progress.  Thanks!

"You may fire when ready, Gridley!"
  • Member since
    December 2007
  • From: Bridgeview, Illinois
Posted by mg.mikael on Wednesday, May 27, 2009 8:13 PM
I gotta admit I admire your skill(gettin' a bit jealous over hereWink [;)]) and your patience. I can only imagine the time it takes to apply the putty/filler then sand down that layer to something so smooth. Hmmmm....you use a power sander or is it all done by hand?

"A good plan executed now is better than a perfect plan next week." - George S. Patton

  Photobucket 

  • Member since
    May 2009
  • From: Michigan
Posted by TimQuinlan on Thursday, May 28, 2009 3:27 PM
If using a power sander is considered cheating, then I must confess, I cheat.  I use a Craftsman variable speed orbital sander for the tough stuff and then finish by hand.  I have also been know to break out the belt sander, but that eats up material pretty fast, so it's hard to control.  However, the Bondo sands well if you get on it in a couple of days, if you let it set for a week, or so, it gets pretty hard.  How is your plane coming along?  Do you coat the wing with monocote (sp?) or is it tissue?  Also, does the finish stay "natural," or was the surface painted on the real thing?
"You may fire when ready, Gridley!"
  • Member since
    December 2007
  • From: Bridgeview, Illinois
Posted by mg.mikael on Thursday, May 28, 2009 4:03 PM

I don't think it cheating.....it's resourcefullness.Wink [;)]

As for my multiplane, it's been on the back burner for a bit since I'm trying to get another build finished by the end of this month. The wing(more like 50 wings on my build) I'll be scratching out of a solid material since the winglets in real life were wood. As for the finish, in photos it shows a more natural look from what I can tell, but if need be I might varnish or seal in the wood.

"A good plan executed now is better than a perfect plan next week." - George S. Patton

  Photobucket 

  • Member since
    May 2009
  • From: Michigan
Posted by TimQuinlan on Thursday, May 28, 2009 7:13 PM
What's on the front burner?
"You may fire when ready, Gridley!"
  • Member since
    May 2009
  • From: Michigan
Posted by TimQuinlan on Friday, May 29, 2009 9:34 AM

Test

"You may fire when ready, Gridley!"
  • Member since
    May 2009
  • From: Michigan
Posted by TimQuinlan on Friday, May 29, 2009 10:24 AM
Hey Mikael, how do I enable an avatar?  Thanks.
"You may fire when ready, Gridley!"
  • Member since
    December 2007
  • From: Bridgeview, Illinois
Posted by mg.mikael on Friday, May 29, 2009 12:24 PM

First of all on the front burner is a 1/35 Zvezda M-3 Scout Car, which I'm building for the Lend-Lease GB of which I'm also hosting.Big Smile [:D] I currently have a WIP for this build... /forums/1076568/ShowPost.aspx  

As for your question about enabling avatars, perhaps one of these links will better explain it then I would:

/forums/730482/ShowPost.aspx

/forums/924718/ShowPost.aspx

Just remember the pic has to be saved on your computer hard drive and not on an image hosting site. So that said, if the image you want is on Photobucket save it to a file on your computer. Hope this helps, if not just ask.

"A good plan executed now is better than a perfect plan next week." - George S. Patton

  Photobucket 

  • Member since
    May 2009
  • From: Michigan
Posted by TimQuinlan on Friday, May 29, 2009 3:48 PM
Thanks for the link for the avatar!  I love the M-3.  Not really my line, but I read through the thread.  I also was VERY impressed with the look of the tire rubber, and the silly putty made a much sharper edge then I would have thought possible.  Did you have to touch up with a brush between the rubber and the rim, or did the airbrush/putty combination make that happen?  I will continue to follow your progress with interest!
"You may fire when ready, Gridley!"
  • Member since
    May 2009
  • From: Michigan
Posted by TimQuinlan on Friday, May 29, 2009 3:53 PM
I wasn't hitting the update button.  Sheesh!  Getting old sucksConfused [%-)]
"You may fire when ready, Gridley!"
  • Member since
    December 2007
  • From: Bridgeview, Illinois
Posted by mg.mikael on Friday, May 29, 2009 3:54 PM

 TimQuinlan wrote:
Thanks for the link for the avatar!  I love the M-3.  Not really my line, but I read through the thread.  I also was VERY impressed with the look of the tire rubber, and the silly putty made a much sharper edge then I would have thought possible.  Did you have to touch up with a brush between the rubber and the rim, or did the airbrush/putty combination make that happen?  I will continue to follow your progress with interest!

Actually the tire and hub are both brush-painted aka hand-painted, and no I didn't need any touch-up's since the mask worked to perfection.Big Smile [:D]

"A good plan executed now is better than a perfect plan next week." - George S. Patton

  Photobucket 

  • Member since
    August 2008
Posted by tankerbuilder on Friday, June 12, 2009 8:08 AM
 HI  TIM   I thought I was all alone out here in scratchbuilding W.W.1 ships . Your ship looks great . I,ll send pics of my S.M.S. KRONPRINZ when I can . I still can,t find anyone to teach me how to post them to this site !
  • Member since
    December 2007
  • From: Bridgeview, Illinois
Posted by mg.mikael on Friday, June 12, 2009 9:33 AM

 tankerbuilder wrote:
 HI  TIM   I thought I was all alone out here in scratchbuilding W.W.1 ships . Your ship looks great . I,ll send pics of my S.M.S. KRONPRINZ when I can . I still can,t find anyone to teach me how to post them to this site !

Here's a link: /forums/890254/ShowPost.aspx. Hope this helps with posting images tankerbuilder. Smile [:)]

"A good plan executed now is better than a perfect plan next week." - George S. Patton

  Photobucket 

  • Member since
    May 2009
  • From: Michigan
Posted by TimQuinlan on Thursday, June 18, 2009 10:12 PM
Hey Tankerbuilder!  I hope Mikael's post has helped you post images!  He sure has given me some great tips!  I would love to see pics of your build!  I love anything from the Spanish American War to WW1.  I will continue my WIP on the Iowa, as I progress.  My efforts have been slowed lately by house remodeling, and an 8th grade East Coast trip that I sponser every year.  So, the Iowa will languish until at least June 28th.  Thanks for the interest, and sorry it took so long to respond!
"You may fire when ready, Gridley!"
JOIN OUR COMMUNITY!

Our community is FREE to join. To participate you must either login or register for an account.

SEARCH FORUMS
FREE NEWSLETTER
By signing up you may also receive reader surveys and occasional special offers. We do not sell, rent or trade our email lists. View our Privacy Policy.