SEARCH FINESCALE.COM

Enter keywords or a search phrase below:

A deployed parachute

19630 views
31 replies
1 rating 2 rating 3 rating 4 rating 5 rating
  • Member since
    May 2003
  • From: Vernon
Posted by DMACWW2 on Monday, January 23, 2012 9:19 PM

Thanks tankerbuilder, I will get some to try out.

I have not posted any progress on my parachutes because of a small snag.  My supply of RTV rubber for making molds has run out and the only supplier I know of, ACE Resins, does seem to be having difficulty filling an order.  I will post the results of my molds as soon as I get some.  Anybody know of a good supplier of the RTV rubber and Activator, preferably in Canada.

Thanks to everyone for your input, great not be alone in this.

  • Member since
    August 2008
Posted by tankerbuilder on Monday, January 23, 2012 7:19 PM

Try this - When you get the chute figured out then try this .I use ,for very fine stuff Plastic  sewing thread .It,s very fine  And it can be painted .If the lines must be flat , well for that I am at a loss .        tankerbuilder

  • Member since
    March 2005
  • From: West Virginia, USA
Posted by mfsob on Tuesday, December 6, 2011 9:10 AM

Wow ... and I thought I was going overboard in 1/700. This is going to be outstanding  Yes

  • Member since
    June 2008
  • From: Iowa
Posted by Hans von Hammer on Wednesday, November 16, 2011 10:23 PM

Outstanding... Keep it up!

  • Member since
    May 2003
  • From: Vernon
Posted by DMACWW2 on Thursday, November 3, 2011 8:36 PM

I wanted to share my progress with my parachute mold.

Step 1 - create the indentations in the styrofoam ball a wire.

Step 2 -Shape the indents to be more realistic, small at top, larger toward the middle of the ball.

Step 3 -Cut some of the excess from the bottom of the ball.

Step 4 - Paint the foam with 2 coats of an acrylic paint.  This really shows up the imperfections in the foam.

Step 5 & 6 - Use this foam to make a RTV rubber mold, then use the mold to make about 3 blanks for vacuum-forming, still to come.


  • Member since
    June 2008
  • From: Iowa
Posted by Hans von Hammer on Wednesday, November 2, 2011 12:26 AM

The only way to post pictures here is to use a photo-hosting site and upload them... PhotoBucket is the most popular, and it's free...


  • Member since
    May 2003
  • From: Vernon
Posted by DMACWW2 on Tuesday, November 1, 2011 8:29 PM

Thanks for the idea of using hair, I never would have thought of that. 

The ring-slot chutes I want to make have an opening in the chute that goes all the way around, hence the 'ring'.  Some have 2 rings.  So, I choose a clear styrene to try.  I am not quite ready for a pull yet.  I have painted the styrofoam blank I made to help protect it from the heat, but I am still concerned that will not be enough.

I am considering making a mold and then create a blank from something heavier and more heat resistant.

I wish I could share some images of my form but I do not host any of my images.  It appears that is required to share the pics here.

Thanks

  • Member since
    May 2003
  • From: Vernon
Posted by DMACWW2 on Tuesday, November 1, 2011 8:22 PM

This sounds like I cannot post pictures if I do not have my images hosted someplace, is that the only way to share images?

  • Member since
    September 2007
  • From: Truro Nova Scotia, Canada
Posted by SuppressionFire on Tuesday, November 1, 2011 5:51 AM

Use thin white styrene sheet as the process will 'stretch' it thinner.

Don't fuss with texture in this scale, a drybrush of a slightly contrasting white will work to add realism.

Have you considered using hair for the lines? CA glue will not effect it, strong and available in many colors its best find the correct color. Do not paint if possible, magic markers work well to tint.

Good luck & post some pictures of the results!


http://i6.photobucket.com/albums/y211/razordws/GB%20Badges/WMIIIGBsmall.jpg


  • Member since
    July 2004
  • From: Sonora Desert
Posted by stikpusher on Tuesday, November 1, 2011 2:11 AM

Are your images on a photo hosting site such as Photobucket? If so, move your cursor over the pic you wish to display here, a drop down menu will appear, select and copy the URL IMG code, then paste that code onto your post. The image should then appear when the post appears on the thread.


F is for FIRE, That burns down the whole town!

U is for URANIUM... BOMBS!

N is for NO SURVIVORS...

       - Plankton

LSM


  • Member since
    May 2003
  • From: Vernon
Posted by DMACWW2 on Tuesday, November 1, 2011 1:24 AM

Thanks tankerbuilder.


I have noticed a few posts that I think may have been intended for elsewhere.


I thought I would try to include some images of my progress, here goes.

Well that was a bust.

Sorry, it was not as easy as I thought it would be. 

Is there a quick guide to adding images to a post?

Thanks

  • Member since
    August 2008
Posted by tankerbuilder on Sunday, October 30, 2011 11:12 AM

I have done this for a class project many years ago . This is the way we did it .Remember the ubiquitous "little green soldiers"? Well we had to use them.We took balloonsand blew them up.These were very small spheroid types and then, we did the chutes .We laid thin cotton (old "T " shirt material ) over the balloons and then coated it (soaked) the material in a very strong mixture of starch and flour till they looked right and then let them dry .When dry we removed the balloons and cut the edges to shape and using thread for the risers  made our paratroopers. The reason ? Well , we were studying the WW2 invasions of EUROPE by the ALLIES and our teachers thought we would as students ,  let more sink in  if we had models to look at . It worked too ! Imagine walking into a history classroom and seeing at least 200 little soldiers hanging in different levels from the ceiling ! WITH their C47 planes too !           tankerbuilder

  • Member since
    July 2004
  • From: Sonora Desert
Posted by stikpusher on Thursday, October 27, 2011 1:32 PM

I saw a few of those nuke simulators employed... usually at NTC during the "attack" portion of the live fire lanes.  Lots of fun sitting buttoned up in a track in MOPP 4 in 115* heat...684 But it was a very impresive boom when you are nearby. I have a pic in my album here of the resulting "mushroom cloud"... I always wondered what the actual thing looked like. I figured it was just a few satchel charges fused in together.


F is for FIRE, That burns down the whole town!

U is for URANIUM... BOMBS!

N is for NO SURVIVORS...

       - Plankton

LSM


  • Member since
    June 2008
  • From: Iowa
Posted by Hans von Hammer on Thursday, October 27, 2011 6:27 AM

Whoopsie.. Never fired one of them things.. Always wanted to though, but weren't in the MTOE of any unit I was ever in, 'cept the Infantry Battalion I was in, and nobody from the Company HQ ever got to fire one... Best I ever got (dating m'self again) was a few M-72A2 LAWs... (Light Anti-tank Weapons for those that don't know)... Always got a kick outta the "Hollywood LAWs" (and RPGs, for that matter) that would "whoosh" like an Estes rocket insteada "BOOM!" like a hand grenade... Even sub-caliber LAWs made a helluva bang, lol... Guess they never considered that all the rocket engine's fuel had to be expended in the length of the tube, eh? At any rate, all I had to shoot at was old washing machines, water heaters, and assorted car hulks anyway...

Speaking of that.. I tried to sell an inert (trainer) M6 rocket for the 2.36-inch M1 bazooka on Ebay (bottom rocket in photo) a few years ago, when I was "thinning down" my "militaria" collection...
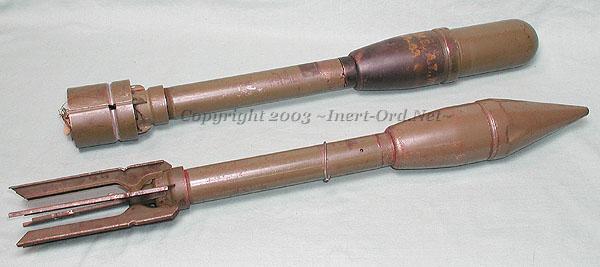
 They pulled the ad (in les than a half-hour too) because they deemed it "Ammunition" and that there was no way that they could verify it as being inert... So I asked 'em back, "Did ya think that I'd have a "buy it now price" of $10.00 on one that was  "ert" ?Wink

Said they was just making sure... *sigh*...

"Most Expensive" military firework I ever set off? A Nuke Simulator... Specifically, "Atomic Explosion Simulator, M142"...

Self-contained unit, packed in a 55 gal fuel drum..
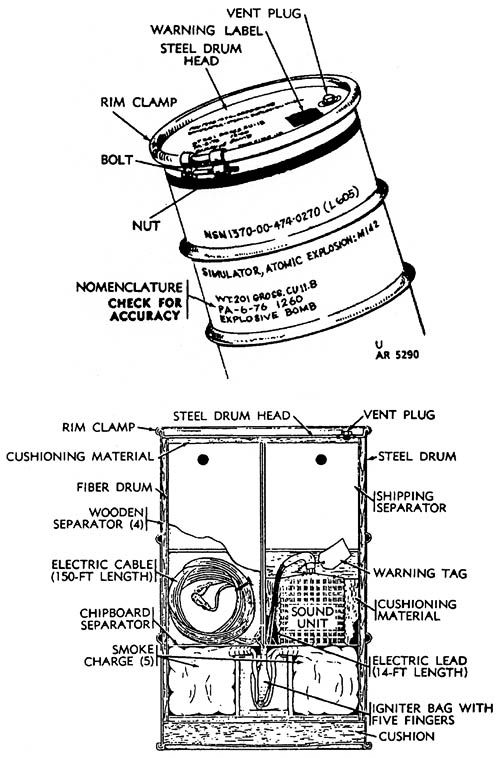
 

It's not a big a boom as a Foo-Gas (Fougasse) though...

Foo-Gas is a non-directional flame-mine that's basically just napalm in a 55-gal drum, WP grenade or trip-flare igniter, some det-cord for a drum-cutter, and a C-4 kicker, all going off at once, lol..

  • Member since
    July 2004
  • From: Sonora Desert
Posted by stikpusher on Monday, October 24, 2011 11:17 PM

TOW is for: Tube launched, Opticaly tracked, Wire guidedWink Most expensive firework that I ever set offStick out tongue

and we all know how Uncle Sam loves a catchy name or acronym these days... sometimes they are helpful... sometimes confusing...


F is for FIRE, That burns down the whole town!

U is for URANIUM... BOMBS!

N is for NO SURVIVORS...

       - Plankton

LSM


  • Member since
    June 2008
  • From: Iowa
Posted by Hans von Hammer on Monday, October 24, 2011 10:27 PM

Milliput is pretty expensive for that kind of application.. Elmer's Wood-Filler is water soluable and much cheaper...

DMACWW2

...Hans, you are of course correct, however in my research I found too many references to LAPES as abbreviations, I was not sure if this forum would recognize the acronym...

Doug

'S ok., Mang.. The "rule" is that if it's a pronounced as a word, it's an acronymn...  LAPES (Low Altitude Parachute Extraction System, for those that don't know) is an an acronymn, while PLF (Parachute Landing Fall) is not a "Pliff"...

JMPI (Jump Master's Personal Inspection) isn't "Jimpy" , same as, and I'm dating m'self here, LBE (Load Bearing Equipment) isn't "Libby", but in the same vein, the LBE is part of the ALICE (All-purpose Light-weight Individual Carrying Equipment) system...   Or for you jet-guys, "JDAM" is an acronymn, (Jay-Dam), or "Joint Direct Attack Munition", and the armor types all know that a TOW Missile is a "Tube-launched Optically-tracked Wire-guided Missile", and the guys that have worked  in the NBCCC at the Brigade TOC (Tock) all know the acronymn, "METT-T" and the USAF types know that a MOAB is actually a FAE...

Sorry for the long-winded post.. First one today, and I don't mind typing yet...  It's also useful (and fun) to play, "Spot the Military Poser" using these things, lol..


  • Member since
    January 2010
Posted by CrashTestDummy on Monday, October 24, 2011 3:37 PM

Isn't Milliput water-soluable?  If so, thin that and use it for a coating.  You can sand it smooth afterward.


Gene Beaird,
Pearland, Texas

G. Beaird,

Pearland, Texas

  • Member since
    September 2011
  • From: Medford, OR
Posted by OMCUSNR on Saturday, October 22, 2011 7:29 PM

Your styrofoam master will HAVE to be surfaced, otherwise you'll end up with all the air cells showing in the surface of the plastic.  My sugestion would be to use some water based latex to fill the voids and sand between layers till you have a Smoooth surface.  you may have to do the surfacing 1st and then do the shroud lines in the paint.

Reid

Grumman Iron Works Fan.

"Don't sweat the small stuff.  And.... it's ALL small stuff, until you hear INCOMING!!!!!!"

  • Member since
    May 2003
  • From: Vernon
Posted by DMACWW2 on Friday, October 21, 2011 8:16 PM

Gene:

Thanks for your reply.

I had the same thought, I know that some paints will melt styrofoam, do you know of one that might work for this?  I also thought that it would be better if I made a mold from my styrofoam sample and then I could make multiple blanks from a plaster or plastic and pull several chutes at once.

I have never vacuformed before and I do not know how much I will do in the future, so difficult to know how much effort to take.

I finished my vacuform table yesterday, ready for testing.  So now is the time to figure out the best way to make a blank chute.

I have been keeping a photo record of my projects for years, so I have lots, I have just never shared them.  I will try to include some pics.


Thanks again,

Doug


  • Member since
    January 2010
Posted by CrashTestDummy on Friday, October 14, 2011 1:58 PM

I would think that the styrofoam will melt to the hot plastic sheeting when you pull it over to suck it down to the styrofoam buck.  Maybe paint your mold a couple of times and let that paint dry well before using it in the vacuum form machine? 

You do realize, of course, you need to do a WIP on this project, picture-rich, on this forum? I look forward to seeing the progress.  Stick out tongue

Gene Beaird,
Pearland, Texas


G. Beaird,

Pearland, Texas

  • Member since
    May 2003
  • From: Vernon
Posted by DMACWW2 on Thursday, October 13, 2011 8:33 PM

Lots of good advice.  I have embarked on the adventure using the vacuum-forming method.

I found some styrofoam balls about 2.4 inches in diameter.  I pierced the centre and mounted in a vise.  Then I used a small wire and gently drew it across and around the ball, from above,  to form an indent of about 1-2 mm.  I repeated this around the ball until I had about 35-40 indents.  Then I used the end of a pen to taper the indent from small at the top of the ball to wider as I approached the centre.  The result looks remarkably like a fully deployed ring parachute with about 35-40 shroud lines.  I cut the ball almost in half, it is at about the 60% mark to allow some extra material for trimming.  I intend to use this as my mold and pull some 0.010 clear plastic in my newly built home-made vacuum form table.

So, the only thing I have not decided on yet is how I will represent the shroud lines.  I am kind of hoping for some inspiration once I get the chutes made.

Thanks to all of you for your input.


  • Member since
    February 2010
  • From: Burlington,Iowa
Posted by hawkeye2an_L-Bird_fan on Thursday, October 13, 2011 9:20 AM

Probably too late to be of help, but I would think you'd want the chute to be semi-transparent. I would use the lightbulb idea, but instead of tissue paper, cut a large piece of plastic from a 2-litre bottle, heat it and pull it over the bulb. Then mix up some green and clear paint to get the look you want.

  • Member since
    May 2003
  • From: Vernon
Posted by DMACWW2 on Sunday, September 25, 2011 11:20 AM

Wow, lots of great feedback.

Thanks 'Hawkeye', the detail you provided is very useful. 

My plan is partly from photos, video and partly from memory.  I served in 435 Sgn CAF in 1980, I only got to see a drop from inside with the Load Master, once, the rest of the times I was up front.  My plan is for 3 equally sized main chutes, with the drogue starting to deflate, I was planning for the load to be just leaving the ramp.  I have calculated that my chutes should be about 2" to 2.5" in diameter.  All of the ideas suggested are great.  I had one that nobody suggested yet, vacuum-forming.  It occurred to me that these chutes, to look right, need to be very thin.  I found a tiny plastic pumpkin in a dollar store, that once cut in half presents a very interesting shape to serve as a mold, unfortunetely, not enough indentations for the number of shroud lines I would need.

I have never vacuum-formed before, anyone tried it, any comments on this application?

Hans, you are of course correct, however in my research I found too many references to LAPES as abbreviations, I was not sure if this forum would recognize the acronym, I was certainly wrong.  Nice to know there are some very knowledgeable people in the forum.

Doug

  • Member since
    August 2006
  • From: Neenah, WI
Posted by HawkeyeHobbies on Friday, September 23, 2011 9:16 AM

The chord used between the pallet and the parachute is not round parachute chord but a flat banding type chord, usually multiples for added strength.

Riggers used a formula based on the size of chute, weight of the item being dropped, airspeed and landing zone distance to rig the item.

I remember rigging with three different sizes of chutes. Heavy loads were given one large chute or multiple smaller ones. There is also in many cases a small pilot chute used to apply tension to the load to initiate the extraction then once it has exited the aircraft the larger chutes deploy to stop the loads forward motion. This is where the riggers reputation is challenged. If the equipment fails, that load can take a great deal of time to slow down and stop with just the pilot chute to do all of the work.

For cushioning material we used stacks of empty cardboard boxes or flat sheets corrugated paper. If you didn't do the cushioning properly...the jarring and impact destroyed the items you were attempting to deliver.

Tissue paper, white glue and fine pinstripping tape done over a light bulb of the appropriate size and shape is how I have done it.

I've also recently seen a photo etched brass drag chute on the market too!

Gerald "Hawkeye" Voigt

http://hawkeyes-squawkbox.com/


"Its not the workbench that makes the model, it is the modeler at the workbench."

  • Member since
    June 2008
  • From: Iowa
Posted by Hans von Hammer on Friday, September 23, 2011 5:03 AM

Ditto.. The old "Papier Mache' over the balloon" trick...  Learned it in art class back about 7th grade, IIRC.. Water & White Glue-mixture, strips of papier mache' laid over the balloon, and when dry, pop the balloon...

Has anyone ever built a fully deployed parachute.

I've done a couple, but I used the drag-chute from the Monogram "T'rantula" dragster model as the basis for it.. It scaled out just right (using the Mk 1 Eyeball) for a 1/48 aircrew parachute

I'd use piano wire vs guitar strings though, for the shroud-lines... It's more rigid than guitar stings for the same guage as well..

Dunno about the actual sizes of the balloons, ping-pong balls or whatever, but the LAPES*  parachutes are 15-foot diameter drogues IIRC, so if you wanna do the math, scale shouldn't be a problem..


 *(Not L.A.P.E.S., as it's an acronymn, not an abbreiviation Wink)

  • Member since
    January 2010
Posted by CrashTestDummy on Monday, September 19, 2011 2:06 PM

Or if your chute is going to be larger than a ping pong ball, get a balloon and blow it up to the needed diameter.  Then, lay some tissue over it to look like the chute fabric.  When things dry, pop the balloon and cut the paper to the proper shape.  Thin guitar wire, or painted fishing line might work for the lines.

I'd use three different balloons at three different amounts of inflation, so your chutes look to be opened a bit differently.  That would provide some variation, as they will rarely be deployed the exact same amount.

Gene Beaird,
Pearland, Texas


G. Beaird,

Pearland, Texas

  • Member since
    November 2005
Posted by Anonymous on Saturday, September 17, 2011 11:54 AM

In that smale of scale forget using any real fabric...think outside the box...maybe cutting a ping-pong ball in half and painting some texture to it...and using stretched sprue for the lines...1/144 is awfullly small so I doubt guitar strings would be thin enough...

BAM! Add another post to my ever-increasing total...and this one might even be considered serious...

  • Member since
    March 2005
  • From: West Virginia, USA
Posted by mfsob on Saturday, September 17, 2011 11:50 AM

The key for something like that is going to be rigidity, I think - so maybe think of guitar strings, which MIGHT be small enough in 1/144 (no way to really tell without eyeballing it, I'm afraid) or perhaps piano/music wire. I'm afraid regular copper wire might have too much give or sag in the small diameter necessary.

The essence of scratchbuilding is experimentation! And this is one of those situations where you might have to try several different things to see what works best.

  • Member since
    November 2009
  • From: Twin Cities of Minnesota
Posted by Don Stauffer on Saturday, September 17, 2011 9:20 AM

DMACWW2

Thanks for the ideas.

My plan is for a L.A.P.E.S. display where the load has 3 round extraction chutes, all fully deployed.  The wire idea might work well to give the parachute shape put I am not sure the lines will look good made from wire.  Your idea of a form is just right, I will try that.  If this works at 1/144, I will try one at 1/72.

Thanks again.

All you need to do is paint the lines the right color.  The wire should be small enough diameter that you will not see any texture (or lack of it).

Don Stauffer in Minnesota

JOIN OUR COMMUNITY!

Our community is FREE to join. To participate you must either login or register for an account.

SEARCH FORUMS
FREE NEWSLETTER
By signing up you may also receive reader surveys and occasional special offers. We do not sell, rent or trade our email lists. View our Privacy Policy.