SEARCH FINESCALE.COM

Enter keywords or a search phrase below:

T08A2 / R3000 spider lightweight tank (from GITS)

17992 views
34 replies
1 rating 2 rating 3 rating 4 rating 5 rating
  • Member since
    November 2014
T08A2 / R3000 spider lightweight tank (from GITS)
Posted by Paulius on Monday, November 24, 2014 5:07 PM

I started working on T08A2 / R3000 spider tank from Ghost In The Shell movie a year ago. For those who haven't seen the movie - I would highly recommend, it's one of the best sci-fi anime movies.

Scale 1:20 (roughly :))

One of the biggest problems that I had from the start was non existence of blue prints, or actually anything that would be close to that. That's why scale is approximate :) So for "blueprints" I ended up with a few things:

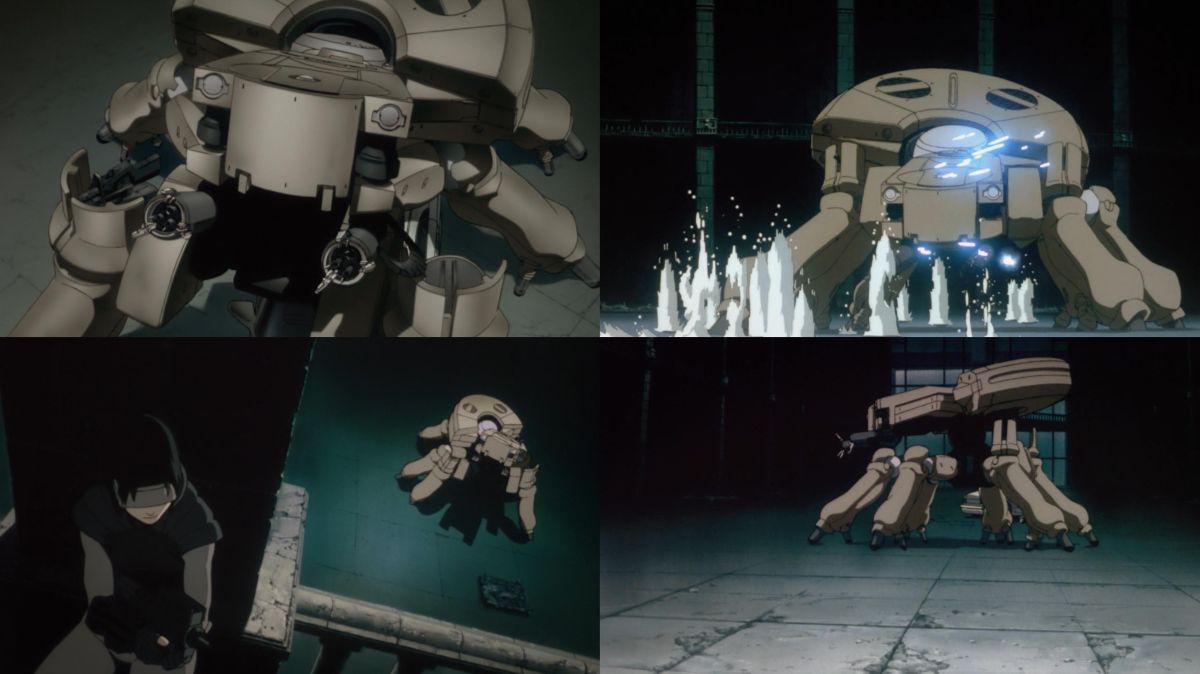
  • Screenshots from the movie
  • Smaller resin model from ebay, which isn't proper quality :)
  • Someone made a 3D model, which I managed to aquire. It isn't very accurate, I would say it follows movie almost...

So yeah, none of these were precise. Actually, even frames from the movie sometimes contradict itself. To make matters worse I wanted to make a model which could move, so following sizes and strength of mechanical components had to be taken into consideration as well...

Initial idea was to make the shell from a styrofoam, but during last year I bought a 3D printer, which came very handy when making these complex shapes.

http://pauliusliekis.tumblr.com/

  • Member since
    November 2014
Posted by Paulius on Wednesday, November 26, 2014 1:27 PM

This is almost complete frame (except "arms"/weapons) and close to complete electronics

Motion is controlled by RaspberryPi. Programming in C++, from scratch. It is controlled with PS3 joystick, but there are plan to have some autonomous functionality.

http://pauliusliekis.tumblr.com/

  • Member since
    November 2014
Posted by Paulius on Monday, December 1, 2014 3:17 PM

A little bit from inside the "brain" of the robot:

The robot has full model of itself (in order to do correct simulation) and it's calculating where to make steps in such way that legs do not collide.

http://pauliusliekis.tumblr.com/

  • Member since
    November 2014
Posted by Paulius on Monday, December 8, 2014 5:11 PM

A little bit from work progress:

Model in 3dsMax:


Model in 3D printing program:


Model in 3D printing program (after slicing):


Printed parts:


Here should be some screenshots of work with sanding paper and acetone, because that's big part of 3D printing, but about that some other time :)

Assembly of electronics (2x servos, 1x laser):


Hiding of cables inside the ammunition belt:


Painting of base color and assembly:


Tags: 3D printing

http://pauliusliekis.tumblr.com/

  • Member since
    November 2014
Posted by Paulius on Thursday, December 25, 2014 7:04 PM

While other bake cookies for Xmas, I bake robot parts :)

http://pauliusliekis.tumblr.com/

  • Member since
    November 2014
Posted by Paulius on Thursday, January 22, 2015 6:15 AM

Wiring complete!

  • 2x Raspberry Pi mirco computers (1st for motion control, 2nd for face tracking)
  • 28x Servos (18 for legs, 4 for body, 6 for weapons)
  • 1x Camera (for face tracking)
  • 3x Servo drivers
  • 2x Lasers (how can you have a robot wittout lazors??!!! :))
  • 1x Distance sensor 
  • 1x PS3 controller

...and some armor:

http://pauliusliekis.tumblr.com/

  • Member since
    December 2002
  • From: Fort Knox
Posted by Rob Gronovius on Thursday, January 22, 2015 10:08 AM

.

  • Member since
    November 2014
Posted by Paulius on Tuesday, January 27, 2015 8:44 AM

A short video from testing of arms:

http://pauliusliekis.tumblr.com/

  • Member since
    January 2015
  • From: Tumwater, WA.
Posted by M. Brindos on Saturday, January 31, 2015 7:50 PM

WOW. O.O

I didn't know that there were still people out there that could still do this type of modelling. I don't have the vocabulary for how awesome this is.

- Mike Brindos "Lost Boy"

  • Member since
    November 2014
Posted by Paulius on Monday, February 2, 2015 3:48 AM

There are still people who do animatronics, i.e. mechanic/electronic dolls/characters for movies:) Although I'm not one of them :)

I actually hope that this kind of modelling is on the rise, because of the progress in electronics and battery technology. It is cheaper to build robots, quadcopters and all sorts of other machines now than ever. Finding electronics is easy: RaspberryPI, Adruino and other more customized boards are available. So yeah I hope to see more of this :)

http://pauliusliekis.tumblr.com/

  • Member since
    November 2014
Posted by Paulius on Monday, February 2, 2015 1:34 PM

A little bit more of progress on the legs:


3D printing:


Polishing (i.e. reducing visibility of 3D printing slices by sand paper and acetone; acetone also gives strength):


Assembling:


Puttying (is that a word? :)) (hiding marks of 3D printing even further):


Painting:


Result:


"Suspension" of toes:


I hope to finish main body and the I'll be able to attach the legs. I hope that everying will work once cables are connected (fingers crossed :)) Otherwise I'll have to disassmeble (read: break) and redo some parts :)) The original plan was to have ability to disassemblable, but that was too complicated, so  I skipped that part :)

http://pauliusliekis.tumblr.com/

  • Member since
    November 2009
Posted by artworks2 on Tuesday, February 3, 2015 8:50 AM

3d art is becoming popular again rapid prototyping has come a long ways. Nice expose in picture...

  • Member since
    January 2015
  • From: Tumwater, WA.
Posted by M. Brindos on Tuesday, February 3, 2015 8:19 PM

This is just amazing. Superior modelling.  :)

- Mike Brindos "Lost Boy"

  • Member since
    November 2014
Posted by Paulius on Thursday, February 12, 2015 7:02 AM

One of the most complicated parts: it's time to cover main-body to which all legs are attached:


The optimistic plan was to print it from a couple of parts:
  

Problem #1: printer shifts all layers by ~1cm sometime during printing. It still did in a different place when printing flipped part, although the problem was smaller, so I just fixed it by slicing printed part into two and gluing it together in correct place:.
    

I subdivided the remaining parts into smaller parts before printing in order to avoid same problems during print:


Problem #2: I could not assemble robot using these parts - there was no way to fit sphere in the middle through other parts once everything is assembled. I had to cut it into smaller pieces and attach these parts separately.


Problem #3: first design mistakes: my virtual project had no screws, so when I tried to fit to and bottom part they didn't fit where they belong (see the photo above), so there was a gap of 1cm between them. The main structure of the robot was done by hand without very precise engineering, so gaps between printed parts and servos were uneven. So even if I fixed design problem with the screws there was no I way to fix all gaps. I had to fallback to plan B: use of polystyrene and macroflex :) To make matters more fun I had to fit wires for 19 servos and plus a bunch of other wires :)
              

More shaping, macroflex, shaping, making surface stronger using PVA glue, polishing, glue, polishing, putty, polishing, putty, polishing:
    

Painting and result:
  

http://pauliusliekis.tumblr.com/

  • Member since
    November 2014
Posted by Paulius on Monday, February 16, 2015 5:26 AM

Some photos from older printing:

"Find 10 differences!" or "My printer misunderstood what I actually want to print (correct piece is on the left side)":


"Tail":


The part is to big to make it as a single print - the max print dimensions 20x20x20cm. It was chopped into 6 individual pieces. The printer was misbehaving again a bit, so 2 out of 6 parts had to be corrected after printing:
    

Assembled:
  

I covered the bottom piece with too much acetone, which resulted in bends...:) I had to cut it, screw to the frame, glue together and use a lot of putty afterwards :) There is still small gap between the top and bottom, so I added a screw to tighten them together after closing. The top and bottom are not glued together, since main electronics sits there and I need to service it occasionally or attach screen and keyboard when coding for it.
  

Result:

http://pauliusliekis.tumblr.com/

  • Member since
    November 2014
Posted by Paulius on Tuesday, February 24, 2015 8:22 AM

I found out that the old RaspberryPi (model B) is getting in a way of cables after assembling all printed parts, so I replaced it by newer model A+. Everything fits much better now:
GITS-RPiReplacement.jpg 

This is how it looked before the painting of details:
GITS-Assembled.jpg

http://pauliusliekis.tumblr.com/

  • Member since
    November 2014
Posted by Paulius on Monday, March 30, 2015 5:55 PM

I finally found time to fix electronics.

Main change: I switched to power source with higher voltage (from 5V to 7.5V) - this gives more strength to the legs. One of the main problems was that it was having hard time standing on the legs after putting so much plastic on it. The robot weights ~5kg now. New and shiny power source:

Of course RaspberryPi still needs 5V, so I had to put voltage stabiliser. That leads to some energy loses, but who cares when you're not planning to use batteries and you have 26A :))

I also had to switch to shorter and thicker power cables for servos. And better plugs for those cables too. I'm glad I didn't have to pull any new cables through internals of the robot - it would be very hard to do at this point :) Although I still had to put a relay in the back and some thick cables. It doesn't look nice (when it's open), but it works! :)


I found out that servos in arms take 6V max, so I had to put another voltage stabiliser :) Any change is never as easy as it seems at first sight:)

http://pauliusliekis.tumblr.com/

  • Member since
    January 2015
  • From: Tumwater, WA.
Posted by M. Brindos on Monday, March 30, 2015 8:07 PM

Extremely impressive. I can't wait to see it finished.  :D

- Mike Brindos "Lost Boy"

  • Member since
    December 2012
Posted by RX7850 on Monday, March 30, 2015 8:16 PM

What the?? This thing is soo cool . I think I hear  Spielberg and Lucas Arts  calling your name. Looking forward to seeing it done.

  • Member since
    November 2014
Posted by Paulius on Monday, April 13, 2015 7:09 AM

@RX7850, Spielberg hasn't called so far. I'm disappointed :)

http://pauliusliekis.tumblr.com/

  • Member since
    November 2014
Posted by Paulius on Monday, April 13, 2015 7:09 AM

..but 3Dprint.com did a story about my robot :)

3dprint.com/.../ghost-in-the-shell-robot-tank

http://pauliusliekis.tumblr.com/

  • Member since
    January 2015
  • From: Tumwater, WA.
Posted by M. Brindos on Monday, April 13, 2015 8:27 PM

That's awesome! :)

- Mike Brindos "Lost Boy"

  • Member since
    August 2008
Posted by tankerbuilder on Thursday, July 23, 2015 2:04 PM

All I can say Paulius is HOT DARN ! ! !

  • Member since
    November 2014
Posted by Paulius on Thursday, July 23, 2015 3:10 PM

Thanks! I really need to find time to make the final photoshoot... I hope when the summer is over to have more time :)

http://pauliusliekis.tumblr.com/

  • Member since
    September 2005
  • From: Illinois: Hive of Scum and Villany
Posted by Sprue-ce Goose on Thursday, July 23, 2015 3:16 PM

DANG !

Even if Spielberg doesn't call,

It might yet fit in with SkynetWink

I'm only just starting out learning Solid Works.

What 3D modeling software do you use? 

  • Member since
    November 2014
Posted by Paulius on Thursday, December 31, 2015 10:12 AM

Sprue-ce Goose
What 3D modeling software do you use? 

3DsMax. It's great for more flexible shapes. Not sure I would like to do this in SolidWorks. SolidWorks are great if you want to do more precise blueprints, because 3dsMax sucks anywhere where you want to enter dimentions or position things preciselly, but modelling such thing in SolidWorks might be too hard for me, because I'm still learning it.

http://pauliusliekis.tumblr.com/

  • Member since
    November 2014
Posted by Paulius on Thursday, December 31, 2015 10:13 AM

Happy New Year everyone! I finally found time to get this project going again - there isn't better time than a night of New Year celebration :) I hope to get a better camera soon and make a final photoshoot....


Here are some older picture about what happens when your 3D printer messes up your print and shifts half of a piece. Anyway, there is no thing that saw, glue and putty can't fix :))

http://pauliusliekis.tumblr.com/

  • Member since
    November 2014
Posted by Paulius on Tuesday, May 31, 2016 2:02 PM

Painting the robot was a lot of fun. I've done these layers:

  • Prime color
  • Shadows / light surfaces
  • Weathering details
  • Chiping
  • Rust
  • Weathering sufraces
  • Oil/dirt

I overdid the chipping, but that's what happens when you're doing it for the first time :) 

http://pauliusliekis.tumblr.com/

  • Member since
    May 2011
  • From: Honolulu, Hawaii
Posted by Real G on Wednesday, June 1, 2016 1:31 PM

I think your chipping is fine.  Superb work there!

“Ya ya ya, unicorn papoi!”

  • Member since
    November 2014
Posted by Paulius on Monday, June 6, 2016 10:21 AM

One of the goals of the project was to make the robot move in the nice, fluid way. A lot of work went into things that can not be shown by photos - coding and preparing the moves. To make it even more fun I had to redo some electronics - the robot stopped working after just sitting idle for half a year :) Anyway during the preparations I prepared a storyboards - my final animation was supposed to resemble the original movie:


I turned my flat into mini photo studio for a couple days :)


I'm not a photographer or filmaker - using a tripod is as far as that goes :) but I decided to try using a couple of spotlights and a smokemachine :) The smokemachine turned out to be harder than I thought. You basically have to know how to use it. Having a good camera dosn't gurantee making good photos - the same for a smoke machine. Anyway, I needed it for making photos of the lasers, so it wasn't completelly waster :) Oh, and I haven't reallized that smoke from smokemachine raises straight up. You need cold smoke in order for it to sit on the ground, so I had to improvise that. 5 liter bottle filled with ice cubes served as cooler for smoke:


http://pauliusliekis.tumblr.com/

JOIN OUR COMMUNITY!

Our community is FREE to join. To participate you must either login or register for an account.

SEARCH FORUMS
FREE NEWSLETTER
By signing up you may also receive reader surveys and occasional special offers. We do not sell, rent or trade our email lists. View our Privacy Policy.