SEARCH FINESCALE.COM

Enter keywords or a search phrase below:

Making patches/ decals for 120mm fig...

2478 views
10 replies
1 rating 2 rating 3 rating 4 rating 5 rating
  • Member since
    March 2008
  • From: East TX
Making patches/ decals for 120mm fig...
Posted by modelchasm on Sunday, January 4, 2009 8:02 AM

Howdy all,

I'm in the process of priming my 2007 OIF figure (actually modded Ver 101st Airborne fig) and I'm beginning to think about the patches, etc that I'm going to be applying soon. All along I've been thinking about just printing some images that I have out on regular paper and either attaching that straight to the model or first gluing it to some thin styrene and then to the model. I'm only going to need to make three decals ... 2x unit patches and 1x US flag. I figure if I can get them to size right in photoshop, I should be golden, right?

Just wanted to fly this one by everyone. What do you think? Suggestions?

Thanks in advance....

"If you're not scratching, you're not trying!"  -Scott

  • Member since
    June 2006
  • From: AusTx, Live Music Capitol of the World
Posted by SteveM on Sunday, January 4, 2009 8:37 AM

I know that Hans prints his own patches, in 1/35. He might be along soon to offer advice. Stay tuned.

Steve


Steve M.

On the workbench: ginormous Kharkov dio


  • Member since
    December 2002
  • From: Massachusetts
Posted by ajlafleche on Sunday, January 4, 2009 9:33 AM
No need even to use photoshop, just resize them in Word as you would clipart. Print on white paper at the highest possible resolution. I've sealed mine with decal saver. Apply dilliuted white glue tothe back which will soften the paper and apply where needed. The softened paper will conform to the folds nicely. I seal my figures with an airbrushed layer of Dullcote.

Remember, if the women don't find you handsome, they should at least find you handy.

  • Member since
    March 2008
  • From: East TX
Posted by modelchasm on Sunday, January 4, 2009 10:36 AM

SWEEEEEETTT!!!!!!!!!!!!

Thanks guys for your input. I primed the fig two days ago, sanded some places and got the 2nd prime coat on this morning BEFORE my run .... (damn early risers, I know!) I'll let it sit until later on today before I start in on fhe painting.

I still have a ways to go before I add the "decals", but thanks again for verifying what I was thinking!

Off to my 2ndary project w/ fiber optic lighting, YEA!!!!

"If you're not scratching, you're not trying!"  -Scott

  • Member since
    June 2008
  • From: Iowa
Posted by Hans von Hammer on Sunday, January 4, 2009 4:11 PM

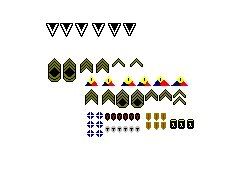
Myself, I made rank and unit patches using MS Paint, then printed them out on white decal paper...Depending on the unit, some patches are so small that you can't get any real detail, while others, like that horse blanket that the 1st Cav wears, are easy...

For 120mm figures, you'll need name-tapes and rank (depnding on the uniform and body armor) as well as the SSI and flag.  Just remember that the US Flag on the right sleeve goes on with the blue field facing forward..

These are my 1/35 scale decals..
 

  • Member since
    March 2008
  • From: East TX
Posted by modelchasm on Sunday, January 4, 2009 5:03 PM
 Hans von Hammer wrote:

Myself, I made rank and unit patches using MS Paint, then printed them out on white decal paper...Depending on the unit, some patches are so small that you can't get any real detail, while others, like that horse blanket that the 1st Cav wears, are easy...

For 120mm figures, you'll need name-tapes and rank (depnding on the uniform and body armor) as well as the SSI and flag.  Just remember that the US Flag on the right sleeve goes on with the blue field facing forward..

These are my 1/35 scale decals..


Easy on the "blanket" there, Hans. Wink [;)] We prefer "shield".

Yours look good. Mind if I use them for some of my 1/35 guys? As far as how I was thinking about doing it ...

I've got a few images, some from my own pictures, that I intended to use. Specifically, a tan IR flag that Soldiers are wearing now in country. I don't think that I had a fll color flag on after I left Kuwait. And yes, Hans is correct ... the Stars fly forward.

"If you're not scratching, you're not trying!"  -Scott

  • Member since
    June 2008
  • From: Iowa
Posted by Hans von Hammer on Monday, January 5, 2009 9:45 AM

The "blanket" thing goes back to my days at Ft Hood and the 2 AD,lol...

As for the decals, go ahead... They print out a skoshi bit smaller than shown on my printer...

  • Member since
    October 2008
Posted by charlietuna67 on Tuesday, May 5, 2009 5:15 PM
how do you know what to size it to for the scale you want?
  • Member since
    March 2008
  • From: East TX
Posted by modelchasm on Tuesday, May 5, 2009 7:08 PM

Charlie,

I didn't use the images that Hans gave me ... although I plan to for future figures. The images that I used, I sized them using PhotoShop. Basically, I measured the spot where I wanted to put them, and them sized the image appropriately.


"If you're not scratching, you're not trying!"  -Scott

  • Member since
    October 2008
Posted by charlietuna67 on Thursday, May 14, 2009 6:15 PM

I will try that. I just want to use some of my own stuff to create my own custom decals for the rank and arm bands of german ww2 figures. I want to make them for 1/35.

Thanks again!

Charlie

  • Member since
    March 2008
  • From: East TX
Posted by modelchasm on Thursday, May 14, 2009 8:07 PM
Good luck with that Charlie. 1/35 stuff is going to be REALLY small, so keep that in mind.

"If you're not scratching, you're not trying!"  -Scott

JOIN OUR COMMUNITY!

Our community is FREE to join. To participate you must either login or register for an account.

SEARCH FORUMS
FREE NEWSLETTER
By signing up you may also receive reader surveys and occasional special offers. We do not sell, rent or trade our email lists. View our Privacy Policy.