SEARCH FINESCALE.COM

Enter keywords or a search phrase below:

How to build a paper airplane model - tips based on a 1/33 Il-2 Stormovik - FINISHED AT LAST!!

33926 views
71 replies
1 rating 2 rating 3 rating 4 rating 5 rating
  • Member since
    May 2009
  • From: Poland
How to build a paper airplane model - tips based on a 1/33 Il-2 Stormovik - FINISHED AT LAST!!
Posted by Pawel on Saturday, July 7, 2018 9:43 AM

Hello!

I recently had to switch from my "regular" to a "field" workshop for some time. To minimize the number of tools and other stuff to take with me in order to continue tinkering I decided to dig out a paper model that I have started years ago while on a long business trip. It's a GPM 1/33 Il-2m3 Stormovik. I thought while watching Philo build his Focke Wulf that I'd make some photos and share some tips on building a paper aircraft model - maybe it will help somebody.

I started building my model with the fuselage. Most paper models of aircraft that I have seen, with an exception of models for little kids and modern jets have fuselages constructed out of segments. You can either have one bulkhead per segment or two bulheads per segment (the main ones). Two bulkheads per segment is more popular - in a model constructed this way every segment with the exception of the noce and tail cone resembles a funny can. When all the segments are done you just glue them together, bulkhead to bulkhead. My Ilyushin was also constructed way. Most segments are already joined together, but the motor segment is still separate:

GPM 1:33 Il-2m3 Stormovik by Pawel

The trick here is to always make sure the bulkheads that will be glued together have identical shape. This is achieved by holding the two bulkheads aligned face to face and sanding them together on their edges. The bulkheads have two marks on them, one marking the top and the other marking the bottom of the bulkhead. You have to make sure these markings are aligned when sanding and when glueing the skin on the segment. The bottom seam usually aligns with the bottom mark on the segment. Plus you have to make sure the bulkhead is not too big for both of the corresponding segments (it usually is before sanding). You have to sand the pair of the bulkheads until it fits both of the corresponding segment skins.

The GPM model has a nice cockpit interior that I have enhanced a little with wire and knobs made out of white glue. A little painting also helps to make everything look better. On the paper model you generally should paint the white paper edges and all the wire parts that are used. My cockpit at the moment looks like this:

GPM 1:33 Il-2m3 Stormovik by Pawel

GPM 1:33 Il-2m3 Stormovik by Pawel

I have also constructed the motor segment with the exhaust, the air intake and rotating prop spinner. The prop blades will be installed later. The empennage is also there and it has positionable steering surfaces - a nice design feature of the GPM model.

Thanks for lookin' and have a nice day

Paweł

All comments and critique welcomed. Thanks for your honest opinions!

www.vietnam.net.pl

  • Member since
    June 2014
  • From: New Braunfels , Texas
Posted by Tanker - Builder on Monday, July 9, 2018 6:25 AM

Hey , Pawel .

That's a nice looking " Stormy " there . Doc 

  • Member since
    November 2005
  • From: Somewhere over the rainbow
Posted by m1garand on Saturday, February 23, 2019 9:13 PM

This is truly amazing.  Would love to see the completed version.

  • Member since
    May 2009
  • From: Poland
Posted by Pawel on Tuesday, February 26, 2019 4:35 PM

Hello!

Thing with this thread here is after TB kindly replied to my post I said OK, let's wait for one or two more responses before replying (very sorry about that, TB!) - and those never came. Shortly thereafter I was forced to shelve the project once again, and didn't think much about this, as there was almost no interest for this subject here in the forums. I have managed to do the inner wing portions before that happened. I hope to get back to this one some day, and then I'll post more photos. Thanks a lot for your interest and have a nice day!

Paweł

All comments and critique welcomed. Thanks for your honest opinions!

www.vietnam.net.pl

  • Member since
    December 2018
Posted by Ted4321 on Tuesday, February 26, 2019 6:28 PM

I just subscribed anyway.  

I asked santa claus for a paper corsair model but he didn't deliver... this year. 

If you decide to pick it back up, I'll be watching. 

You have a nice day as well. 

T e d

  • Member since
    June 2014
  • From: New Braunfels , Texas
Posted by Tanker - Builder on Thursday, February 28, 2019 5:16 PM

Thank You , Ted :

 I was beginning to wonder if anyone besides Pawel read this .I think more folks should try them .Shoot , you can get a whole forty years stash in one large desk drawer ( till you build them , that is )  T.B.

  • Member since
    May 2009
  • From: Poland
Posted by Pawel on Friday, March 1, 2019 5:01 PM

Ted, TB - thanks a lot for your comments here. TB is right, paper models are cool! Ted - if you need any help maybe I could help you find a nice paper Corsair model here in Poland?

Thanks again and have a nice day

Paweł

All comments and critique welcomed. Thanks for your honest opinions!

www.vietnam.net.pl

  • Member since
    December 2018
Posted by Ted4321 on Friday, March 1, 2019 5:13 PM

Pawel

The one I had picked out was a Huntly's paper warplane.  

Once I decide to order (I need to build more of my stash first) I'll do more research.  I'll keep your offer in mind without a doubt. 

Thank you! 

T e d


  • Member since
    May 2009
  • From: Poland
Posted by Pawel on Sunday, March 3, 2019 5:22 PM

Hello!

I have looked up the Huntly model - while it's OK, you might want to take a look at some Polish paper models of the Corsair, they are a little more detailed, maybe you'll like them?

This one is pretty nice:

https://www.mojehobby.pl/products/F4U-1D-CORSAIR-713944.html

This one is simpler and a better deal:

https://www.mojehobby.pl/products/Kawasaki-Ki-61-versus-Corsair.html

Good luck with you modelling projects, and have a nice day

Paweł

All comments and critique welcomed. Thanks for your honest opinions!

www.vietnam.net.pl

  • Member since
    December 2018
Posted by Ted4321 on Sunday, March 3, 2019 7:43 PM

Pawel

Thanks for the links.  I think i like these kits more.  The website has other good stuff too.

I'd imagine I'd have to order several things to make the shopping worth it. 

I've bookmarked the site.  Thanks again for the tips.

T e d

  • Member since
    August 2014
  • From: Willamette Valley, Oregon
Posted by goldhammer on Monday, March 11, 2019 12:01 PM

Never have done a paper/card model.  Have a Mustang and P-40 in the drawer to try one day.  

Will keeep an eye on this when you get back to it.

  • Member since
    September 2016
  • From: Albany, New York
Posted by ManCityFan on Thursday, March 28, 2019 9:27 AM

That cockpit is truly amazing.  I would also like to see the finished product.  I am also interested in the tools you use.  Thanks for posting.

Dwayne or Dman or just D.  All comments are welcome on my builds. 

  • Member since
    May 2009
  • From: Poland
Posted by Pawel on Friday, March 29, 2019 5:34 PM

Hello!

Thanks a lot for your comments!

goldhammer - let's see when I can get back to work on this one.

ManCityFan - thanks a lot for your kind words! As for the tools, you don't need as many as for the plastic models, that's why I take my paper model with me, when I'm on a business trip lasting more than two or three weeks. The base is of course a pair of good scissors, then you need a sharp knife, the one with segmented and narrow blade works really well. A tube of white glue and a small stick for applying it, and a bottle of CA take care of glueing. A pair of tweezers for handling small parts, and that's almost it. A sanding block comes handy, too. Then you often can use some wire, with good needle-nosed pliers for bending it and maybe some fine drill bits for making holes to put the wire parts into - but in a pinch those drill bits can be replaced by a needle or hot wire to burn the holes through. A fine brush and some acrylic colours can also be used. Again, in a pinch you can only use black paint. And that would do it - fits into a small pouch that can be comfortably carried in a suitcase, and the finished subassemblies are carried in a shoe box.

Hope it helps and have a nice day

Paweł

All comments and critique welcomed. Thanks for your honest opinions!

www.vietnam.net.pl

  • Member since
    October 2019
Posted by healthfreak on Tuesday, October 22, 2019 6:30 PM
I would like to see the finished "product" of your model.
  • Member since
    March 2005
Posted by philo426 on Wednesday, October 23, 2019 10:11 AM

Yeah tackle this monster!

  • Member since
    March 2005
Posted by philo426 on Wednesday, October 23, 2019 10:14 AM

  • Member since
    May 2009
  • From: Poland
Posted by Pawel on Wednesday, December 25, 2019 2:44 PM

Hello everybody!

I have just completed the first phase of my move to a new apartment. In this new apartment I have set up a new workbench (more about it here: http://cs.finescale.com/fsm/tools_techniques_and_reference_materials/f/23/t/183808.aspx) and I decided that the best way to gradually break it in would be to finish that Stormovik - it's been sitting in a box way too long.

So first, let me post the photos from 1,5 years ago - that's when I built the wings for the Stormovik. Here's how it went:

GPM 1:33 Il-2m3 Stormovik by Pawel

First step is to prepare the inner structure of the wing. In this case it consists of two segments each - the inner wing and the outer wing. Both are reinforced with 1mm cardboard, carefully cut out - many times it's good to take a knife for it rather than scissors, to avoid bending the ribs - and the edges are sanded to make them smooth and to give you more glueing surface.

Thing is the mating ribs, where the inner wing meets the outer wing have to be identical to match nicely - the trick here is to hold them together tightly and sand them together - after that they are pretty close!

GPM 1:33 Il-2m3 Stormovik by Pawel

I have prepared the outer skin for the wing by carefully bending it - using the bench edge is one of the tricks here. It's important not to create any sharp bends where they aren't needed - and in older aircraft the leading edge of the wing was nice, round. I have also reinforced the skin from the inside with thin cardboard to make it a little stronger and to keep the ribs from showing through - that didn't quite work out though. I still recommend doing that on most larger parts. Checking for the right fit is very important at every step!

GPM 1:33 Il-2m3 Stormovik by Pawel

It's important to constantly keep checking the fit of the parts. Any problems spotted early enough can mostly be corrected, for example by sanding the ribs. Here, the ribs have already been fixed to the top of the wing skin, the bottom can still be adjusted some. You can also see I have decided to take the option this model gives - to make the flaps extended.

GPM 1:33 Il-2m3 Stormovik by Pawel

GPM 1:33 Il-2m3 Stormovik by Pawel

Here you can see the inner wings closed up. As I said, not everything went as planned - the wing beam shows through the skin a little - I could have probably sanded it down a little more, maybe I have used a little too much glue - now I'll have to live with it!

I hope to give you more progress shots soon - I hope you'll like it, have a nice day

Paweł

All comments and critique welcomed. Thanks for your honest opinions!

www.vietnam.net.pl

  • Member since
    May 2009
  • From: Poland
Posted by Pawel on Sunday, December 29, 2019 6:26 PM

Hello!

Today I'd like to write a little about building the wing root on paper airplanes. Let me start with cutting the part out and shaping it:

GPM 1:33 Il-2m3 Stormovik by Pawel

As with many parts on paper models, it's important to properly shape the part efore even thinking about glueing it. Sometimes you need a sharp edge, sometimes, like here, an edge would be undesirable - for this part you need smooth bends that can be obtained by rolling the part around various objects like pencils, drill bits and stuff like that - or by running the part around a suitable edge, like the egde of scissors or the edge of the workbench - but with care, so that the part isn't "broken", just bent a little, this needs some feeling. Then you have to make some test fitting:

GPM 1:33 Il-2m3 Stormovik by Pawel

As you see the fuselage, the engine and the iner wings are already put together. Now especially with parts like the wing root you need just the right glue to do it. I'm using white glue here, but one that is used for bookbinding - this glue dries transparent, can be wiped from the model surface to avoid ugly marks. This glue gives enough time to adjust the parts before seting but doesn't contain too much water, so as not to "soak" the parts and make them too soft and to distort their shape.

After I'm sure the shape of the part is OK, with all the right bends where they are needed, I gradually apply glue and work my way along the part, from the rear towards the fron of the wing root:

GPM 1:33 Il-2m3 Stormovik by Pawel

As you can see the colours around the white fuselage bands don't quite match. This happens on paper models from time to time, that's why it's good to mix some paint matching the colours of the kit and then you can do some re-touching. It's also good to paint up the white paper edges - I'll do that later. Here's a close-up of the problematic spot - other than the colouring it doesn't look too bad:

GPM 1:33 Il-2m3 Stormovik by Pawel

Here's the underside of the model and the front-most portion of the wing root:

GPM 1:33 Il-2m3 Stormovik by Pawel

Using the same procedure I have also tackled the other side:

GPM 1:33 Il-2m3 Stormovik by Pawel

The yellow arrow on the photo below shows a spot for an air vent that I didn't attach yet - if I did, it would cause a problem for me to build that wing root - just goes to show how important the planning of the build sequence can be. Some colour mismatch is also visible here - looks a bit like a faulty kit design, but not really a big deal.

GPM 1:33 Il-2m3 Stormovik by Pawel

That would be it for now - thanks for looking and have a nice day

Paweł

All comments and critique welcomed. Thanks for your honest opinions!

www.vietnam.net.pl

  • Member since
    May 2009
  • From: Poland
Posted by Pawel on Wednesday, January 1, 2020 7:26 AM

Hello!

Moving on with the wing - today the wingtips.

Here are the parts of the wingtips before cutting them out. I mean the parts 63P (top) and 63aP (bottom). A little remark - on Polish models they often use the letter P (as in polish "prawy") to indicate parts that go to the right side of the model (looking of course toward the fron of the model). Corresponding left parts are marked with L:

GPM 1:33 Il-2m3 Stormovik by Pawel

Again, after cutting them out the parts must be properly shaped before checking them for proper fit. Here I'm using a little trick - I'm rounding the edges of the parts by embossing them with a tip of a paintbrush handle. This works better on sligtly soft work surface - in this case I have used some broadcloth:

GPM 1:33 Il-2m3 Stormovik by Pawel

The outer wing has some "teeth" prepared for the wingtip to attach to:

GPM 1:33 Il-2m3 Stormovik by Pawel

I started with glueing the top part for the wingtip to the "teeth", of course after careful checking for fit. After a few minutes I have checked the bottom, adjusted the bends a little and then I have also glued the bottom part of the wingtip. The fit was very nice:

GPM 1:33 Il-2m3 Stormovik by Pawel

GPM 1:33 Il-2m3 Stormovik by Pawel

GPM 1:33 Il-2m3 Stormovik by Pawel

As I wrote before, I'll mix some paint and I'll paint over the white edges later, that will help the looks of the model a lot.

Next thing to do will be joining the inner and outer wings together. Thanks for looking and have a nice day

Paweł


All comments and critique welcomed. Thanks for your honest opinions!

www.vietnam.net.pl

  • Member since
    May 2009
  • From: Poland
Posted by Pawel on Friday, January 3, 2020 5:39 AM

Hello!

In order to comfortably work on the undercarriage, the wings should have the final geometry, that's why I'm joining the outer wings with the remainder of the model today. The inner and outer wings end with a rib. Those ribs should be identical, so there's no "step" at the joint. That's why before those ribs are installed, they are sanded together (on their edge). Now after adding the wing skin it is good to sand the faces of the ribs, to ensure nice fit. Then those sanded faces are covered with glue and joined - but those joints will remain soft for some time - this is both good and bad. Good because it gives you time for adjustments - and bad because without control the geometry of the model can become something we don't want. That's why it's important to put the model in some kind of improvised jig that holds the desired geometry while the glue dries. Here's what I have built:

GPM 1:33 Il-2m3 Stormovik by Pawel

Now the dihedral of the wing might be a bit much - but that's the way the model was designed. I've already decreased the dihedral as much as the fuselage spar would allow. Changing it further might be challenging, because it would involve also redesigning everything under the wing - undercarriage, it's nacelles and so on. There's of course the question - how much dihedral should it really have?

That would be it for now - thanks for looking and have a nice day

Paweł

All comments and critique welcomed. Thanks for your honest opinions!

www.vietnam.net.pl

  • Member since
    May 2009
  • From: Poland
Posted by Pawel on Monday, January 6, 2020 9:21 AM

Hello!

This would be more comfortably done right after installing the horizontal stabilizers, but somehow I have missed it, so let me do it today, before it gets even more uncomfortable - installation of the horizontal stabilizer roots.

As usual everything starts with some printed parts:

GPM 1:33 Il-2m3 Stormovik by Pawel

As you can see the root for each stabilizer is printed in two parts - that makes it more complicated but I reckon the intent of the author was to give you a part with a fancy curve more closely following the real thing. After cutting the parts for one side out (L for left, P for right) I have shaped them and tested for fit, and then I decided to glue the together first:

GPM 1:33 Il-2m3 Stormovik by Pawel

After even more test-fitting I started installing the stabilizer root. I have started at the color partition line - that's about the only way to make sure this line will be where I want it to be:

GPM 1:33 Il-2m3 Stormovik by Pawel

Then, adding some glue step by step, I have finished the top and then the bottom. Then I just had to repeat it on the other side. Here's how the finished part turned out:

GPM 1:33 Il-2m3 Stormovik by Pawel

Thanks for looking and have a nice day

Paweł

All comments and critique welcomed. Thanks for your honest opinions!

www.vietnam.net.pl

  • Member since
    May 2009
  • From: Poland
Posted by Pawel on Saturday, January 11, 2020 5:29 PM

Hello!

Today I'd like to show my progress on the undercarriage fairings - parts pretty special to the Il-2. Let's satart with the parts:

GPM 1:33 Il-2m3 Stormovik by Pawel

We've got the outer skin (blue), inner skin (grey), the front of the fairing (the round parts) and three frames/bulkheads. The iner and outer skin both contain the undercarriage doors that have to be cut out if you'd like to pose the undercarriage down, like I intend to do. You could theoretically cut those out before or after glueing the fairing. I will cut the doors out before glueing the fairings, hoping for a cleaner cut. Some people would go for cutting the doors out after glueing, hoping for a better shape of the doors. The first check for fit at one showed, that the bulkheads are too big for the skins - this happens very often in may paper models so it really pays off to check that often:

GPM 1:33 Il-2m3 Stormovik by Pawel

I have sanded the bulkheads until they fit, then I have cut out the undercarriage doors and using strips of paper sandwiched between the outer and inner skin bits I have put one fairing together. Of course I had to repeat everything for the second time, for the other side of the aircraft:

GPM 1:33 Il-2m3 Stormovik by Pawel

Fitting a finished fairing to the wing doesn't have to be easy, so on the left side of the aircraft I have constructed the fairing a bit differently - I have fitted the front and therear of the fairing to the wing first, and just then I have installed the sides - this gives better fit to the lower wing surface, but the trade off is worse fit of the sides - oh well... The photos below show the construction of the rounded front parts of the fairing. Here the bulkhead is also too big  for the skin, but it's OK - you have to sand the side of the bulkhead to be conicaland then glue it so that it sticks out a little - the side of the bulkhead is the glueing surface where two parts of the fairing meet. I have used short strips of paper to help joining the fairing parts together:

GPM 1:33 Il-2m3 Stormovik by Pawel

GPM 1:33 Il-2m3 Stormovik by Pawel

Below are the photos of the finished undercarriage fairings:

GPM 1:33 Il-2m3 Stormovik by Pawel

And another photo of the compound fronts of the fairings. I have already mixed some acrylic paint to re-touch the edges of the parts, as can be seen in the photos above and below:

GPM 1:33 Il-2m3 Stormovik by Pawel

Now I'm working on the undercarriage itself - thanks for looking and have a nice day

Paweł

All comments and critique welcomed. Thanks for your honest opinions!

www.vietnam.net.pl

  • Member since
    October 2019
  • From: New Braunfels, Texas
Posted by Tanker-Builder on Thursday, January 23, 2020 6:55 AM

Hi Pawel:

    As you can see, It's been a while for me. Health issues and other things. I recently got elected President of the Board for our Rail Museum. Gees, I hope I do a good job! Anyway as you can see I found some things that piqued my interest.( The two Ships I mentioned )

 Now that I have a new Camera I might get this picture thing sorted out. Then Maybe you will be able to see what I've been up to. Card models under construction are as Follows. Edmund Fitzgerald. Confederate Ironclad and the AngelBurg Refrigerator Ship. My Foil Covered Airliner still resides in it's envelope.

    I built one quite a few years back when PMI was still in Business. That one went hanging off the ceiling of the Martinez Veterans Hospital Rec Room. I am sure it is not there now.

 That was my second aircraft and it was the same as the Foil Covered one ,except I didn't know about the foil one till later. My first was a very small F-4-J that I don't believe was more than four inches long. I will be back. T.B.

  • Member since
    May 2009
  • From: Poland
Posted by Pawel on Thursday, January 23, 2020 6:08 PM

Hello TB!

Congratulations on your new position - and I hope you're feeling all right health-wise. Thanks a lot for your comment - I've been missing any comments in this thread since I have resumed building of my baby here - I wasn't sure if anybody is even reading this.

It sure would be great to see some pictures of your builds.

I don't think I've heard about PMI before - I'm going to have to look it up...

Paper aircraft are cool, aren't they? Building aircraft models this way is a bit closer to the way most of real aircraft are constructed than plastic models...

And today I wanted to show you the way I solve one problem common to almost all aircraft models - how to do the wheels?

Now the instructions of old "Maly Modelarz" models if you know that old Polish brand, tell you to re-use some toy wheels - no need to say that this isn't the best way to do it... My take is to glue several cardboard disks together, then sand them, soak with CA and paint. If you put some creativity in it, you can get quite good aircraft wheels this way. This is the way my wheels looked before painting:

GPM 1:33 Il-2m3 Stormovik by Pawel

As you can see, for the main wheels I've done an imitation of bulging tire wall - this is done by cutting out the centers of the outer cardboard disks and sanding them on the inside before glueing the disks together. It's also good to drill a center hole in every disk (with the exception of the ones I mentioned before), to make the wheels straight and true while glueing them.

Let me proceed with the tail wheel - I'll build the main landing gear later. I have painted the tire dark grey and installe dthe wheel on a strut I have made out of 0,8mm copper wire. The wire is hidden between two paper parts of the "fork" near the wheel itself, and in a tube made out of thin paper in the remainder of the tail wheel strut:

GPM 1:33 Il-2m3 Stormovik by Pawel

It's better to make such parts out of thin paper, rather than the cardboard the model comes printed on, because thin paper can be rolled ito tight tubes better. I have redesigned the tail wheel assembly, too, because what comes in the GPM model doesn't really resemble the real thing. The tail wheel also needed one additional wire part that I have made myself. After adding it the time came to carefully check the fit of the new part to the rest of the model.

After I was sure everything fits like it should, I proceeded to paint the tail wheel strut grey:

GPM 1:33 Il-2m3 Stormovik by Pawel

Now it was only  a question of fixing the part in place - here's what it looks like now:

GPM 1:33 Il-2m3 Stormovik by Pawel

GPM 1:33 Il-2m3 Stormovik by Pawel

I hope you liked it - thanks for looking and have a nice day

Paweł

All comments and critique welcomed. Thanks for your honest opinions!

www.vietnam.net.pl

  • Member since
    October 2019
  • From: New Braunfels, Texas
Posted by Tanker-Builder on Friday, January 24, 2020 10:24 AM

Oh My:

 See? That's why people are surprised at paper ( Card ) models!  If I didn't know your work I would swear it was plastic! I just recently( in the last two days,)ordered two ships from overseas. Hey, What did you think of the old Maly Modelarz kits anyway?

    I got three, a German Destroyer and the Polish one and a Freighter. I started on the Polish one and am totaly enjoying the experience. A little more detailed with tiny parts than a lot of them! Catchya Later-T.B.       Gotta P.S. here. I noticed the rivet patterns on the plane. Did you know about using a pounce wheel on the inside lightly will make them more noticeable?

  • Member since
    April 2015
Posted by Mopar Madness on Sunday, January 26, 2020 9:32 PM

That is seriously impressive! 

Chad

God, Family, Models...

At the plate: 1/48 Airfix Bf109 & 1/35 Tamiya Famo

On deck: Who knows!

  • Member since
    February 2011
Posted by GreySnake on Monday, January 27, 2020 7:45 AM
Ventured over here out of curiosity and I’m very impressed! Never really looked into the building process of a paper model I’m amazed to say the least.
 
 
Tanker-Builder; I’m interested in seeing the Edmund Fitzgerald when you get around to it. I’ve always been fascinated by the doomed freighter after watching a documentary on it back in the nineties.  
  • Member since
    May 2009
  • From: Poland
Posted by Pawel on Monday, January 27, 2020 5:47 PM

Hello!

Thanks a lot for your comments, I'm glad somebody is reading this and I'm even more glad you like it!

TB - I would like to convince people to try paper models - as you alredy know they can be great if you want some unusual subject not kitted in plastic or just like BIG models that won't take your whole paycheck to buy. Plus, they are great developing your scratchbuilding skill!

Say, what Polish destroyer did you get? Maybe I have built it many years ago? I remember doing the ORP Piorun back in 1988 when it came out.

And those days I thought Maly Modelarz kits are amazing - huge, detailed, accurate. One problem I noted back then was you never knew what paper you're going to get, or if your copy will be printed right (in register). Now I know those babies weren't all that great, but still thay can be hard to beat for their fun/cost factor!

Good luck with your ships - looking forward to seeing those promised photos!

Mopar Madness - thanks a lot!

GreySnake - thank you very much! I'd like to show the modellers outside of Poland that a paper model, in most cases is no baby toy, but a full blooded model!

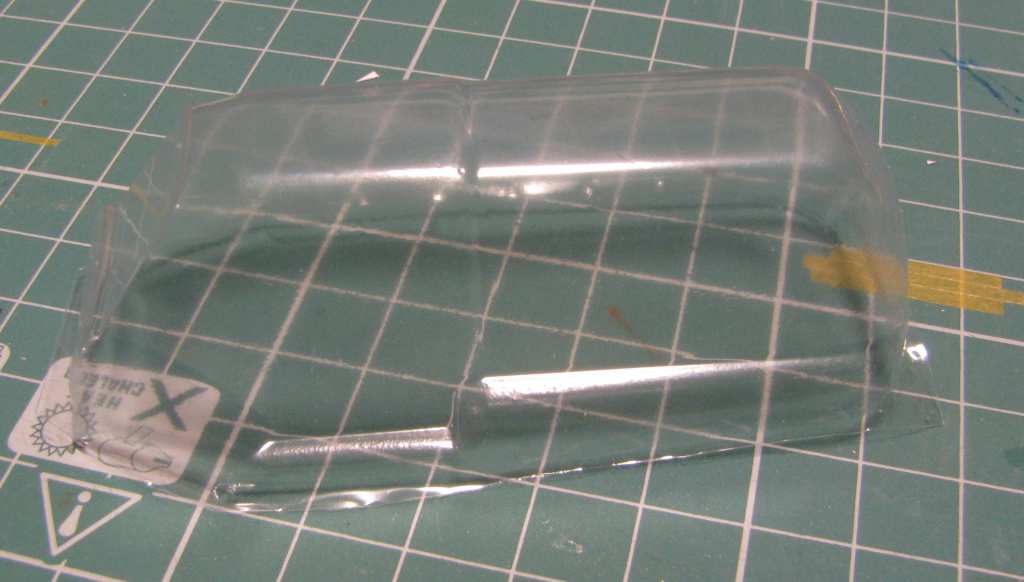
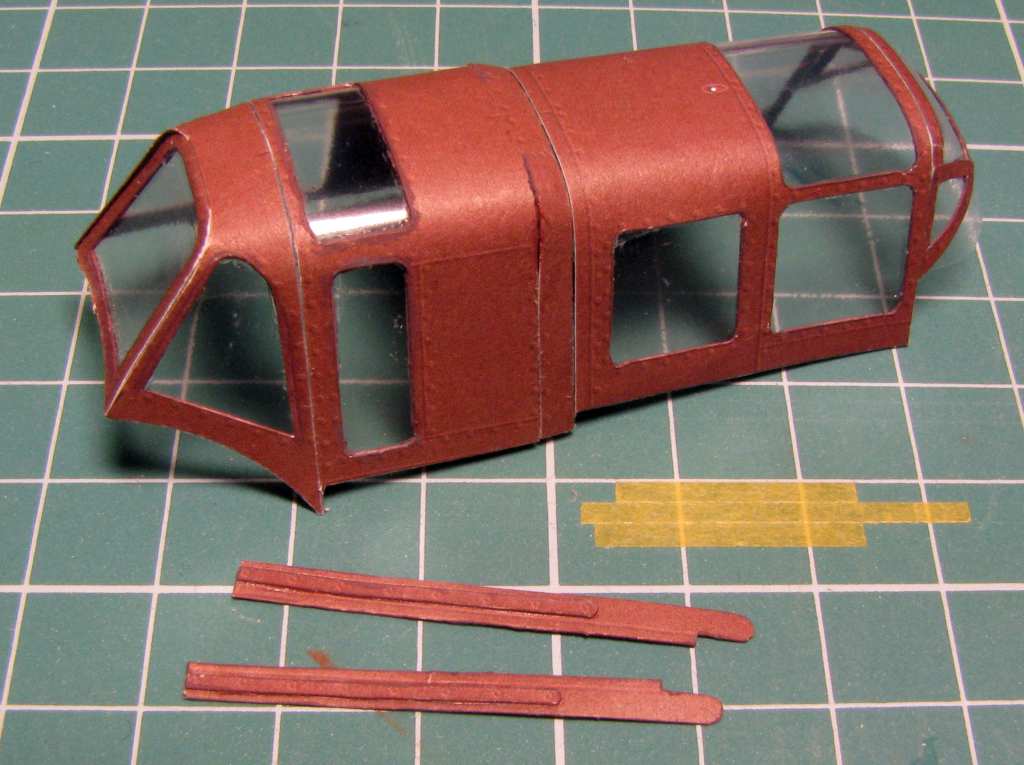
And I'm movin' on with the build - recently I have ordered a vacuum-formed canopy for my Il-2 - and that's the cool thing, for most paper models needing one they can be ordered and they don't cost much, I have paid about 2$ plus postage for this one:
GPM 1:33 Il-2m3 Stormovik by Pawel

There's also the option of making your own vacuum formed parts - I'd be glad to show you how, but it's a stuff for a separate thread. In older aircraft you could also build the paper canopy framing and then just glue individual flat or slightly curved windows from the inside (this could work here).

Thare are also paper parts in the model for the canopy:
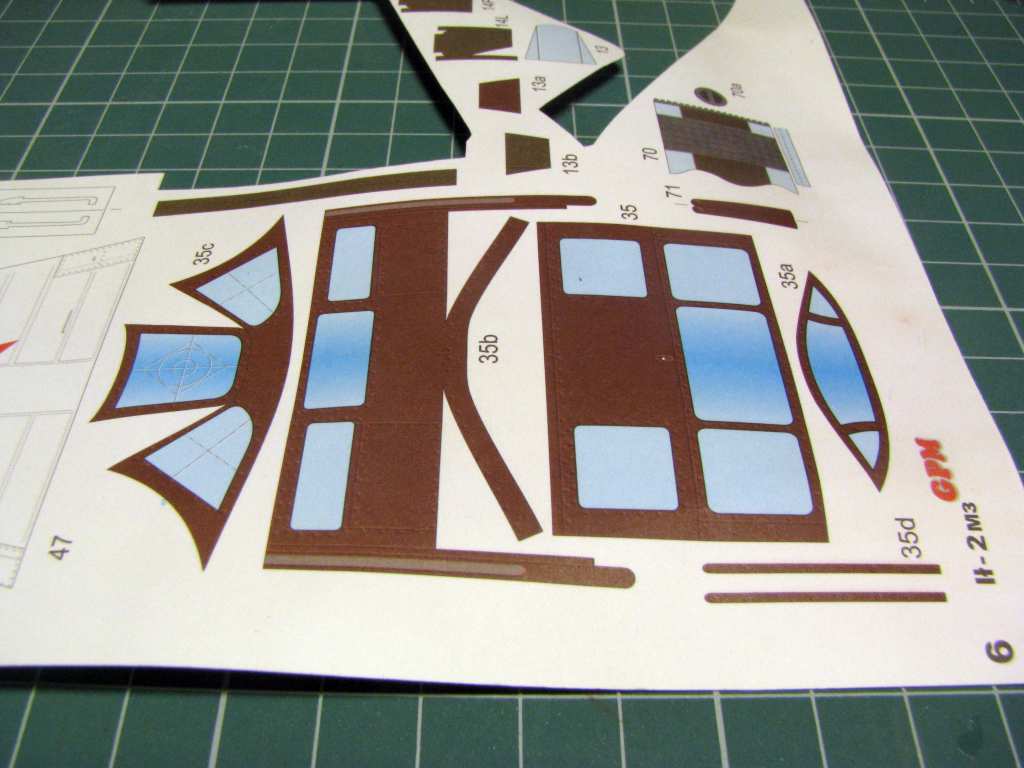
GPM 1:33 Il-2m3 Stormovik by Pawel

Those blue parts are for people who don't feel like building a detailed cockpit. In my case they will be cut out. Now on the inside I wouldn't want the parts to be white, so I have painted everything dark grey:
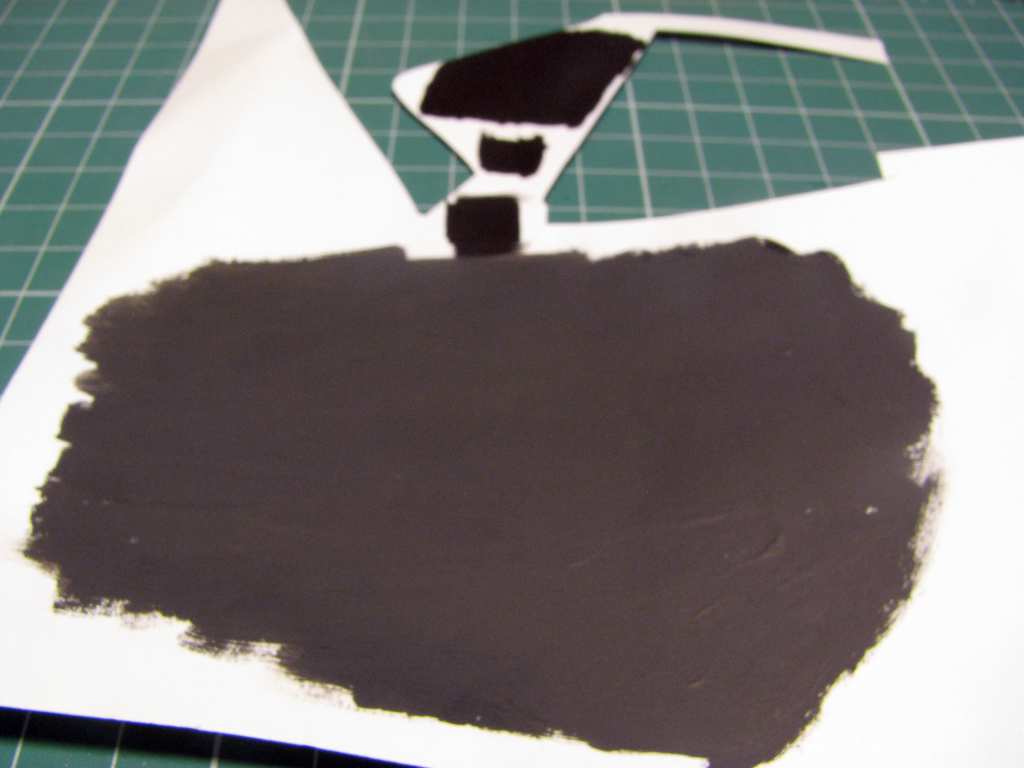
GPM 1:33 Il-2m3 Stormovik by Pawel

Now the hard part is to fit the paper parts to the vacuum formed part, and the first one is critical:
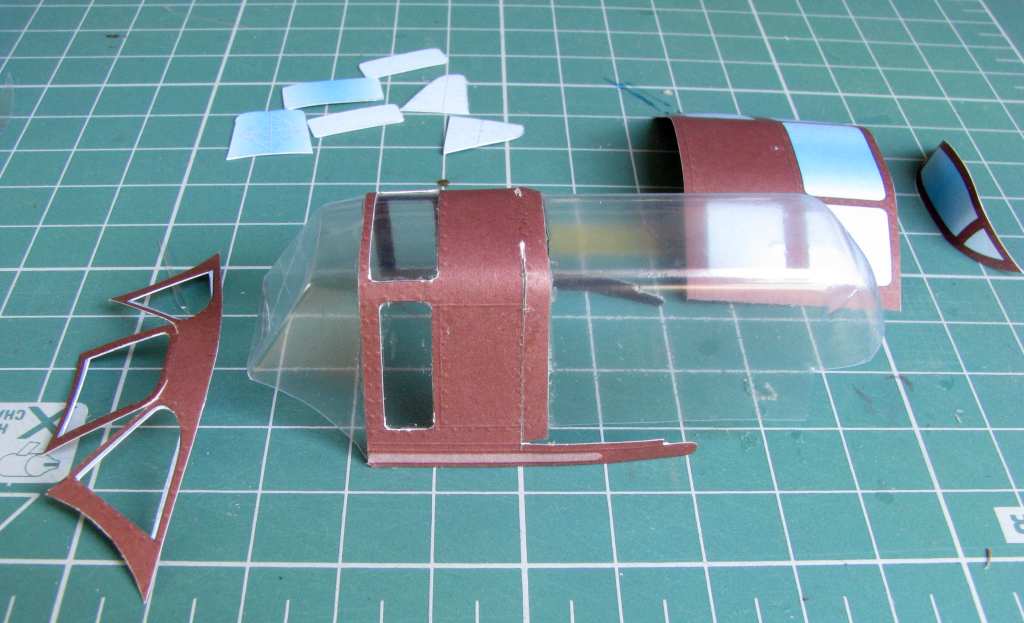
GPM 1:33 Il-2m3 Stormovik by Pawel

As you can see I had to adjust the windshield a little and it needs now to be touched-up where the colour doesn't match. I have also painted the edges of the cut-outs so that they aren't white - the model looks much better this way:
GPM 1:33 Il-2m3 Stormovik by Pawel

I have also cut away the rails for the sliding part - that will help aligning the part on the model, and there are still a few edges to touch up.

That would be it for now - thanks for reading and have a nice day

Paweł

All comments and critique welcomed. Thanks for your honest opinions!

www.vietnam.net.pl

  • Member since
    October 2019
  • From: New Braunfels, Texas
Posted by Tanker-Builder on Tuesday, January 28, 2020 9:43 AM

Hi Pawel.

      To be honest with you I am not sure I do know it sounded like ORP Maly? She appeared to be a take-off on a British Tribal class.

  • Member since
    October 2019
  • From: New Braunfels, Texas
Posted by Tanker-Builder on Tuesday, January 28, 2020 9:46 AM

Hello GreySnake!

   The Eddie Fitz did create a stir back in the day. I got her because when I was little I touched her( The Real One) when she visited Buffalo, New York. The color and finish on the model are darned near dead on.  

JOIN OUR COMMUNITY!

Our community is FREE to join. To participate you must either login or register for an account.

SEARCH FORUMS
FREE NEWSLETTER
By signing up you may also receive reader surveys and occasional special offers. We do not sell, rent or trade our email lists. View our Privacy Policy.