SEARCH FINESCALE.COM

Enter keywords or a search phrase below:

The Endless Nausicaa Model Thread

57707 views
335 replies
1 rating 2 rating 3 rating 4 rating 5 rating
  • Member since
    January 2018
Posted by PeterPan on Friday, June 8, 2018 6:03 AM

AWESOME, AWESOME, AWESOME.

Thanks for showing your log the way you do. Lots of work there with the model and posting updates. Greatly appreciated. Learning lots about working in plastic, which I am just starting in.

Peter

  • Member since
    May 2011
  • From: Honolulu, Hawaii
Posted by Real G on Friday, June 8, 2018 5:18 PM

Thank you, Peter Pan!  But if you ever need to do stuff I am doing, you are building one really crappy model!  Big Smile  Or a vac-form.  Stick out tongue

Time for a mini-update.  I got the aileron cutouts sorted, and have started on the ailerons proper.

https://flic.kr/p/281otft] [/url]Bakagalas-104 by N.T. Izumi, on Flickr

https://flic.kr/p/281ot2c] [/url]Bakagalas-105 by N.T. Izumi, on Flickr

Ha-ha, see that crack in the old plastic panel?  It shattered when I was pulling off the trailing edge strip!  Stuck it back on and will fill/sand after the primer goes on.

The undersides of the wings, with their 30-year fresher plastic paneling, look a lot more orderly than the battered topsides.

https://flic.kr/p/KSxHbE] [/url]Bakagalas-106 by N.T. Izumi, on Flickr

Looks like I will actually be able to get the wing paneling done by the weekend, meaning I can start on the engines.  I hope to make rapid progress to boost the entertainment level!

“Ya ya ya, unicorn papoi!”

  • Member since
    May 2011
  • From: Honolulu, Hawaii
Posted by Real G on Monday, June 11, 2018 1:34 PM

Okay guys, some progress!  I wanted to start the underwing engine fairings, and alignment was going to be important.  So a jig with a sliding component was built to set the fairings fore/aft on the wings, ensure vertical alignment, and locate the critical pivot points for the biplane flaps.

https://flic.kr/p/KVBq1S] [/url]Bakagalas-101 by N.T. Izumi, on Flickr

The fuselage belly had to be plated to bring the model level in the jig.

https://flic.kr/p/27ZCva9] [/url]Bakagalas-104 by N.T. Izumi, on Flickr

Testing, testing.  My fat hands and sausage fingers could not fit in the narrow space bewteen the jig base and wings, so it's going to be tweezers all the way.

https://flic.kr/p/KVBpSA] [/url]Bakagalas-102 by N.T. Izumi, on Flickr

https://flic.kr/p/25kXehm] [/url]Bakagalas-105 by N.T. Izumi, on Flickr

https://flic.kr/p/286VKhB] [/url]Bakagalas-106 by N.T. Izumi, on Flickr

If all goes well, I'll end up with something like this.

https://flic.kr/p/25kXe6j] [/url]Bakagalas-107 by N.T. Izumi, on Flickr


“Ya ya ya, unicorn papoi!”

  • Member since
    May 2011
  • From: Honolulu, Hawaii
Posted by Real G on Tuesday, June 12, 2018 1:04 PM

I am quickly running out of plating to apply to the airframe, which is a good thing!  The last remaining areas were the wing roots, so they were addressed.  I got one side done last night and started the other side, but ran out of time.

https://flic.kr/p/273vgUC] [/url]Bakagalas-109 by N.T. Izumi, on Flickr

https://flic.kr/p/26LmUVg] [/url]Bakagalas-110 by N.T. Izumi, on Flickr

Only four more small plates to go!

https://flic.kr/p/273vh7G] [/url]Bakagalas-108 by N.T. Izumi, on Flickr

I spent most of my bench time last night working out the engine fairing structure, and extending the rails on the alignment jig to assist with locating the secondary engines.  The four outboard engines are much simpler in shape so will not require the jig.

Sorry to bore everyone with months of rough carpentry.  Like the dragons in "Game of Thrones", the detail stuff is coming - soon.  (But I confess to not watching the show.)

“Ya ya ya, unicorn papoi!”

  • Member since
    November 2009
  • From: SW Virginia
Posted by Gamera on Tuesday, June 12, 2018 7:35 PM

Still coming along great! Love how everything looks.

"I dream in fire but work in clay." -Arthur Machen


  • Member since
    May 2011
  • From: Honolulu, Hawaii
Posted by Real G on Wednesday, June 13, 2018 5:14 PM

Thanks for your support Gamera!

Well, the wings are finally plated over, so more interesting things can happen now.

https://flic.kr/p/Jwewqz] [/url]Bakagalas-112 by N.T. Izumi, on Flickr

There are lots of little stuff to clean up, but they are not a problem.  For example, the upper wing fillets were short at the back end.  30 years ago, this was an "uh-oh" moment, but now we just shove a sliver of sheet plastic into the gap and sand it flush.  Too easy.  Any overly gappy plating will be dealt with the same way.

https://flic.kr/p/L3bdbh] [/url]Bakagalas-113 by N.T. Izumi, on Flickr

So after much thinking and planning, the engine fairings will be started tonight.  Can't wait!


“Ya ya ya, unicorn papoi!”

  • Member since
    May 2011
  • From: Honolulu, Hawaii
Posted by Real G on Wednesday, June 13, 2018 6:09 PM

And this just showed up in the mail!

https://flic.kr/p/L3Hpb1] [/url]Gunship-01 by N.T. Izumi, on Flickr

When Bandai acquired the molds for the Nausicaa kits from Tsukuda, they re-engineered them for snap fit and tried to mold the parts in individual colors.  I knew there was some alterations to the parts to improve them, but the scope of modifications done to the Gunship came as quite a surprise.  In addition to improvements to the Nausicaa and Mito figures, the Gunship's panels lines appear to be completely different.  It's almost like a new kit.  There are also gun muzzles molded into the Derringer-like nose of the aircraft, which was definitely not on the original Tsukuda kit.  I am very pleased.  Okay gotta put the new toy away and get on with the Bakagalas!

https://flic.kr/p/L3HoTY] [/url]Gunship-02 by N.T. Izumi, on Flickr

“Ya ya ya, unicorn papoi!”

  • Member since
    May 2011
  • From: Honolulu, Hawaii
Posted by Real G on Wednesday, June 13, 2018 7:14 PM

I wonder what Mito is doing in the back seat of the Gunship?  Giving the Tolmekians the "birdie"?  Aw nuts, now I want a 1/72 Tolmekian Corvette...

“Ya ya ya, unicorn papoi!”

  • Member since
    May 2011
  • From: Honolulu, Hawaii
Posted by Real G on Thursday, June 14, 2018 5:33 PM

The engine fairings got a start last night.  I only got as far as roughing out the core structure due to much measuring and recalculating.

https://flic.kr/p/28cqxCr] [/url]Bakagalas-115 by N.T. Izumi, on Flickr

Some 2mm plastic rod stubs were added to the base plate of the core structure to assist in alignment.  Holes were drilled into the 0.040" base plate to give them some gluing surface area, and the excess on top was trimmed and sanded flush.  Oops, I drilled the holes off-center on the wings!  I can fix that.  I have to stop these careless mistakes, but I did say I was a measure once, cut twice kind of person.  Stick out tongue

https://flic.kr/p/28cqxtP] [/url]Bakagalas-116 by N.T. Izumi, on Flickr

https://flic.kr/p/2882G9W] [/url]Bakagalas-118 by N.T. Izumi, on Flickr

The previously made jig assists in getting the fairng to be square all around.  It occurred to me that the holes for the biplane flaps would be easy to mark on the outside of the finished fairings if I made another slider for the jig.  I'll show what I mean when it comes time to mark them.

“Ya ya ya, unicorn papoi!”

  • Member since
    November 2009
  • From: SW Virginia
Posted by Gamera on Thursday, June 14, 2018 9:46 PM

Ohhhhh now you're getting into the really complicated parts!

And nice gunship. Gosh, I haven't seen the movie in years...

"I dream in fire but work in clay." -Arthur Machen


  • Member since
    May 2011
  • From: Honolulu, Hawaii
Posted by Real G on Friday, June 15, 2018 1:52 PM

Gamera,

Well time consuming parts is more like it.

I spent last night figuring out how to make one of the engine fairings, by trial and error as per my M.O.  Mostly trial, a little error.  Without going into boring details, here is where it stands as of today:

https://flic.kr/p/L6jC9y] [/url]Bakagalas-120 by N.T. Izumi, on Flickr

https://flic.kr/p/25tfJhE] [/url]Bakagalas-122 by N.T. Izumi, on Flickr

The trailing edges will be filled in by stacking sheet plastic like lumber until all the recesses are filled.  It will then be sanded to a sorta aerodynamic shape.  Telescoping tubing will then be inserted to form the rocket engine exhausts.

When I took this old model out to finish, I mocked my primitive SLAM (Sheet LAMination) technique to form parts, but it looks like I'm using it extensively even now.  It sure beats carving a buck from wood and vac-forming, especially so for one-off or two-off parts.  But the landing gear sponsons and possibly the canopy will require vac-forming, no getting around that.  I'd better go look for it. 

“Ya ya ya, unicorn papoi!”

  • Member since
    May 2011
  • From: Honolulu, Hawaii
Posted by Real G on Monday, June 18, 2018 1:09 PM

The first engine fairing has been roughed out, and lessons learned will be applied to streamline the construction process for the opposite hand unit as well as the two smaller units.  To fill around the tubing, I stacked strip styrene vertically.  I tried horizontally orienting them at first, but that didn't work out.  This way was much more effective and easier.

https://flic.kr/p/25uMHtY] [/url]Bakagalas-123 by N.T. Izumi, on Flickr

https://flic.kr/p/25uMHgo] [/url]Bakagalas-126 by N.T. Izumi, on Flickr

The rocket exhausts will be made from telescoping tubing.  The construction of the trailing edge may seem overly elaborate, but it is the only way I could think of to cleanly make those engine openings.

https://flic.kr/p/25wzXU3] [/url]Bakagalas-127 by N.T. Izumi, on Flickr

I made a card stock template to work out the size/shape of the small inboard fairings that will support the flaps and test fitted it to the wings along with the engine fairing, to check for proportion and position.  Looks good, construction will proceed.

https://flic.kr/p/25wzXx1] [/url]Bakagalas-129 by N.T. Izumi, on Flickr

In my disorganized brain, I only now realized that the landing gear sponsons were more of a priority than the engines.  Plus there were some "oops" areas that will need fixing where the cut-outs on the fuselage sides were ovesized/lopsided.  I also wanted to redo the spacing of the tyres.  The larger of the two types of resin tyres I sourced also would not fit into the old sponsons, so new ones were started.  Again, I had planned on vac-forming these, but decided to build them up like the wings and engines.

https://flic.kr/p/JFjjhH] [/url]Bakagalas-130 by N.T. Izumi, on Flickr

I'll get back to the engines after the sponsons are complete.


“Ya ya ya, unicorn papoi!”

  • Member since
    November 2009
  • From: SW Virginia
Posted by Gamera on Monday, June 18, 2018 2:15 PM

Oh wow!!! 

I need a pop-eyed emote!!! 

"I dream in fire but work in clay." -Arthur Machen


  • Member since
    May 2011
  • From: Honolulu, Hawaii
Posted by Real G on Tuesday, June 19, 2018 4:22 PM

Put your eyes back in their sockets Gamera, here goes another trial and error process:

https://flic.kr/p/28hkuJG] [/url]Bakagalas-132 by N.T. Izumi, on Flickr

https://flic.kr/p/28hkuRL] [/url]Bakagalas-133 by N.T. Izumi, on Flickr

The "ribs" and "longerons" are nothing but straight plastic strip fitted in a grid pattern around the landing gear boxes, then sanded down to form the needed contours.  Not much planning nor precision to do this, and the challenge will be to avoid over-sanding, which I have already done.  Embarrassed  "Oopsies" are repaired by simply gluing more strip onto the low areas and sanding to the intended shape.  And then trying to avoid making more mistakes!  Areas with gentle contours will be covered with the usual crinkled sheet plastic, tight radius areas such as the front and back ends will be filled in solid using the SLAM method.  And that's the plan, Ripley.

Okay okay okay, so I'm avoiding vac-forming as much as possible.  But I might have to vac the lower portions of the sponsons to get a thin edge for the wheel cut outs.  Maybe.  Maybe not.  Wink

“Ya ya ya, unicorn papoi!”

  • Member since
    May 2011
  • From: Honolulu, Hawaii
Posted by Real G on Wednesday, June 20, 2018 1:24 PM

The other sponson has been framed but not yet shaped.  It happened much quicker than the first one, as the process was now streamlined.

https://flic.kr/p/27hPurb] [/url]Bakagalas-134 by N.T. Izumi, on Flickr

As mentioned, the formers and longerons are just straight pieces of plastic strip; the only element of precision was the use of a "Chopper" to quickly get consistent lengths.

https://flic.kr/p/28p5EsM] [/url]Bakagalas-135 by N.T. Izumi, on Flickr

I have thought about how to best (i.e. easy and lazy) cover the sponsons, and after some thought decided the way to go is to fill the sponsons with epoxy putty and vac form over them.  The contours are just too tight to use the old crinkled plate method.  The sponsons will require inserts on their bottoms to continue the contours underneath, for a vac-form bottom piece to allow thin edges around the wheel openings.

https://flic.kr/p/Lge82q] [/url]Bakagalas-136 by N.T. Izumi, on Flickr

“Ya ya ya, unicorn papoi!”

  • Member since
    November 2009
  • From: SW Virginia
Posted by Gamera on Wednesday, June 20, 2018 7:19 PM

That's so cool G!

I'm making metal notes, someday ah someday I'll try something like this! But right now I've got about a zillion kits in boxes I need to be working on- and I'm wasting time on the internet as usual... Embarrassed

"I dream in fire but work in clay." -Arthur Machen


  • Member since
    July 2014
  • From: Philadelphia Pa
Posted by Nino on Wednesday, June 20, 2018 7:54 PM

Real G

[/url]Bakagalas-133 by N.T. Izumi, on Flickr

The "ribs" and "longerons" are nothing but straight plastic strip ....


 Beautiful work and some real pain-staking construction.  It's apparent I will need to order some Evergreen plastic before it is all sold out...Big Smile
 
   Nino
  • Member since
    May 2011
  • From: Honolulu, Hawaii
Posted by Real G on Thursday, June 21, 2018 12:58 PM

Gamera - Well to be honest this project was borne out of an almost maniacal desire to have a kit of this beast.  So it's not about any skills, it's all about an uncontrollable obsession that drives me.  No, no, no wait... it's passion.  Yeah, that's it.  Passion.  Cool  But you can feel the passion too - just find something you absolutely love, and build a model of it.  If you love it, you will find a way!  And yeah, I also have a butt-load of unbuilt kits waiting on the shelves.  And closets.  And under the bed...

Nino - Thanks for the kind words.  And no worries, my LHS carries a good stock, AND 1) they re-order regularly, 2) they will special order, and 3) the special orders come in a week or two because of 1).  Oh I forgot to mention that it is located in Honolulu.  Sorry.  Embarrassed

OK gotta do a free plug - it is Hobbietat, located in Palolo Valley, mere blocks away from my house.  If you check out their website, they make absolutely no mention of plastic models and supplies despite carrying some scale kits, Gundams, and cars.  I guess it is because they started out as a deep water fishing supply store that branched out to R/C planes and cars, and only very recently plastic kits.  Their Plastruct strip/rod/tube selection is pretty good because according to the owners Butch and Paula, the architectural students from the university go there to buy supplies for their projects.  Lucky me - no other LHS has their selection.

So no update for today, as I'm still working on those landing gear sponsons.  Like Wiley E. Coyote, I am concocting a convoluted plan to get them built.  I think I'll need a large rocket, some rope, a wooden crate, and bird seed.

“Ya ya ya, unicorn papoi!”

  • Member since
    March 2013
Posted by LonCray on Thursday, June 21, 2018 1:46 PM

Funny enough, I'm going to visit your fair city in a few weeks and I've reserved a day for looking for hobby shops - I'll put Hobbietat on the list!  

  • Member since
    May 2011
  • From: Honolulu, Hawaii
Posted by Real G on Thursday, June 21, 2018 6:15 PM

LonCray,

The most well-stocked hobby shops are The Hobby Company and Animeya, both in Pearl City and in the same building.  Hobby Co. has the "normal" stuff like planes, tanks, some ships, cars, R/C, and crafts.  Animeya is all Gundam stuff, but they have a lot of Gunze hobby supplies like paint, glues, etc.  There are also some other small shops that carry Gundam kits and Japanese chochkies like Mini-Q in Mililani and Pearl City.

Weller's Hobbycraft in Kailua is the last brick and mortar hobby shop on the island.  Their selection is a lot smaller than Hobby Co., but they have some old US sci-fi kits that are long OOP.

Hobbietat is first and foremost a fishing supply and R/C store, and their paint selection reflects this.  I like them because I can get consumable supplies from them and are conveniently close to where I live.

HTH

“Ya ya ya, unicorn papoi!”

  • Member since
    November 2009
  • From: SW Virginia
Posted by Gamera on Friday, June 22, 2018 7:38 AM

G, yeah there's a few things I can't find kits for. Someday I might attempt to scratchbuild something from Babylon 5 or FarScape. You are inspiring me to try! 


And lol, I've got about twenty Aloha shirts but I've never been to Hawaii. And recently I picked up all eight seasons of Magnum P.I. and am watching them in order. One day I gotta fly out to visit you guys in paradise!!! 

"I dream in fire but work in clay." -Arthur Machen


  • Member since
    March 2013
Posted by LonCray on Friday, June 22, 2018 10:21 AM

Thanks Real G!  I appreciate the information.  First thing I do before any trip is figure out if there's going to be any model stores in the area or on the route and if I'm going to have time to visit them.  When I drive to Gen Con in Indianapolis each year (but not this year), I make sure to spend a night in Columbus Ohio so I can go to Hobbyland there.  All the good brick and mortar places near me are gone, so hobby stores on vacations are a bonus!

  • Member since
    May 2011
  • From: Honolulu, Hawaii
Posted by Real G on Friday, June 22, 2018 6:30 PM

Lon Cray - Glad to help!  Is the hobby shop in Columbus close to the convention center?  The last time I was there, me and a friend strolled around town just to see what there was to see.  They had a really nice graphic arts store on the main drag.

Gamera - Wow, you have twice as many aloha shirts as I do!  I also like the ships from B5, especially the weird ones, like the Shadows crab-things and the Vorlon stuff.  I was disappointed when Monogram only did the B5 station and the Starfury.  Years ago I collected some orthogonal views from the internet of several ships with the thought of making them.  Out of the lot, I think Kosh's transport is the one I'd like to build.  But how to get that crazy fluoresent kaleidoscope effect inside the "petals"?

I'm still banging away at the landing gear sponsons - update will follow on Monday.

“Ya ya ya, unicorn papoi!”

  • Member since
    May 2011
  • From: Honolulu, Hawaii
Posted by Real G on Saturday, June 23, 2018 5:38 PM

I'm a big, fat liar!

Work on the sponsons is going well, so here are some progress pics.  I tried inking the sponson framing with permanent marker.  I figured that the color contrast would make it easier to gauge progress during sanding, and it did.  To spread the color around, I used alcohol as a thinner and brushed it into the nooks and crannies where the felt tip of the pen would not reach.

https://flic.kr/p/25FeTG1] [/url]Bakagalas-137 by N.T. Izumi, on Flickr

The spaces were packed with Milliput two-part epoxy putty and left to cure overnight.  Here is a pic of the old sponsons with balsa wood sides, and the new ones with the Milliput.  The one in the foreground has been rough sanded.  Sanding Milliput takes patience, elbow grease, and lots of soapy water!  The sanding slurry sticks to everything.

https://flic.kr/p/276FsBx] [/url]Bakagalas-139 by N.T. Izumi, on Flickr

And test fitted to the fuselage, just for fun.

https://flic.kr/p/276FvKr] [/url]Bakagalas-140 by N.T. Izumi, on Flickr

So the plan... um, I forgot what number plan I'm on now, is to vac form a shell using the sponsons.  The wheels will have an independent frame to align them, and some bulkheads will be made to support the sponson shell.  And that's the plan, Ripley.

“Ya ya ya, unicorn papoi!”

  • Member since
    November 2009
  • From: SW Virginia
Posted by Gamera on Sunday, June 24, 2018 3:20 PM

Oh cool, honest to gosh if I didn't the different sorts of materials I'd swear she were a commercially available kit.


As to scratchbuilding I'd thought about trying the Centari Vorchan, it's pretty angular and slab-sided so I figured it would be easier than some of the others.

"I dream in fire but work in clay." -Arthur Machen


  • Member since
    August 2007
  • From: back country of SO-CAL, at the birth place of Naval Aviation
Posted by DUSTER on Sunday, June 24, 2018 6:13 PM

Real G

https://flic.kr/p/276FvKr] [/url]Bakagalas-140 by N.T. Izumi, on Flickr

So the plan... um, I forgot what number plan I'm on now is to vac form a shell using the sponsons.  The wheels will have an independent frame to align them, and some bulkheads will be made to support the sponson shell.  And that's the plan, Ripley 


Plan #'s are the bane of Real Creative Thinkers, we have just too many more worthy things to occupy our massive intellects,    

                                                 Sometimes,

                                                         I think,

                                                            well you know


Steve

Building the perfect model---just not quite yet  Confused

  • Member since
    March 2013
Posted by LonCray on Monday, June 25, 2018 8:23 AM

Hobbyland in Columbus is 7 miles straight north up High Street from the Convention Center.  206 Graceland Blvd.  Maybe a half hour drive with big city traffic.  

  • Member since
    May 2011
  • From: Honolulu, Hawaii
Posted by Real G on Monday, June 25, 2018 1:13 PM

Gamera - I dove into the internet for a peek at the Centauri Vorchan and noted it kind of looked Kingon/Romulan in shape.  Tell you what, let's do an informal group build!  I'll do Kosh's transport, and we can bounce problem solutions back and forth.  Big Smile

Duster - Nah, I'm more like Wiley E. Coyote.  I identify with his methods (and results).  I don't really have plans.  You see the mob has plans.  Comissioner Gordon has plans.  I'm like a dog chasing cars - I wouldn't know what to do if I caught one!  Now where's the Joker emoji when  need it?

LonCray - Good to know.  Maybe I'll check it out if I get back to Columbus!

Okie dokie, some progress:

https://flic.kr/p/25JACQh] 
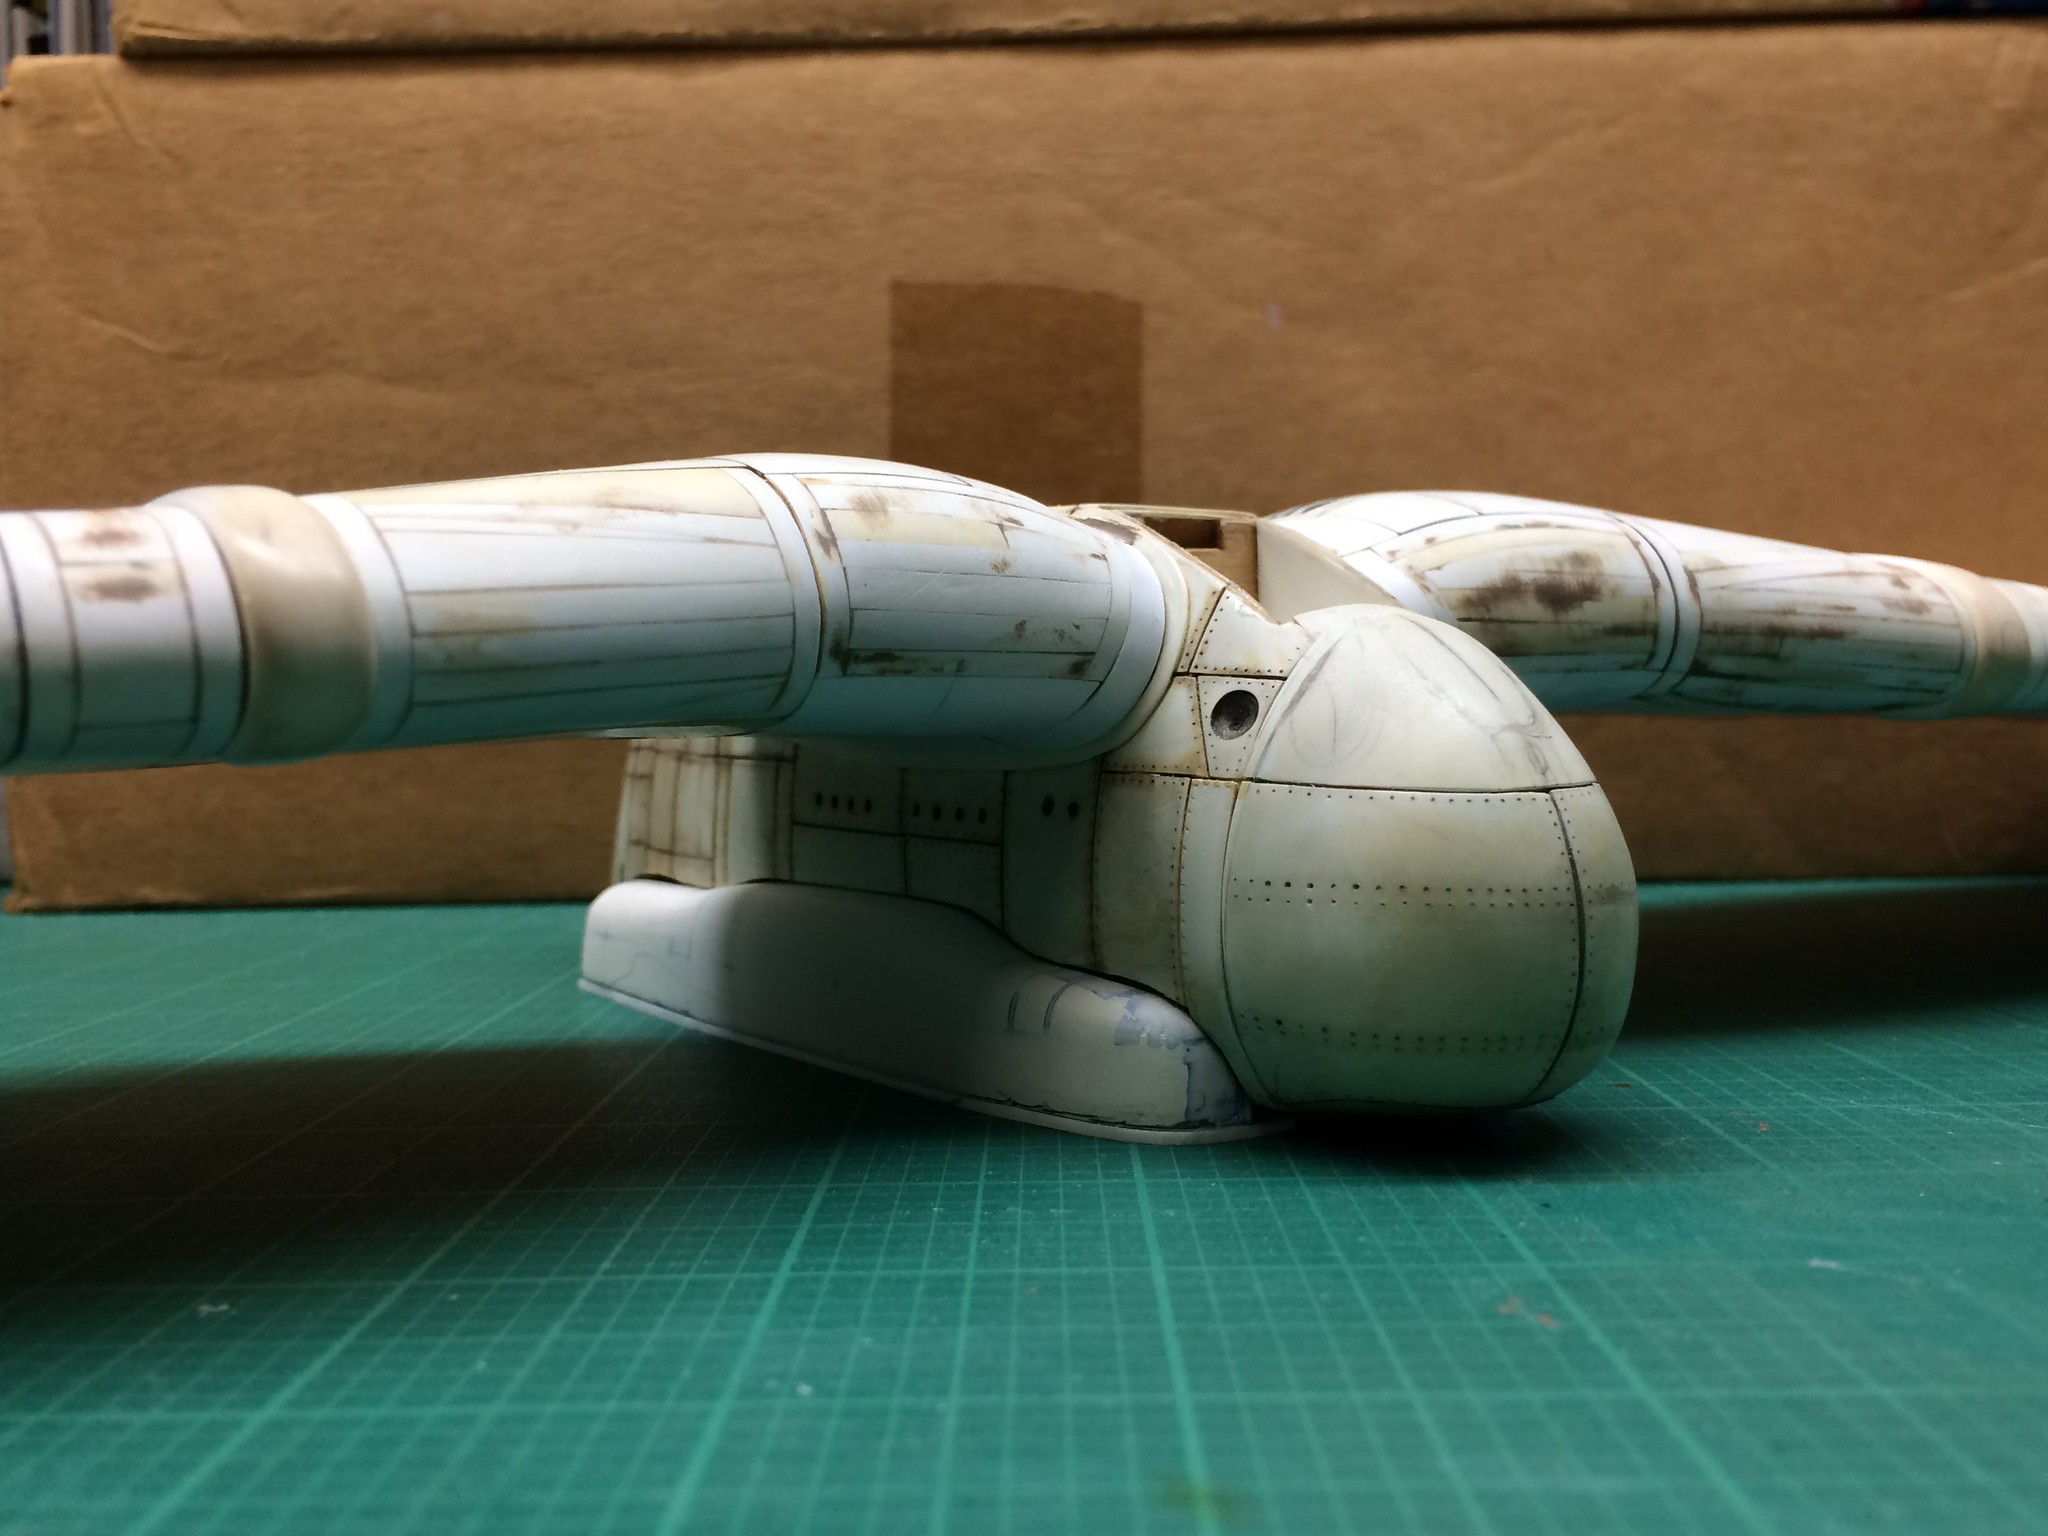
[/url]Bakagalas-141 by N.T. Izumi, on Flickr

I now have both sponsons rough sanded, and am now in the process of refining them and the fuselage cutouts for proper fit.

https://flic.kr/p/LnQfGj] 
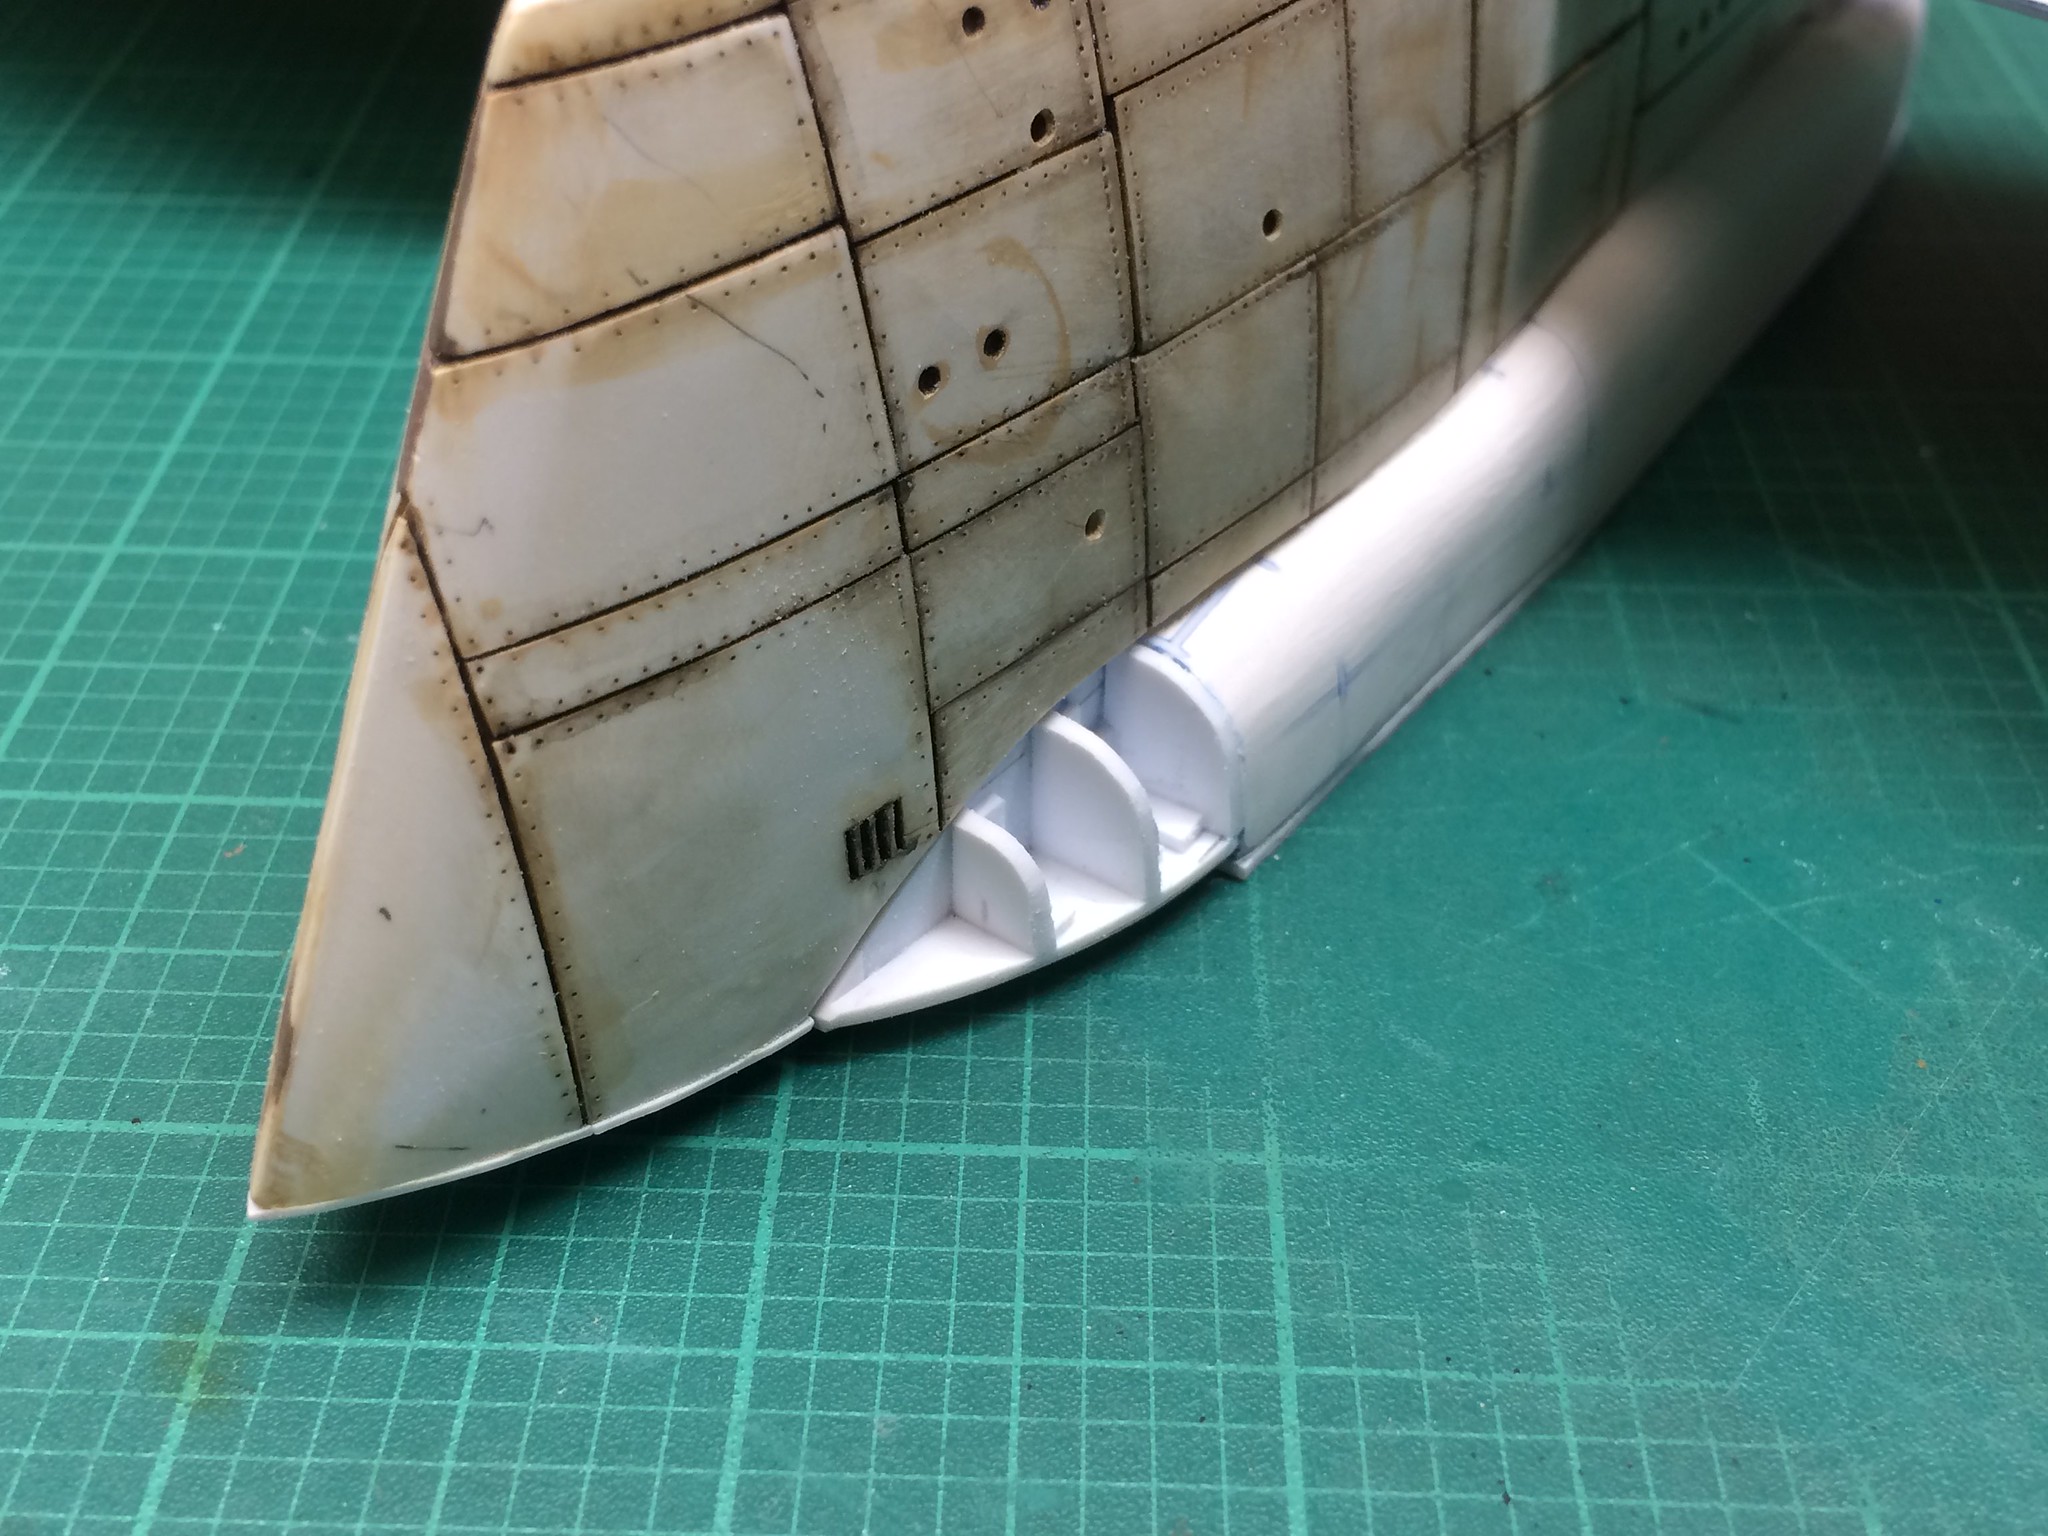
[/url]Bakagalas-143 by N.T. Izumi, on Flickr

Oops, forgot about the ends of the sponsons.  They got framed up and are ready for filling with epoxy putty.

https://flic.kr/p/2791DGZ] 
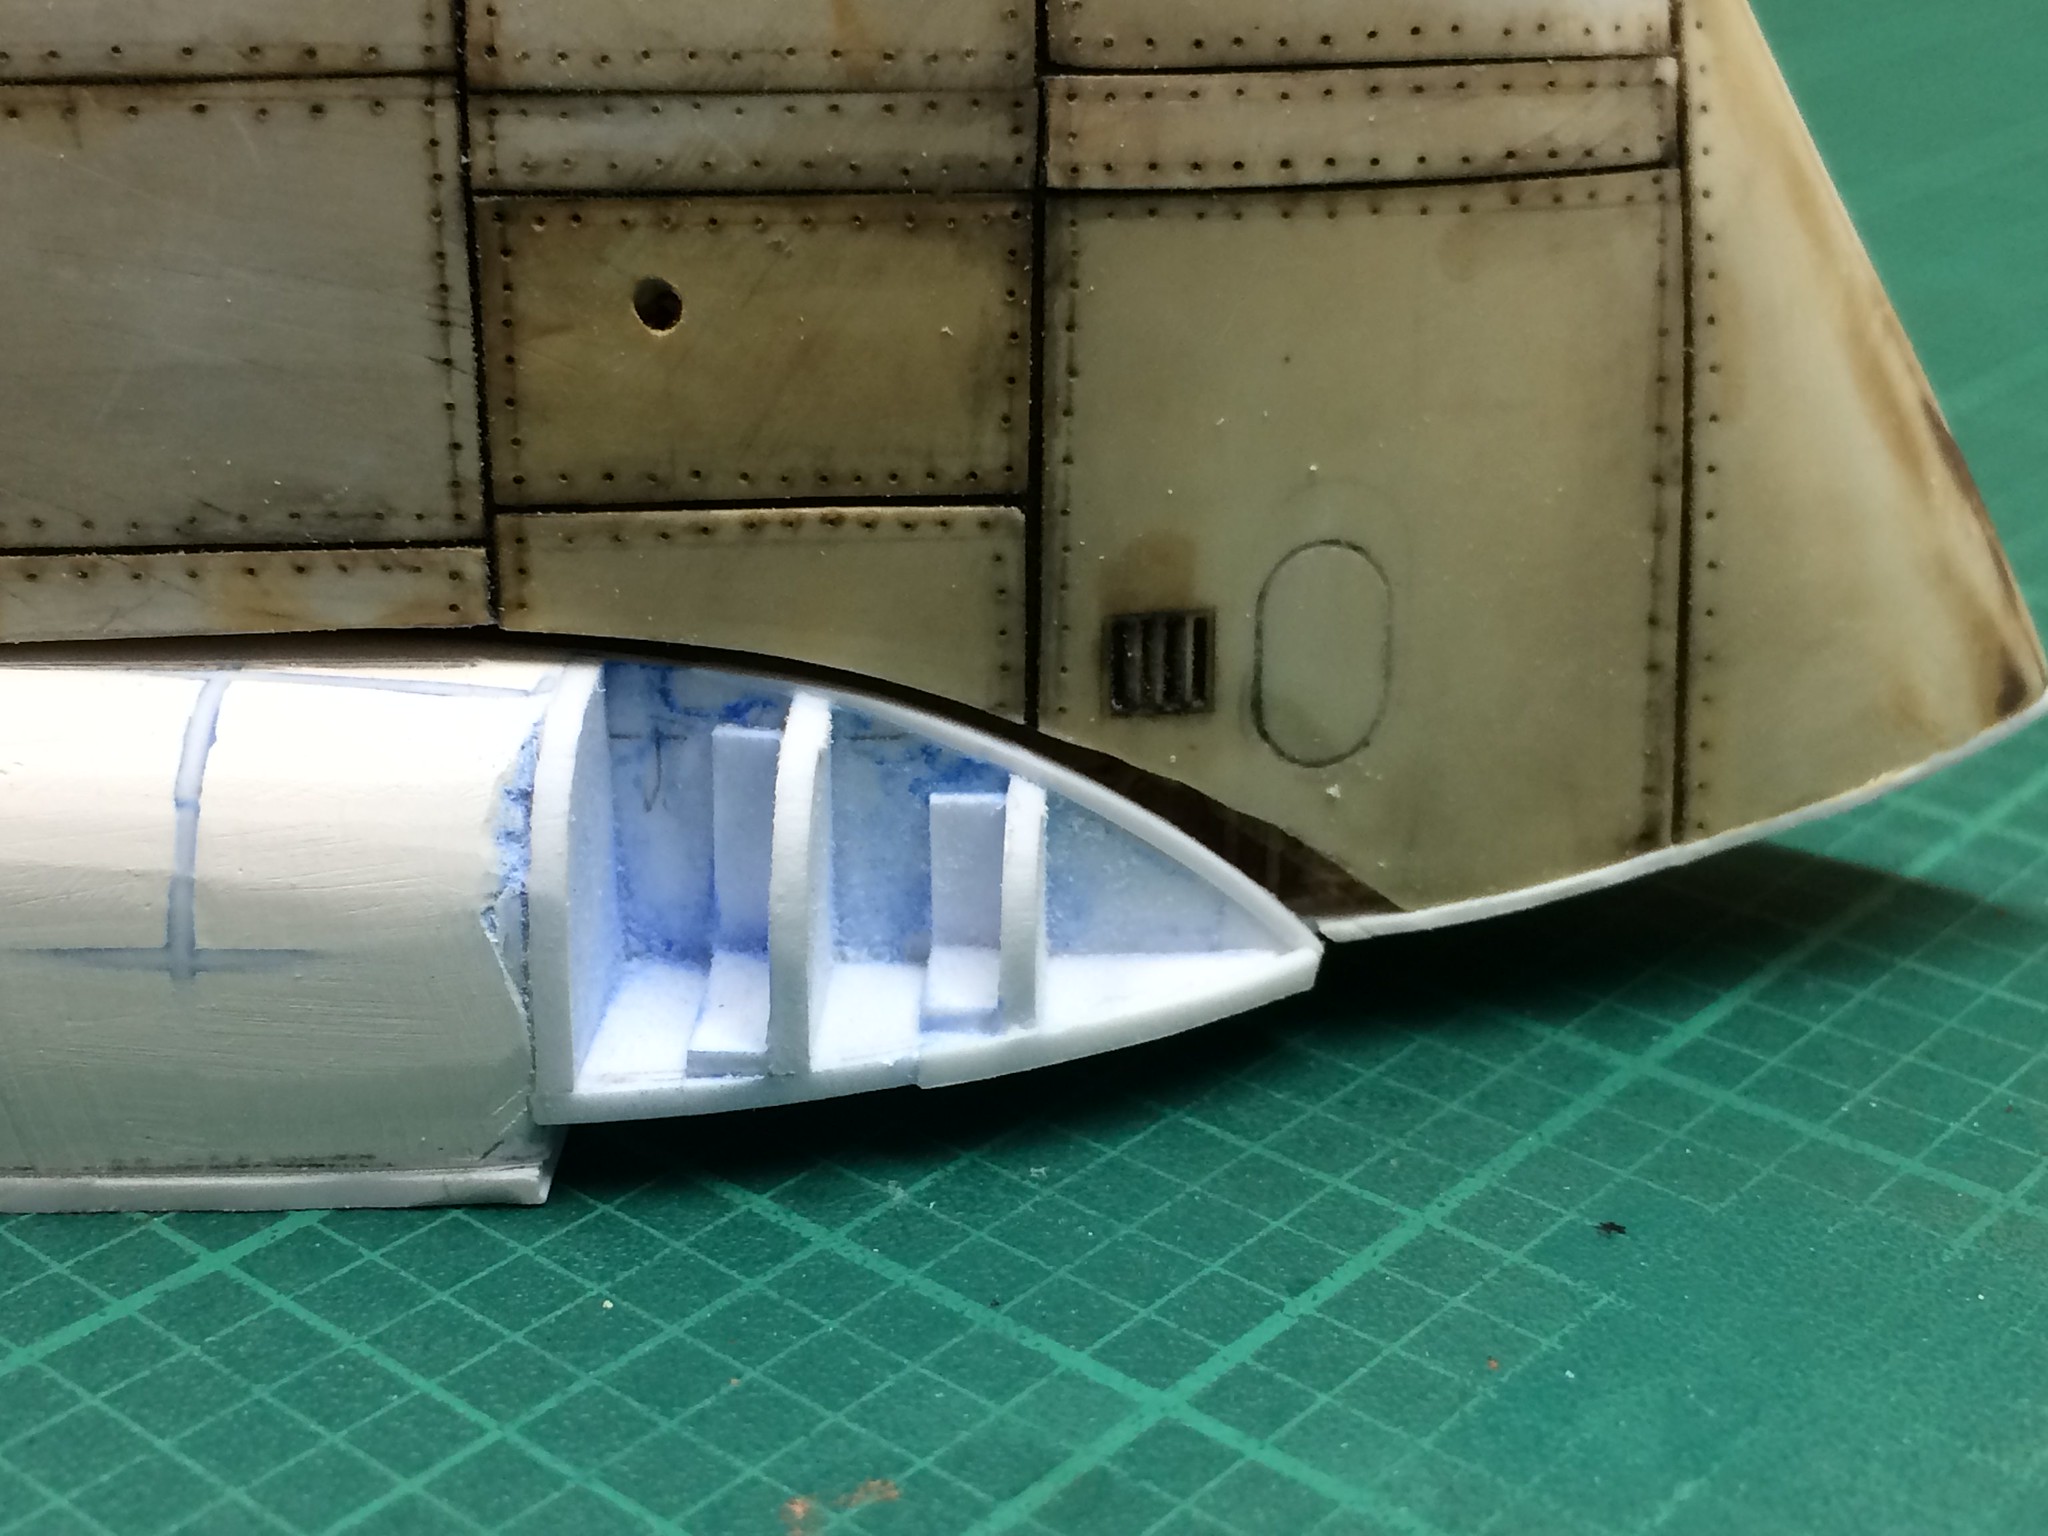
[/url]Bakagalas-144 by N.T. Izumi, on Flickr

But there is a problem - the left fuselage cutout was over-cut 30 years ago and at the time, I didn't know how to fix it. 

https://flic.kr/p/LnQf83] 
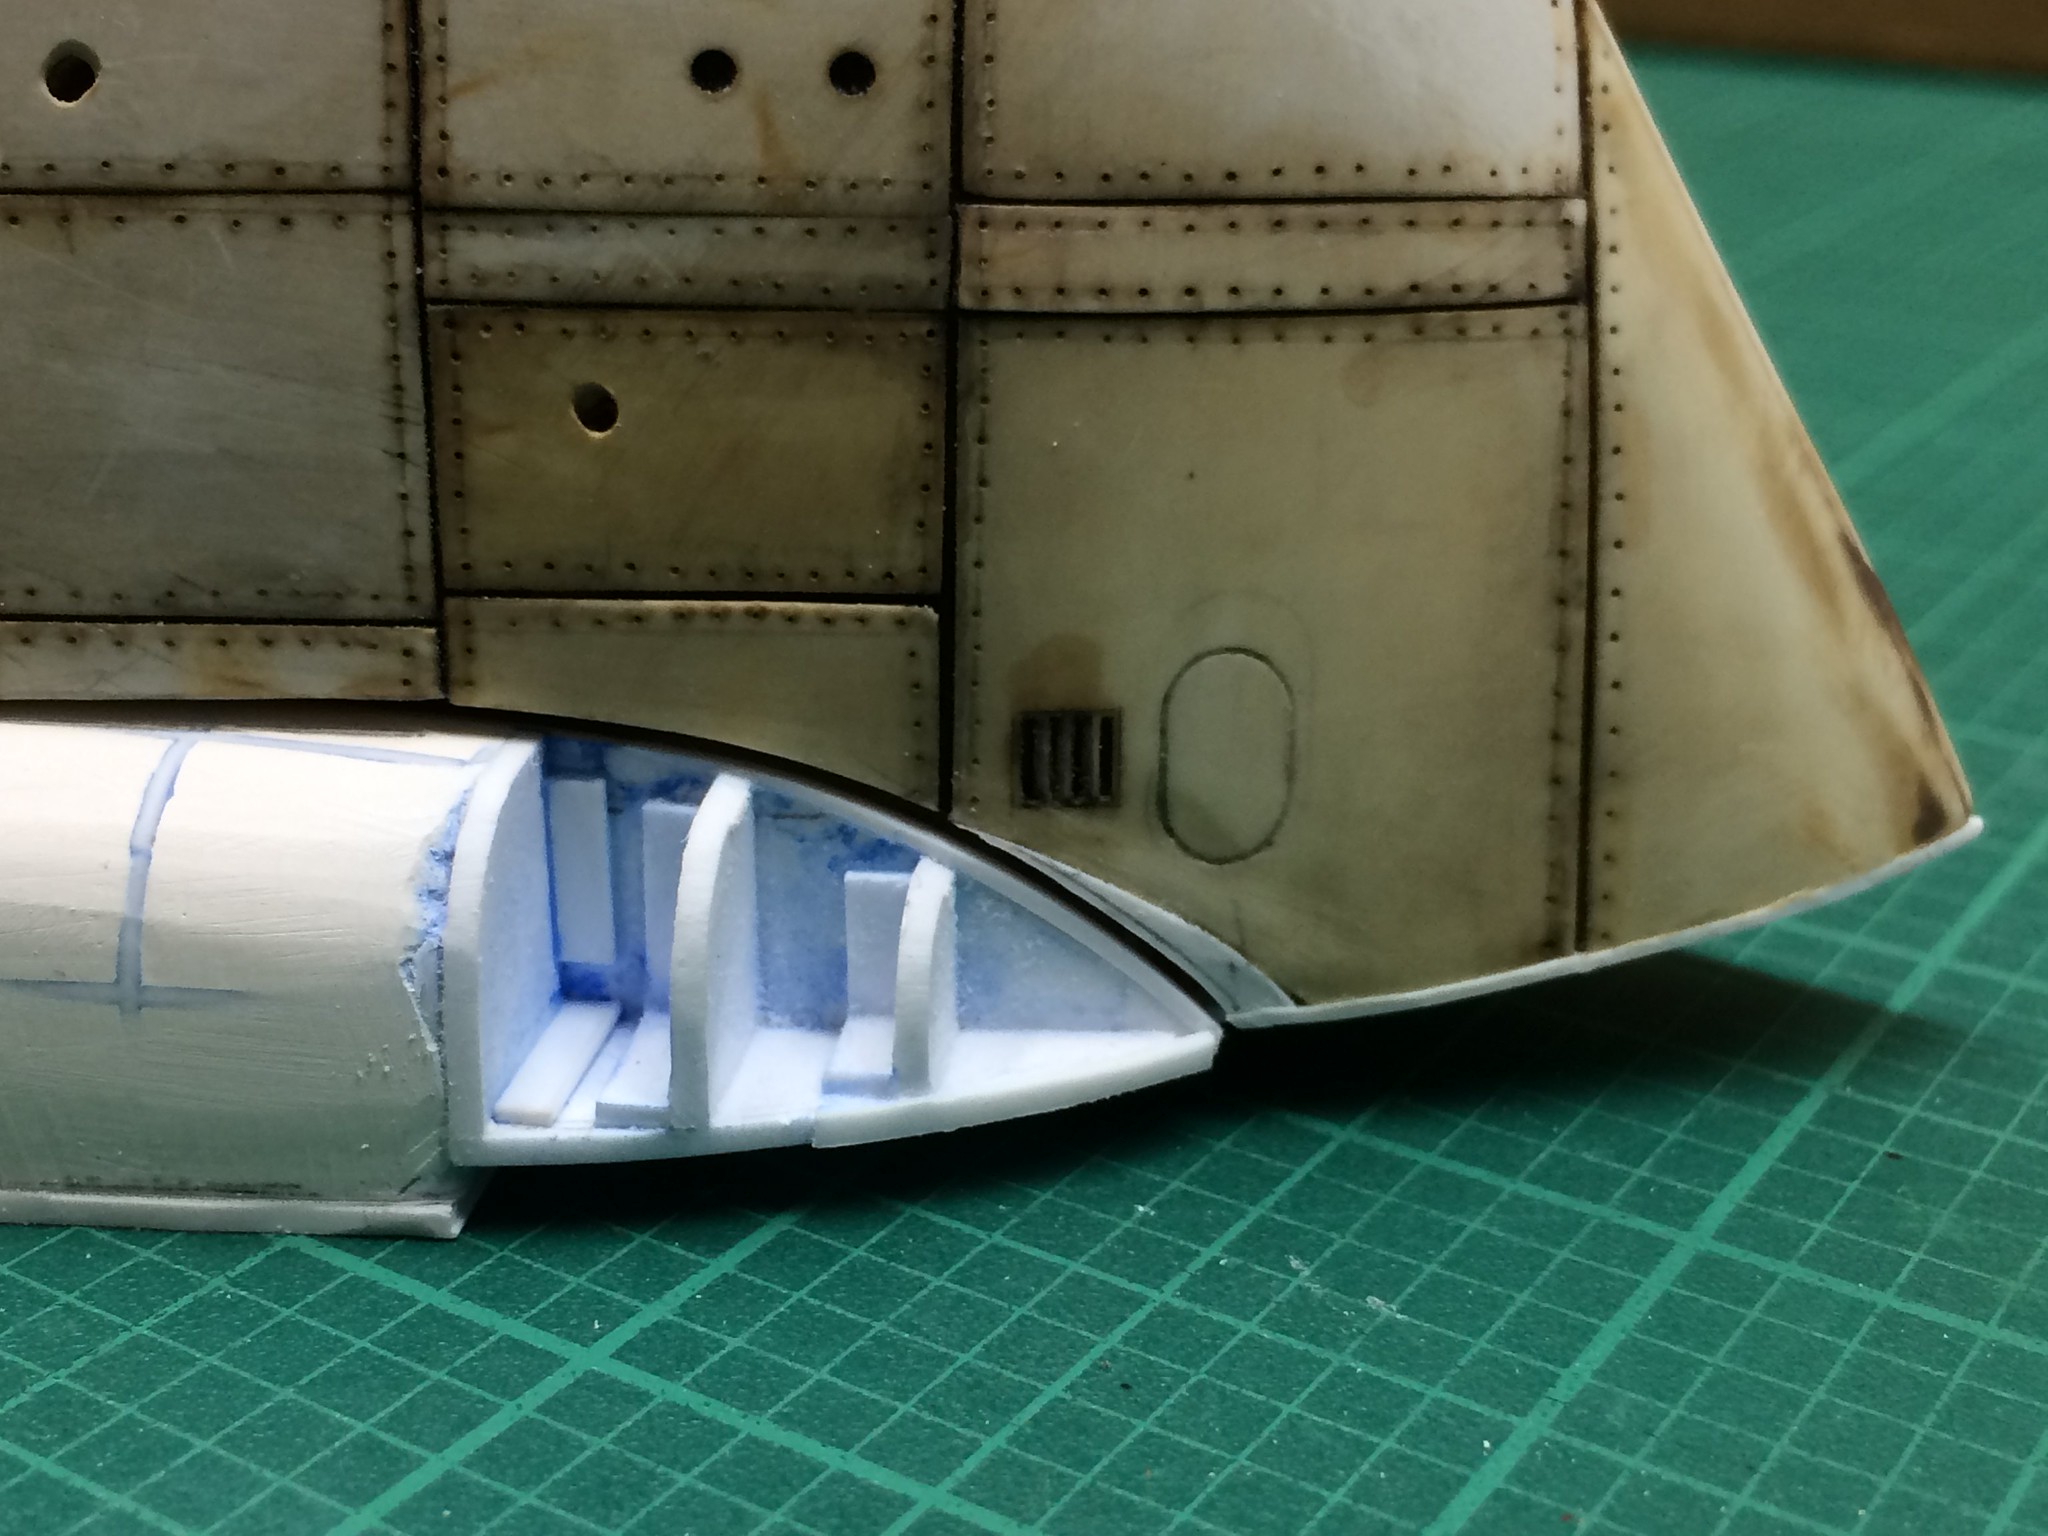
[/url]Bakagalas-145 by N.T. Izumi, on Flickr

A simple fix, really.  Just trim a bit of sheet plastic to match the cut edge, glue in, and carefully trim to the correct shape using a fresh blade.  And go slowly; it's no fun doing this stuff twice!

“Ya ya ya, unicorn papoi!”

  • Member since
    November 2009
  • From: SW Virginia
Posted by Gamera on Tuesday, June 26, 2018 12:19 PM

G: Love the idea! Frankly I'm a little loaded down with stuff right now but hopefully in the future. 

"I dream in fire but work in clay." -Arthur Machen


  • Member since
    May 2011
  • From: Honolulu, Hawaii
Posted by Real G on Tuesday, June 26, 2018 5:40 PM

Gamera - Heh heh, beware the Shadows; they sneak into your dreams and plant bad ideas...

OK another quickie update.  I packed out the aft ends of the sponsons with Milliput.  Since you always end up with extra mixed putty, I cut the waste material up to see if they can be used to make bucks to heat smash (I prefer the Japanese term "heat-o puressu") the dozens of little lumps and bumps.  We'll see about that.

https://flic.kr/p/LptDXC] [/url]Bakagalas-146 by N.T. Izumi, on Flickr

I did a quick sand-down this morning and here is where I'm at.  I definitely have to look for my vac-former real soon.

https://flic.kr/p/25NaCyG] [/url]Bakagalas-148 by N.T. Izumi, on Flickr

The lower part of the sponsons extend a little under the fuselage, so flat plate extensions were made.  They will get additional layers to build thickness, and will be sanded to have a gentle curve.  The line where they meet with the sponsons will be more heavily radiused.

https://flic.kr/p/25NaCrs] [/url]Bakagalas-150 by N.T. Izumi, on Flickr

https://flic.kr/p/27sB1T9] [/url]Bakagalas-151 by N.T. Izumi, on Flickr

So maybe two more evenings of work and they will be ready to use.  Now I have to hurry up and finish making the engines.

“Ya ya ya, unicorn papoi!”

JOIN OUR COMMUNITY!

Our community is FREE to join. To participate you must either login or register for an account.

SEARCH FORUMS
FREE NEWSLETTER
By signing up you may also receive reader surveys and occasional special offers. We do not sell, rent or trade our email lists. View our Privacy Policy.