SEARCH FINESCALE.COM

Enter keywords or a search phrase below:

Aliens APC - Its a rescue mission, youll love it!

17920 views
118 replies
1 rating 2 rating 3 rating 4 rating 5 rating
  • Member since
    December 2002
  • From: Bury St Edmunds, Suffolk, England
Posted by Bish on Thursday, November 26, 2015 2:43 PM
Some really nice work there, I really like what your doing with this.

I am a Norfolk man and i glory in being so


On the bench: Airfix 1/72nd Harrier GR.3/Fujimi 1/72nd Ju 87D-3

  • Member since
    May 2011
  • From: Honolulu, Hawaii
Posted by Real G on Monday, November 30, 2015 2:23 PM

The new chassis is ready to be fittted to the kit body.  Rails made from sheet plastic reinforced with square stock are used to set the chassis height.  A simple gauge has been made to hang off the sides of the body shell to help align the rails (see thing with the blue arrows).

  https://flic.kr/p/BbRxru] [/url]APC-29 by N.T. Izumi, on Flickr

A test fit into the body shell confirms the steering system works as planned.

https://flic.kr/p/B7L9cN] [/url]APC-28 by N.T. Izumi, on Flickr

Yes, yes, I know i have to get on with the treads.  Here is the front wheel at maximum deflection.  Not as much as I wanted, but I am okay with it.

https://flic.kr/p/ABngeN] [/url]APC-26 by N.T. Izumi, on Flickr

“Ya ya ya, unicorn papoi!”

  • Member since
    August 2007
  • From: back country of SO-CAL, at the birth place of Naval Aviation
Posted by DUSTER on Monday, November 30, 2015 7:47 PM

Real G

Yes, yes, I know i have to get on with the treads.  Here is the front wheel at maximum deflection.  Not as much as I wanted, but I am okay with it.

https://flic.kr/p/ABngeN] [/url]APC-26 by N.T. Izumi, on Flickr


This looks so flamin' Cool 

Steve

Building the perfect model---just not quite yet  Confused

  • Member since
    May 2011
  • From: Honolulu, Hawaii
Posted by Real G on Wednesday, December 2, 2015 1:34 PM

Thanks all for the ecouragement!  I promise to keep the fire hot!

While rounding up a shopping list to light the model, I decided to see if there were any other projects I wanted to light.  So I figured that the Dropship should also get some LED love.

https://flic.kr/p/Bj9SpU] [/url]Dropship-01 by N.T. Izumi, on Flickr

I just realized I forgot to get teeny LEDs for the landing lights on the gear legs.  D'oh!  Anyway, I'll get to this one after the APC.  I'm not planning on a scratchbuilt bay or a 1/72 APC, but a removable ramp would be a convenient way to access batteries and such.

“Ya ya ya, unicorn papoi!”

  • Member since
    November 2009
  • From: SW Virginia
Posted by Gamera on Thursday, December 3, 2015 7:34 AM

She's looking great there Real G, and that dropship is pretty cool too! A guy in our club built the APC but didn't correct all the stuff you did, I don't think I've ever seen the dropship built. 

"I dream in fire but work in clay." -Arthur Machen


  • Member since
    May 2011
  • From: Honolulu, Hawaii
Posted by Real G on Thursday, December 3, 2015 12:25 PM

Gamera, I have seen some pretty impressive builds of the Dropship on-line and in magazines, but they all involved a staggering amount of work.  My plan is to streamline the project to end up with something that isn't too crazy but looks good enough.  I do want to make the weapon stations moveable though.

I finally finished adding the new tread blocks to the last tire last night.  So relieved!  I just have to sand the blocks smooth and add a little detail to the suspension arms, then it will be time to move on to work on other areas.

https://flic.kr/p/BefQU6] 
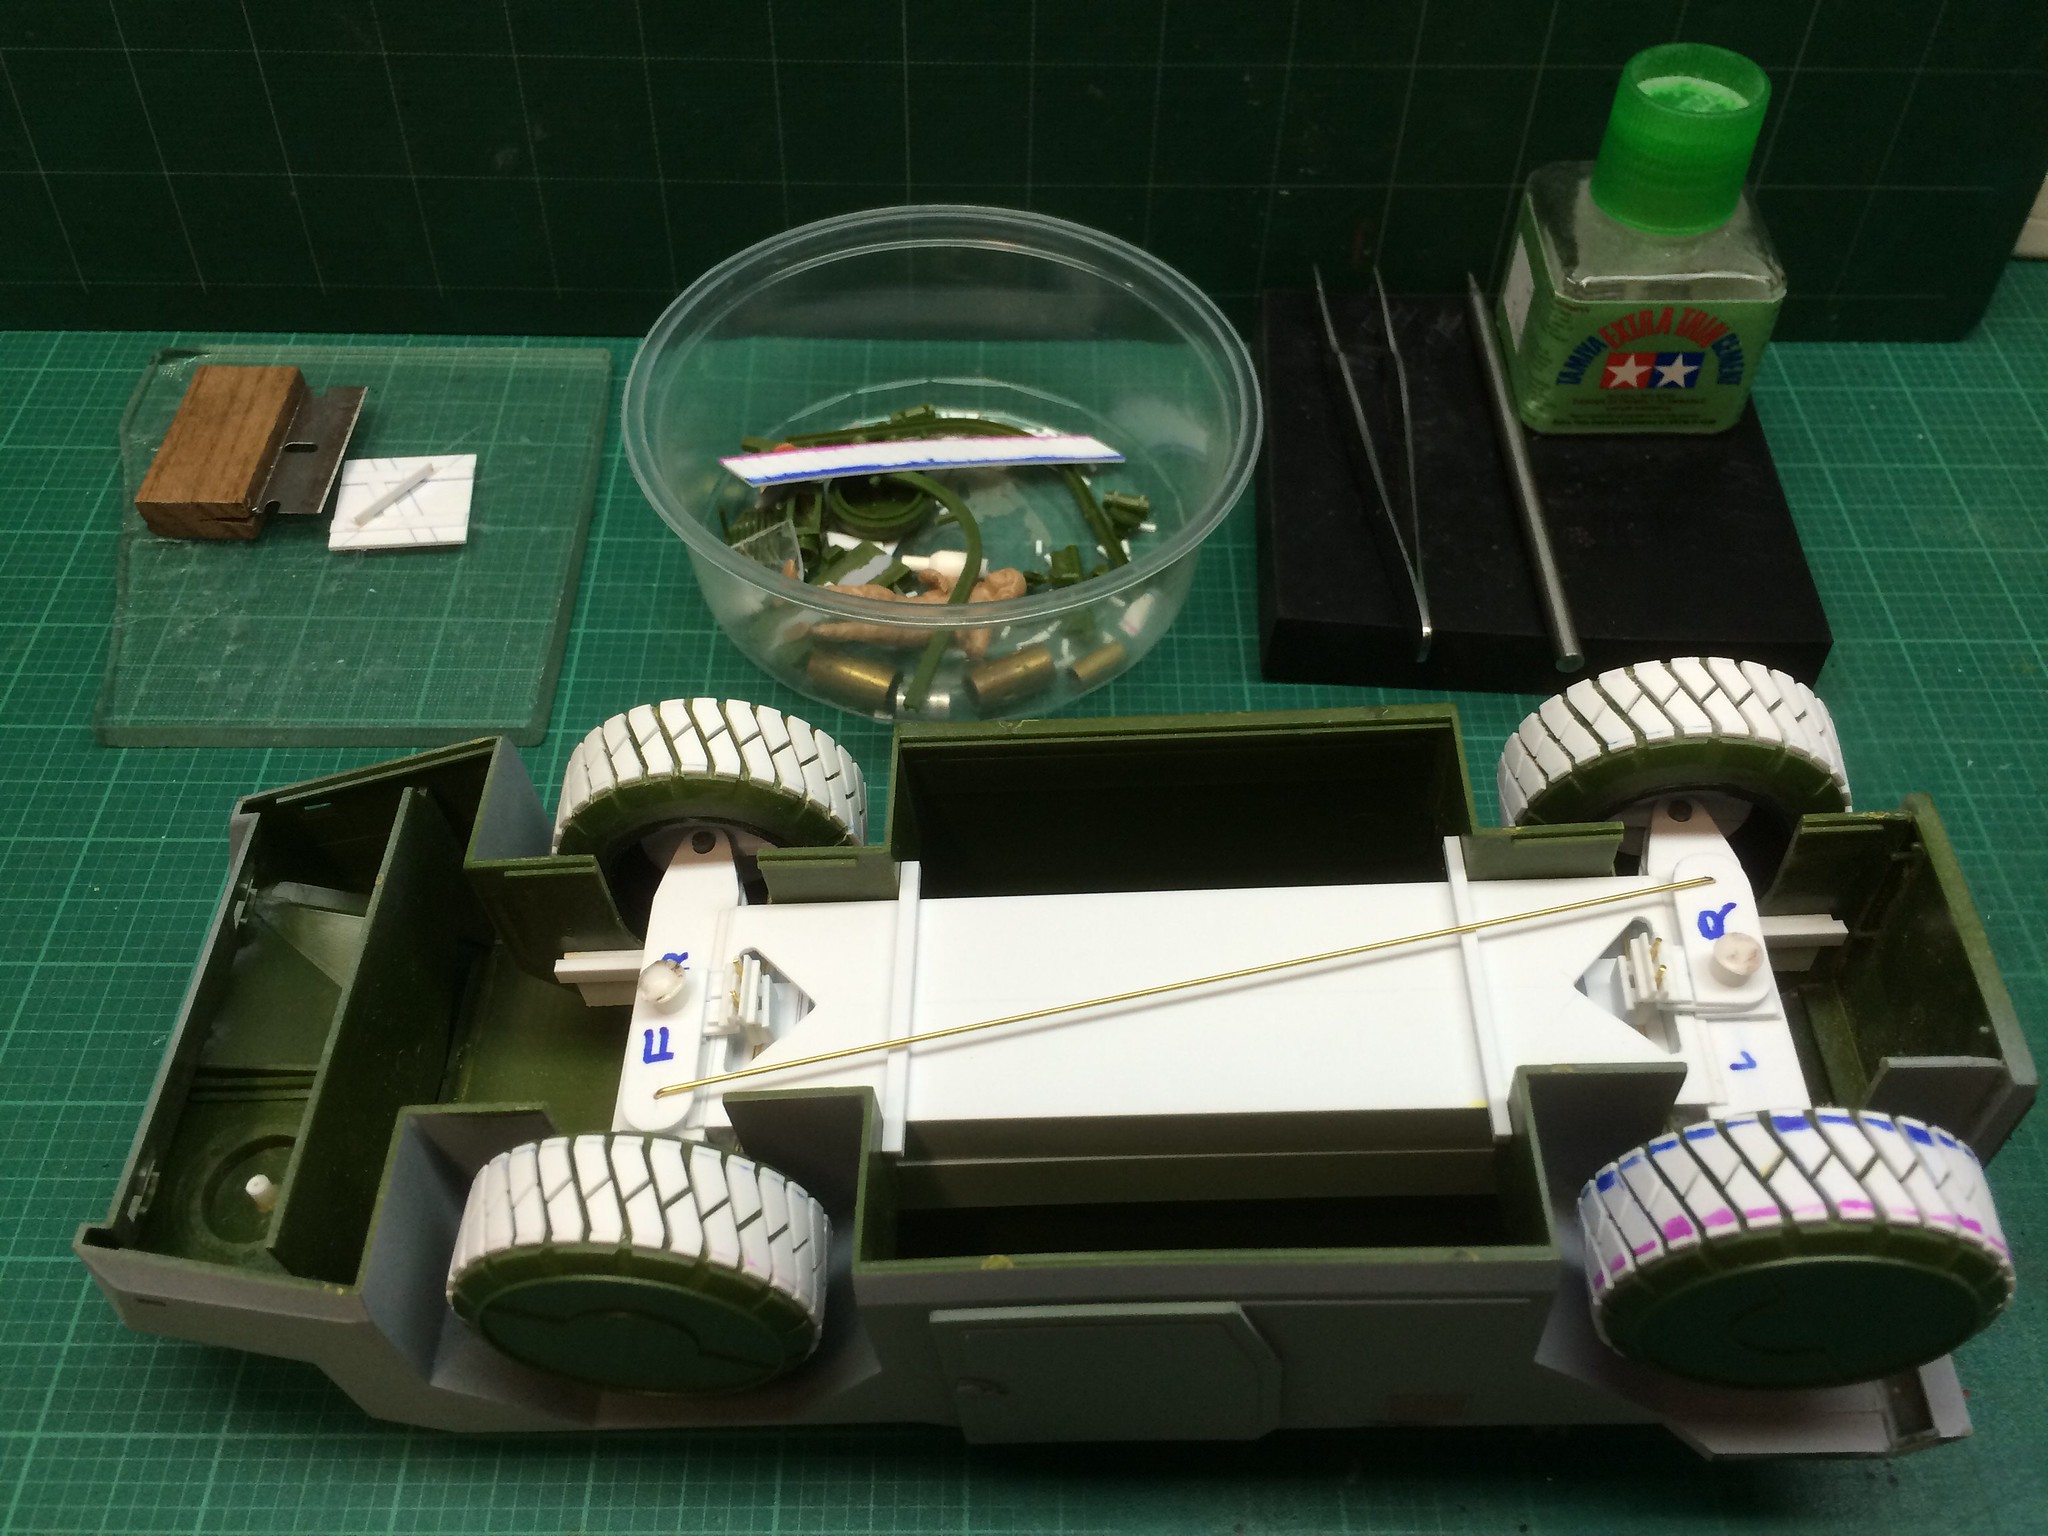
[/url]APC-33 by N.T. Izumi, on Flickr

I'll be replacing the milky headlight and spotlight lenses with aftermarket ones from Modeler's.  But I think I'll use the kit's side markers and tail lights, as they will help diffuse the LED lighting.

https://flic.kr/p/BMM6kV] 
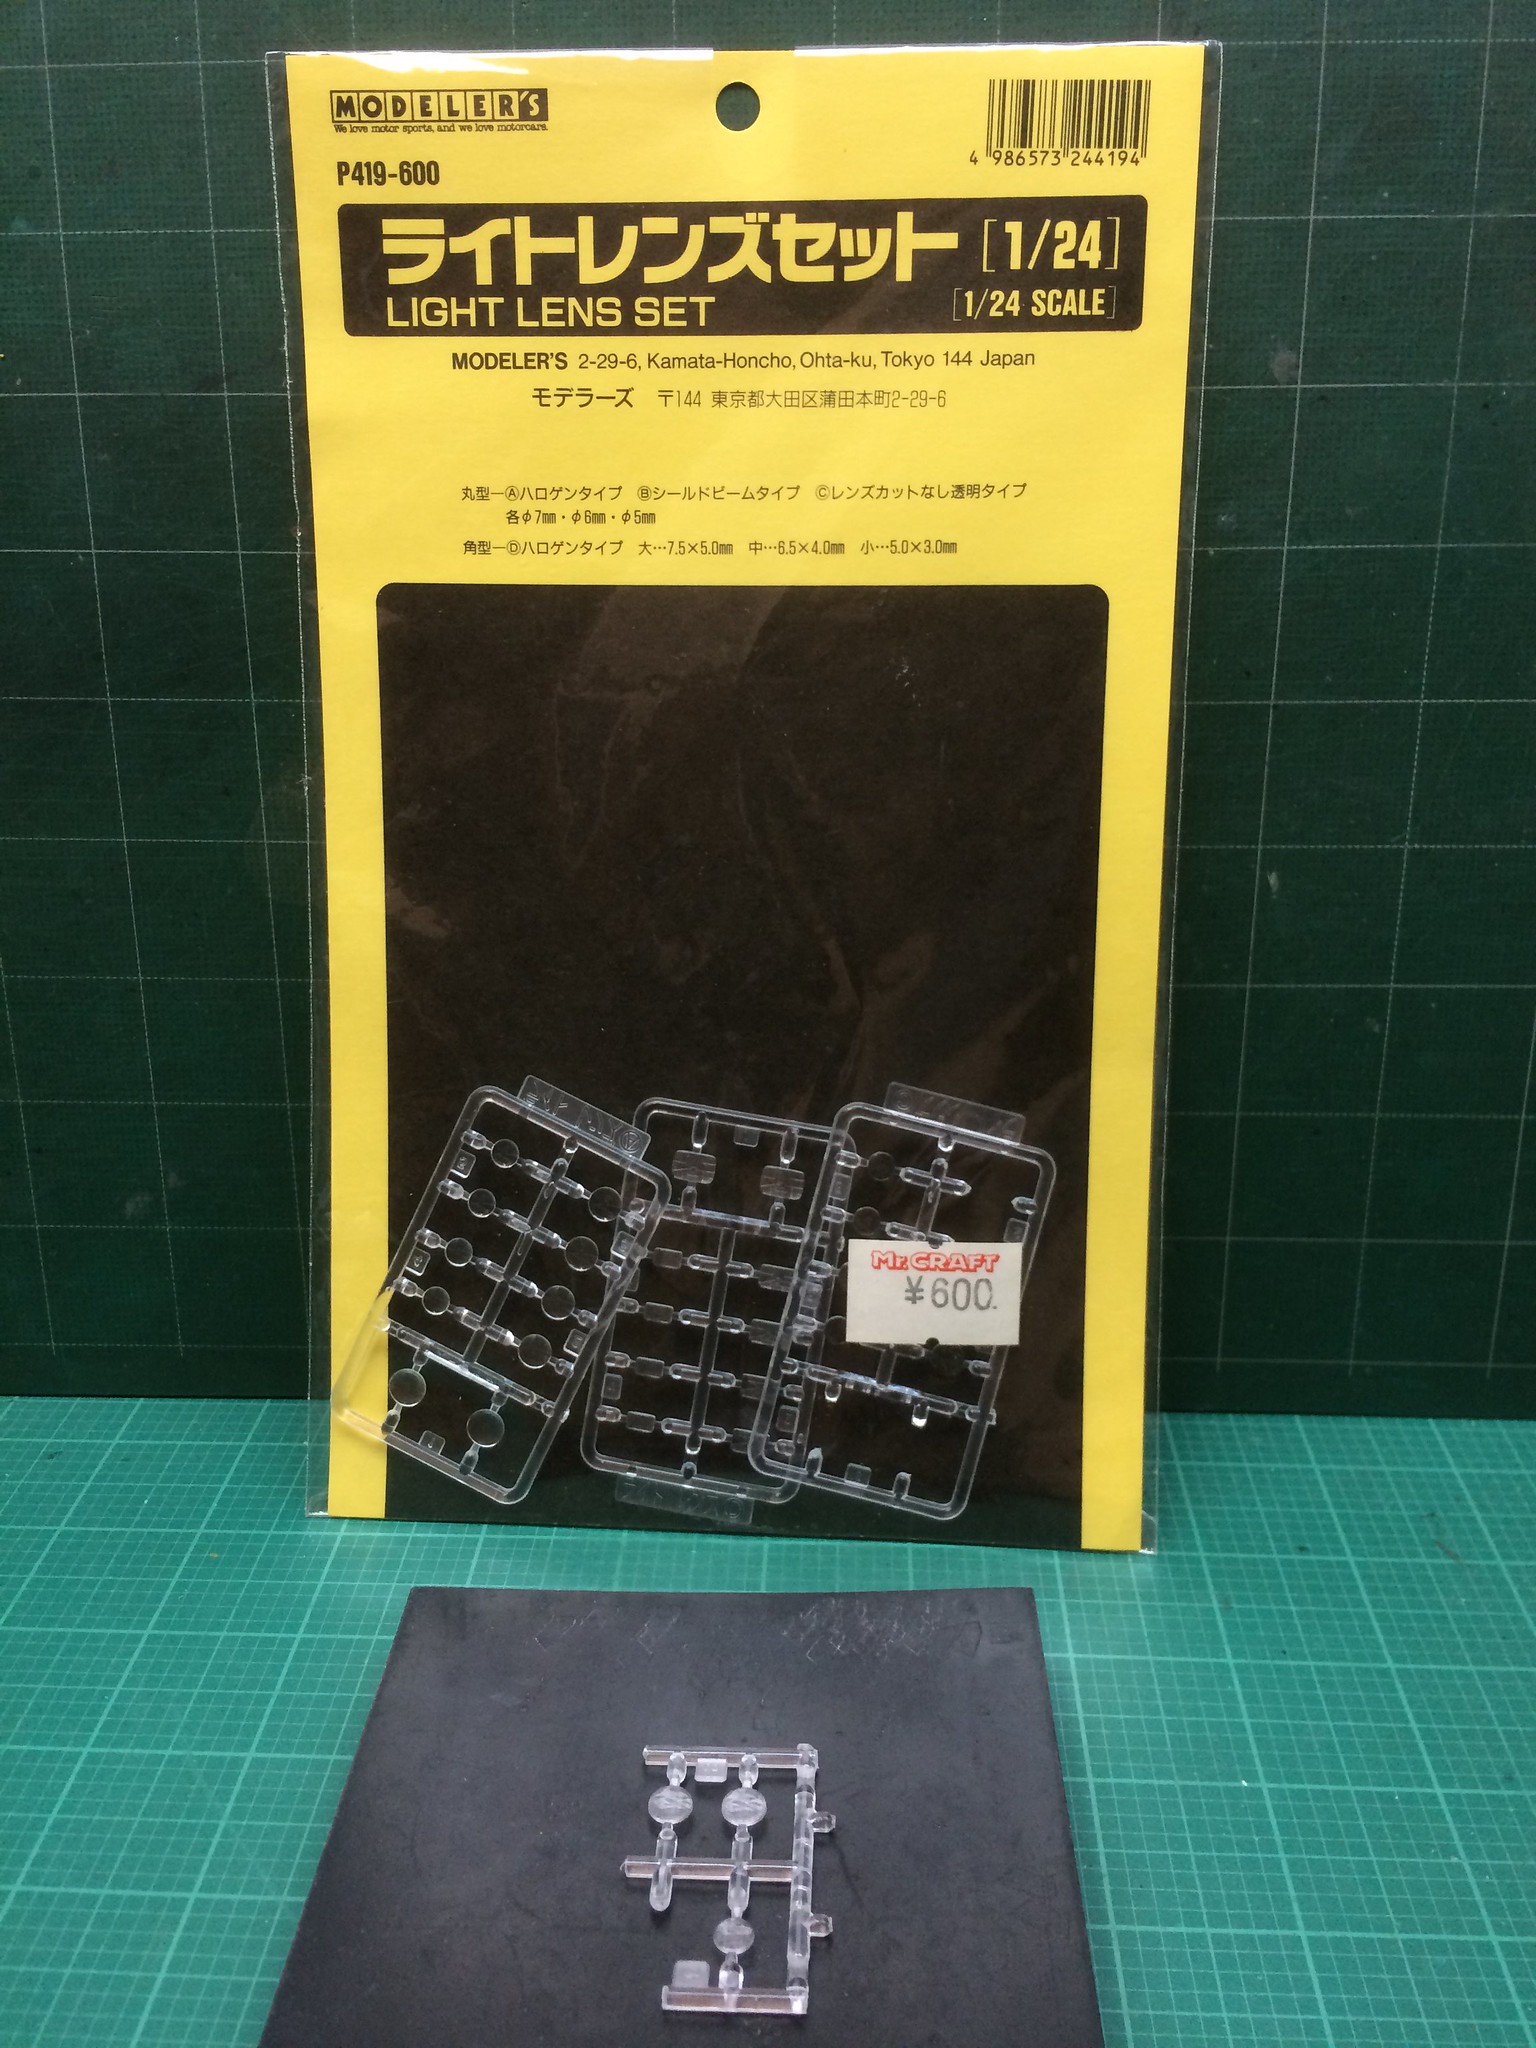
[/url]APC-34 by N.T. Izumi, on Flickr

I ordered LED parts from these guys:

http://www.modeltrainsoftware.com/

Once I got used to their catalog system, it was pretty easy to order what I needed.  You tick off boxes to specify style, size, color, voltage, lead lengths, etc.  If you know what you want, it is super simple.  The nice thing about their LED products is that idiots like me who do not dabble with soldering can still make up some simple set-ups.  I tip my hat (if I had one!) to the Star Trek guys who do those incredibly intense lighting projects.  Now I know why they have to add power supply systems to their projects.

“Ya ya ya, unicorn papoi!”

  • Member since
    May 2011
  • From: Honolulu, Hawaii
Posted by Real G on Monday, December 7, 2015 12:29 PM

I reworked the rooftop spotlight guard by replacing the grating with 0.020" plastic rod.  I really should have used a finer diameter, but the next size down was a little too floppy for my clumsy fingers, and I thought I'd just make a mess with CA glue and metal wire.

https://flic.kr/p/dPPw1g] [/url]APC-6 by N.T. Izumi, on Flickr

https://flic.kr/p/BTxHc6] [/url]APC-36 by N.T. Izumi, on Flickr

Photos of the real filming vehicle had a curved cover over the spot light, so I made one from wrapping a 0.015" sheet plastic strip around a brass rod, securing it with tape, then plunging it into boiling water.  A handy tip here: use a Pyrex measuring cup with water and microwave on high for about 2-3 minutes.  So much easier and faster than using the range!  The flanges were made from 0.010" plastic strip and was detailed with punched washers and bolts.

https://flic.kr/p/AW3569] [/url]APC-37 by N.T. Izumi, on Flickr

https://flic.kr/p/Brqyj1] [/url]APC-38 by N.T. Izumi, on Flickr

The LED parts arrived from Model Train Software in just three days - thanks for the personalized service Dave!  I'm kind of excited to get-it-on!

https://flic.kr/p/AZ5hH1] [/url]APC-39 by N.T. Izumi, on Flickr

“Ya ya ya, unicorn papoi!”

  • Member since
    May 2011
  • From: Honolulu, Hawaii
Posted by Real G on Monday, December 7, 2015 8:13 PM

I hurriedly stuck the leads together and hooked up a battery to test the lights - and they all work - hooray!  Note the different temperatures (colors) of the white lights.  I chose to go with warm white for the head lamps and running lights, and cool white for the spotlight and tail lamps.  Strangely, the tail lamps are bluish on the movie prop, so that's what it's going to be on my model.

https://flic.kr/p/BPZCWR] [/url]APC-40 by N.T. Izumi, on Flickr

I forgot to mention that the spotlight had to be moved back a little along with the guard, as the shroud's front edge has to sit on the roof's contour break.  The guard is scooted up close to the front of the shroud.  The repositioned peices seem to match those of the full size vehicle.

“Ya ya ya, unicorn papoi!”

  • Member since
    November 2009
  • From: SW Virginia
Posted by Gamera on Tuesday, December 8, 2015 7:35 AM

Very cool G, looking forward to seeing all the lights in place. 

"I dream in fire but work in clay." -Arthur Machen


  • Member since
    May 2011
  • From: Honolulu, Hawaii
Posted by Real G on Thursday, December 10, 2015 12:21 PM

Time for a small update.  I should be finishing the hull details, but I could not wait to figure out how to install the LED lights.  I made up a sheet plastic box to fit inisde the front of the hull to take the headlights, and slipped the LEDs in for a quick check to see what they look like.

https://flic.kr/p/BtiKVZ] [/url]APC-41 by N.T. Izumi, on Flickr

https://flic.kr/p/BSekCU] [/url]APC-42 by N.T. Izumi, on Flickr

I also bored a hole through the hull roof and test fit the spotlight LED.

https://flic.kr/p/BSeAyA] [/url]APC-43 by N.T. Izumi, on Flickr

As my first lighting project, I'm really enjoying this!

Okay, back to finishing up the hull.

“Ya ya ya, unicorn papoi!”

  • Member since
    January 2006
  • From: California
Posted by SprueOne on Thursday, December 10, 2015 6:07 PM

Def keeping the fire hot as promised Yes Idea 


Anyone with a good car don't need to be justified - Hazel Motes


Iron Rails 2015 by Wayne Cassell Weekend Madness sprueone

  • Member since
    August 2008
Posted by tankerbuilder on Friday, December 11, 2015 11:17 AM

Verrrrrrrrry Interessting !   T.B.

  • Member since
    May 2011
  • From: Honolulu, Hawaii
Posted by Real G on Saturday, December 12, 2015 12:10 PM

As of last night, the lighting installation is 90% figured out.  I goofed on the measurements of the headlight mounting box, so the lights ended up just a little too close together.  Rather than start over, I just sawed the box in two and added some patches to extend it.  It's not pretty, but it worked!

https://flic.kr/p/C6Shmz] [/url]APC-44 by N.T. Izumi, on Flickr

The front side marker and tail lights had simple bits of styrene sheet glued together to form boxes to accomodate the SMD chips.  I just had a brain fart this morning to tone down these lights - I'll add a 0.005" or 0.010" white sheet of platic between the SMD chips and clear parts.  I really want them to not look like Xenon floodlights!  Plus the sheet plastic will eliminate the obvious yellow color of the SMDs from peeking through when they are switched off.

https://flic.kr/p/BDKqqW] [/url]APC-45 by N.T. Izumi, on Flickr

https://flic.kr/p/BDKDH7] [/url]APC-46 by N.T. Izumi, on Flickr

And here is what the extent of wiring will look like once everything is in place.  But it will be neater of course.

https://flic.kr/p/BDKRym] [/url]APC-47 by N.T. Izumi, on Flickr

OK, no more excuses - I have to finish working the hull details and take care of some ugly seams.  Stay tuned!


“Ya ya ya, unicorn papoi!”

  • Member since
    August 2007
  • From: back country of SO-CAL, at the birth place of Naval Aviation
Posted by DUSTER on Sunday, December 13, 2015 10:38 AM

This is getting better 'n better. Now the electric s I got my stuff out and

am ready to go   OOPS maybe later

Steve

Building the perfect model---just not quite yet  Confused

  • Member since
    November 2009
  • From: SW Virginia
Posted by Gamera on Sunday, December 13, 2015 4:49 PM

Looking really cool there G!

"I dream in fire but work in clay." -Arthur Machen


  • Member since
    October 2014
Posted by TomZ on Sunday, December 13, 2015 6:20 PM
You can tone down the LED intensity by inserting a resistor in the line. You can buy small potentiometers and twiddle the adjustment until the illumination is perfect.
  • Member since
    May 2011
  • From: Honolulu, Hawaii
Posted by Real G on Sunday, December 13, 2015 8:05 PM

TomZ, thanks for the advice! I am going super low tech (read lazy) on this project, so the engineering approach will be as simple as possible.  I tested white 0.020" styrene as a light block, and it worked well.  I will definitely consider the use of resistors for more ambitious projects In the future.

“Ya ya ya, unicorn papoi!”

  • Member since
    May 2011
  • From: Honolulu, Hawaii
Posted by Real G on Monday, December 14, 2015 1:27 PM

A mini-update.  I tested the 0.020" white styrene sheet to tone down the side marker SMD.  It is hard to tell from the photo, but the side marker is noticeably less bright than the headlights.

https://flic.kr/p/C9uo8m] [/url]APC-48 by N.T. Izumi, on Flickr

I started the task of going over all the terrible kit joints with Mr. Surfacer 500 last night.  Man, this is one ugly fitting kit!

“Ya ya ya, unicorn papoi!”

  • Member since
    August 2007
  • From: back country of SO-CAL, at the birth place of Naval Aviation
Posted by DUSTER on Monday, December 14, 2015 5:47 PM

"...I started the task of going over all the terrible kit joints with Mr. Surfacer 500 last night.  Man, this is one ugly fitting kit!..."


Now, now don't be so hard on the poor ol' thing.  Stick out tongue  After all of your upgrades it's all down hill now - uhh I mean that in a Good wayEmbarrassed

Steve

Building the perfect model---just not quite yet  Confused

  • Member since
    May 2011
  • From: Honolulu, Hawaii
Posted by Real G on Thursday, December 17, 2015 4:26 PM

A mini, mini update.  I had a little time last night, so I tackled making replacement cylinders that go on the rear roof.  The kit parts have mold slip lines and shrink marks, so new ones were made up of 1/8" plastic rod and 0.020" strip.  I taped short sections of the strip around a steel ruler and drill, and dunked them in boiling water to impart curvature for the area that goes around the cylinders.

https://flic.kr/p/BH5TUg] [/url]APC-49 by N.T. Izumi, on Flickr

To secure the free ends of the strip, I took 1/8" wide strip styrene and drilled a hole, cut the strip in two, then glued it between the strips and to the underside of the cylinders.  I make everything over long so it would be easier to handle the bits, then sanded everything down to the correct height.

https://flic.kr/p/C9jqhM] [/url]APC-50 by N.T. Izumi, on Flickr

For some reason, I didn't feel like getting around to doing this task, but aside from a little Mr. Surfacer on the cylinder ends and a bit of sandpaper work, it is done.

“Ya ya ya, unicorn papoi!”

  • Member since
    May 2011
  • From: Honolulu, Hawaii
Posted by Real G on Saturday, December 19, 2015 6:33 PM

A little more progress.  I decided to replace the tail light base plates molded to the hull for two reasons.  1) I needed to clean up the plugged holes for the brush guards, and not having the plates there made it easier.  2)  I wanted more light going through the tail light assembly, so replacing the plates with white sheet plastic would allow that.

https://flic.kr/p/CaobZw] [/url]APC-51 by N.T. Izumi, on Flickr

I cut away the locator pins mounted to the clear(ish) tail lamps and drilled holes to represent bulbs.  Two stepped 0.020" sheet plastic chips made up the new base plates, which were colored on the back with a cyan marker to impart the bluish color seen on screen.  After some tests, it was found that a total of 0.040" of white sheet plastic cut down on the glare of the SMD to a desirable level.  0.5 mm brass wire replaced the massively thick kit brush guards.

https://flic.kr/p/CbmLTb] [/url]APC-52 by N.T. Izumi, on Flickr

A test fit to see what everything will look like when done.

 APC-53 byhttps://www.flickr.com/photos/ntizumi/]N.T. Izumi[/url], on Flickr

And a quick battery test to see what those strange blue tail lamps will look like.

https://flic.kr/p/BTNUTC] [/url]APC-54 by N.T. Izumi, on Flickr

I'm still banging away with the filler and sandpaper to get this beast to the paint shop.


“Ya ya ya, unicorn papoi!”

  • Member since
    May 2011
  • From: Honolulu, Hawaii
Posted by Real G on Thursday, January 14, 2016 4:25 PM

With Christmas and New Year out of the way, work has finally resumed on the APC.  The turret rails had round section supports that suffered from mold slip.  Looking at photos of the full size prop, it appears that they should be square section, so I cut the kit supports off and replaced them with 0.080" square plastic rod.  The rails are closer to 0.070" in width, so the rods needed a little sanding to match.

https://flic.kr/p/D6o3q7] [/url]APC-56 by N.T. Izumi, on Flickr

Since the kit's plastic was so brittle, I replaced the guide pins on the turret base with brass rods, and ran them straight through both lugs for alignment and strength.

https://flic.kr/p/Cxnnsx] [/url]APC-55 by N.T. Izumi, on Flickr

Getting closer to finishing up the little details.  Hope to get some primer on for a final check prior to paint application.

“Ya ya ya, unicorn papoi!”

  • Member since
    November 2009
  • From: SW Virginia
Posted by Gamera on Friday, January 15, 2016 8:56 AM

Wow, looking very good G!!! 

"I dream in fire but work in clay." -Arthur Machen


  • Member since
    February 2014
  • From: Michigan
Posted by silentbob33 on Friday, January 15, 2016 2:24 PM
Super cool! I can't wait to see some paint on it.

On my bench: Academy 1/35 UH-60L Black Hawk

  • Member since
    January 2006
  • From: California
Posted by SprueOne on Friday, January 15, 2016 9:33 PM

Nice progress. 

With Christmas and New Year out of the way, I can now watch this build again.

Anyone with a good car don't need to be justified - Hazel Motes


Iron Rails 2015 by Wayne Cassell Weekend Madness sprueone

  • Member since
    August 2007
  • From: back country of SO-CAL, at the birth place of Naval Aviation
Posted by DUSTER on Monday, January 18, 2016 1:11 AM

Very clever tail light solution.  The rest is coming along like gang busters

Steve

Building the perfect model---just not quite yet  Confused

  • Member since
    May 2011
  • From: Honolulu, Hawaii
Posted by Real G on Monday, January 18, 2016 1:25 AM

Thanks for the encouragement guys! Things are still a bit hectic in my non-model world so progress is slow. Over the weekend I stuffed some poly caps into the wheels so they can be adjusted once in place.  No rolling around on the carpet though; they are there just to keep the wheels from falling off. Hopefully more pics this week!

Duster, I am very pleased how the tail lights turned out.  I tested the method on some other sci-fi kits and it looks useful for robot eyes and maybe even some Trek kits.


“Ya ya ya, unicorn papoi!”

  • Member since
    May 2011
  • From: Honolulu, Hawaii
Posted by Real G on Tuesday, January 19, 2016 12:39 PM

Okay, it's the final push before heading to the paint shop!

https://flic.kr/p/CQNmis] [/url]APC-57 by N.T. Izumi, on Flickr

The hull pates fit badly where the sliding door track was, so it was lost during filling/sanding.  A replacement was made from strip styrene.

https://flic.kr/p/CkwPyt] [/url]APC-58 by N.T. Izumi, on Flickr

There was a tab molded on the roof that looked like a simplified grab handle, but it appears to actually be a rod supported by two small tabs according to photos of the full size prop.  So some bits of sheet and rod were used to make something representative.

https://flic.kr/p/DfBgS7] [/url]APC-59 by N.T. Izumi, on Flickr

The front tow shackle mounts has bad mold slip lines and sink marks, so Mr. Surfacer 500 was carefully brushed in to fill all the nasty stuff.  The blob-like bolts were cut off and new ones were punched from 0.015 sheet plastic.  'Kay, that's good enough.

https://flic.kr/p/DhVJBk] [/url]APC-60 by N.T. Izumi, on Flickr

The rooftop spotlight shroud had a couple more bolts to busy things up.

https://flic.kr/p/CQP1f9] [/url]APC-61 by N.T. Izumi, on Flickr

A final look before a soap water scrub.  Next stop:  the paint shop!  Big Smile


“Ya ya ya, unicorn papoi!”

  • Member since
    August 2007
  • From: back country of SO-CAL, at the birth place of Naval Aviation
Posted by DUSTER on Tuesday, January 19, 2016 6:54 PM

Oh Boy! off to the car-er- APC wash

Steve

Building the perfect model---just not quite yet  Confused

  • Member since
    May 2011
  • From: Honolulu, Hawaii
Posted by Real G on Friday, January 22, 2016 4:27 PM

Primer coat is on:

https://flic.kr/p/CW1YDj] [/url]APC-63 by N.T. Izumi, on Flickr

https://flic.kr/p/CW2dK5] [/url]APC-64 by N.T. Izumi, on Flickr

https://flic.kr/p/DfS6Tz] [/url]APC-65 by N.T. Izumi, on Flickr

https://flic.kr/p/Do9gU6] [/url]APC-66 by N.T. Izumi, on Flickr

https://flic.kr/p/Do9kPF] [/url]APC-67 by N.T. Izumi, on Flickr

https://flic.kr/p/Do9pde] [/url]APC-67 by N.T. Izumi, on Flickr

Now to address the numerous little flaws with Mr. Surfacer and sandpaper.  Hope to get color on the model by next week.  (It's kind of tough getting bench time for airbrushing, as I can only do it at night after work/chores are done.)  Gotta keep the momentum up to get over the "project hump" to reach the finish line.

“Ya ya ya, unicorn papoi!”

JOIN OUR COMMUNITY!

Our community is FREE to join. To participate you must either login or register for an account.

SEARCH FORUMS
FREE NEWSLETTER
By signing up you may also receive reader surveys and occasional special offers. We do not sell, rent or trade our email lists. View our Privacy Policy.