SEARCH FINESCALE.COM

Enter keywords or a search phrase below:

Star Trek Model?

15567 views
40 replies
1 rating 2 rating 3 rating 4 rating 5 rating
  • Member since
    May 2006
  • From: Las Vegas, NV
Posted by CaptainHawk1 on Monday, June 1, 2009 4:49 PM
 Phil_H wrote:

 silentmodeler wrote:
... and as for future u mention,  to be honest i have no idea where to find it since i have hear alot of positive thing abt that floor polish and i have been looking and looking at hardware store such as home depot, walmart.

In late 2007, in the US, Future was rebranded as "Pledge with Future Shine". This may be why you are having trouble finding it.

i dont mind to try the future. but is dullcote same conpect as future or its different? 

Basically, what it comes down to is that Future is simply a low cost alternative to Hobby branded clear gloss coats.

I forgot to mention this:

Dullcote is lacquer (as is Testor's Glosscote), and Future obviously is not.  Being acrylic, means it's water soluable and a heck of a lot easier to work with.

For best results when decalling, the decals must be applied to a gloss surface.
  This should be rephrased as such: if you don't want your decals to look like poop, they must be applied to a gloss surface.

This is especially important when using setting solutions such as Micro Set/Sol. Although it may appear smooth, a "flat" surface is in fact covered with microscopic pits - these pits trap air between the surface and the decal, resulting in silvering of the decal. 

When you apply a setting solution, you may notice that the decal will appear to shrivel and then will settle onto the surface as it dries. A gloss surface offers less resistance to the decal as it settles. A "flat" painted surface may cause drag, resulting in the decal "hanging up" and drying before it's fully settled onto the surface, causing wrinkled decals.  

Apply the Dullcote at the end of the job, but while applying decals, you need a gloss surface,

Word.
"Never mind...it's just easier to call you stupid." -Brian Griffin
  • Member since
    May 2006
  • From: Las Vegas, NV
Posted by CaptainHawk1 on Monday, June 1, 2009 4:38 PM
 silentmodeler wrote:

Captain Hawk, what is ur website since u mention ur R2 dealer  maybe i can look it up. 

and umm im still confused abt polar light  R2 and AMT   which is which?  since i know AMT/ERTL for long time until polar light and R2 comes out and not familar or hear abt them  let me know thanks. 


Round 2 (R2) is now the parent company of both AMT and Polar Lights.  They bought both brands.  Ertl is no longer associated with AMT.

My website is Las Vegas Shipyards Models(<---- click) however, I don't have any kits listed for sale yet as I just became a dealer and my first order was just placed last Friday.  I should get them within a week.  Feel free, though,  to check out my stuff.  We do custom builds and sell Trek collectibles and we've recently expanded to better service the hobby market.

For a complete list of Round 2 brands and products, click here.

"Never mind...it's just easier to call you stupid." -Brian Griffin
  • Member since
    October 2006
  • From: Rochester, NY
Posted by silentmodeler on Monday, June 1, 2009 4:16 PM

Captain Hawk, what is ur website since u mention ur R2 dealer  maybe i can look it up. 

and umm im still confused abt polar light  R2 and AMT   which is which?  since i know AMT/ERTL for long time until polar light and R2 comes out and not familar or hear abt them  let me know thanks. 


"Do, do not, theres no try" ~Yoda
  • Member since
    May 2006
  • From: Las Vegas, NV
Posted by CaptainHawk1 on Monday, June 1, 2009 1:12 PM

Pefectly understandable.  The reason the R2 did this is  brand name recognition and I don't blame them.  I mean, is the noob modeler going to know who R2 is?  Doubtful.

The downside, though, is the confusion that it creates when trying to figure out who's who. Wink [;)]

"Never mind...it's just easier to call you stupid." -Brian Griffin
  • Member since
    May 2009
Posted by trekriffic on Monday, June 1, 2009 1:04 PM

Thanks for posting the correct information on who's coming out with these kits Captain Hawk. I must admit I sometimes get R2, Polar Lights, and AMT mixed up. As far as future is concerned, when you say you can add it to your paint mixture, I assume you are referring to acrylic paints rather than enamels or lacquers. 

Patsy: "It's only a model."
  • Member since
    May 2006
  • From: Las Vegas, NV
Posted by CaptainHawk1 on Sunday, May 31, 2009 1:20 PM

Excellent jobs on the 1/2500 scales, trekriffic.  I don't think I've ever seen that scale done so well without the use of all-over decals.

EDIT: Whoops!  I missed the part where you said you used the Absolute Decals!  Still looks great!

Couple of points to add on to the discussion:

There has been mention of Polar Lights being "no more" and Round 2 owning the master molds. This might be nitpicking a bit but that staement not quite accurate.  R2 owns both the Polar Lights and AMT Brands (not Ertl) brands.  I'm making the distinction because the kits aren't repopped under the R2 banner, they are repopped under AMT and Polar Lights banners, depending on which brand initially produced them.

As far as the 1/1000 Refit and the Akira Class, those will be released under the Polar Lights banner, not the R2 banner.

For the record, I'm a R2 dealer as well so if you're interested in any kits or want to preorder contact me through my site.

As far as Future is concerned, it is basically liquid acrylic.  I've been using the same bottle for the last three years.  Betwen that and the 33 cent 16 oz. container of salt I have for salt weathering, it's probably the cheapest and most valuable investment on my bench (baking soda, rubbing alcohol and hardware store paint thinner are up there as well).

It's a perfect product.  It's water soluble, it sprays perfectly right out of the bottle, if you want to thin it you can and you won't hurt anything, if you make a mistake with it you can easily correct it. You can also use it to thicken paint that you've overly thinned by putting it in a cup and letting it dry to the point where it thickens up and then just pour it in to your jar of paint.


"Never mind...it's just easier to call you stupid." -Brian Griffin
  • Member since
    May 2009
Posted by trekriffic on Thursday, May 28, 2009 10:02 AM
 silentmodeler wrote:

 PaintsWithBrush wrote:
stikpusher is right, the Polar Lights 1/350 is 1701-A. I just received my pre-order from MegaHobby last week and it is a BIG box.

 i have seen the polar light of the 1701-A and it was in big box and cost around 80s bucks, i would love to buy it but i know i wont have any place to put it once its compete since i live in townhouse so i might need a big house for that model lol

You have the same space issues I have with the big kit. There's a resin 1/1000 scale refit kit available but what I'm really waiting for is the styrene 1/1000 scale Round 2 kit due out in December. You can preorder it at the SSM Store:

http://www.starshipmodeler.biz/index.cfm?fuseaction=product.display&Product_ID=1422

It's only 12" long and includes the aztec decals !

Patsy: "It's only a model."
  • Member since
    May 2009
Posted by trekriffic on Thursday, May 28, 2009 9:53 AM

 silentmodeler wrote:
nice looking NX-01 you got trekriffic! 

Thanks for the compliment ! Here's a couple more pics of the NX-01:

Patsy: "It's only a model."
  • Member since
    May 2009
Posted by trekriffic on Thursday, May 28, 2009 9:46 AM

You've got it. After you've finished decaling and gloss coating let it dry for a day before applying dullcote as, in my opinion, most Trek ships look best with a flat finish. They also photograph better as you get less reflection with a duller finish. As far as areas you want to keep glossy, you could mask them off but I would just go back in with a brush and apply a few coats of future to restore the shine. As far as painting the nacelles on the inside or outside, the 1/2500 kits are solid styrene (no clear parts) so you would paint the outside surface.

Patsy: "It's only a model."
  • Member since
    October 2006
  • From: Rochester, NY
Posted by silentmodeler on Wednesday, May 27, 2009 5:40 PM
nice looking NX-01 you got trekriffic! 
"Do, do not, theres no try" ~Yoda
  • Member since
    October 2006
  • From: Rochester, NY
Posted by silentmodeler on Wednesday, May 27, 2009 5:38 PM

 trekriffic wrote:
Once the decals are dry, you should seal with another coat of the same gloss coating you used underneath the decals. This seals them and should also make the edge of the decal disappear making the decals look as though they are painted on. Once that's dry you can spray on as many layers of dullcote as you like depending on how flat you want the finish. Fewer coats will yield a semi-gloss "satin" finish.

okay  just want to make it clear,  when the model is finished (before decals applied)  spray them with glosscote then put decals on it.  then put other coat of glosscote on it.  when it dry up   spray with dullcote?  if so  how do i want to keep the lights (on the nanclleus (sp) and dish) shining? since i know dullcote will make them look flat and not shiny.  that mistake i learned from doing my race car.  oopies daisies.  mask them up?   and also  do i paint the color inside or outside of the nanclleus and dish (sp) or doesnt matter?   let me know too

and guess what  i got the package that i order today.  but i cant get start on it since i have to finish up my other projects.   i might will contact you when i get start on mine.

"Do, do not, theres no try" ~Yoda
  • Member since
    October 2006
  • From: Rochester, NY
Posted by silentmodeler on Wednesday, May 27, 2009 5:30 PM

 PaintsWithBrush wrote:
stikpusher is right, the Polar Lights 1/350 is 1701-A. I just received my pre-order from MegaHobby last week and it is a BIG box.

 i have seen the polar light of the 1701-A and it was in big box and cost around 80s bucks, i would love to buy it but i know i wont have any place to put it once its compete since i live in townhouse so i might need a big house for that model lol

"Do, do not, theres no try" ~Yoda
  • Member since
    November 2008
  • From: Biding my time, watching your lines.
Posted by PaintsWithBrush on Tuesday, May 26, 2009 10:58 AM
stikpusher is right, the Polar Lights 1/350 is 1701-A. I just received my pre-order from MegaHobby last week and it is a BIG box.

A 100% rider on a 70% bike will always defeat a 70% rider on a 100% bike. (Kenny Roberts)

  • Member since
    May 2009
Posted by trekriffic on Tuesday, May 26, 2009 9:56 AM

Yes. TRU had the 1/1000 PL NX-01 kit on the shelf on one of my visits. I built mine awhile ago using JDecals aztecing decals. Saved me a ton of masking time. They're available at the SSM Store:

http://www.starshipmodeler.biz/index.cfm?currentpage=2&fuseaction=category.display&category_id=31

Turned out great IMO. Check it out:

Patsy: "It's only a model."
  • Member since
    January 2009
  • From: San Diego, CA
Posted by samdiego on Saturday, May 23, 2009 9:42 AM
The NX-01 from "Enterprise" can also be found at TRU
Broadcasting from the California Institute for the Used to be Alright
  • Member since
    May 2009
Posted by trekriffic on Wednesday, May 20, 2009 2:37 PM
Once the decals are dry, you should seal with another coat of the same gloss coating you used underneath the decals. This seals them and should also make the edge of the decal disappear making the decals look as though they are painted on. Once that's dry you can spray on as many layers of dullcote as you like depending on how flat you want the finish. Fewer coats will yield a semi-gloss "satin" finish.
Patsy: "It's only a model."
  • Member since
    October 2006
  • From: Rochester, NY
Posted by silentmodeler on Wednesday, May 20, 2009 2:31 PM
 Phil_H wrote:

In late 2007, in the US, Future was rebranded as "Pledge with Future Shine". This may be why you are having trouble finding it.

thanks phil_h

Basically, what it comes down to is that Future is simply a low cost alternative to Hobby branded clear gloss coats.

For best results when decalling, the decals must be applied to a gloss surface.

This is especially important when using setting solutions such as Micro Set/Sol. Although it may appear smooth, a "flat" surface is in fact covered with microscopic pits - these pits trap air between the surface and the decal, resulting in silvering of the decal. 

When you apply a setting solution, you may notice that the decal will appear to shrivel and then will settle onto the surface as it dries. A gloss surface offers less resistance to the decal as it settles. A "flat" painted surface may cause drag, resulting in the decal "hanging up" and drying before it's fully settled onto the surface, causing wrinkled decals.  

Apply the Dullcote at the end of the job, but while applying decals, you need a gloss surface,

so u mean apply the glosscote or future coat first on the finished painted model  before apply the decals with the sol/set. then after decals are set and dry then use dullcote for the final stage?  just want to make sure that i understand Smile [:)]

"Do, do not, theres no try" ~Yoda
  • Member since
    August 2005
  • From: Sydney, Australia
Posted by Phil_H on Monday, May 18, 2009 8:18 PM

 silentmodeler wrote:
... and as for future u mention,  to be honest i have no idea where to find it since i have hear alot of positive thing abt that floor polish and i have been looking and looking at hardware store such as home depot, walmart.

In late 2007, in the US, Future was rebranded as "Pledge with Future Shine". This may be why you are having trouble finding it.

i dont mind to try the future. but is dullcote same conpect as future or its different? 

Basically, what it comes down to is that Future is simply a low cost alternative to Hobby branded clear gloss coats.

For best results when decalling, the decals must be applied to a gloss surface.

This is especially important when using setting solutions such as Micro Set/Sol. Although it may appear smooth, a "flat" surface is in fact covered with microscopic pits - these pits trap air between the surface and the decal, resulting in silvering of the decal. 

When you apply a setting solution, you may notice that the decal will appear to shrivel and then will settle onto the surface as it dries. A gloss surface offers less resistance to the decal as it settles. A "flat" painted surface may cause drag, resulting in the decal "hanging up" and drying before it's fully settled onto the surface, causing wrinkled decals.  

Apply the Dullcote at the end of the job, but while applying decals, you need a gloss surface,


  • Member since
    October 2006
  • From: Rochester, NY
Posted by silentmodeler on Monday, May 18, 2009 7:18 PM

okay will check on it when i get the package, they wont ship it til this wednesday cuz of wonderfest.  yes i do use mircoset and mircosol  its helpful to me.  and as for future u mention,  to be honest i have no idea where to find it since i have hear alot of positive thing abt that floor polish and i have been looking and looking at hardware store such as home depot, walmart. i dont mind to try the future. but is dullcote same conpect as future or its different? 

"Do, do not, theres no try" ~Yoda
  • Member since
    May 2009
Posted by trekriffic on Monday, May 18, 2009 12:19 PM
Glad to hear you ordered the Absolute Models decals. Yes, these are waterslide decals. When I said they were tricky to apply I was referring to the fact that the decals I received were a little oversized in some areas; it seemed like the resolution was off just a tiny bit when they were printed. They are also fairly thin so you need to handle them gently or they will tear. For all the ship saucers, I recommend starting from the centerline and working your way outwards one section at a time until you reach the neck at the back of the saucer. The upper saucer decals for the D in particular will need to be trimmed a bit at the edges unless the maker has fixed that problem in the ones they're shipping now. Best to do a test fit before application. I also recommend cutting the larger decals up into smaller sections; it will make it easier to position them before they become stuck down. And cut the phaser strips out and apply them first. Once they are dry brush on a good coat of future acrylic floor polish so they don't loosen when you apply the adjacent decals. Once you apply a section, tamp it down good and tight with a Q-tip and/or sponge using a pin to poke out any trapped air bubbles. I would apply one section at a time and let it dry 5-10 minutes before applying the next decal. Patience is key when applying these. Do you use MicroSETand MicroSOL ?
Patsy: "It's only a model."
  • Member since
    October 2006
  • From: Rochester, NY
Posted by silentmodeler on Sunday, May 17, 2009 2:29 AM

Great!  sound good to me will let you know when i get start on it but ofc i have to finish up my projects before i get start on my star trek so its easier for me to focus.

i already order the absolute model decals thur the federation model for 3 ships.  what do u mean by tricky with the absolute decals?  same conpect using water like normal decals?  since i look on the pictures of the absolute decals, its looks like its in one part for each side. but ill have to wait them to arrive in mail. 

"Do, do not, theres no try" ~Yoda
  • Member since
    May 2009
Posted by trekriffic on Thursday, May 14, 2009 10:18 AM

 silentmodeler wrote:
awesome!   i just ordered the original, A and D set.   they were out of B, C, and E set  so hopefully i can find them which im sure i can find them someday.   

Great ! You'll have a lot of fun with these. Let me know when you start on the A. I had to make a few corrections on that one too although not as extensively as on the original. I spent most of my time accurizing the deflector dish, the impulse engines, and the stern.

BTW... if you decide to give Absolute Models decals a try, you can find them here: http://home.comcast.net/~d.tomita/decals/main.htm 

They can be tricky to apply but they really add a ton of detail to these small models.

Patsy: "It's only a model."
  • Member since
    October 2006
  • From: Rochester, NY
Posted by silentmodeler on Wednesday, May 13, 2009 9:36 PM
awesome!   i just ordered the original, A and D set.   they were out of B, C, and E set  so hopefully i can find them which im sure i can find them someday.   
"Do, do not, theres no try" ~Yoda
  • Member since
    May 2009
Posted by trekriffic on Wednesday, May 13, 2009 4:37 PM

I would start with either the C or the D. The C comes in another 3 ship set which includes the B, C, and E Enterprises. I really didn't do anything to accurize the C. The D corrections involved building out the small strip over the deflector dish in the lower hull where it runs up to the photon torpedo launcher in the neck. The photon torpedo opening should be recessed top and bottom from the flat surface that runs up the front of the neck. I think that was the only thing I changed. Some think the impulse engine at the base of the neck facing the rear needs to be accurized but I didn't bother.

Here's my C:

Detail of the D showing the deflector dish and forward photon torpedo launcher:


Patsy: "It's only a model."
  • Member since
    October 2006
  • From: Rochester, NY
Posted by silentmodeler on Wednesday, May 13, 2009 3:43 PM

what a fine looking enterprise you got.  boy  the painting sound difficult to me but worth to learn it.  and thanks for explaining the terminology.   sound like ill try to find the 1/2500 set of it.  boy i would love to do the big one   maybe one day i will who knows.  

if i got the set   which one shall i start with? i mean which one is the easy to do  ill assume the Enterprise D since u mentioned its almost accurated than A and original?   guess time for me to search and order it.

"Do, do not, theres no try" ~Yoda
  • Member since
    May 2009
Posted by trekriffic on Wednesday, May 13, 2009 2:35 PM

Glad you found my build information helpful.

Regarding Star Trek ship terminology...

B-C decks: The teardrop section immediately beneath the bridge on top of the saucer.

Secondary hull: The engineering section below the saucer. Attached to the saucer (primary hull) by the connecting dorsal. Here's a pic of my 18" Enterprise showing it:

Pylons: The two long arms that attach the warp engines to the secondary hull (aka struts).

Nacelles: The long cylindrical warp engines.

Control Reactor Loops: The two u-shaped arms inboard of the warp nacelles near the front. See this pic: 

Flux Constrictors: The 3 flat rectangular shaped sections at the front of the warp nacelles under the round bussard domes. See this pic:

Intercoolers: The two rectangular "ears" at the rear of the warp nacelles. See this pic:

As far as the color, I used a light ghost gray as the basecolor and a slightly darker shade for the strip at the front of the dorsal, the impulse engines at the rear of the saucer, the end caps at the back of the warp engines, and the area at the front of the nacelles behind the flux constrictors. You can see this area in this pic of the 18 incher:

On the 1/2500 E, after the basecoat had dried, I applied a coat of Testors clear matte enamel (aka Dullcote) and brushed on a light coat of Tamiya silver pastel chalk which I then rubbed in with a Q-Tip and soft cloth. This gave the ship a metallic silver caste similar to the look of the "remastered" Enterprise. I then sprayed on a Testors clear gloss enamel (Glosscote) prior to applying the decals. Once those were dry I sprayed on more clear gloss and painstakingly cut tiny rectangular sections of white decal film and laid them over the top of the black windows that came with the Absolute Models decals with decal solution since aome windows are black and some are white. You'll need a sharp exacto knife and some very fine pointed tweezers to do this. For round windows, I tapped the tip of a white gel ink pen to the black dots of the Absoute Models decals to make them white. After the windows were dry I spayed on more Glosscote followed by about 4 coats of Dullcote. Gel pens were also used to produce the multicolor look of the bussard domes at the front of the nacelles. It took quite a few steps to get them right.


Patsy: "It's only a model."
  • Member since
    October 2006
  • From: Rochester, NY
Posted by silentmodeler on Wednesday, May 13, 2009 11:54 AM

Oh boy Shock [:O] thats alot of work but sound so fun to do it Smile [:)].  some of the star trek words u mention, Im not very familiar with it or no idea where it is. The only thing i know the deck A which is on the top of the um  saucer. but  Deck B,C and secondary hull, plyons, nacelles,  no idea.  Sign - Oops [#oops]  Im not 100% hardcore star trek but love the shows and the model as well. it would be nice if you explain what those words mean or where it is so i will know.

i was looking at ur finished pictures,  for some reason i always thought the original and the A was in white color.  what color did you use? since the color of the ships and the lights does stand out very well.  you should publish ur work up in the FSM magizine  Bow [bow].

 as i recalled mine enterprise D when i was young,  i didnt paint or spray paint the ship  same goes with the A. but overall i did good job on it but not like the master modeler yet. I just add yellow/black color for lights (some where on and some where off)    

"Do, do not, theres no try" ~Yoda
  • Member since
    May 2009
Posted by trekriffic on Wednesday, May 13, 2009 10:53 AM

Here's the link to a couple of subalbums with pics of the 1701:

In progress: http://s146.photobucket.com/albums/r259/Trekriffic/New%20Ships%2003-03-07/?start=40

Finished: http://s146.photobucket.com/albums/r259/Trekriffic/New%20Ships%2007-06-07/

http://s146.photobucket.com/albums/r259/Trekriffic/New%20Ships%2007-06-07/?start=20

http://s146.photobucket.com/albums/r259/Trekriffic/New%20Ships%2009-29-07/?start=0

http://s146.photobucket.com/albums/r259/Trekriffic/New%20Ships%2009-29-07/?start=20

The display stand in the kit holds all 3 ships; there are no individual stands:
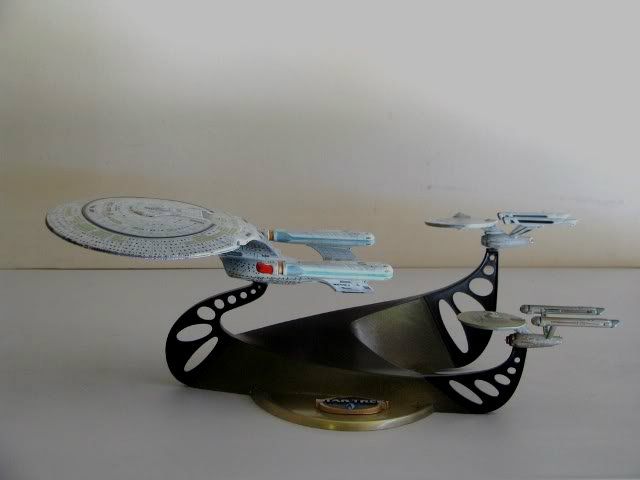
If you do want to display it individually, there are acrylic display stands available for model airplanes that should work quite well. Or do what a lot of people do and use a section of brass or aluminum rod inserted into a length of plastic tubing mounted in the underside of the secondary hull near the front. Insert the other end into a block of wood or some of those wooden craft bases available at any craft store. These are just a few ideas for bases; I'm sure there are many others.

As far as the original needing a lot of work, if you can imagine a model with all of the inaccuracies of its 18" cousin but in 1/4th the size you'll get some idea of what I was dealing with. I did the saucer, secondary hull and pylons, and nacelles as subassemblies. To summarize (ha ha) what I did:

1) The bridge (deck A) needed to be filed and sanded to a more rounded shape as the sides were too flat.

2) The B-C deck was too wide in back (needs to be more teardrop shaped) and also needed to be more rounded on the sides. 

3) The angle of the saucer rim was too flat and needed filing and sanding to a more acute angle.

4) The gridlines needed to be sanded off the saucer. The Absolute Modesl decals included the gridlines as well as all the ship registration and other markings. I ended up toning down the gridlnes with silver pastel chalk so they are more subtle in appearance.

5) The 3 round indents in the lower saucer had to be filled in with putty and sanded smooth. I ended up sanding off the raised concentric circles too as I used the Absolute Models decals which had those circles.

6) I completely removed the deflector housing rings and replaced them with Evergreen plastic rings cut from tubing and a brass outer ring. Scratch built a new deflector dish from styrene sheet turning it in my dremel like a lathe. The center spike was redone using brass wire and tiny bits of styrene tubing for the base and tip of the spike. The front of the secondary hull was filed to at a 45 degree angle for a nice bevel where it meets the rear of the deflector housing.

7) The stern was too short so I extended the fantail with styrene strip about 1/8 inch. The hangar bay door detail is soft in the kit so I filed, scraped, and sanded the doors to a rounder shape and lightly scribed new door seams. I also dug out a lot of plastic out under the "cowling" and drilled a small hole in the top of the secondary hull stern down into the top centerline of the doors to insert a short length of plastic tubing (round on top) for the beacon above the doors.

8) The one piece nacelle pylon assembly was rather flimsy IMO so I scribed and filed out a shallow channel down the centerline and used a bent V-shaped section of brass rod glued in with CA for reinforcement down each strut and across the center section which fits in a slot in the hull strongback. I also left enough rod sticking out of the top of the struts to insert into the slots of the warp engines for added strength at the glue joint. I covered the slot with the brass rod with a thin piece of rectangular styrene cut to the size of each strut. It does make the struts thicker than the original but that's the price I decided to pay for improved strength.

9) On the nacelles, there was a lot of soft detail especially with the control reactor loops at the front of the inboard slot. Basically they were just blobs of plastic. I cut them loose filing with my exacto knife and carved them to shape before reattachment. Photoetch screen was added beneath the loops and along the length of the inboard indent. The 3 flux constrictors as molded were the wrong shape so I added small sections of plastic strip to lengthen them then filed and sanded to shape. The intercoolers at the top rear of the engines needed a slot filed along the lower edge as they were flat along the sides. The end cap "balls" were removed and replaced with metal beads so they hung out a little more.

These were the major steps I took in accurizing this little beast. I could go into the details of painting, decaling, and how I achieved the bussard effect (two words- gel ink) but I won't go into that yet as I fear your eyes may already be glazed over from what I've already written. That is unless of course somebody really wants to hear more about that.  ;?)

Patsy: "It's only a model."
  • Member since
    October 2006
  • From: Rochester, NY
Posted by silentmodeler on Wednesday, May 13, 2009 1:59 AM

trekriffic

you can send me a link so i can take a look to see what it looks like and does it comes with display stand too?   let me know thanks  and aslo you mentioned that the original needs alot of work   what do u mean by that?  so i can get the idea of it 

"Do, do not, theres no try" ~Yoda
JOIN OUR COMMUNITY!

Our community is FREE to join. To participate you must either login or register for an account.

SEARCH FORUMS
FREE NEWSLETTER
By signing up you may also receive reader surveys and occasional special offers. We do not sell, rent or trade our email lists. View our Privacy Policy.