SEARCH FINESCALE.COM

Enter keywords or a search phrase below:

1/24 A-Wing buildup

5005 views
51 replies
1 rating 2 rating 3 rating 4 rating 5 rating
  • Member since
    March 2007
  • From: Atlanta, Ga.
1/24 A-Wing buildup
Posted by MrSquid2U on Sunday, September 27, 2009 5:31 AM

 The postman brought this client build just yesterday. It's the ModelNutz casting and it looks to be a nice build ahead. But then, after I posted this on another board ModelNutz actually contacted me to offer some upgraded replacement parts and even to provide the pilot who went MIA somewhere, somehow? Now that's the kind of "support" from a kitmaker that I just have to share with the community!

 So stay tuned (if you choose) as I delve into this one.


  • Member since
    April 2008
  • From: Philadelphia PA
Posted by smeagol the vile on Sunday, September 27, 2009 8:12 PM

 May I ask where you got this kit?  The Awing is one of my favorite designs and I have been wanting to build one forever


  • Member since
    March 2007
  • From: Atlanta, Ga.
Posted by MrSquid2U on Monday, September 28, 2009 9:59 PM
 smeagol the vile wrote:

 May I ask where you got this kit?  The Awing is one of my favorite designs and I have been wanting to build one forever


Hi,

 While I "know" the maker of this kit, first, the client mailed it to me. Then since the builder of the kit, 'ModelNutz' and I share another forum I usually contact him by PM 'over there'? But I have sent a PM to request contact info which I will then post here for you and anyone else who wants to inquire about his offerings, which are not limited to this kit! He makes some excellent subjects and has proven to offer service second to none!Approve [^]


  • Member since
    March 2007
  • From: Atlanta, Ga.
Posted by MrSquid2U on Tuesday, September 29, 2009 10:46 AM

You can order this kit by contacting ModelNutz at holthill@aol.com

Thumbs Up [tup]


  • Member since
    April 2008
  • From: Philadelphia PA
Posted by smeagol the vile on Tuesday, September 29, 2009 6:39 PM
how much is the price on the kit?


  • Member since
    March 2007
  • From: Atlanta, Ga.
Posted by MrSquid2U on Thursday, October 8, 2009 2:11 PM

 The replacement parts and "upgraded" parts arrived from ModelNutz and they're all great.

Thanks again for that customer service Ed!Bow [bow]


  • Member since
    December 2002
Posted by ouizel on Friday, October 9, 2009 11:31 AM

What are the 'upgrades'?  I bought this kit about 3 months ago.  Haven't started yet but am curious to see what might have been changed.


Thanks.

  • Member since
    March 2007
  • From: Atlanta, Ga.
Posted by MrSquid2U on Friday, October 9, 2009 3:04 PM
 ouizel wrote:

What are the 'upgrades'?  I bought this kit about 3 months ago.  Haven't started yet but am curious to see what might have been changed.


Thanks.


While I don't know when they went into effect, the kit's guns now incorporate aluminum tubing and of course hold their shape better as well as simply look nicer. Then too I believe ModelNutz looked over my photo carefully and maybe some parts were missing (the client had this on the shelf for some time) because I also received some cockpit panels and the noticeably absent pilot with builder's choice of two different heads/helmets. Again, probably just due to "age"and storage, this kit had a badly warped and twisted canopy frame which again, was replaced!


You just can't ask, let alone expect, customer service to get any better than that!Cool [8D]


  • Member since
    December 2002
Posted by ouizel on Friday, October 9, 2009 5:33 PM

I think the only difference between what you cited and mine are the aluminum gun parts - which I was planning on re-making anyway.

Thanks!

  • Member since
    March 2007
  • From: Atlanta, Ga.
Posted by MrSquid2U on Wednesday, November 4, 2009 1:35 PM

Getting back to this one I've fashioned lil toggle switches for the dash as well as placing some FO in places to accompany the main screens. The upper four lights, above the top main screen switch hues and then flash while the lower three lights above the toggle switches simply flash on/off red. Here's a few pics during various phases of the light changes.


  • Member since
    October 2009
  • From: Minnesota
Posted by ScottN on Wednesday, November 4, 2009 2:24 PM
those light are tremendous. Spectacular look. How did you get the glow on the screens?

Workbench: Lord of the Rings, Fellowship Figures. Panzer II dio, Crimson Skies inspired 1/72 plane.

  • Member since
    March 2007
  • From: Atlanta, Ga.
Posted by MrSquid2U on Wednesday, November 4, 2009 2:57 PM

 ScottN wrote:
those light are tremendous. Spectacular look. How did you get the glow on the screens?

While there are lotsa good ways to do it- I didn't have any light filter material that would disperse everything evenly so instead I built a small enclosure for a bright LED below the panel with an access slot, coated the entire inside of that with foil, the inside of the dash with silver paint and then sanded the backside of the screens with 600grit. That gave indirect, difused lighting so the hot spots on the screen are minimized.

And, thank you for the kind words.Smile [:)] 


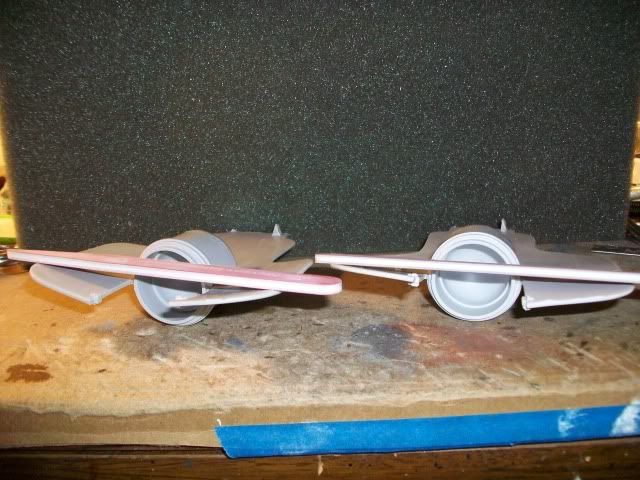
The wings warped a tad while being stored so off they go for a nice dip in warm water.


  • Member since
    March 2007
  • From: Atlanta, Ga.
Posted by MrSquid2U on Wednesday, November 4, 2009 4:53 PM

First real hot water and then laid in a cradle that supported the wings straight. Let cool a bit and then plopped in the freezer for a couple of minutes. All good, straight and locked in place now.


  • Member since
    March 2007
  • From: Atlanta, Ga.
Posted by MrSquid2U on Wednesday, November 4, 2009 5:25 PM
The engines are cast thoughtfully with a pass through hole for wiring so I just cut a deeper receptacle to allow a 10mm Jumbo LED to fit behind the engine exhaust grids which have been thinned from behind to open up all of their "holes".


  • Member since
    March 2007
  • From: Atlanta, Ga.
Posted by MrSquid2U on Thursday, November 5, 2009 7:41 AM

The thoughtfulness behind this kit carries right into the engine can base which is shaped somewhat like a flashlight's reflector cone. A hard shape to cover in foil but more effective for lighting. I used BareMetal brand chrome foil and burnished it heavily to minimize the wrinkles while it tried to conform. In this instance, the effect will outweigh the "beauty" (or lack of).Wink [;)]


  • Member since
    March 2007
  • From: Atlanta, Ga.
Posted by MrSquid2U on Thursday, November 5, 2009 4:02 PM

The cast in sidewalls have been removed (on one side) and the opening reshaped as well as a "trough" cut to receive the new backwall with it's details.


Compared to the remaining stock side.

And here's all the Evergreen stock you'll need to replicate what was there.


  • Member since
    March 2007
  • From: Atlanta, Ga.
Posted by MrSquid2U on Thursday, November 5, 2009 10:16 PM
And mounting up the phone jack I used a "housed" version which when material was removed from the internal reinforcement will now span the gap and once epoxied should be as strong as ever.

And on the bottom it was countersunk. I did think of capping it with a washer to just blend it in further but somehow I kind of like the utilitarian nature of leaving the nut and washer showing? It's still flush anyways.


  • Member since
    March 2007
  • From: Atlanta, Ga.
Posted by MrSquid2U on Thursday, November 5, 2009 11:33 PM
This area has so much reinforcement (material) behind it that it's easier to grind flat the cast in details then just add them back.

After grinding, am working on restoring the arced overhang of the surface which somewhat wraps into/over this panel.


  • Member since
    March 2007
  • From: Atlanta, Ga.
Posted by MrSquid2U on Friday, November 6, 2009 1:46 PM
With some shifting of my castings over time the wing root didn't meet the body.

For me the easiest solution was to grind away the original locator ledge of the backplate.

Which after other adjusting allowed the engine to slide forward and snuggle it's wing root up.

And then the side dressing can be added (after adjustments) and the lil replcaement styrene piece can cap off that corner that turns into the gun mount area being reworked.


  • Member since
    March 2003
  • From: Newport News VA
Posted by Buddho on Friday, November 6, 2009 4:38 PM
My goodness...that instrument panel is fabulous....this is one top notch build.

  • Member since
    March 2007
  • From: Atlanta, Ga.
Posted by MrSquid2U on Friday, November 6, 2009 5:32 PM

 Buddho wrote:
My goodness...that instrument panel is fabulous....this is one top notch build.


Thank you for those very kind words.Cool [8D]


  • Member since
    December 2002
  • From: Third rock from the sun.
Posted by Woody on Friday, November 6, 2009 5:36 PM
Wow is that ever cool! I'm looking forward to seeing the finished model.

" I wish to have no connection with any ship that does not sail fast; for I intend to go in harm's way." --John Paul Jones
  • Member since
    March 2007
  • From: Atlanta, Ga.
Posted by MrSquid2U on Friday, November 6, 2009 8:08 PM

 Woody wrote:
Wow is that ever cool! I'm looking forward to seeing the finished model.


Ya know, I wish the builder would hurry up and display the finished piece too!Whistling [:-^]

Thanks!Big Smile [:D]


And here's a new gun mount shoulder.


  • Member since
    March 2007
  • From: Atlanta, Ga.
Posted by MrSquid2U on Saturday, November 7, 2009 8:36 AM
The back plate had some nicked and chipped "rings" so new ones were fashioned up and grafted on. A suitable/matching size brass collet was cut and then used to form the styrene strip. The whole thing was then glued onto the flattened bases and let dry. Later they'll be sanded down to height and generally cleaned up.


  • Member since
    December 2002
  • From: Third rock from the sun.
Posted by Woody on Saturday, November 7, 2009 8:49 AM
What a great idea for forming ring shapes in styrene.

" I wish to have no connection with any ship that does not sail fast; for I intend to go in harm's way." --John Paul Jones
  • Member since
    March 2007
  • From: Atlanta, Ga.
Posted by MrSquid2U on Saturday, November 7, 2009 9:28 AM
And the cleaned up backplate in place.

With it's surround mocked in place as well.


  • Member since
    March 2007
  • From: Atlanta, Ga.
Posted by MrSquid2U on Saturday, November 7, 2009 7:53 PM

So, here's an engine light test.


BTW- those darker pictures aren't taken in the "dark". They're just one with no flash and regular bright room lighting and then the direct look in is with flash as well?
Ummmm, it's so bright that I made the mistake of looking into it? I'm still "sunspotted"??? ::)


  • Member since
    March 2007
  • From: Atlanta, Ga.
Posted by MrSquid2U on Tuesday, November 10, 2009 3:37 PM

After studying the studio filming mini I realized all of the sidewall detail with that torpedoe launch bay had been "added"? Now the Studio mini has a flat rear wall but I went with the thought that any engineer would have made it a "tube".

I've "frenched" styrene tubing into the sides and just need to do some finish work. IMHO it will look the part but also in my opinion, it will just look "right", if that makes sense?


  • Member since
    October 2009
Posted by 3d-modeler on Tuesday, November 10, 2009 5:40 PM
It makes a lot of sense....thought you were safe here nice try!!!LOL
Looking excellent all over the place looking forward to paint and
beauty shots of my favorite fighter!!!
  • Member since
    March 2007
  • From: Atlanta, Ga.
Posted by MrSquid2U on Tuesday, November 10, 2009 7:15 PM

 3d-modeler wrote:
It makes a lot of sense....thought you were safe here nice try!!!LOL
Looking excellent all over the place looking forward to paint and
beauty shots of my favorite fighter!!!


Are you stalking me?


LOOK, over there. SHINEY! (As I runaway!)


Tongue [:P]

Thanks MP!Wink [;)]


JOIN OUR COMMUNITY!

Our community is FREE to join. To participate you must either login or register for an account.

SEARCH FORUMS
FREE NEWSLETTER
By signing up you may also receive reader surveys and occasional special offers. We do not sell, rent or trade our email lists. View our Privacy Policy.