SEARCH FINESCALE.COM

Enter keywords or a search phrase below:

AMT/TOS Romulan BOP

10251 views
39 replies
1 rating 2 rating 3 rating 4 rating 5 rating
  • Member since
    March 2007
  • From: Atlanta, Ga.
AMT/TOS Romulan BOP
Posted by MrSquid2U on Sunday, December 20, 2009 12:05 PM

Yes, Swanny's build motivated me to finally knock the dust off and crack the box open! I hope SWanny doesn't mind if a small attack group starts forming up?

Decided to pull one out of the stash and get to it.

Started on some nacelle mods first by replacing the rear portion with brass tube to improve the uniformity which will look better after lighting. Sank the bologna cut sleeve into the trimmed nacelle which will not only look a lil better at that joint but also help with light leakage more than if I had just glued it to the end cap.
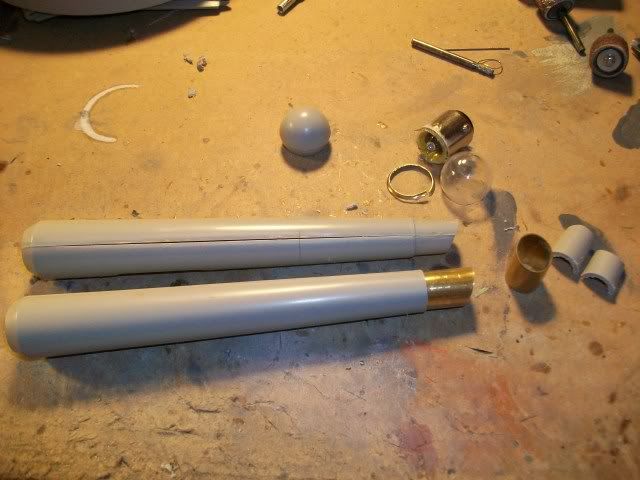
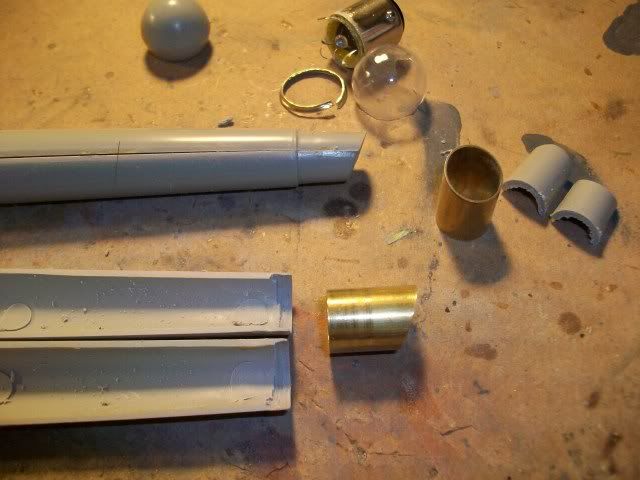
Started to search for a replacement "dome" on the front end and when I first looked at some references I thought the dome was almost an entire sphere perched atop the end. SO, I actually cut apart an automotive bulb (seen in background) and was pretty happy with the effect. Then the majority of references I eventually looked at went contrary to my perception and it appears a 'half sphere/dome cap' is closer. No need to seperate the lightbulb assembly and dress it with diamond bits that way so I'll forego the work.

Opened up the kit's molded in portholes while leaving the lil surrounds (frames?) of each just because I like that look.
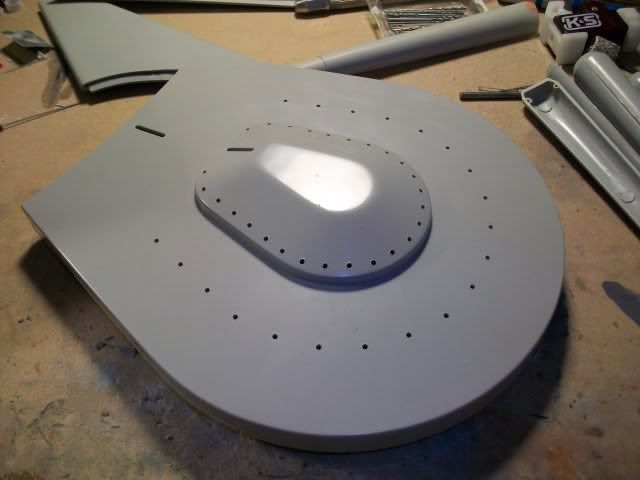
And I'm now scratching my head on how much further I wanna go to accurize the various missing portholes/windows and sensor openings? That includes pondering wether or not to rebuild all the sidewalls to include the missing angle and step from the surround into the plane of the top surface?
This will be lit for the "interior", nacelles, weapon, and thrusters.

If anyone is interested in stepping in now and getting it built to your own specs please PM me while changes can be accomodated.

Thanks for looking in.


  • Member since
    March 2007
  • From: Atlanta, Ga.
Posted by MrSquid2U on Sunday, December 20, 2009 11:55 PM

Up front on the nacelle I used a kit supplied piece to replace the evetual dome location. Recontoured it's taper, drilled it out and sleeved it in brass. This will give a nice receiver for the blue lens to be sunk into and with a green LED behind will shine nicely through the clear dome- a cutdown piece from a PL Enterprise.


  • Member since
    July 2004
  • From: Sonora Desert
Posted by stikpusher on Monday, December 21, 2009 12:59 AM

This is one I want to see finished... "Balance of Terror" was one of the best episodes.


F is for FIRE, That burns down the whole town!

U is for URANIUM... BOMBS!

N is for NO SURVIVORS...

       - Plankton

LSM


  • Member since
    March 2007
  • From: Atlanta, Ga.
Posted by MrSquid2U on Monday, December 21, 2009 2:39 AM

Maybe if you and I keep after the builder we can both see it soo.......


Oh.Confused


Um, thanks!Smile Burger


  • Member since
    March 2007
  • From: Atlanta, Ga.
Posted by MrSquid2U on Sunday, December 27, 2009 6:24 PM

Decided to go ahead with the kit mods to "bring it up to date" working off of the blueprints and also using the 1/350th AW (EX SR) piece as a references.


That "step" around the circumference of the upper saucer after it was cut down in diameter was added in styrene and will eventually join to new "angled" sidewalls. The upper hull itself was cut apart to account for the concave rear section.

Meanwhile the electronics have been made for the Photon Torpedo effect as well which will be added to the lit nacelle effects.


  • Member since
    March 2007
  • From: Atlanta, Ga.
Posted by MrSquid2U on Monday, December 28, 2009 7:58 AM

The sidewalls were rebuilt with a taper allowing the top half of the saucer with it's newly beveled edges to sit into that with an interference fit which will aid final finishing after all interior work is done. There's also a comparison of a stock BOP and you'll see the overall thickness has also been adjusted.


  • Member since
    March 2007
  • From: Atlanta, Ga.
Posted by MrSquid2U on Tuesday, December 29, 2009 2:46 PM


 Due to the sidewalls being tapered now had to refit the wings to the body and they are now ready to mount after being beveled, if you wanna call it that. Also separated the bridge to allow some reshaping, further drilling and so I could button up the hull and retain access to the interior to the very end.


  • Member since
    March 2007
  • From: Atlanta, Ga.
Posted by MrSquid2U on Wednesday, December 30, 2009 1:27 AM

Since many windows need adding and others are now being relocated I fashioned up lil "frames" for them. That's part of the charm for me of the BOP- all the frames.


  • Member since
    March 2007
  • From: Atlanta, Ga.
Posted by MrSquid2U on Wednesday, December 30, 2009 7:49 PM

Added the engine vents to the rear panel-


  • Member since
    March 2007
  • From: Atlanta, Ga.
Posted by MrSquid2U on Thursday, December 31, 2009 8:20 AM

And did the rough in for reshaping the bridge.


  • Member since
    March 2007
  • From: Atlanta, Ga.
Posted by MrSquid2U on Friday, January 1, 2010 3:18 AM

 I've wanted to leave the bridge removable. At least for myself up through the very last of assembly to ease the joining of the hull halves and such. Not sure if I'm so worried about it remaining that way but just in case, I fashioned up a receiver within the hull that accepts the bridge with a VERY tight fit and now due to the channel effect it will also block light so I do have that option.


  • Member since
    March 2007
  • From: Atlanta, Ga.
Posted by MrSquid2U on Saturday, January 2, 2010 5:24 AM

Here's the top hull with it's window inserts.


And the lower hull awaiting it's turn now.


I for one love the lil "bumps" and character that these will add and they were present on the filming mini afterall.


(This project is for sale and now is a good time if you'd like it painted to your specs, to contact me by PM. Thanks.)


  • Member since
    July 2004
  • From: Sonora Desert
Posted by stikpusher on Saturday, January 2, 2010 2:38 PM

That is coming along beautifully! Your reshaping, enhancements, and overall corrections are really capturing the menacing look of the Romulan Bird of Prey!


F is for FIRE, That burns down the whole town!

U is for URANIUM... BOMBS!

N is for NO SURVIVORS...

       - Plankton

LSM


  • Member since
    March 2007
  • From: Atlanta, Ga.
Posted by MrSquid2U on Saturday, January 2, 2010 3:38 PM

Thank you Stikpusher. I am hoping to add more character- especially if it's of an evil or menacing nature!Devil

And here's the lower hull with its frames in place.


  • Member since
    March 2007
  • From: Atlanta, Ga.
Posted by MrSquid2U on Sunday, January 10, 2010 9:58 PM

Fashioned the rear thrusters into the body and built a light box as well for them.

Grating was added which is actually a 1:160th rail road catwalk which offers nice elongated holes rather than traditional mesh. It was backed up with sandwiched acetate sheets, clear and smoked.

Added the Plasma Weapon Housing up front.

 Here she is with the "lid" not only in place but glued and blended. Since I was rather careful during the fabrication it was really no more than allowing the AC to ooze out of the seam and then sanding that flat. Of course a prime and sand then capped it off.


  • Member since
    June 2004
  • From: The House of Blues Clues
Posted by Griffworks on Monday, January 11, 2010 5:52 PM

I didn't realize that FSM now hosts our pics!

The greatest measure of a man is his children and what kind of people they are.


  • Member since
    March 2007
  • From: Atlanta, Ga.
Posted by MrSquid2U on Thursday, January 14, 2010 8:44 AM

Griff,

 Well yes, yes they do! And to further prove it here's some more.Wink


The front nacelle lights pass through shaved down "lenses" shown earlier which then sit behind clear domes. Now the rear lights shine through cut down domes which are multifaceted and create a very nice scattered light effect. I like the visual interest as compared to "bare LEDs" and also this way not only does the light get further "effects" but you never see the LEDs themselves.


The model will sit upon a stereo plug which will allow more than just a straight power feed. This way I can hide a micro switch upon the model itslef to control the plasma weapon and the base will hold switches for interior lighting and nacelles as well as making the thrusters controllable.

The tubing has hole cut in it to peg the stereo plug to help it from ever pulling out of the tubing which can happen even when epoxied in place. The outer styrene was chosen since paint adheres better though there will be a metal tube within that for further strength.


The plugin will sit angled within the hull so that the display will allow viewing of the prominent bird on the bottom while it can also swivel or just be popped off the stand/pole so that you can still fly it about the room when the mood strikes! And with me, that's quite often.Stick out tongue


  • Member since
    March 2007
  • From: Atlanta, Ga.
Posted by MrSquid2U on Friday, January 15, 2010 9:54 AM

The female jack was mounted onto a styrene collar which was angled to effect the display. Since the jack (box) had a keyway, that was transferred onto the mount with additional bracing around the perimeter so once snugged down with it's own nut everything should stay put well. The entire mount is below flush with the hull.


  • Member since
    March 2007
  • From: Atlanta, Ga.
Posted by MrSquid2U on Saturday, January 16, 2010 11:56 AM

The stereo phono jack gives two power feeds besides a ground. That leaves me one short of functions required so something needs a switch upon the ship itself and to operate between warp or thrusters made sense as an either/or scenario.

A very small ST/DP switch was scavenged from the odds box and wired up to be hidden on the craft.


  • Member since
    March 2007
  • From: Atlanta, Ga.
Posted by MrSquid2U on Saturday, January 16, 2010 3:31 PM

Because space (width) is of the essence I slipped styrene between the leads to insulate them from each other then pressed the leads together to further slim the assembly. All of that was encased within CA  because those leads are now getting quite thin and fragile and I don't want them coming apart or breaking off of course. The switch casing itself was then sanded even slimmer because it will become the bottom trailing edge of the tail itself. It now matches the outside width of the tail assembly which of course has room within for the wiring run.


  • Member since
    March 2007
  • From: Atlanta, Ga.
Posted by MrSquid2U on Saturday, January 16, 2010 4:52 PM

And the switch assembly blended into the tail. I'll add a contoured "cap" to the 'knob' to further disguise it.


  • Member since
    March 2007
  • From: Atlanta, Ga.
Posted by MrSquid2U on Sunday, January 17, 2010 10:10 AM

The wiring from the new switch was simply run into the bridge.


While this is the componentry for the Plasma Weapon.


  • Member since
    March 2007
  • From: Atlanta, Ga.
Posted by MrSquid2U on Tuesday, January 19, 2010 3:05 PM

Meanwhile I've retested all the various powered elements and sorted their wiring to the switch and the phono plug. This is what it all looks like before getting stuffed and set into place! Quite the temporary mess.:blink


  • Member since
    July 2004
  • From: Sonora Desert
Posted by stikpusher on Tuesday, January 19, 2010 11:38 PM

Yikes! electric spaghetti, with a  side helping of pc board!Geeked


F is for FIRE, That burns down the whole town!

U is for URANIUM... BOMBS!

N is for NO SURVIVORS...

       - Plankton

LSM


  • Member since
    March 2007
  • From: Atlanta, Ga.
Posted by MrSquid2U on Wednesday, January 20, 2010 9:13 AM

^^^

Indeed! We'll add a nice garnishment of hot glue to hold things in place too.Stick out tongue


  • Member since
    March 2007
  • From: Atlanta, Ga.
Posted by MrSquid2U on Wednesday, January 20, 2010 11:26 AM

With all electrical components affixed internally it's finally time to attach the bridge and new tail. First pass of primer towards blending it all in and then the bodywork will be finished.


  • Member since
    March 2007
  • From: Atlanta, Ga.
Posted by MrSquid2U on Saturday, January 23, 2010 12:40 PM

I placed a base coat of black followed by a new product, Holomatic, Spectral Chrome. It's a pretty badazz hue with prismatic shifts that do remind me of one of those holographic security stickers. I'll use this with some further embellishments.


  • Member since
    March 2007
  • From: Atlanta, Ga.
Posted by MrSquid2U on Sunday, January 24, 2010 2:24 PM

I wanted a base to help identify this further as Romulan. Looked up an old TOS Rommie emblem and it will sit atop the pedestal. The "fingers" will control the switches for electronics with contacts underneath triggered by depressing the red for weapon and green for all lights since the engines are switched upon the model itself. Of course those are paper templates already transferred to other styrene pieces.


  • Member since
    March 2007
  • From: Atlanta, Ga.
Posted by MrSquid2U on Sunday, January 24, 2010 10:51 PM

And here it is complete prior to paint. Again, the control switches will be activated by pressing down on the radiating "fingers" which rest below the half round trim to limit their travel back upward. The beveled and rounded edges were chosen to reflect highlights from the pearl and prismic shift paints that will be used on the trim.


  • Member since
    February 2003
  • From: Sandusky Ohio, USA
Posted by Swanny on Tuesday, January 26, 2010 6:58 AM

Excellent work, I like that finish. I'm kind of stalled on mine again.

JOIN OUR COMMUNITY!

Our community is FREE to join. To participate you must either login or register for an account.

SEARCH FORUMS
FREE NEWSLETTER
By signing up you may also receive reader surveys and occasional special offers. We do not sell, rent or trade our email lists. View our Privacy Policy.