SEARCH FINESCALE.COM

Enter keywords or a search phrase below:

Star Trek models--first timer Trekkie.

5411 views
25 replies
1 rating 2 rating 3 rating 4 rating 5 rating
  • Member since
    April 2010
  • From: San Diego, CA, USA
Posted by Gerry on Sunday, December 16, 2012 8:58 PM

Very nicely done. The smaller ones are so difficult to get detail.

Great job.!

Gerry ...Young at Heart - Other parts slightly older.

  • Member since
    January 2010
Posted by Klik on Saturday, December 15, 2012 5:17 PM

Thank you all for the kind responses--don't actually know what happened to PB, just started endlessly reloading on my browser--must be my computer.

Any how, last pics:

Under side of the 1701 (refit)

and the biggest dissappointment of the kit(s):

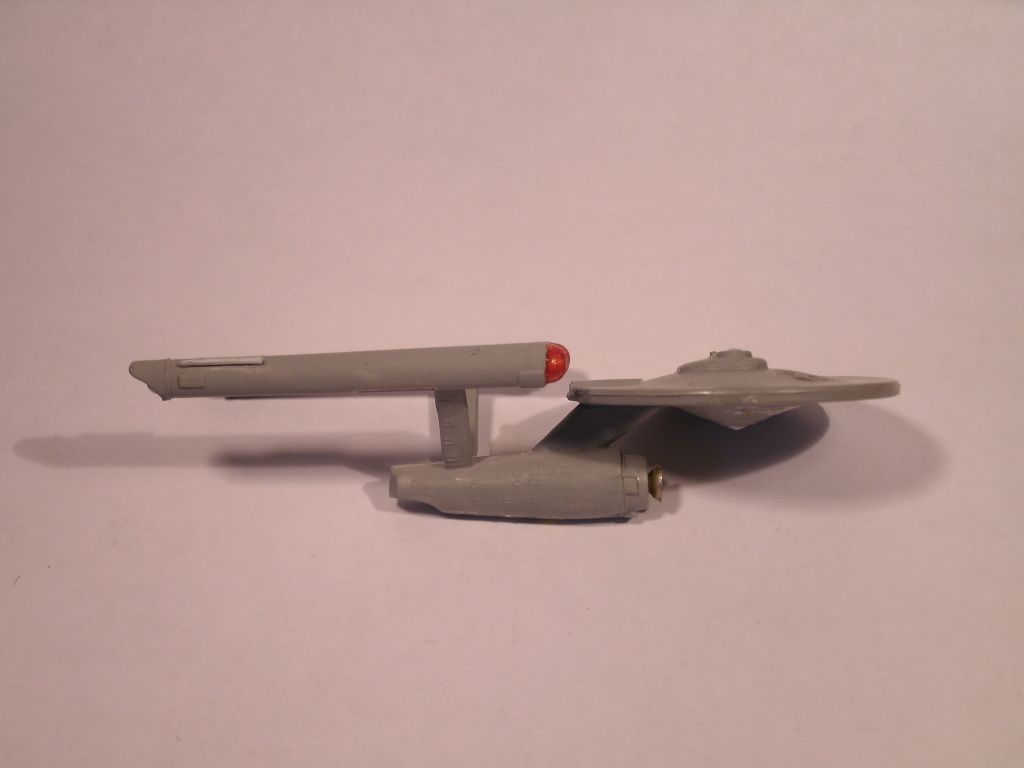
the TOS 1701:
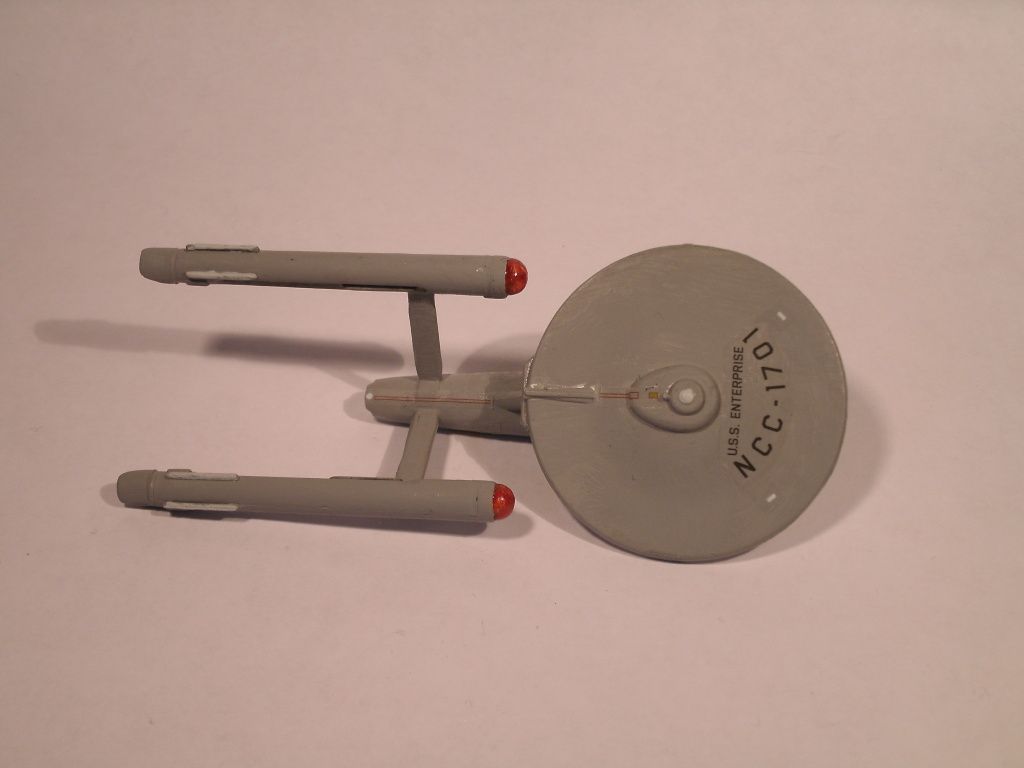
Just in case you didn't notice--the decals on the sides of the ship, the underside of the dish, and the sides of the engines didn't conform, to the point where I ended up tearing the nacelle and side decals into uselessness. So, there they sit.

I found that the nacelles would probably line up better if the posts that held them to the rest of the ship were made of stronger plastic (or even metal), which lead me to 'damage' to the St. Lo's nacelle as a way to explain its extreme tilt. The TOS Enterprise had the best fit overall, and its nacelles literally did not need to be glued (just to be safe, I glued them anyways). The Enterprise-B (which I chose not to decal at all and renamed the St. Lo after the pocket carrier from WWII) had the worst fit overall, and actually needed tape to hold its parts in place to dry (and then still had a nasty seam), and the Enterprise (refit) had alignment issues (if you look carefully enough, the engine halves do not line up).

Basically, these were fun and easy kits that I used as a test bed for weathering. I tried not to use too many decals, even though you could, potentially not paint the kit at all (there are decals for the entire ship), though the decals are excellent, just needing a solvent to get them to conform to the surface details (which I obviously do not have). Not a lot of effort, and a lot of bang for your buck from three kits that cost about $6 apiece in one box.

In all, these kits were so much fun that I am looking into getting more Star Trek kits.

Klik


P.S. I was surprised, as a Star Wars fan, how small the Enterprise is. Placed alongside my 1/2200-ish Star Wars "Republic Star Destroyer" puts the 1/2500th scale of these kits into perspective.

oneyearwar1

The hardest part of flying isn't flying...it's landing.

  • Member since
    December 2012
Posted by Blaine Vanderwell on Wednesday, December 12, 2012 12:46 AM

I too am a "Trekkie"....and have built or attempted to build a few "Star Trek" "Enterprise: models over the years,,,,i found the problem was the allingment of the naecels and holding these is perfect allingment untill the glue dried.....never a success so I have given up on theses models

  • Member since
    July 2003
  • From: Huntington, WV
Posted by Kugai on Monday, December 10, 2012 10:52 PM

Looking good!  Hope you get the others up soon.

Are you sure that PB "died"?  I've had one or two times that I hit a limit of WIP pics that I could fit in the post and had to start another.

http://i712.photobucket.com/albums/ww122/randysmodels/No%20After%20Market%20Build%20Group/Group%20Badge/GBbadge2.jpghttp://i6.photobucket.com/albums/y211/razordws/GB%20Badges/WMIIIGBsmall.jpg

  • Member since
    January 2010
Posted by Klik on Monday, December 10, 2012 6:10 PM

OK, been a little while--school's winding  down, and this is the first chance I've had to break from Finals.

Back with final pics:

St. Lo:

Just love the way I got the paint to give the appearance of battle damage without actually damaging the model at all...

bottom pics:


The 1701 (refit) [not the -A as I had originally assumed, though I did have that decal option, which was nice]:


and then photo bucket died on me. Again. Maybe later I'll be able to post the pics of the classic TOS 1701.

Klik


oneyearwar1

The hardest part of flying isn't flying...it's landing.

  • Member since
    January 2010
Posted by Klik on Sunday, November 25, 2012 3:21 PM

Ok, third time's the charm?

Finished pics of the St. Lo:

Ok, Can't do any more than two at a time (thanks Photobucket...)

Klik


oneyearwar1

The hardest part of flying isn't flying...it's landing.

  • Member since
    January 2010
Posted by Klik on Wednesday, November 14, 2012 4:55 PM

sorry about the lack of posts recently--I've been very busy with school papers this week. Soon as I'm done with those, will post pics of all three finished.

Klik

oneyearwar1

The hardest part of flying isn't flying...it's landing.

  • Member since
    November 2009
  • From: SW Virginia
Posted by Gamera on Tuesday, November 6, 2012 8:11 AM

They look good to me Klik, I think you're better off going with too little damage than too much. I mean if the ship is shot all to hades, I figure she'd be scrapped instead of mothballed.

"I dream in fire but work in clay." -Arthur Machen


  • Member since
    July 2003
  • From: Huntington, WV
Posted by Kugai on Monday, November 5, 2012 1:09 PM

Looking good, Klik!

I've always found it interesting how different people approach the Bussards on the TOS Enterprise when it's not being lit, trying to capture the idea of "something happening" or "different" about that part of the ship compared to the static nature of the rest of the exterior.

http://i712.photobucket.com/albums/ww122/randysmodels/No%20After%20Market%20Build%20Group/Group%20Badge/GBbadge2.jpghttp://i6.photobucket.com/albums/y211/razordws/GB%20Badges/WMIIIGBsmall.jpg

  • Member since
    January 2010
Posted by Klik on Sunday, November 4, 2012 7:26 PM

Okay, it has been a very busy weekend. I didn't get any more work done on these guys, so this is where they have been for the last 5 days or so. As I said, Very Busy...

Pics of St. Lo, with enhanced and darkened battle damage:

Overall shots:


And the 1701:

I did add a little a more to the markings, but I haven't photo'ed it yet...

I am kinda pleased how the engines came out (Bussard collectors?) with a coat of clear red over the red and yellow stipes. Sorry about the blurry pic, it is the most recent one I've got.

As for the battle damage's severity to the St. Lo, I think someone (forget who) said that it wasn't "severe enough" to result in abandoning ships. Well, here is the Status board for the 1701-B:

I would agree with you, which is why I wanted to post this alongside my damaged St. Lo. I think that one or two of the damage spots would have, if penetrating deep enough into the ship, set off some severe damage that could have released some nasty stuff into the core of the ship. (At least one hit could have, if gone deep enough, hit the warp core, I think), But I'll let you all decide on that.

Comments and concerns?

Klik


Will post final pics with a proper background once I get the TOS Enterprise decaled.


oneyearwar1

The hardest part of flying isn't flying...it's landing.

  • Member since
    January 2010
Posted by Klik on Wednesday, October 31, 2012 6:11 PM

I had aperfectly good post going, now it's deleted.Dead I give up for the day. I'll post the St. Lo and the 1701 (with finished engines and deflector dish) Tomorrow.

Klik

oneyearwar1

The hardest part of flying isn't flying...it's landing.

  • Member since
    January 2010
Posted by Klik on Wednesday, October 31, 2012 6:04 PM

Ok, so I'm back with pictures, if I can post them (Photobucket still has problems)

First, I painted the 1701-A's stripes (?) a close approximation to the colors of the decals.

Then came decals:

I was actually rather pleased with the decals--they went down really easily, didn't silver at all, snuggled up tight to the model's surface, and dried without the "shinyness" of typical decals, which means that I don't have to spray a coat of dull coat over the model to get the decals to blend in.

Since my computer is running slow, that's all I can fit in one post. I'll post the "St. Lo" and the 1701 next.

Klik


oneyearwar1

The hardest part of flying isn't flying...it's landing.

  • Member since
    January 2010
Posted by Klik on Tuesday, October 30, 2012 11:31 PM

Thank you for the replies. Actually, this afternoon I went back and darkened the St. Lo's battle damage, before I even got your response.Embarrassed

I also got the important decals on the 1701-A, and finished painting the TOS 1701. I'll have pics up soon.

Klik

Edit: the scale, if I forgot to mention it before, of these ships is only 1/2500.

oneyearwar1

The hardest part of flying isn't flying...it's landing.

  • Member since
    July 2003
  • From: Huntington, WV
Posted by Kugai on Tuesday, October 30, 2012 10:33 PM

While the TOS-era ships ( including up through the first 6 movies ) seem to have been made of metal, the outer hulls of the Next Gen era are described as having ceramic materials that wouldn't rust.

The rusty color could still fit, even with the lack of oxygen in space, if you figure it's space dust or other residue ( consider the sulfur dust on the Discovery in 2010 ) that's accumulated while it was adrift.

Definitely a better job than my first pass at weathering a ship, but seems to me like it's in pretty good shape for a "derelict."  Please take this in the intended spirit of "a suggestion" and not "criticism"...

In a way, damage tells a story.  Even if you hadn't seen Star Trek II before seeing ST III, you could tell that the Enterprise took a heckuva beating from the scorch marks and holes.  If I were making a ship that was a "derelict", I'd add a bit more damage to where you'd know exactly why the crew decided to get the Censored out instead of trying to get a tow.

Since you say you're new, here's an idea that I've acted on that's come in handy for low-cost experimenting with techniques and materials without using up a perfectly good model: what I call the "crash-test dummy."  

Get a good-sized used model, usually pretty cheap, and use it for experiments.  I have a Millenium Falcon model that someone started and lost parts to before offering it to me for free.  I already had a few in the stash and scratch-building replacements seemed like too much trouble, so I've used it to test ideas for battle damage, painting, masking, weathering, etc. that were used on my "real" models once I knew the ideas would work.  After a few experiments, you may end up coming back to this and adding a few touches that you haven't thought of yet.

Again, I don't mean this as "criticism", just mentioning ideas that I wish I'd been aware of 20 years ago that would have helped me develop my skills faster when I was starting off in case they might come in handy for you.

http://i712.photobucket.com/albums/ww122/randysmodels/No%20After%20Market%20Build%20Group/Group%20Badge/GBbadge2.jpghttp://i6.photobucket.com/albums/y211/razordws/GB%20Badges/WMIIIGBsmall.jpg

  • Member since
    November 2005
  • From: Amongst Words
Posted by aardvark1917 on Tuesday, October 30, 2012 1:05 AM

Nice seeing how big these things are. I'm used to the 1/600th scale (approximately) old kits and the 1/1000th scale newer ones.

The "aztec" decals are for those who don't have the extreme patience necessary to mask and detail airbrush the various magic alloy panels these starships are made of. Unless you're painting a derelict spacecraft with whole sections missing, you'll never see any rust: magic Star Trek alloys don't do that.

Battle-damage does, however, looks like splotchy black areas, so your "black wash" might be alright if it's not overdone. Otherwise, keep it pristine. Use Starship Modeler for photographic reference.

"Freedom is a possession of inestimable value." -- Marcus Tullius Cicero

  • Member since
    January 2010
Posted by Klik on Friday, October 26, 2012 2:05 PM

So, I'm back with the rest of the pictures of the modified 1701-B.


Paint finished (Note the lack of really large patches of rust):


Light weathering applied, with battle scars!

Then I gave it its name plates and NCC # code.

I wasn't too thrilled with the way the second "s" came out in the U.S.S., so I had to add some more damage.

And a final pic, blurry, but usable:

Note the spots of damage on the ship. I hoped to make it look like a derelict victim of an ambush in deep space. How did I do?

I will post final pics of all three, with a more appropriate background (for a starship). I have been bogged down this week with school work, so all three are stalled as they are. I hope to get decals on the Enterprises over the weekend, if I can.

Comments and criticisms welcome.

Klik

oneyearwar1

The hardest part of flying isn't flying...it's landing.

  • Member since
    January 2010
Posted by Klik on Wednesday, October 24, 2012 6:46 PM

YAY!! A photo got through. This means I can post the 1701-B.

I originally intended to make this ship a "derelict", covered in rust and peeling paint.

First coat was the 'rust'

Then, I meant to wash off the light grey color that I painted next, but the paint wasn't having it.

Oh well. This grey responded well to a light sanding, and gave off a light dusting of rust, which is probably more realistic anyways.


And...there goes Photobucket again. I'll try again tomorrow. You'd think that they would've fixed this problem by now...Angry


oneyearwar1

The hardest part of flying isn't flying...it's landing.

  • Member since
    January 2010
Posted by Klik on Wednesday, October 24, 2012 6:29 PM

Back with pics. This is where I stand as of now, since School work has picked up this week and prevented me from really working on models right now...Crying

So, with what little time I've had so far this week, I managed to paint another coat on the 1701, but the shinyness still remains...so, another coat will have to be done. (not sure why the paint went shiny when I painted the dish, but whatever.) I also added more to the engines.

I touched up the 1701-A's dish so that the lines didn't stand out so much--they didn't stand out that much before a painted it, but the weathering brought out the lines in stark relief. I don't have any pics of it right now, but will have "finished" pics when I get the decals on it.


I also 'finished' the 1701-B as a different ship entirely.


And, I tried to post photos, but now, they're all gone....


Thanks Photobucket. Thanks a lot.

Pic attempt #2:

1701's engines:


I'll start another post for the 1701-B.

Klik

oneyearwar1

The hardest part of flying isn't flying...it's landing.

  • Member since
    January 2010
Posted by Klik on Monday, October 22, 2012 5:07 PM

I have more photos on the way, and will have them posted up later this week. Promise.

Klik

oneyearwar1

The hardest part of flying isn't flying...it's landing.

  • Member since
    July 2003
  • From: Huntington, WV
Posted by Kugai on Saturday, October 20, 2012 3:13 PM

dirkpitt77

 Keep working. It's all about practice, practice, practice.  

--Chris

Careful, now.  That kind of thinking can lead to a stash in no time.

"The first one is for practice, getting familiar with every aspect of the kit.  The second one is going to be for the real serious model.  The third is for spare parts, if any from the first 2 get broken.  The fourth is in case I come up with an idea for a variant.  The fifth is because some of the parts look like they might come in handy for a kitbash someday..."

http://i712.photobucket.com/albums/ww122/randysmodels/No%20After%20Market%20Build%20Group/Group%20Badge/GBbadge2.jpghttp://i6.photobucket.com/albums/y211/razordws/GB%20Badges/WMIIIGBsmall.jpg

  • Member since
    January 2006
  • From: NW Washington
Posted by dirkpitt77 on Friday, October 19, 2012 8:43 PM

Your construction looks good. On  your Enterprise-A, I would have sanded the grid lines off. In the pics they look way out of scale. A man that size would need a ladder to get over them.

  From the pics it looks like you brush painted these. The silvery patches on the Enterprise-A again....was that intended? If you intended it as weathering, I'd say it looks ok. If not, maybe an airbrush should be on the list for Christmas?  ;)

  Hope you take this as constructive criticism, which is how I intended it. Keep working. It's all about practice, practice, practice.  

--Chris

    "Some say the alien didn't die in the crash.  It survived and drank whiskey and played poker with the locals 'til the Texas Rangers caught wind of it and shot it dead."

  • Member since
    April 2009
  • From: Longmont, Colorado
Posted by Cadet Chuck on Friday, October 19, 2012 6:27 PM

Nice work, yes, I can see the pix.  Just checked my Photobucket site- they seem to be switching over to a new Beta version and things are not complete.  They have been messed up for awhile.

I have built the 1/350 Polar Lights version of the Enterprise NX-01, and have a 1/350 NCC-1701A waiting in the stash- a bit bigger than yours!!!

I'm old enough to have watched Star Trek TOS when first run on TV- in B&W those days!

Gimme a pigfoot, and a bottle of beer...

  • Member since
    January 2010
Posted by Klik on Friday, October 19, 2012 12:40 PM

and, of course, all the photos have disappeared...sorry, I'll try to post them later....


EDIT:

Photobucket is running slow. The photos seem to be up for now. Can you all see them?

Klik


P.S. I won't post what I've done with Enterprise B until somebody responds or asks me to. (I'll give you a taste--It's not the Enterprise any more)

oneyearwar1

The hardest part of flying isn't flying...it's landing.

  • Member since
    January 2010
Posted by Klik on Friday, October 19, 2012 12:34 PM

Next, I started on the original Enterprise, NCC-1701. Construction was very straightforward, with no major fit issues.

The next photos I took were after construction.

The paint is way to dark, I know, even though it's only Light GreyAngry.

With painting finished, and after watching a classic TOS episode, I began painting the engines:

oneyearwar1

The hardest part of flying isn't flying...it's landing.

  • Member since
    January 2010
Posted by Klik on Friday, October 19, 2012 12:23 PM

Ok, first the pics of the NCC-1701-A, the first one I built. This Enterprise is actually the first one I ever saw, since, as a kid, I watched the movies with my parents (Wrath of Khan and the Voyage Home being my favorites). The show (TOS), at that time, was no longer on TV.

First pic:

Sorry about the odd perspective. I tried to paint the "glow" of the Deflector Dish (?). Looks better in reality.

And that is where it sits today. I haven't gotten around to decalling it, though I did notice that this kit comes with full decals for every kit, right down to the 'aztec' (correct word?) pattern of the hull plates. I don't particularly care for the mottled hull, so I just gave it a quick and dirty black-wash.

Comments always welcome.

Critiques even more welcome.

Klik


oneyearwar1

The hardest part of flying isn't flying...it's landing.

  • Member since
    January 2010
Star Trek models--first timer Trekkie.
Posted by Klik on Friday, October 19, 2012 12:14 PM

I've always been a Scifi geek, and though I normally stick to Star Wars, when I saw the Trio pack of the USS Enterprise (NCC-1701, 1701-A, and 1701-B) for $19 (about $6 per Enterprise) I just couldn't resist.

Pic up soon, and I've got a lot so far. I meant to post these several days ago, but got so caught up in the fun that I forgot.

Klik


P.S. Please, Trekkies, Tell me what you think of my work. Keep in mind, these are the first Star Trek kits I have ever built.

oneyearwar1

The hardest part of flying isn't flying...it's landing.

JOIN OUR COMMUNITY!

Our community is FREE to join. To participate you must either login or register for an account.

SEARCH FORUMS
FREE NEWSLETTER
By signing up you may also receive reader surveys and occasional special offers. We do not sell, rent or trade our email lists. View our Privacy Policy.