SEARCH FINESCALE.COM

Enter keywords or a search phrase below:

Bandai 1/72 Destroid Spartan

15791 views
241 replies
1 rating 2 rating 3 rating 4 rating 5 rating
  • Member since
    October 2021
Posted by PhoenixG on Thursday, September 21, 2023 2:37 PM

Real G
PhoenixG, No sir, the apology is mine! I did not mean any snark in my response! I was just sad that I didn't think of the magnet idea before you did the hands. But your way worked, so all is well! I bought a Bandai rebox of the Spartan to do what you are doing now. I had the original Imai kit over 30 years ago, and I botched it up pretty badly. So I wanted a rematch to finally have a decent looking Spartan on the shelf. Anyway, rock on, and keep the updates coming!

Real G,

We've just experenienced the perennial challenge of text based communications.  The lack of contextual depth in the messaging.

I wish to assure your there there was no snark perceived in any of your messages.  I was however, concerned that I had unintentionally offended.   I am relieved to discover that was not the case.

Good luck on your Spartan build when you choose to take on that challenge!  Your original experience is why I hesitate to mod.  Well, that and because there is a scarcity of Macross models where I live which meant no second chances.  Until the forums revealed HLJ to me, and much, much, more.  Well my pocket book may not be saying thank you, but the modeler in me is doing the Snoopy happy dance. :)

Thank you for the continued encouragement!

On the Bench:

Bandai Starblazers 2202 Garmillas Zoellugut

  • Member since
    October 2021
Posted by PhoenixG on Thursday, September 21, 2023 2:42 PM

Bakster

Hey PG, it is good to see another build from you. And yet another cool looking figure. Looking good so far, and I will be following your build.


Hi Bakster,
Good to hear from you and thanks! 
I must say your LIS build has been a hoot to follow.  Can't wait to see the next episode in the saga of "what color is it really?".  Big Smile

On the Bench:

Bandai Starblazers 2202 Garmillas Zoellugut

  • Member since
    October 2021
Posted by PhoenixG on Thursday, September 21, 2023 3:26 PM

I decided to attempt to build a mockup of the missile box and spent a good chunk of time yesterday trying to draw out a diagram of it.

First attempt was to try tracing some of the outline.  First issue was the little emblems molded on to the covers was interfering with getting level.  Out comes the chisel and shaved one off.  Pretty confident I can replace that with some scratch styrene or shave off the other one and call it good.

close shave

So now I should be able to trace it out.  Laid it down on some sheet styrene I'd acquired and started the process.  However,  because everything is tapered, and rounded, and humped over it's near impossible to get a clean trace.  And using a ruler to clean it up only highlighted how inconsistent each trace was.

https://photos.galacticcowboy.net/photogallery/_data/i/upload/2023/09/21/20230921135528-fe5a29c0-la.jpg

Put my thinking cap on at this point.  Everything is tapered so it's not like building a bunch of rectangles and calling it good.  I was trying to trace it because Measuring angles is a bit extreme.

Introduced a minor epiphany.  Realized can measure the widths and heights and connect the dots.  Out came the calipers and a few choice words as I only have two hands and the job at times needed three.  Needless to say I did get a template drawn out.

template

The arrows are to tell me which side of the pencil line to cut on.  That Pencil lead is about the thickness of the taper so cutting on the wrong side of the line will either make it too narrow or too wide.  However, I can now scan, print and apply them to the styrene as templates.  Small step forward.

I still need to figure out how to build the side walls of the box.  Again, no simple lines.  Time for more caliper work?  Nope,  had another epiphany.  Scan the part.  Flatbed scanners automatically record inches etc of the image. It turned out a lot better than I expected.

scanned

Armed with a good high res scan,open it in a photo editor with a ruler and grid line.  Voila, virtual calipers and no need for an extra hand.  Each square represents 1/100 of an inch. 

gridlines


I can use this to outline the sidewalls onto the image and I just realized I can print the template from here without ever having to measure anything.  Just saved myself from counting lots of little squares.

This process is still time consuming, but not as much and more accurate and consistent than if I tried to do this all freehand.

On the Bench:

Bandai Starblazers 2202 Garmillas Zoellugut

  • Member since
    July 2014
  • From: Franklin Wi
Posted by Bakster on Thursday, September 21, 2023 5:31 PM

PhoenixG


Bakster

Hey PG, it is good to see another build from you. And yet another cool looking figure. Looking good so far, and I will be following your build.


Hi Bakster,
Good to hear from you and thanks! 
 
I must say your LIS build has been a hoot to follow.  Can't wait to see the next episode in the saga of "what color is it really?".  Big Smile
 

Laughing. Well, I think that animal is beat to death, but I am sure I can find something more to obsess over. Just give it time. I will find something.  Lol.

  • Member since
    July 2014
  • From: Franklin Wi
Posted by Bakster on Thursday, September 21, 2023 5:39 PM

PG. I wonder if you placed the piece on a scanner and set it  1:1. Even with the raised detail, just maybe it will image it. Just a thought. 

Looking good, Compadre. Keep up the good work.

  • Member since
    July 2014
  • From: Franklin Wi
Posted by Bakster on Thursday, September 21, 2023 6:01 PM

Nevermind, I see u did that.


  • Member since
    May 2011
  • From: Honolulu, Hawaii
Posted by Real G on Thursday, September 21, 2023 9:37 PM

I never considered interference of the arm sockets to the missile bays.  Yeah, that makes the bays very shallow.  Maybe split the missile bay floor into two pieces and place them around the arm sockets?  The missiles would still need to align in a row, and not have a "up over the hill" run.  Very challenging.

I was going to replace the shoulder armor with a more spherical one so the arm tracks up and down following the curve, but now that I know there is an interference problem with the missile bays, I'll have to rethink this.

“Ya ya ya, unicorn papoi!”

  • Member since
    October 2021
Posted by PhoenixG on Sunday, September 24, 2023 10:40 PM

Bakster

Nevermind, I see u did that.


Great minds think alike.  Though I may be giving myself more credit on that one.  Stick out tongue

On the Bench:

Bandai Starblazers 2202 Garmillas Zoellugut

  • Member since
    October 2021
Posted by PhoenixG on Sunday, September 24, 2023 10:56 PM

Real G

I never considered interference of the arm sockets to the missile bays.  Yeah, that makes the bays very shallow. 


It makes them extremely shallow.  It was measuring at just over a tenth of an inch deep at the narrowest parts.

Real G
Maybe split the missile bay floor into two pieces and place them around the arm sockets? The missiles would still need to align in a row, and not have a "up over the hill" run. Very challenging.

That is exactly what I was planning to do and have been building the template around it.

shoulder2

  I spent spent some time yesterday outlining the template on to the piece. The template is the dark grey outline.  It revealed there is a slight curve to that part.  Getting an exact fit to that curve is more effort than it is worth.  My plan is to make the sides slightly proud to account for it.  It would do two things.  Ensure plenty of surface for gluing and it will give a hairsbreadth more depth to the box. Anything sticking over the edge can be sanded down.

One final alternative to this is to of course cut out part of the recess for the shoulder to make more room for the box.  However, that will be very challenging as I'd already glued the two sides of the should together before embarking upon this journey.  Just another twist to this little experiment


On the Bench:

Bandai Starblazers 2202 Garmillas Zoellugut

  • Member since
    October 2021
Posted by PhoenixG on Sunday, September 24, 2023 11:05 PM

 I had drawn the cover template in pencil but after scanning it in for printing it became apparent it had several inconsistencies that would create poor fit. Ended up spending several hours drawing it out again on the computer.

top template

it is a very simple outline but the taper makes it a complex shape.  A good portion of the time was spent learning the tools so that it could an accurate representation.  Everything should be within a couple thousandths of an inch.  Sadly it does require that level of accuracy.  The taper is visible to the naked eye and it's a difference of only a few hundredths of an inch.

Working on creating the templates for the sides of the missile cover and the other sides of the missile box.

I just had a frightening thought.  I don't think I accounted for the thickness of the plastic that will remain after cutting off the covers...

At least if I have to do it, it should go faster now that I know how to do it. 

What a pain. Stick out tongue

On the Bench:

Bandai Starblazers 2202 Garmillas Zoellugut

  • Member since
    November 2009
  • From: SW Virginia
Posted by Gamera on Tuesday, September 26, 2023 8:14 PM

Lotsa work but she's gonna look great Phoenix! 


I need to build a friggin' mech for a change of pace. But it's so easy to dig out another tank kit...... Confused

"I dream in fire but work in clay." -Arthur Machen


  • Member since
    October 2021
Posted by PhoenixG on Wednesday, September 27, 2023 6:10 PM

Gamera

Lotsa work but she's gonna look great Phoenix! 


I need to build a friggin' mech for a change of pace. But it's so easy to dig out another tank kit...... Confused


Heh.  I have the opposite issue.  I should probably build one of the tanks in my stash for a change of pace, but the stash ratio is in favor of mechs so if I just grab one...

On the Bench:

Bandai Starblazers 2202 Garmillas Zoellugut

  • Member since
    October 2021
Posted by PhoenixG on Wednesday, September 27, 2023 6:23 PM

While building the rest of the templates for the missile box and covers I discovered that I'd misread the calipers and therefore all of the diagrams were off.  So they all got trashed.

However, now that I am more familiar with photoshop I was able to redraw them all in a fraction of the time.   Here's the complete set of templates.

finished templates

The image canvas is to scale (printed it looks right, PC monitor it will look larger) so all I need to do is print them to 100% scale, paste them on the sheet styrene, and cut them out.

Alas, my printer has chosen this exact moment to die.  I may be able to repair it, but it's over 15 years old.  Finding parts may be a challenge.  So now this is on pause while I consider replacement options.  Be interested in any input on brands/models.  Especially when it comes to printing waterslide decals. 


On the Bench:

Bandai Starblazers 2202 Garmillas Zoellugut

  • Member since
    July 2014
  • From: Franklin Wi
Posted by Bakster on Thursday, September 28, 2023 10:39 AM

Hey PG, way to go rebooting through photoshop. Yes

Unfortunately, I can offer no advice for printers specific to printing decals. I have an $80 Epson that is probably eight years old, and amazingly, still going strong. It gets daily use through work. Actually, the daily use is probably the saving grace for it. No more dried up ink heads. I have printed decals on it and for my purposes, adequate. What current Epsons are like, I do not know. But at the time, they were decent for image quality.

Hopefully, someonelse can chime in.

  • Member since
    October 2021
Posted by PhoenixG on Thursday, September 28, 2023 6:53 PM

Bakster

Hey PG, way to go rebooting through photoshop. Yes


Bakster, photoshop elements is an excellent tool.  It's an ancient version but it does all that I have needed it to.

Bakster
Unfortunately, I can offer no advice for printers specific to printing decals. I have an $80 Epson that is probably eight years old, and amazingly, still going strong. It gets daily use through work. Actually, the daily use is probably the saving grace for it. No more dried up ink heads. I have printed decals on it and for my purposes, adequate. What current Epsons are like, I do not know. But at the time, they were decent for image quality.

That's fair.  The dead printer is an HP that printed nearly 5000 pages over the years.  Excellent longevity when you consider the average duty cycle of a home printer.  

I think my biggest debate will be inkjet vs laser.  I see much research in my future.

On the Bench:

Bandai Starblazers 2202 Garmillas Zoellugut

  • Member since
    July 2014
  • From: Franklin Wi
Posted by Bakster on Friday, September 29, 2023 9:22 PM

Hey PG, I have Elements as well. I also have Paint Shop Pro. I gravitate to PSP more because I know the program better. Both are good programs.

I hear you about inket verses laser. Let us know what you decide and what your learn. I am interested.

  • Member since
    October 2021
Posted by PhoenixG on Tuesday, October 3, 2023 12:33 PM

Bakster
Hey PG, I have Elements as well. I also have Paint Shop Pro. I gravitate to PSP more because I know the program better. Both are good programs.

Agreed.  I use Elements because I've been using it since version 1.

Bakster
I hear you about inket verses laser. Let us know what you decide and what your learn. I am interested.

There's a plethora of vendors and functional options.  Happy to share highlights and lowlights of my search for a replacement. Once I find one.  :)

On the Bench:

Bandai Starblazers 2202 Garmillas Zoellugut

  • Member since
    October 2021
Posted by PhoenixG on Tuesday, October 3, 2023 3:34 PM

Working on the lower half of the destroid while researching a replacement printer.  Lots of clamping needed to keep parts mostly aligned.  Good amount of glue used as still plenty of gaps.

stuff

While assembling the feet, noticed the articulation on one was really loose.  All of the joints are simple friction fit.  No polycaps.  To help the piece fit a little more snug added a very thin layer of CA to the posts. Just enough to make it a firm fit.  Haven't tried this before.  It will be interesting to see how well it holds up.

CA

Lots of filling and sanding of the seams.  Putty and I don't get along too well.  Usiing CA to fill the gaps as I find it easier to work with.

filling

Works in progress but the feet are almost complete.  After they are finished being cleaned up, will prime them, followed by the preshade, and base color.  Then I can move onto the next step in assembling the legs and preshading.

On the Bench:

Bandai Starblazers 2202 Garmillas Zoellugut

  • Member since
    November 2009
  • From: SW Virginia
Posted by Gamera on Friday, October 6, 2023 9:46 PM

Looks cool Phoenix, you're making great progress there! 

"I dream in fire but work in clay." -Arthur Machen


  • Member since
    July 2014
  • From: Franklin Wi
Posted by Bakster on Saturday, October 7, 2023 5:02 PM

To help the piece fit a little more snug added a very thin layer of CA to the posts. Just enough to make it a firm fit.  Haven't tried this before.

Good thinking. Yet another use for CA!

  • Member since
    October 2021
Posted by PhoenixG on Wednesday, October 11, 2023 6:42 PM

Thanks for the encouragement Gamera.  It's been a bit of slog compounded by very little bench time these last couple of weeks.  I may be avoiding it.  Every step forward in assembly has some little niggling issue that slows down the process. 

I usually let a lot of these kinds of small issues slide as I'm looking for the thrill of completing the model.  I'm working on upping my game a bit with this one  The hoped for payoff is a more refined looking model.  Fingers crossed!

On the Bench:

Bandai Starblazers 2202 Garmillas Zoellugut

  • Member since
    October 2021
Posted by PhoenixG on Wednesday, October 11, 2023 6:46 PM

Bakster

To help the piece fit a little more snug added a very thin layer of CA to the posts. Just enough to make it a firm fit.  Haven't tried this before.

Good thinking. Yet another use for CA!


That thin layer was almost too much.  The fit is really snug now.  Which is good.  I don't want the foot collapsing when it get's put on display.
I admit that when I bought the bottle of CA I was half expecting it to dry out from neglect.  As it turns out that stuff is like duct tape for modeling!

On the Bench:

Bandai Starblazers 2202 Garmillas Zoellugut

  • Member since
    May 2011
  • From: Honolulu, Hawaii
Posted by Real G on Wednesday, October 11, 2023 7:15 PM

PG those weird feet are challenging!  Keep at it, you are doing great!

“Ya ya ya, unicorn papoi!”

  • Member since
    October 2021
Posted by PhoenixG on Wednesday, October 11, 2023 7:28 PM

I am happy to say that the new printers are on their way.  I'll be able to resume the scratchbuild experiment in the next week or so.

The use of plural was not an accident.  There was a sale going on so I got a standalone color laser printer and an all in one inkjet. 

After doing some testing with them, will most likely make a more detailed posting in the tools section.

On the Bench:

Bandai Starblazers 2202 Garmillas Zoellugut

  • Member since
    October 2021
Posted by PhoenixG on Friday, October 13, 2023 1:27 PM

There was much more filling and sanding on those unusually articulated feet, but they were finally good enough to get some primer last night.  Given the amount of trimming, sanding, and filling they got I was surprised by how clean they came out.

So much so that I had to take a picture and share.  ;)

ugh feet

There are four joints on this foot and the articulation isn't typical.  The one on the left is what I would call the foot at rest.  The one on the right is arched.  The pins in the center are actually a ring that fits around an axle that joins the front and back.  This makes it so the feet could technically be rocked side to side.  Might make this the first mecha I've built that could sprain an ankle.

profile

Next step is to test fit the lower and upper legs and see if I need to change my painting plans.

On the Bench:

Bandai Starblazers 2202 Garmillas Zoellugut

  • Member since
    November 2009
  • From: SW Virginia
Posted by Gamera on Friday, October 13, 2023 9:08 PM

Looks good Phoenix! Seems like it will give you some interesting possibilities as how you mount him to the base. 

"I dream in fire but work in clay." -Arthur Machen


  • Member since
    July 2014
  • From: Franklin Wi
Posted by Bakster on Monday, October 16, 2023 5:06 PM


The use of plural was not an accident.  There was a sale going on so I got a standalone color laser printer and an all in one inkjet. 


Oh... a Merry Christmas to you! Way to go... Big Smile


  • Member since
    July 2014
  • From: Franklin Wi
Posted by Bakster on Monday, October 16, 2023 5:07 PM

Your filling and sanding looks sweet! Nice work, sir.  It is coming along nicely...

  • Member since
    October 2021
Posted by PhoenixG on Wednesday, October 18, 2023 6:49 PM

Brace yourselves, this is going to be a rather lengthy post.  :)

Did a test assembly of the legs and it confirmed my original plan for painting.

Lower leg and upper leg assmeblies are clam shells that go around the feet and the hip joint. The right leg's inward lean is due to the ankle axle.  It provides a small degree of side to side motion.

legs

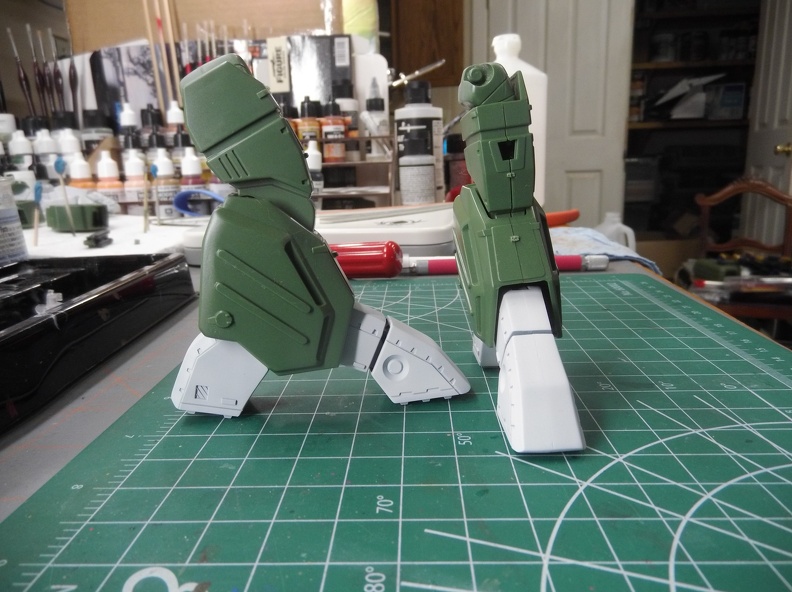
My biggest complaint about this model is the seams.  Something about the mold makes every seam have a distinctive ridge that has to be sanded down. Other than that, the legs fit and align much better than the feet did.  The joints are somewhat loose so I'll be doing the trick with the thin coat of CA stiffen them all up.

There isn't an easy way to paint this so I am going to complete the priming & pre-shading of the feet and hip connector before encasing them in the legs.  I'll likely prime the inside with black before assembly to hide the remains of that gawdawful green.

For anyone who might be interested I counted 8 points of articulation on these legs. about half have a fairly limited range of motion but it does increase the posability of the model.

Onto the next problem with this model.

The chest cannon.  The door can't close with it installed.  So it's pose it open or closed. No in-between.  You can change the tilt of the cannon, but if it's installed there is no way that panel is closing.

open wound

sucking chest wound

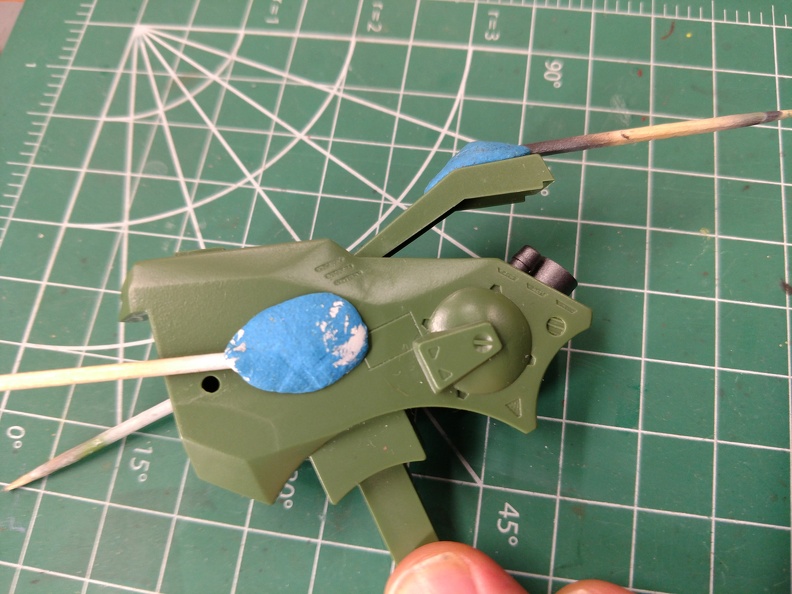
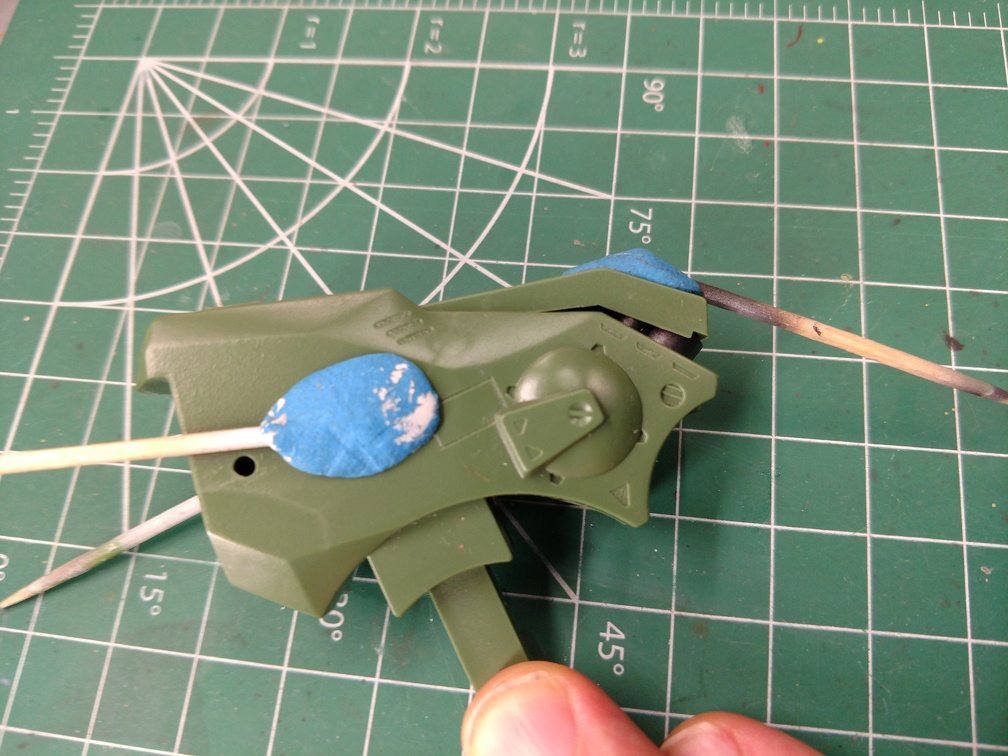
Tried moving the cannon's position but it just made it worse.  The toothpicks are because the parts next step is to paint the inside black.

I could probably cut off the existing mounting points and use some tube styrene to change the location of the gun so the chest could close but doing so requires moving the cannon further back into the chest. Which would make it less prominent. I've already decided not to do any modification.  Not really interested in making yet another change to this model.  Open or closed is TBD.  It may depend on whether I can make the shoulder missile bays work.

Speaking of the should missiles.  Now that I have a printer again I was able to print off the template!

template

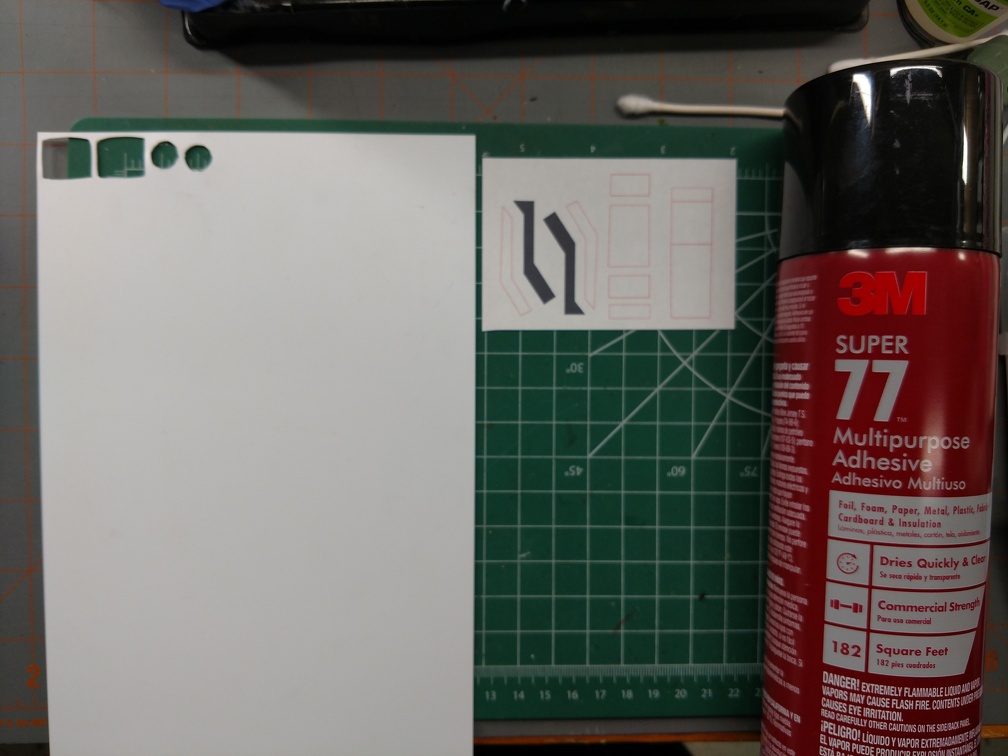
The can is a spray adhesive that I used to affix the template to the styrene.  Use sparingly.  It's messy but cleans up pretty easily with some acetone.

attached

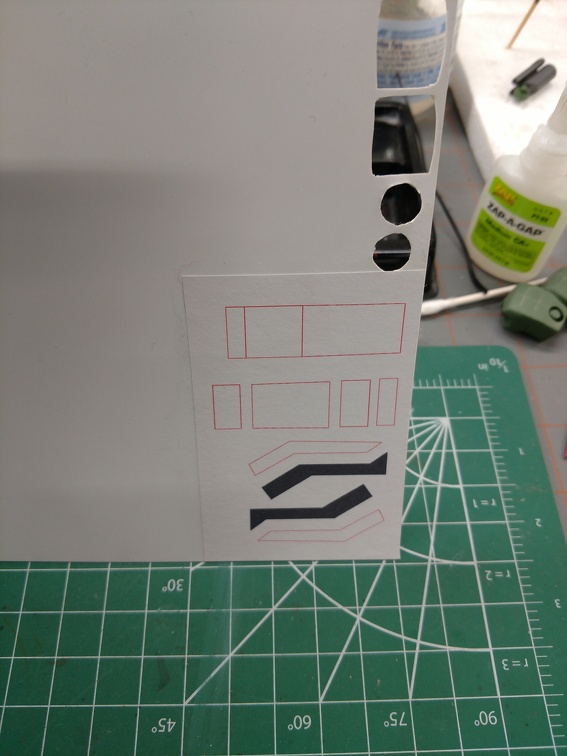
Lady luck was smiling upon me that night. The template went down flat and square on my first try.  Murphy must have been preoccupied with making someone else miserable.  ;)

Since it is all straight lines, using the good ol' chisel blade made short work of cutting these out and helped ensure the sides were relatively perpendicular.
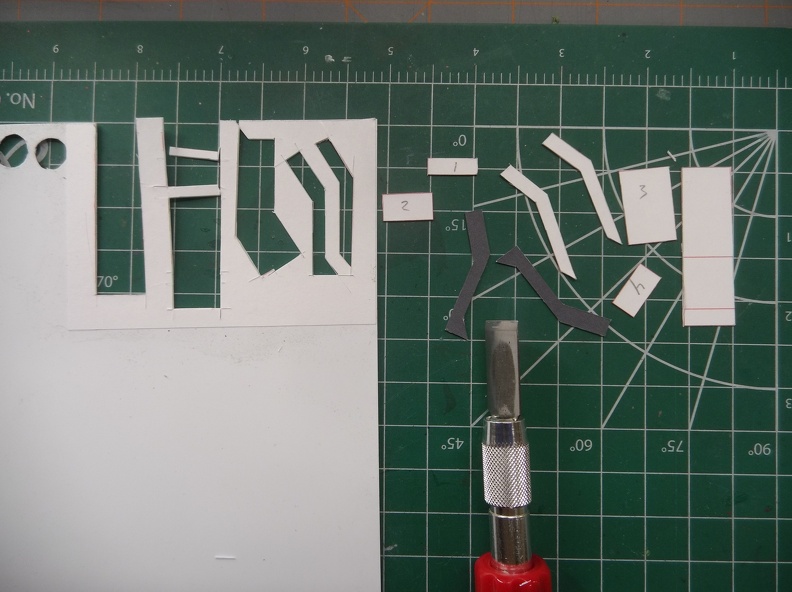
bitsand pieces

Next up:

Assembling the little pieces to make the lid and box.  I've an idea of how to keep it reasonably square during assembly.


On the Bench:

Bandai Starblazers 2202 Garmillas Zoellugut

  • Member since
    October 2021
Posted by PhoenixG on Wednesday, October 18, 2023 6:53 PM

Gamera

Looks good Phoenix! Seems like it will give you some interesting possibilities as how you mount him to the base. 


I like possibilities.  :)

Some day I may start making bases for my models.  For the moment they all get placed wherever I have space on the shelf above my workbench.  On occasion fights break out between them over placement. Big Smile

On the Bench:

Bandai Starblazers 2202 Garmillas Zoellugut

JOIN OUR COMMUNITY!

Our community is FREE to join. To participate you must either login or register for an account.

SEARCH FORUMS
FREE NEWSLETTER
By signing up you may also receive reader surveys and occasional special offers. We do not sell, rent or trade our email lists. View our Privacy Policy.