SEARCH FINESCALE.COM

Enter keywords or a search phrase below:

MS 18K Kempfer is Komplete

1895 views
19 replies
1 rating 2 rating 3 rating 4 rating 5 rating
  • Member since
    January 2006
  • From: Baton Rouge, Snake Central
MS 18K Kempfer is Komplete
Posted by PatlaborUnit1 on Sunday, January 7, 2007 10:15 AM

Hi everyone

I'm posting in-progress photos of my Bandai MG MS-18K Cold Climate Type (KempferKaltKlimaat) 

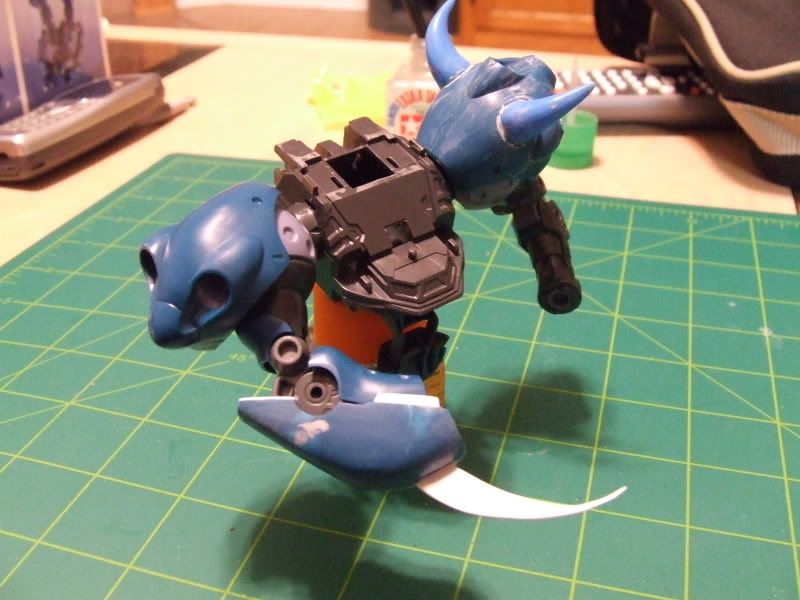
So far I have made foot mods with bolt-on snow grousers and robbed the shoulder spikes off of an abandoned Gouf for use here.  I used the two beam sabres and made a DoubleSabre and forearm mods include scythes made from cardstock for ripping/stabbing up close

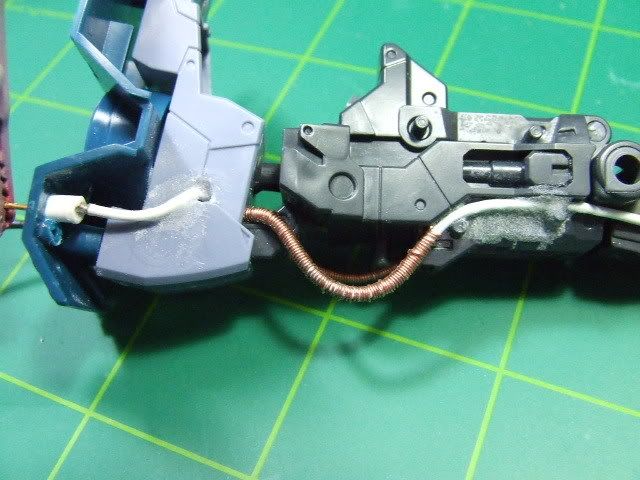
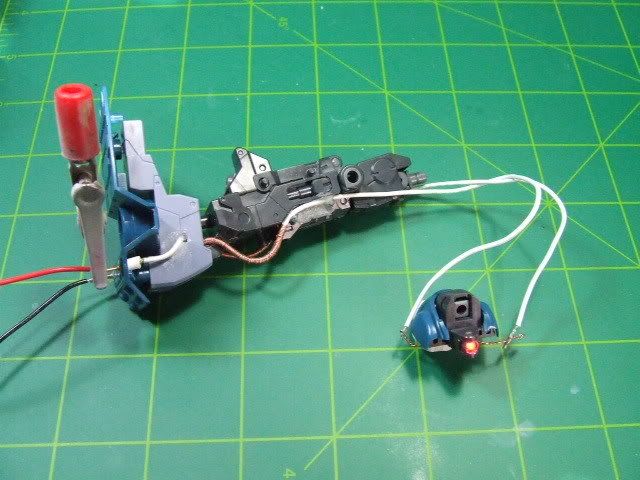
A rare earth type Nydobium (sp?) magnet is mounted in the foot vernier on the left foot to allow this kit to be removed from the base-- yet held securely-- since the wiring for the monoeye LED runs from the eyesocket, through the coreblock, to the hip and into the leg armor, exiting at the feet.  I used aircraft type socket/pins from work to allow me to remove the kit from the base for transport and make any needed repairs.

Last nights mod includes drilling out and adding "seed beads" from the jewelry aisle. These are a total pain to drill out properly but add a lot of visual interest to the kit, breaking up the smooth lines of the Kempfer for more of a "Ka" type look which I prefer.

The next major mod, which I have not tackled yet, will be creating a waist cape that will mount upbelow the power conduit that runs around the lower chest.  Most likely I'll use  Magicsculp epoxy putty to create the cape.  Paint on this  kit will be a disruptive winter pattern, using white base, lightened lavender and light blue in disruptive countershadowing with earthtones and grey towards the feet and ankles.


 I'll post a couple of pics here, the rest of the pics are at my photobucket account under Scale Modeling album:

 http://s20.photobucket.com/albums/b244/ThePlasticFanatic/

David


Build to please yourself, and don't worry about what others think! TI 4019 Jolly Roger Squadron, 501st Legion
  • Member since
    March 2006
  • From: Boyertown, PA, USA
Posted by Dubau on Sunday, January 7, 2007 11:53 AM

Have NO IDEA what it is, but I can say this. Looks GOOD

Bud 

" You've experienced a set back, and without set backs and learning how to fix them you'll never make the leap from kit builder to modeler "
  • Member since
    January 2006
  • From: Baton Rouge, Snake Central
Posted by PatlaborUnit1 on Sunday, January 7, 2007 12:26 PM

Thanks Dubau , Ill post up a link for those not familiar with the MS-18 Kempfer from the Gundam end of the spectrum. Its a high-speed, lightly armored heavy-hitter mobile suit that trades verniers and agility for heavy armor plate and long endurance. Think of it in terms of a fast-attack helicopter that can get up close and personal and then get back out again....

Here is a link to the type listing on MAHQ.NET which is a great reference site for many different anime series, Manga and other non Anime series.

David

http://www.mahq.net/mecha/gundam/index.htm  

when the page opens click on Mobile Suit Gundam 0080: War in the Pocket 
 

click on MS-18E Kampfer  

Build to please yourself, and don't worry about what others think! TI 4019 Jolly Roger Squadron, 501st Legion
  • Member since
    December 2005
Posted by Mindless on Sunday, January 7, 2007 12:38 PM
Looking good so far. Nice idea with the wiers for the LED through the feet.
  • Member since
    January 2006
  • From: Baton Rouge, Snake Central
Posted by PatlaborUnit1 on Sunday, January 7, 2007 12:48 PM

Thanks Mindless, I really appreciate it! 


I wanted to use a battery pack, like you can use in a  Dom or  Acquy, but there just is no chest room on this one, so wires it was.

They re bonded in place with baking soda reinforced superglue, run into tubestock recievers in the foot pad, with the backside that will be visible at the ankle joint wrapped in wire to look like reinforced hydraulic or feul line hoses for the foot vernier.  Luckily this leg will remain almost vertical supporting the weight of the kit while the right leg will be drawn back at a drastic angle, putting the kit into a hard spin pose with the doublesabre being brought up to bear.....

Build to please yourself, and don't worry about what others think! TI 4019 Jolly Roger Squadron, 501st Legion
  • Member since
    March 2006
  • From: Boyertown, PA, USA
Posted by Dubau on Sunday, January 7, 2007 1:23 PM

Cool, thanks for the link

Bud

" You've experienced a set back, and without set backs and learning how to fix them you'll never make the leap from kit builder to modeler "
  • Member since
    January 2006
  • From: Baton Rouge, Snake Central
Posted by PatlaborUnit1 on Sunday, January 7, 2007 7:50 PM

Hi Guys

Here is one more pic of further mods I did tonight, this includes drilling around fifty holes with two and sometimes three different size drill bits to make indentations for bead jewelry "seed beads", which add visual interest tothe kit. Drilling the holes was a complete, BORING, tedious pain (you do not drill all the way thru, just enough to create a socket) but I'M DONE !! 

For those that have no clue what they are ( I sure did not till I met my wife!! Thanks babe!) they are tiny jewelry rings/tubes/cubes/etc from stores like Hobby Lobby and Michaels and they come in various sizes and an array of colors. Here I am using bright gold and a green/purple tint beads, which cost about three dollars total when the bead-aisle items at Hobby Lobby were on sale. You can get this kind of thing from Fire Mountain Beads and Gems and other sources online as well.

I will also install the socket head cap screws (from the RC aisle at the LHS)  on the foot grousers as a bolt-on snow package (got to cut the threaded portions off first ;-) )

David 


Build to please yourself, and don't worry about what others think! TI 4019 Jolly Roger Squadron, 501st Legion
  • Member since
    December 2005
  • From: Down Under
Posted by dj898 on Monday, January 8, 2007 8:34 PM

very interesting indeed mate.

your post reminds me to finish off that Patlabor themed Kampfer I was building using junk/broken Kampfer kit last year before I lost the interest... ^__^

people living in glass colonies shouldn't throw nuclear stones.
  • Member since
    January 2006
  • From: Baton Rouge, Snake Central
Posted by PatlaborUnit1 on Tuesday, January 9, 2007 10:25 AM

two things dont register here.......

lost interest in a Patlabor (HOWWWWWWWW?????????????????) and in a Kempfer (HOW????????) LOL

 I love my Patlabor2, Ota's unit, Ill have to get some pics of it one of these days.

it was my very first MG builtd another than the vinyl joint covers I really enjoyed the heck out of it.

 David

Build to please yourself, and don't worry about what others think! TI 4019 Jolly Roger Squadron, 501st Legion
  • Member since
    December 2005
  • From: Down Under
Posted by dj898 on Tuesday, January 9, 2007 8:11 PM
raising a 3yo kid will certainly made you to loose interest in pretty much anything -by the time she's gone bed you'd be too tired to do much else...
people living in glass colonies shouldn't throw nuclear stones.
  • Member since
    January 2006
  • From: Baton Rouge, Snake Central
Posted by PatlaborUnit1 on Tuesday, January 9, 2007 10:12 PM

yeah, Ill stick with my dog...and two cats.........


David


Build to please yourself, and don't worry about what others think! TI 4019 Jolly Roger Squadron, 501st Legion
  • Member since
    March 2004
  • From: Fresno, CA
Posted by BlackOps on Wednesday, January 10, 2007 10:43 PM
Some very nice detail work you've put into the build so far, looking forward to seeing more progress pics Smile [:)]
Jeff G.
  • Member since
    January 2006
  • From: Baton Rouge, Snake Central
Posted by PatlaborUnit1 on Thursday, January 11, 2007 12:13 PM

Im planning on making the cape from foil and epoxy putty this weekend, Ill get pics of that posted up as well... so far this has turned into a neat project!


David

Build to please yourself, and don't worry about what others think! TI 4019 Jolly Roger Squadron, 501st Legion
  • Member since
    March 2003
  • From: Newport News VA
Posted by Buddho on Friday, January 12, 2007 10:56 PM
Excellent work, David....

  • Member since
    January 2006
  • From: Baton Rouge, Snake Central
Posted by PatlaborUnit1 on Tuesday, January 23, 2007 9:36 PM

Here are a couple of additional In-Prog photos. I shot the base coat on, and laid on my camo, and immediatly stripped it off.   Tonight I repainted the base, hitting some areas that I missed before. This time instead of putting all the components on skewers I wrapped the prepainted leg frames with plumbers teflon tape and put the armor in place where it belongs. Then I went ahead and shot the coat, getting the coverage i wanted. Now I can lay my masks in place to lay on the camo tomorrow night.

I use cheap bamboo skewers and poster putty to hold my parts while I paint, as well as bulldog clips, hemostats, etc...

The base is together and my "snowdrifts" that I made using homemade playdoh is drying and will be ready for paint and "snow" soon.... 

Its getting there, contest is Sunday morning!

David


Build to please yourself, and don't worry about what others think! TI 4019 Jolly Roger Squadron, 501st Legion
  • Member since
    January 2006
  • From: Baton Rouge, Snake Central
MS 18--Final Update, Kempfer is Komplete!
Posted by PatlaborUnit1 on Sunday, February 4, 2007 10:03 PM

Hi everyone

I want to post up the final set of photos of my Kempfer build. Thanks for the interest this build has generated, I've enjoyed reading the comments. The snow base is done but I still want to add a bit more snow, the Woodland Scenics stuff is a bit thin and its hard to build up layers, and the weathering is not where I want it yet. Im still awaiting the decals to be shipped from Hong Kong...The LED was not lit in the final pic but I assure you it does work just fine *but not for the camera!*

My mods include:

Modifying the forarms to add the scythes, adding the led, adding snow grousers to the feet, modifying the left shoulder armor with Gouf horns,modifying the shotgun with aluminum tubing,adding seed beads over the model, drilling out panels and lightening/vent holes,changing the neck wiring arrangement using wrapped wire and tubing, modifying the hands to open the fingers independantly, creating the doublesabre and adding tiny screws to the neck below the head. My paint is a ton of white *custom mix!!* Tamiya acrylic and every shade of Alclad and Testors Metallizer I had in the rack.

The last photo is not mine, I have not downladed the camera yet. credit this one to the folks at IPMS/SWAMP in Lake Charles, LA at CALMEX2007. All other photos mine.


Build to please yourself, and don't worry about what others think! TI 4019 Jolly Roger Squadron, 501st Legion
  • Member since
    December 2005
  • From: Down Under
Posted by dj898 on Thursday, February 8, 2007 12:12 AM

I'd love to see some chipping on the paintwork but that's just me...

nice work mate! 

people living in glass colonies shouldn't throw nuclear stones.
  • Member since
    January 2006
  • From: Baton Rouge, Snake Central
Posted by PatlaborUnit1 on Thursday, February 8, 2007 10:09 AM

 honestly, the kit is not 100% done yet. The decals came in from Hong Kong last night and they are at the PO ready to pickup today, Im goign with Samuels' MS 18 decals, so I wanted to wait on extensive weathering until they were on.  I dont want to go too beat up tho, the way I nromally would, since this is a relatively new paint job over existing paint, with grafted on snow mods....

Still a ways to go on it, ill get some decent final pics when shes done.

David


Build to please yourself, and don't worry about what others think! TI 4019 Jolly Roger Squadron, 501st Legion
  • Member since
    March 2004
  • From: Fresno, CA
Posted by BlackOps on Thursday, February 8, 2007 5:52 PM
David, this kit has progressed beautifully! Looks like I still have a ways to go but you definately give me something to strive for! Looking forward to more pics :)
Jeff G.
  • Member since
    January 2006
  • From: Baton Rouge, Snake Central
Posted by PatlaborUnit1 on Thursday, February 8, 2007 9:29 PM

Thanks BO

I got my decals in from Samuel today, its a lot of white on the carrier sheet but there are some yellow Zeonic markings as well as stencilling (* I love a lot of stencilling!) so if I get a chance this weekend I may tackle it. Sure does look better now that I have the LED working properly.


David


Build to please yourself, and don't worry about what others think! TI 4019 Jolly Roger Squadron, 501st Legion
JOIN OUR COMMUNITY!

Our community is FREE to join. To participate you must either login or register for an account.

SEARCH FORUMS
FREE NEWSLETTER
By signing up you may also receive reader surveys and occasional special offers. We do not sell, rent or trade our email lists. View our Privacy Policy.