SEARCH FINESCALE.COM

Enter keywords or a search phrase below:

Painting an MG gundam Zaku II (black trinity)

9786 views
46 replies
1 rating 2 rating 3 rating 4 rating 5 rating
  • Member since
    November 2005
Painting an MG gundam Zaku II (black trinity)
Posted by Anonymous on Tuesday, July 10, 2007 3:20 PM

I recently ordered a master grade gundam.  I have always wanted to build one of these.  I haven't recieved it yet and was wondering about an easy way to paint it.  Im not looking for perfection here (not yet, this is my first model) but I would like it to be presentable.  The kit claims that painting is not necessary, but all the information ive read says that it will greatly increase its appearance.

Since this is still my first model im not ready to make a big investment.  How should I go about painting?  I was thinking of getting spray paint and painting them while still on the sprue(correct word?).  And then getting a brush and touching them up after i cut them away.  Then spraying with some sort of top coat after i complete the model.

 What type of paint should I use?  Im not even sure if hobby paint will be available to me locally.  Can I buy some sort of basic spray paint and still get good results?

 Also most sites ive seen recommend tracing detail lines with a fine point dark paint marker.  Are there any good alternatives for this?


Thanks a lot for any help!!  Any info will be of great help! 

  • Member since
    January 2006
  • From: Baton Rouge, Snake Central
Posted by PatlaborUnit1 on Tuesday, July 10, 2007 9:43 PM

Welcome Gundamnoob,I have my MG kit in front of me and I think youre going to be happy with it!   First, take your time and carefully review the instructions as well as the parts. I love the MG kits, I have been building for almost forty years now, and was intro'd to Gundam four years ago. I will not build less than MG kits now.   yes, the parts are molded in plastic colors but you will not be happy withthe result if you just assemble as-is.  I use marker pens on each panel line for the style of assembly/finish that I do, but thats not truly necessary.

This is your first model, so here is my advice: R E L A X!  This hobby is supposed to be FUN and I have introduced many people to it over the years. Do NOT expect too much of yourself on your first run!!!!!! Now, that being said, this is a MG kit and you wont be dealing with many seams, fit issues, etc.  What I will advise you to watch out for is the foil stickers: they are junk and I dont use them. If your kit comes with the rub on type dry transfers you may be happier withthem, and they are not hard to install.

I would strongly suggest you check out the fantastic, blow by blow photo tutorials over at

www.fichtenfoo.com   [on the first page look at the bottom right corner, how to build mecha] and at Codys Coop at http://codyscoop.com/models/how-to

As far as painting, take your sprues to the sink and gently wash them with dishwashing detergent and cool water, and let them dry. Dont lose any parts that may come loose!

Always use an inexpensive sprue cutter for your Mecha, I have one pair just for mecha, and use fine and medium grit fingernail buffers to buff down the stub when you cut a part you. Bandia has great plastic that cuts well but can be tough to sand down, so take your time.

For paint you want a good hobby enamel. If you decide to go the spray can route, warm the paint and the model together to the same temperature, I just leave them both in the garage for a while to come up to temp together (prevents serious problems with the cooler solvents in the paint drying too fast when it contacts warmer plastic].  Mount the parts on skewers [check the pics of my Kempfer] to hold them while you spray and keep it thin and light.   Let it all dry and use markers for your panel lines, or as Fichten does, apply a coat of Future floor wax and apply a sludge wash and remove excess with Formula 409. I dont do this myself, I prefer the Zig marker route (size .005 works best).

I hope these tips help, defintely check out the two links I have posted, and most of all, HAVE FUN!!!!

David
 

Build to please yourself, and don't worry about what others think! TI 4019 Jolly Roger Squadron, 501st Legion
  • Member since
    November 2005
Posted by Anonymous on Wednesday, July 11, 2007 12:38 AM

Thanks for your reply.

 Those two sites you listed were very helpful and were what I was looking for.  The only step Im not confident about is the painting, especially since im using rattlecans.

 On another note, the site I ordered from cancelled my order for no apparent reason.  I ended up reordering from a different site and decided to go with the zeta plus A1 instead.  The good news is they offered the fine tip "gundam markers" I was looking for. 

 Hopefully Im able to be to stay patient enough to make something that looks nice.  We'll see how that goes!

  • Member since
    April 2007
Posted by Alpha54 on Wednesday, July 11, 2007 9:28 AM

I to am building an MG Nu Gundam and I would also recommend that you prime it before painting as this will show you any mistakes before painting that you can fix with putty or sanding.

  • Member since
    January 2006
  • From: Baton Rouge, Snake Central
Posted by PatlaborUnit1 on Wednesday, July 11, 2007 9:32 AM

GundamNoob which site did you order from?

the kit may have been out for a while now (not sure on that one, I have the Char's red MS06) and it is not the new version, it is the older version from a few years ago but very similar. Some kits sell out rather quickly, and it will aslo depend on which site you ordered from.  (which one by the way? inquiring minds want to know...).

I like Duplicolor grey sandable primer in thin coats for my primining, as well as Mr. Surfacer in the spray can.

David


Build to please yourself, and don't worry about what others think! TI 4019 Jolly Roger Squadron, 501st Legion
  • Member since
    November 2005
Posted by Anonymous on Wednesday, July 11, 2007 11:57 AM

The first was ordered from toyfan.com and I still haven't recieved any reasoning as to why my order was cancelled.  And the next was from gundamstoreandmore.com.  Has anyone had any experience with the latter?  I really hate ordering from small online stores like these, but I couldn't find a main stream way of obtaining these models.

 As far as the putty goes.. Is there any brand that I could pick up at wal-mart or lowes that would work well?

 Thanks

  • Member since
    January 2006
  • From: Baton Rouge, Snake Central
Posted by PatlaborUnit1 on Wednesday, July 11, 2007 7:05 PM

Hi Gundamnoob

You dont want to use anyting like wall spackle, it willnot do anything but fall off of plastic.

You may be able to use Bondo Spot Glazing putty or 3M Acryl in the BLUE tube if you can get that at wally world. I only use Tamiya putty and very little of that on a typical MG kit, only to fill the odd seam where the MG parts have a small fit issue, or where the head halves come together.

I dont have any experience with either online retailer. I buy from Hobbylinkjapan or Ebay, or get what I want in a store like Bobe's in Pensacola who has a large Gundam stock. Call them or visit thier website at www.bobehobbyhouse.com there is no catalog but get thier phone number and give them a call, and they will definitely be able to help you out, its where I get a lot of my current stock Gundam stuff.

HTH

David


Build to please yourself, and don't worry about what others think! TI 4019 Jolly Roger Squadron, 501st Legion
  • Member since
    November 2005
Posted by Anonymous on Thursday, July 12, 2007 1:12 AM

Thanks again PatlaborUnit1.

 Ill try to find the 3M stuff.

 Ill try to keep this thread updated on my progress and let everyone know what I chose and how it works.  Though.. I have no previous experience to judge against.

  • Member since
    January 2006
  • From: Baton Rouge, Snake Central
Posted by PatlaborUnit1 on Friday, July 13, 2007 2:43 AM

Modeling is a learning experience, we learn from success and we learn from failure, although we tend to forget that we actually LEARNED something from our modeling failures and then rip it apart and throw it in the parts box.

Just relax, and have fun!

David


Build to please yourself, and don't worry about what others think! TI 4019 Jolly Roger Squadron, 501st Legion
  • Member since
    November 2005
Posted by Anonymous on Sunday, July 15, 2007 12:15 AM

Wow great service from gundamstoreandmore.com.  I made the order on the 10th and recieved it on the 13th.

Im actually impressed with the quality of the of the kit (master grade MSZ-006A1 zeta plus).  I remember building a model or two with my brothers when I was younger and they were junk, but this is a different story.

So far ive pre-built both arms, both legs and a gun.  Its a lot of work getting all the nubs from the sprue off, but its worth it when you get it put together.  Im enjoying the hobby so far.  Ive even started looking at which model ill try next!

I checked both walmart and lowes for some sort of putty and the best I could come up with is a wood "filler" product by elmers.  It sands well and stays put after it dries but its almost impossible to get it squeezed into small areas and stay there while its still 'wet'.  Im going to look for 3M stuff and some 1200 grit sand paper at an auto store sometime soon.

I went with krylon primer.  I haven't tested it yet.   Thats all for now.  After I get painting Ill try to get some pictures posted so you guys can get some laughs out of this thread, lol.

  • Member since
    November 2005
Posted by Anonymous on Monday, July 16, 2007 8:22 PM

I primed the legs arms and a gun today.  I think I did a pretty good job.  I think ill be able to pull off a good paint job now.

 PatLabor the kabob tip was very helpful.  I painted about half of the pieces on those and about half just laying on the newspaper.  I did a much better job on the parts I put on skewers.

One other thing I was wondering about.  Im going to paint with flat paints and use a matte finish.  I think I remember reading somewhere that decals dont work well on flat finishes.  Is there a way to make the decals work well with these sorts of surfaces or will it be fine? 

  • Member since
    January 2006
  • From: Baton Rouge, Snake Central
Posted by PatlaborUnit1 on Thursday, July 19, 2007 12:02 PM

Hi Gnoob

Pretty soon you will need to change your name!

On the flat paitn I apply a glosscoat, I use future floor wax or any other gloss spray. I apply the Future with an airbrush straight from the bottle at 18PSI but you can also carefully paint it on with a brush and clean up with ammonia. A spray gloss will work, you just wont have quite as much control from the spray bomb. let it dry a day or two and apply your markings.

Im goign to assume here you will use the kit markings. These are a mix of dry transfers (see elsewhere in here and in the links for dry transfers, they are different than decals and I love using them) and the horrid thick shiny kit stickers. If you must use the stickers, cut very close to the marking to get rid of all that awful clear film, it shows BADLY !!! I have used them on my HG kits with fiar success by heating them in hot water prior to application, after trimming off the etra film.

HTH

David

Build to please yourself, and don't worry about what others think! TI 4019 Jolly Roger Squadron, 501st Legion
  • Member since
    November 2005
Posted by Anonymous on Thursday, July 19, 2007 12:32 PM

Doh, I didn't open the markings package until I read  your response.  I think I have one sheet of dry transfer.  Then a sheet of clear stickers, which I thought were decals Dead [xx(] before.  And then a sheet of foil? stickers that look pretty horrible, lol.  I think Ill try to use some of those ones that go into recesses though.

This sucks.. I might try to find some AM decals.

  • Member since
    April 2007
Posted by Alpha54 on Friday, July 20, 2007 2:04 PM
If you go on Ebay you might be able to find the waterslides versions of the dry transfers you have Bandai makes them to.
  • Member since
    January 2006
  • From: Baton Rouge, Snake Central
Posted by PatlaborUnit1 on Friday, July 20, 2007 5:45 PM

I have tons of pretty small and fairly generic stencil decals that I use on mine. I have several sheets of specific decals from Bandia that I got on a sweet deal one day on Ebay, like ten sets for up to thirteen different suits, plus several Mecha decals from WAVE.  I like to use the good old standby 1/48 aircraft stencil dry transfers from Verlinden and apply them in an overlapping form, creating my own new stenciling icons for ground crews. Real aircraft use these logos for servicing, I just reimagine them.

David


Build to please yourself, and don't worry about what others think! TI 4019 Jolly Roger Squadron, 501st Legion
  • Member since
    November 2005
Posted by Anonymous on Friday, July 20, 2007 9:02 PM

Im going to keep an eye out for some AM decals and dry transfers.

 In other news, Ive begun color painting and I will probably have some pictures up by the end of next week.  Ive only begun painting the legs arms and a gun though so dont get to excited anyone!


  • Member since
    January 2006
  • From: Baton Rouge, Snake Central
Posted by PatlaborUnit1 on Friday, July 20, 2007 9:16 PM

i get the squadron. com flyer mailer in the mail each month and scour the decals , often they have clearance decals by Microscale for 99 cents and I snatch those up, the German stuff is great for zeon suits and the unusual (to US anyway) artwork applied looks good on some machines.

for suit specific stuff you can get the nice Samueldecals from www.samueldecal.com  the page takes forever to load up but I have used the decals and they are nice. 


David 


Build to please yourself, and don't worry about what others think! TI 4019 Jolly Roger Squadron, 501st Legion
  • Member since
    November 2005
Posted by Anonymous on Wednesday, July 25, 2007 10:46 PM

Well I finally got around to getting those pictures. I ended up finding a sheet of gundam decals online for sale so a couple of those are on them.  And some of them are dry transfers that came with the kit, which I really like, by the way.  Im not done with these yet.  Im still experimenting with some weathering techniques that aren't working, lol.  You will probably notice some dirt on the feet... I think im going to wash that off.

Im not used to taking pictures so I made a lot of noob mistakes.  Like getting to close with the flash.. so some details got washed out. 


Here is one of those big ugly stickers David.  I didn't have any other decals or dry transfers that would create this affect.


Here is the inside of the leg with the same big ugly seem thats on the outside.  I wish I would have taken the time to do it right but I didn't have any putty that would work at the time.  Oh well, next time.  I plan on adding some soot and such around the vents.

Both legs in a standard pose


And a little Lebron tribute on my Gundam Whistling [:-^]


Dont have any arm pictures because I tried using Gundam markers... LOL.  Ill be adding another coat or two onto those! 

  • Member since
    November 2005
Posted by Anonymous on Wednesday, July 25, 2007 10:52 PM

Lol I just noticed from the my picture post that one of the polycaps on one of the legs is facing the wrong direction..  Might need to fix that..

Sign - With Stupid [#wstupid]

  • Member since
    November 2005
Posted by Anonymous on Thursday, July 26, 2007 7:10 PM

Great progress so far!  What are you using for the weathering?  Can't wait to see more done. 

I have thought about picking this kit up before but I have a few too many as it is.

  • Member since
    November 2005
Posted by Anonymous on Thursday, July 26, 2007 7:38 PM

 Thanks Malich.  This kit went together well and Ive had no problems with it, but I wish I would have started out with one that had less pieces!

 Well what you see in the pics is me trying to use dirt + water (mud) and apply it with an old toothbrush.  Well I figured out why everyone doesn't just do that... It looks like crap, lol.

Im starting to consider just skipping the weathering.  I plan on applying a matte finish so if I want to come back later with pigments (whenever I can justify spending more money!) I believe I can do that right on top of the finish. 

  • Member since
    January 2006
  • From: Baton Rouge, Snake Central
Posted by PatlaborUnit1 on Friday, July 27, 2007 11:35 AM

i do all of my weathering after I seal it with a coat of flat so the weathering powder has something to stick to otherwise it can come off of gloss paint.

im playing with MiG weathering powders now as well as Tamiya weathering kits. Othwerise, my weathering has always been a good old umber oil paint wash and pastels. 

On the leg that has the seam, on your next kit, try using a liquid glue and forcing the halves together and creating a weld seam of plastic being forced out. Let that totally dry and sand, it will help a LOT in filling. Otherwise, get some Tamiya putty or bondo spot glazing putty in the tube.

Nice to see the work posted!

David

Build to please yourself, and don't worry about what others think! TI 4019 Jolly Roger Squadron, 501st Legion
  • Member since
    November 2005
Posted by Anonymous on Sunday, July 29, 2007 3:30 PM

You could always get a couple of 1/144 kits just to practice on or you can just use this kit as your practice.  I wouldn't put off learning the weathering though.  Consider it as part of the whole learning process.

 I thinking you are making good progress and I can't wait to see more pics! Smile [:)]

  • Member since
    November 2005
Posted by Anonymous on Sunday, July 29, 2007 8:58 PM

Thanks for the comments guys.  Its definately been a learning process and I think im finally starting to get the basics down.   I think my next one will look a lot better.

 I might build a 1/144 next and practice all the stuff that I didn't do on this MG.  I already got a 1/35 tamiya willys jeep, but after I looked through it I think I prefer gundams... we'll see.

 Back to my current build, If the weather permits ill probably have most of it painted and assembled by the end of the week!  All the wings are going to need masking and stuff (I actually used cement on the seams, lol) so they will probably take awhile to get painted.

  • Member since
    November 2005
Posted by Anonymous on Monday, July 30, 2007 10:04 PM

Well I got some new batterys for the camera today so I decided to take some random pictures of my build.

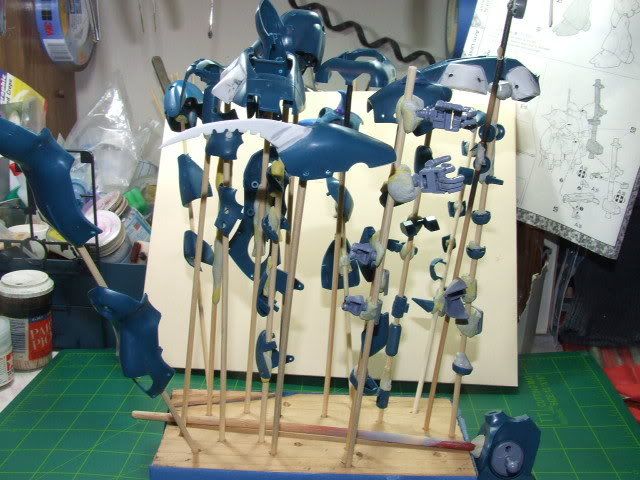
The majority of the remaining parts in the priming stage.

The box.


Here is a glossy picture of the completed kit that came in the box. 

This is a GI Joe gun I borrowed from my GI JOE (he didn't seem to mind).  Its The perfect scale. I wish I would taken a picture of it beside the gun that I assembled from the kit.

And here are the remains. 


Enjoy

  • Member since
    January 2006
  • From: Baton Rouge, Snake Central
Posted by PatlaborUnit1 on Wednesday, August 1, 2007 9:32 AM

Isnt painting on the skewers easier?
Scour your leftover sprues, I always find one or two option parts left behind on them.

I use the MG box inserts as wall decoration on my building bench, you could even three hole punch them for a binder, like you have with Ma.K. kits.


David

Build to please yourself, and don't worry about what others think! TI 4019 Jolly Roger Squadron, 501st Legion
  • Member since
    November 2005
Posted by Anonymous on Wednesday, August 1, 2007 4:15 PM

Yeah painting on the skewers definately gives a better finish than laying them on newspaper or something and getting splattering all over.  Im glad you gave me that tip!

I did find a couple leftover parts that, to the best of my knowledge, were never even mentioned in the instructions... hmm..  And there was a ton of leftover polycaps, but thats probably normal. 

I rushed my build together today and despite not giving the paint a couple days to cure I only managed to rub half the paint off, lol.  I snapped a couple pics.  I haven't finished painting the wings, added any decals, a matte finish or any weathering yet, but I thought no one would mind an update.

One thing I dont like about this kit now that I built it is how skinny the waist area is.  It makes the mech look almost delicate or fragile

front shot

back (this area is not finished at all! still needs wings and a couple pieces)


my awesome photography skillz...


Sorry for the picture quality Ive been trying to keep the file size down so dial-uppers can still view them.


  • Member since
    November 2005
Posted by Anonymous on Thursday, August 2, 2007 6:59 AM

The pics look great!  You're right about the waist though.  Doesn't seem like there's enough meat on those bones.  Plus the hips look kinda wide too.  That's okay though, cause once you get the hang of things you will want to start modding everything so the proportions look right.

So once this kit is under your belt what's next?

  • Member since
    November 2005
Posted by Anonymous on Thursday, August 2, 2007 8:32 AM

Well I figured out what was wrong with the hips. I didn't have them snapped against the frame.  Now that they are it looks a little better.

I think im going to try a 1/35 willys jeep and im looking at either a Gouf, a Zaku, or maybe the Mk II 2.0 as my next gundam. 

  • Member since
    January 2006
  • From: Baton Rouge, Snake Central
Posted by PatlaborUnit1 on Thursday, August 2, 2007 10:17 AM

Glad to help.

One of my freinds will ONLY use Mr. Color lacquer for painting his mecha due to its strength, it wont rub off. I only use Tamiya acrylic, I have used MM enamel since it was introduced and I can NOT get a good coat of paint on with it, but the Tamacrylic seems fine! Wierd.

What kind of paint are you using. Also, if you did not wash all your parts with soap and water prior to painting, and you are not using a solvent based paint, then the paint is flaking off from the mold release agents/skin oils on the kit, since they are literally dried on top of it (acrylics have little "bite" on thier own and work best if attached to a quailty primer).

I agree with the waist. My Patlabor Unit 2 is the same, almost the same waist.  When I really took a logn look at my GP01 and GP02 kits, those anemic legs really put me off.......

David

Build to please yourself, and don't worry about what others think! TI 4019 Jolly Roger Squadron, 501st Legion
JOIN OUR COMMUNITY!

Our community is FREE to join. To participate you must either login or register for an account.

SEARCH FORUMS
FREE NEWSLETTER
By signing up you may also receive reader surveys and occasional special offers. We do not sell, rent or trade our email lists. View our Privacy Policy.