SEARCH FINESCALE.COM

Enter keywords or a search phrase below:

revell Thermopylae

15893 views
55 replies
1 rating 2 rating 3 rating 4 rating 5 rating
  • Member since
    March 2014
revell Thermopylae
Posted by kpnuts on Tuesday, November 10, 2015 12:14 PM
Hi all we due to the kind generosity of CPNGROATS (a member on another forum who was so impressed by my model ships he gifted this to me from his own stash)I have received this 
 
 
today.
Thank you very, very much George, very kind indeed.
I hastily opened it tonight eader to start but my missus says NO!!! "you have enough models on the go, cluttering up my house. you finish some of them off and get them out the way". to be fair I do have 9 on the go and bits are all over the place, she's generally ok so I cant complain ( but I have found in the past a bit of sweet talking can bring her round ) so watch this space, in the very near future.
  • Member since
    September 2012
Posted by GMorrison on Tuesday, November 10, 2015 1:49 PM

Hey thats cool. It takes up a lot of space.

When you do get to it, there's plenty of info online about little things you can do to make it sort of more accurate.

 Modeling is an excuse to buy books.


  • Member since
    May 2003
  • From: Greenville, NC
Posted by jtilley on Tuesday, November 10, 2015 2:25 PM

GMorrison was perhaps a litte...cryptic. What everybody who tackles that kit needs to know is that it isn't a scale model of the Thermopylae. It's a slightly modified repackaging of Revell's Cutty Sark. The two ships actually looked like each other only from a considerable distance.

How important that is, of course, is up to the individual modeler. Whether a modeler builds a model from that kit is none of my business. But I do think every modeler is entitled to go into such a project with his/her eyes open.

Revell has only produced three 1/96, 3-foot-long sailing ship kits: the Cutty Sark, Kearsarge, and Constitution. All those kits are (believe it or not, fellow Olde Phogies) at least fifty years old. (I'm not counting that "Spanish Galleon," because it isn't a scale model of...well, anything.) All the other big Revell sailing ships (Thermopylae, Pedro Nunes, Alabama, and United States) are modified reissues - and in many cases the modifications have nothing to do with reality.

Caveat emptor.

Youth, talent, hard work, and enthusiasm are no match for old age and treachery.

  • Member since
    September 2012
Posted by GMorrison on Tuesday, November 10, 2015 7:22 PM

The John Steel painting is really great, and that box alone is worth a fair amount of money I'd guess. Be sure to keep it.

And I don't mean to sound that way... do build this model. If it has the formed sails, I definitely would get rid of them. If you ever get to the final stages, the running rigging that controls the sails, a surprising amount of it remains in place without them. But you'd be surprised how many folks don't get that far. I was looking at some build/ review Cutty Sark models just now, oh God! A lot of pretty bad models.

My paternal Grandfather, deceased before his time or mine, was a prolific if eclectic modeler of mostly scratchbuilt stuff. I've inherited a lot of his train models, but not much else. I have a ship-in-a-bottle, a big five masted bark, but I'm not sure yet if it's one of his.

There was a wooden, finished Cutty Sark model in a closet on a shelf in our house when I was growing up. It had had some really major catastrophe; all of the rigging and spars were a giant tangle right down to where they had snapped off at the deck. It seemed about the same scale as your ship; which is a real scale. I always figured it had taken a tumble off of a shelf at some point. More recently, I asked after it as I would now just love to take the thing apart and put it back together. My mother couldn't remember; she'd either thrown it a way or sold it at a yard sale when they moved.

Maybe there was a wood kit on 1/8" = 1'-0" back in the 1940's. I don't imagine he would have built anything like that from scratch as ships weren't a primary interest of his.


 Modeling is an excuse to buy books.


  • Member since
    September 2005
  • From: Groton, CT
Posted by warshipguy on Monday, November 16, 2015 11:06 AM

The only wood kits of Thermopylae that I have seen are the old Scientific solid hull kit (which isn't too bad at all!), and a small 1/124 scale Mantua/Sergal POB kit that also does not look too bad (at least in the photos of the model).  As John says, the Revell kits are just modified versions of the Cutty Sark.  Interestingly, I once bought an obscure Japanese plastic model of Thermopylae that proved to be nothing more than a re-boxing of the small-scale Revell CS.  This is really a shame since Thermopylae was a very beautiful ship.

Bill Morrison

  • Member since
    December 2002
  • From: Greenville,Michigan
Posted by millard on Wednesday, November 25, 2015 8:06 PM

I build this kit a few years ago.it sets in my living room right now.Watch some very fragile parts when you start pulling the rigging taut.The main problem with all the Revell big ships is the 3 part decks. You either have a line wher they connect or if you sand out the seams you lose deck detail.I would get some wood decking from Artwox and lay over the plastic deck.

Rod

  • Member since
    November 2009
  • From: Twin Cities of Minnesota
Posted by Don Stauffer on Thursday, November 26, 2015 9:51 AM

warshipguy

The only wood kits of Thermopylae that I have seen are the old Scientific solid hull kit (which isn't too bad at all!), and a small 1/124 scale Mantua/Sergal POB kit that also does not look too bad (at least in the photos of the model). 

Bill Morrison


I agree about those Scientific kits.  I got my start in ship modeling about 55 years ago with the Scientific and Guillows kits.  I couldn't afford Model Shipways then.  Neat thing is, found an old Scientific Revenue Cutter a couple of years ago at a garage sale for five bucks, essentially unstarted. It is underway now.  Fittings were junk on all those kits, but both then and now you can easily find blocks, deadeyes aftermarket.


Don Stauffer in Minnesota

  • Member since
    September 2005
  • From: Groton, CT
Posted by warshipguy on Saturday, November 28, 2015 7:07 AM

Don,

I agree with your comment about the fittings.  The sails were very basic as well.  Given these flaws, I also believe that most of those kits could be built into serious models in the right hands.  However, let the buyer beware; I have two of their USS Kearsarge kits, one with a pine hull and one with a balsa hull, with nothing on the box to indicate the difference. I do not believe that any of the Thermopylae releases ever had a balsa hull, though.  The series does present an interesting collection of clipper ships.

Bill

  • Member since
    March 2014
Posted by kpnuts on Saturday, December 12, 2015 1:29 PM

Hi all well since I'm having a rest from the darn Citroen I need something to fall back on (this addiction will be the death of me)I thought what be better than this,TBH I've been looking forward to this since I was kindly given it (I just hope I can do it justice) 


  • Member since
    September 2012
Posted by GMorrison on Saturday, December 12, 2015 2:27 PM

Exciting!

Take good care of that box with the Steel art. It's a classic.

As long as you are going to be painting the bottom, I'd repaint the green too.

http://mcjazz.f2s.com/ClipperThermopylae.htm

Kind of a nice Hunter Green, maybe.

http://www.benjaminmoore.com/en-us/paint-color/huntergreen

I don't know what the bottom sheathing was, but I'd bet is was Muntz Metal. Thats more of a gold than a copper brown.

 Modeling is an excuse to buy books.


  • Member since
    March 2014
Posted by kpnuts on Saturday, December 12, 2015 3:07 PM

I have some copper leaf which I intend to guild the bottom with then spray with salt water (this is my plan (can't soak it in salt water as the size is acrylic so would come off in water) since she was plated with copper this should give the right colour.

  • Member since
    September 2012
Posted by GMorrison on Saturday, December 12, 2015 3:41 PM

The salty water is to get a patina?

Try adding a little vinegar to it. Also, when you leaf the ship wear gloves, or really clean your hands.

(Sign maker)

Should look great.

 Modeling is an excuse to buy books.


  • Member since
    May 2003
  • From: Greenville, NC
Posted by jtilley on Saturday, December 12, 2015 4:47 PM

Be sure to test that combination of copper gilding and ammonia before you try it on the model. In the first place, I'm not at all sure the "copper" is the real thing. Maybe - but most of the stuff sold as "gold leaf" isn't really gold. (If it was, few people could afford it).

In the second place, the big problem with chemical treatments like that is that they're so difficult to control. The hull might look great at first, but turn pure black in a few weeks.

In the third place, ships of that period ordinarily weren't sheathed with copper but with "yellow metal," which is, to all intents and purposes, brass. How important that is, of course, is up to the modeler, but a reddish bottom isn't really appropriate in terms of accuracy.

I once, completely by accident, did an experiment that relates to all this. One of my minor decadent habits is eating lunch in my car at fast food restaurants. I once dropped three pennies (copper alloy) into a cupholder in my center console, and unknowingly put a soft drink on top of them. The soft drink cup sweated water, which covered the bottom of the cupholder to a depth of about 1/4". Also on the bottom of the cupholder was a little package of salt. The paper of the salt packet promptly dissolved, so I unknowingly had three samples of copper alloy soaking in saltwater. When I finally noticed they were there, a couple of weeks later, one of the pennies had turned almost pure black. Another was green with a powdery white crust on it. The other hadn't changed color.

To be honest, kpnuts, I've seen lots of attempts at chemically coloring copper bottoms on models over the years, and I have yet to see such an attempt that actually worked. If you want to try it, by all means go ahead - but I really think you'd be happier with paint. You've got excellent painting skills. A combination of carefully chosen colors with dry brushing and washes can give a really impressive and beautiful result.

Youth, talent, hard work, and enthusiasm are no match for old age and treachery.

  • Member since
    September 2012
Posted by GMorrison on Saturday, December 12, 2015 5:18 PM

Nothing was mentioned about ammonia, thats an entirely different ball of string. What will patina copper is acid. The old trick was to use urine, obviously thats not really desirable. A little lemon juice also will work.

I did forget to mention, and of course its important, is to test anything like this off of the model. because what happens is that the etch will be a resist- anything that has any foreign substance on it like sizing, oil from your fingers etc. will stay copper colored and it will look terrible.

Copper leaf is most likely copper, but I would suspect leafing this would run to some money. One of the beauties of leaf is that properly done, the leafs themselves, which are about three inches square, are clearly visible and form part of the look. But you don't want that here.

For copper bottoms, I really like copper tape, which I get from the stained glass supply places.

I didn't want to say this earlier, but I think you are headed for an unholy mess. Even if it works, the streaking etc. will not be "scale".

As for the actual material, I think it was Muntz Metal, which is a brass. But the OP thinks otherwise, I don't want to argue about it. There's an opportunity here for a very smart looking ship, a dark flat green/ white and gold presentation.

Frankly I really have a dislike for all of the Revell Thermo models I've seen over the years, that putrid green plastic color over bright copper.


Just my two bits.

 Modeling is an excuse to buy books.


  • Member since
    December 2003
  • From: 37deg 40.13' N 95deg 29.10'W
Posted by scottrc on Saturday, December 12, 2015 6:39 PM

How much patina are you looking at here???  I personally feel there should be an even balance of copper and patina.  I prefere using oils and this stuff call Rub n Buff.  I first spray a coat of copper, usually Krylon from a can, then spray a coat of Krylon Matte Finish, followed by thin washes of a mixure of the three Rub n Buff colors, some lamp black oil paint, thinned with about 75% turpintine, then seal with a final coat of Matte finish.  The results end up with a balanced hue and depth on the hull.  Shown is my never ending Connie project. The Revell kits do have some pretty dramatic representation of copper plates, so there is a lot to work with when painting them and getting a good, natural look to the lower hull.  The nice thing with Rb n Buff, as that it dries, if you do not like the hue, you can buff it thinner, or add more color to thicken it up.  If it becomes too hard and tacky, add some more turpintine and it softens right up.  And a tube will last for years.  I usually use a tack towel to rub my hull down after applying a wash to give uniformity.

The green upperworks were painted on a kit, shown after years of being stored in the open and in need of restoration, many years ago using Krylon Satin Green as a base and then using washes of Emerald and Gold Leaf, mixed with some Saphire Blue to give a really deep, natural look to the model.  

  • Member since
    December 2003
  • From: 37deg 40.13' N 95deg 29.10'W
Posted by scottrc on Saturday, December 12, 2015 6:48 PM

I wanted to also say that your pictures of opening the box brought back memories of a winter day in 1976.  That kit has some really fond memories attached to it.  You will enjoy it.

  • Member since
    May 2003
  • From: Greenville, NC
Posted by jtilley on Saturday, December 12, 2015 7:53 PM

I didn't notice that kpnuts left ammonia out of his formula; sorry. The old tradition I grew up with is a bath of salamoniac (salt water and ammonia), applied by soaking a towel in it and wrapping the ship's hull in the towel for several days.

I don't think salt water alone will work. If that is actual copper leaf you're talking about, any sort of acidic chemical may eat through it.

I've got two models that I coppered with genuine copper plates. On one, the Bounty, wound up painting the underwater hull so the copper itself is virtually invisible. For the other, the Model Shipways Phantom, I used the copper foil tape GM referred to. I left it unfinished, except for a thin coat of Renaissance curatorial wax. That was about ten years ago. In those ten years it's darkened noticeably, but hasn't turned green.

I've never tried applying copper foil tape over molded "copper sheathing." If GM says it works, I believe him.

Muntz metal is, indeed, quite close to brass. (It's made of copper and zinc.)

The hulls of scottrc's models look mighty fine to my eye. Kpnuts - I repeat: you have plenty of skill in painting. I strongly suggest you rely on them to give you an underwater hull that looks like you want it.

Youth, talent, hard work, and enthusiasm are no match for old age and treachery.

  • Member since
    December 2003
  • From: 37deg 40.13' N 95deg 29.10'W
Posted by scottrc on Saturday, December 12, 2015 8:31 PM

Hello again kpnuts,

I just looked at your previous work, and man, John isn't kidding, you have the talent.  I swear if it wasn't for some of the back up shots, I thought I was looking at an actual restoration of a full sized car.  By all means, continue to use paint and your knowledge of powders and pigments as a medium, you have a knack for scale and composition. 

  • Member since
    September 2012
Posted by GMorrison on Saturday, December 12, 2015 10:19 PM

Copper tape, which is self adhesive, comes in a pretty wide variety of widths. It's important to get the width you need, scaled off the model molded plates. Even then of course there's some variety at the ends and other areas where the plates change shape.

I also suspect it has some kind of a coating on it, the hulls I've done stay pretty bright, and don't discolor from the oils and acids in my fingerprints. Which coating would make it darn difficult to patina.

I get mine from here;

http://www.anythinginstainedglass.com/metals/foil.html

I don't make stained glass, just one more thing to not be good at.

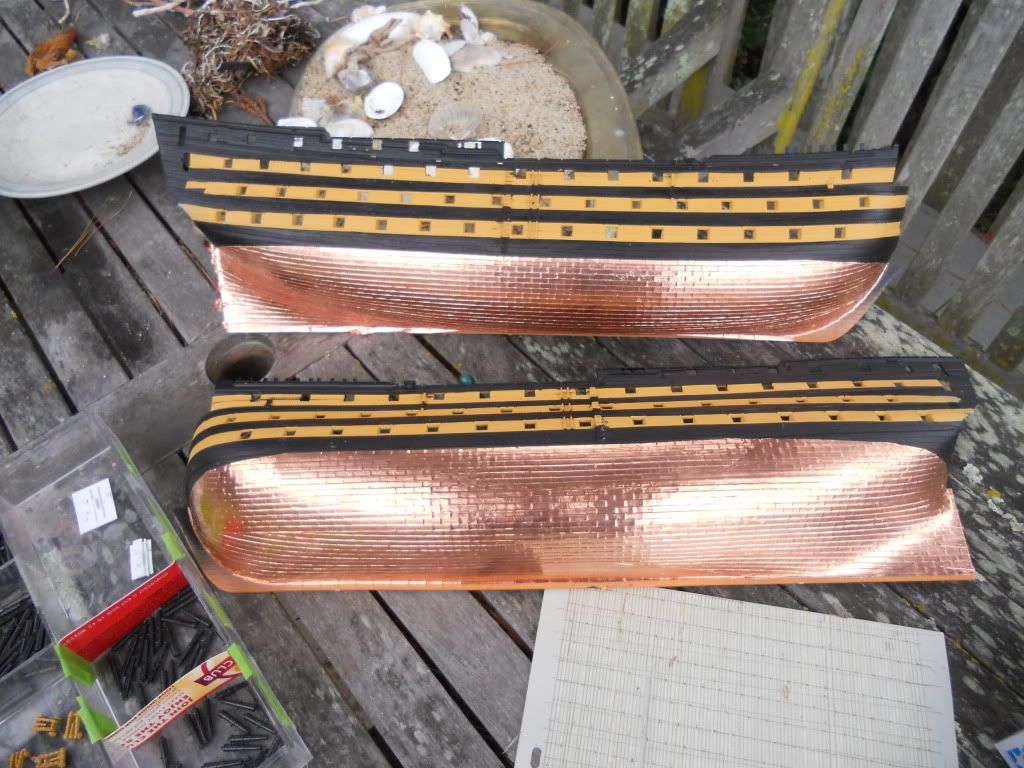
Five years later this ship looks pleasantly a little more darker and softer. I'll get her out and take some photos. But it's a pretty dramatic look, a personal choice.

I'm of the opinion that being able to weather a model is a sign of advanced skills. But I'm not sure about bottoms. That Constitution of Scott's looks good to me, like an antique.

But my usual concern is that the ship's bottoms I've seen when fresh from the sea, look, and smell; pretty bad.

Maybe ten years ago I was involved in a project where the architects clad an emormous museum in San Francisco with over 250,000 square feet of copper alloy panels. The Board Director was very proud of the design, it was a masterpiece (by others), and showed many renderings of the building, looking much like my Victory there.

Now, I spent a year of my architectural degree study in Copenhagen and took a few classes on the subject of copper roofs. So I pointed out to him that his building would have a very graceful and changing life, going to brown, black and eventually green. He became really indignant with me, so I used the Tilley test and pulled a handful of pennies out of my pocket (I'm an architect) and spread them out. He was quite taken aback, but also amused.

Scott, those are very beautiful models. I really like the frigate esp.

 Modeling is an excuse to buy books.


  • Member since
    March 2014
Posted by kpnuts on Sunday, December 13, 2015 2:06 AM

Thanks for all your advice (lots to try and think about now)gosh I wasn't expecting such interest in this one.

  • Member since
    March 2013
Posted by Marcus.K. on Sunday, December 13, 2015 5:48 AM

I am looking forward to see your progress on the Clipper.

I fully agree to GM's proposal to safe the boxes painting. I loved those boxes as a kid and still do and collected those covers even from friends. This one is a beauty and the situation would be a nice idea for a dio.

Concerning the copper. I think most pictures I did see from hulls which have been in the water did look nearly black from sea weed and shells. There are photos of HMS Rose / Surprise which show that. Copper is even not visible.

But this might be too much for a model ...

  • Member since
    March 2014
Posted by kpnuts on Monday, December 14, 2015 2:39 PM

Hi all here is the next update, most of the deck colour is done with pastels


  • Member since
    March 2014
Posted by kpnuts on Wednesday, December 16, 2015 1:49 PM

Hi all well I've tried a little experiment, I got some copper and brass leaf with the intention of guilding the copper plates and spraying it with salt water to get the patination of the real plates, well they dissolved so that's out so now I'm thinking I will guild it then distress it with a combination of washes and such my question is ( as there is some debate as to weather it was copper or muntz metal which is an alloy of zinc and brass I think) should I guild it with copper or brass.


  • Member since
    March 2014
Posted by kpnuts on Thursday, December 17, 2015 2:03 PM

Hi all I've gone for the copper leaf (needs a bit of patching) but I think its ok


  • Member since
    March 2014
Posted by kpnuts on Thursday, December 17, 2015 4:48 PM

Hi all since I'm going to paint the weathering on should I go for greenish blue or as the instructions say antique black wash ( whatever that is) never done anything other than paint the hull gold before.

  • Member since
    September 2012
Posted by GMorrison on Thursday, December 17, 2015 6:15 PM

Kp I can't help you here. If you do anything to the leaf, start by putting a flat clear coat over it. It won't take any handling at all, otherwise.

After that you can try anything. I've been on a little side foray into building tank models, and also a LHA model I posted here. I used Testors Dullkote, followed by washes of artist oil paint very diluted in odorless Turpenoid. It works pretty well and can be wiped off early if you screw up. I'd start with dark colors like black/ brown, very diluted, juts to pick out the detail. Any kind of streaks or direction to the weathering is not going to look right.

 Modeling is an excuse to buy books.


  • Member since
    March 2014
Posted by kpnuts on Friday, December 18, 2015 12:56 AM

Already done a satin coat as I was worried about finger marks if I handled it without gloves. Thanks 

  • Member since
    December 2003
  • From: 37deg 40.13' N 95deg 29.10'W
Posted by scottrc on Friday, December 18, 2015 1:09 PM

Looking good!

  • Member since
    March 2014
Posted by kpnuts on Saturday, December 19, 2015 3:02 PM

Hi all well I've started weathering the copper.


  • Member since
    March 2014
Posted by kpnuts on Sunday, December 20, 2015 1:15 PM

Hi all given the green a coat of paint and weathered that and done a bit more to the copper


JOIN OUR COMMUNITY!

Our community is FREE to join. To participate you must either login or register for an account.

SEARCH FORUMS
FREE NEWSLETTER
By signing up you may also receive reader surveys and occasional special offers. We do not sell, rent or trade our email lists. View our Privacy Policy.