SEARCH FINESCALE.COM

Enter keywords or a search phrase below:

Making Parrels? References, Sizes, Materials, Etc.?

7183 views
38 replies
1 rating 2 rating 3 rating 4 rating 5 rating
  • Member since
    September 2005
  • From: Groton, CT
Posted by warshipguy on Monday, August 8, 2016 3:57 PM

Gentlemen,

I just purchased a book from Amazon called Eighteenth-century Rigs & Rigging by Karl Heinz Marquardt that compares and contrasts French, British, and Continental parrels in the 17th and 18th centuries. The primary difference between British and French parrels seem to be the locations of the trucks. British practice was to place the ribs outboard of the trucks, alternating thusly:  rib, truck, rib, truck, and so forth.  French practice was to do the opposite, truck, rib, truck, rib, and so forth.  In British practice, a rib was closest to the yard on both ends; on French large ships, the outermost truck was closest to the yard.  On smaller ships in the Meditterranean, the parrels only consisted of trucks.  Another difference was that, in French ships, the ribs were slightly curved upwards on the ends.  I'm not sure that that would be worth the effort.

If someone can advise me how to copy the appropriate pages and diagrams onto FSM, I will do so.  Otherwise, I will send copies to anyone who wants them.

Bill

  • Member since
    March 2012
  • From: Marysville, WA
Posted by David_K on Monday, August 8, 2016 5:23 PM

Good info, Bill!

I have noticed before that some models have had the configuration of truck/rib/truck, and others rib/truck/rib....now it makes sense.

By the by, I regret to inform that after several failed attempts to fabricate consistent ribs with styrene sheet, I have conceded to purchase some pre-fabbed parrels from an online source.  I tried, and tried, and tried to make ribs...but they come out with too much variation for me.  I have not the patience to make and waste dozens more!

So kudos to those who have what it takes...:)

I'll update soon with a review of the pieces, and perhaps even share my laughable attempts!

Dave

        _~
     _~ )_)_~
     )_))_))_)
     _!__!__!_         
     (_D_P_K_)
   ~~~~~~~~~~~~~
    ~~~~~~~~~~~

Current Project:  Imai/ERTL Spanish Galleon #2

Recently Finished: Revell 1/96 Cutty Sark

Next Up:  ???


  • Member since
    September 2005
  • From: Groton, CT
Posted by warshipguy on Monday, August 8, 2016 5:33 PM

David,

I see nothing wrong with that. There might be another approach.  Chuck Passaro has recommended using parts cut our from manila folders.  He argues that they are indistinguishable from parts made from plastic or wood, but that they are easier to make.

I will be happy to send you the appropriate pages from Marquardt's book if you want them.

Bill 

  • Member since
    March 2012
  • From: Marysville, WA
Posted by David_K on Saturday, August 13, 2016 9:42 AM

Manila Folders would probably be a good material, easy to cut out for sure!

I went ahead and ordered some Amati Parrel kits from Agesofsail, they arrived yesterday, and I'm happy with them.  The 10mm versions have ribs with 3 holes, and the 6mm have two holes...ribs appear to be molded styrene and the beads are wooden.  The ribs might want for a little sanding, but the overall shape of the parts is consistent, and I like that!

Here's a couple of pictures, of both the amati parts, and of my initial attempts to construct ribs from styrene sheet...

I started by making a grid of rectangles, and marking the spots for rib hole placement.  I thought I was off to a good start, but after I started trying to shape the curve of the ribs, I had all kinds of trouble getting them to look right...I thought after awhile, I'd get a rhythm down, and they would start lookign better...I was wrong!  I think I made 12-15 ribs, and the profiles of most of them ended up glaringly different, and also the styrene wasn't sanding as cleanly as I'd hoped....these are the few that looked *almost passable*...but I still didn't want to use them...

In the interest of saving time and frustration, I spent the cash on premade sets, and now I can just get on with it!  They were a little over 2 bucks apiece, money well spent.

I'm currently attaching blocks to the yards of my SR, but once I get to assembling some parrels, I'll likely share pics of that stuff on both this thread, and my SR WIP.

Again, those who can make parrels from scratch have my salute (Kirill has done a great job with his!)...but for me, I just wasn't feeling the magic :)

Thanks for watching!

Dave

        _~
     _~ )_)_~
     )_))_))_)
     _!__!__!_         
     (_D_P_K_)
   ~~~~~~~~~~~~~
    ~~~~~~~~~~~

Current Project:  Imai/ERTL Spanish Galleon #2

Recently Finished: Revell 1/96 Cutty Sark

Next Up:  ???


  • Member since
    December 2002
  • From: Lyons Colorado, USA
Posted by Ray Marotta on Saturday, August 13, 2016 10:17 AM
A Craft Store will be your best source of material for parrels. They were simply wooden "beads" about the size of a closed fist. (3 or 4 inches or, 7.5 - 10CM) so, in 1/96th scale a little over 1/32nd of an inch. In smaller scales, you could "represent" the parrels with knots tied in a piece of thread. Their color would be natural wood. After doing the math for scale purposes, you can shift over to the TLAR method (That Looks About Right) to polish it up...

 ]


  • Member since
    September 2005
  • From: Groton, CT
Posted by warshipguy on Saturday, August 13, 2016 4:26 PM

David,

I like the Amati sets you purchased!  You made an excellent decision, especially given the level of detail and craftsmanship/artistry that you have strived for throughout your build!

Bill

  • Member since
    March 2012
  • From: Marysville, WA
Posted by David_K on Sunday, August 14, 2016 4:22 PM

Agreed, Bill!

The parts are good quality, and they will translate to scale pretty well; the parts I was making were going to be 10mm and 7mm for the ribs, compared to 10 and 6 for the Amati parts....if I were adhering strictly to scale, I would need several different sizes, but for me, it works just great!  (I like the *that looks about right* scale method!)

The parrel kits also each came with a length of rigging thread...it seems usable, but I may substitute my Syren mini rope for it...we'll see.

Anxious to make progress and see how the parrels work out, but Summer is of course a tough time of the year to carve out spare hobbying hours...nonetheless, I'll continue to make small advances as time allows.

DavidK

        _~
     _~ )_)_~
     )_))_))_)
     _!__!__!_         
     (_D_P_K_)
   ~~~~~~~~~~~~~
    ~~~~~~~~~~~

Current Project:  Imai/ERTL Spanish Galleon #2

Recently Finished: Revell 1/96 Cutty Sark

Next Up:  ???


  • Member since
    March 2012
  • From: Marysville, WA
Posted by David_K on Thursday, August 25, 2016 5:32 PM

Quick update:  I haven't had much luck in figuring out a good, repeatable way to install a parrel onto a yard/mast yet.  I've tried several times, and I keep ending up with it looking really messy, or being out of alignment...it's frustrating.

Despite all the pictures and advice from the member here (which has been very helpful!) I'm still struggling.

I plan to meet with the members of the local ship modeling group Puget Sound Ship Modelers at the next meeting and see if anyone can give me a live demonstration of how they do it....it seems to be one of those common applications wherein seeing it done must be way easier than just reading about it!

So I'm pretty much at a standstill for now.

Dave

        _~
     _~ )_)_~
     )_))_))_)
     _!__!__!_         
     (_D_P_K_)
   ~~~~~~~~~~~~~
    ~~~~~~~~~~~

Current Project:  Imai/ERTL Spanish Galleon #2

Recently Finished: Revell 1/96 Cutty Sark

Next Up:  ???


  • Member since
    March 2012
  • From: Marysville, WA
Posted by David_K on Saturday, October 1, 2016 2:52 PM

At last!

I've gotten a method for making and installing parrels that I like, and I've been making progress in the sail/yard/running rigging of my current model ship, Heller's Soleil Royal.

I've only gotten the bowsprit rigging in progress right now, so the only parrel installed yet is the Sprit Topmast Yard Parrel.  Being among the smallest of the yards, the parrel parts are a bit oversized for scale, but bear with me :) 

Here's a few photos of how I preassembled my Parrels:

First I took two lengths of line, and tied them together, sort of like an X

Then I threaded on the trucks and ribs (I used a mock-up of ribs and trucks for each mast to predetermine the number of each needed for all parrels)

Then I tied the line again on the other end of the parrel parts, making them more or less fixed in place so they can't slide all over the place (Note: It's important to keep the knots on either end of the assembly at a specific distance from the parts; they need to be held in place, but need to be flexible, and also the knots have to be close enough to the parts so that they can still be drawn up closely to the yard when it's fastened so the parrels will not be too slack)  Here's the basic finished product for the sprit topmast yard

Then I went through and preassembled all of them for all yards that need a parrel (sprit yard and crossjack yard only required a basic sling, so I needed 9 parrels total)

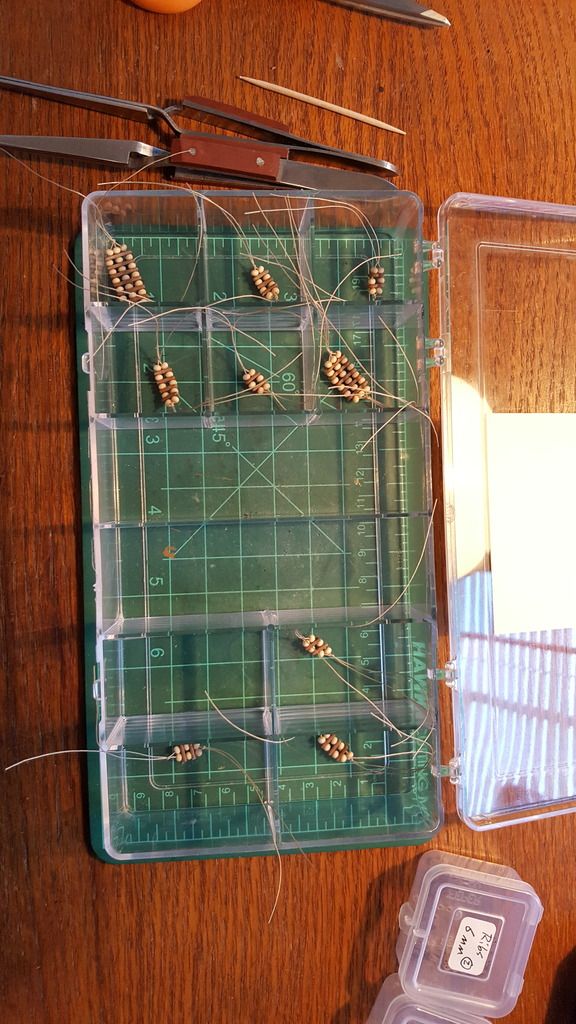
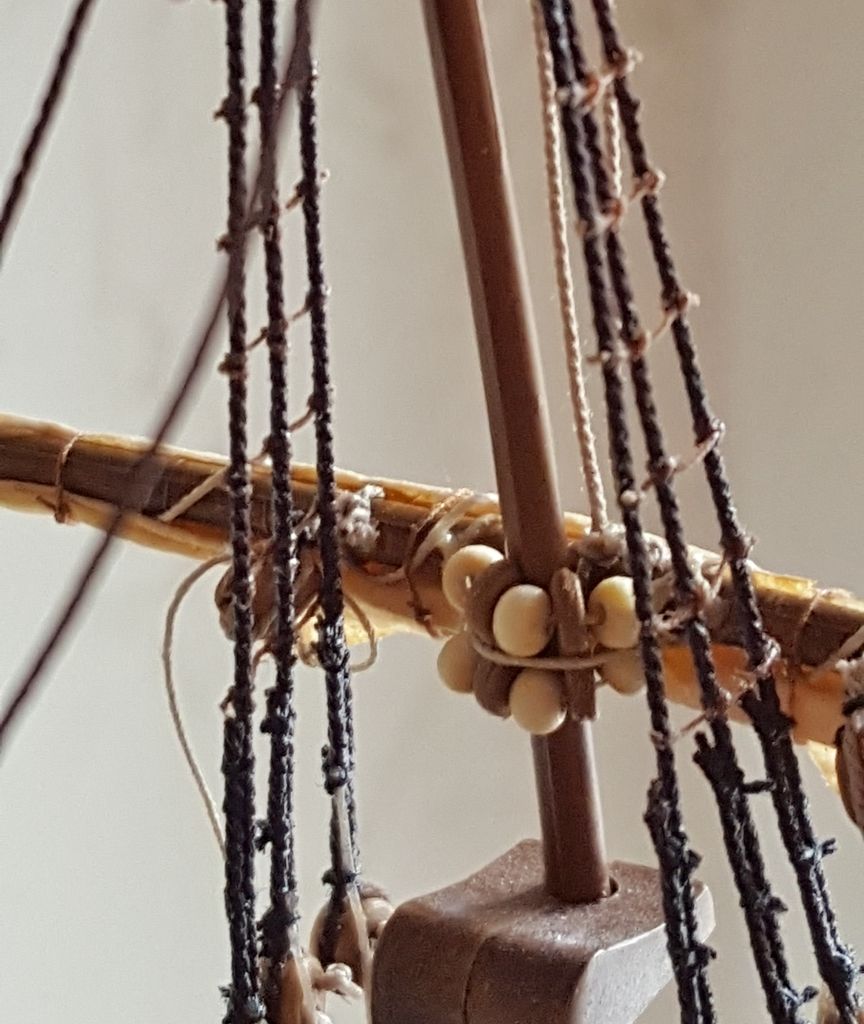
Here's a shot of the first installed parrel...installation is a little messy, and requires patience and fine-tuned long-tweezer skills!  Just before moving the yard into place I used a needle threader to pull one free end of one side of the line between the yard and the furled sail.  I then loosely tied that end to the other free end of that same side of the parrel, and drew the lines so that the knot was taken up behind the yard, and more or less hidden by the sail.  Note:  I do not cut off the loose trailing ends of the parrel lines at this time, some of them will be used to cross over the grooves in the parrel ribs in the final step!  For a 1-groove rib, I need one line left long on either side...for a 2-groove rib parrel, I will keep all four lines long so I can cross over both grooves and then tie them to each other...so it's worth mentioning that during initial preassembly of the parrels, make sure to leave a few inches of extra line trailing from both ends of the parrel, for use later!

Then I got the yard in place by attaching the halyard lines temporarily and, once the yard was in its proper location (lowered close to the cap, since the sails are furled!) I then drew one line of the remaining side of the parrel around the yard, using a needle threader as before.  Then I tied the over-and-under ends of that side of the parrel (again, same as the first side) until I had them evenly tensioned and holding fast.  That was the trickiest part.  Tying the first side of the parrel onto the yard is pretty easy, it can be done with the yard off the model, but once it's in place, I had to contend with mast, yard, standing rigging, etc., and try to gently get the lines tied.  It took a few minutes, but it worked out prety good.

Finally, I trimmed two loose ends of the parrel lines, but I left two long (one from each side).  I took one long end left from the first knot that holds the parrel to the yard, and drew it across the groove in the ribs over to the other side, and tied them together.  Then I applied a couple small drops of Elmer's to the parrel/yard knots, and trimmed the ends.

So there you go...that is how I decided to tackle (so to speak) parrels...

Hopefully this post isn't too complicated to understand....I tired to be clear, and I think it should be helpful to anyone who may wish to use all or part of this technique when discovering their first atempt with Parrels!  lol

I may post more pics and updates on this thread later, especially if I find anything of further instructional value as I continue on to more yards.

Thanks!

Dave


        _~
     _~ )_)_~
     )_))_))_)
     _!__!__!_         
     (_D_P_K_)
   ~~~~~~~~~~~~~
    ~~~~~~~~~~~

Current Project:  Imai/ERTL Spanish Galleon #2

Recently Finished: Revell 1/96 Cutty Sark

Next Up:  ???


JOIN OUR COMMUNITY!

Our community is FREE to join. To participate you must either login or register for an account.

SEARCH FORUMS
FREE NEWSLETTER
By signing up you may also receive reader surveys and occasional special offers. We do not sell, rent or trade our email lists. View our Privacy Policy.