SEARCH FINESCALE.COM

Enter keywords or a search phrase below:

Lindberg 1/95 Nantucket Lightship FINAL?? 6-03

45566 views
67 replies
1 rating 2 rating 3 rating 4 rating 5 rating
  • Member since
    January 2008
  • From: Chicago
Lindberg 1/95 Nantucket Lightship FINAL?? 6-03
Posted by DerOberst on Wednesday, April 8, 2009 1:54 PM

Folks,

As a child I remember seeing the Nantucket Lightship during my travels in that area.  So when I saw the kit in the LHS, I took it home.

I am in the process of building it.  Things are going smoothly, if a bit slowly.

My editorial comments to date are as follows:

The directions are a bit vague.  It takes some guess work and references to figure out where some of the stuff goes.

The plastic is very soft.  This is good, however, since there is a fair amount of flash and ejector marks.

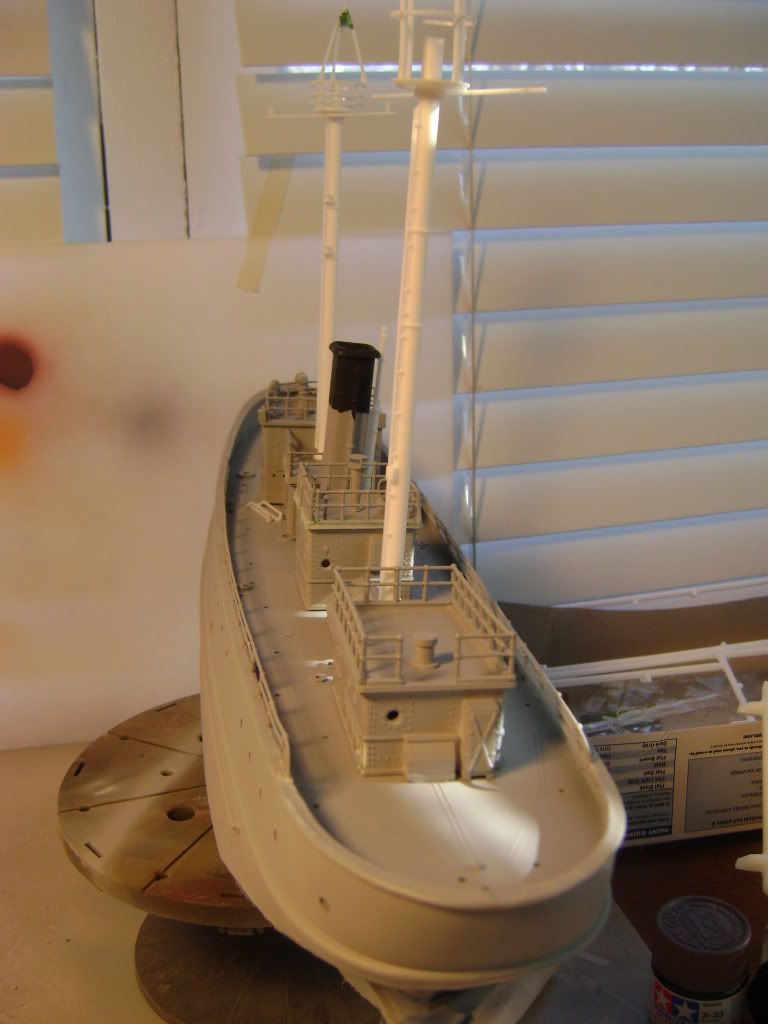
The pictures show WIP.  The grey is primer, which is helping me find gaps, etc.   The hull is painted Hull Red and taped off.

Some of the parts are warped or otherwise need remediation prior to installation.

The kit was missing the decals.  And this was an issue because masking and painting

"N A N T U C K E T" on the side would have been a pain.   But a quick call to Lindberg and I have replacement decals in hand within 48 hours.  Bravo!

I have been somewhat deliberate in the assembly.  And none of the major assemblies you see are glued down.
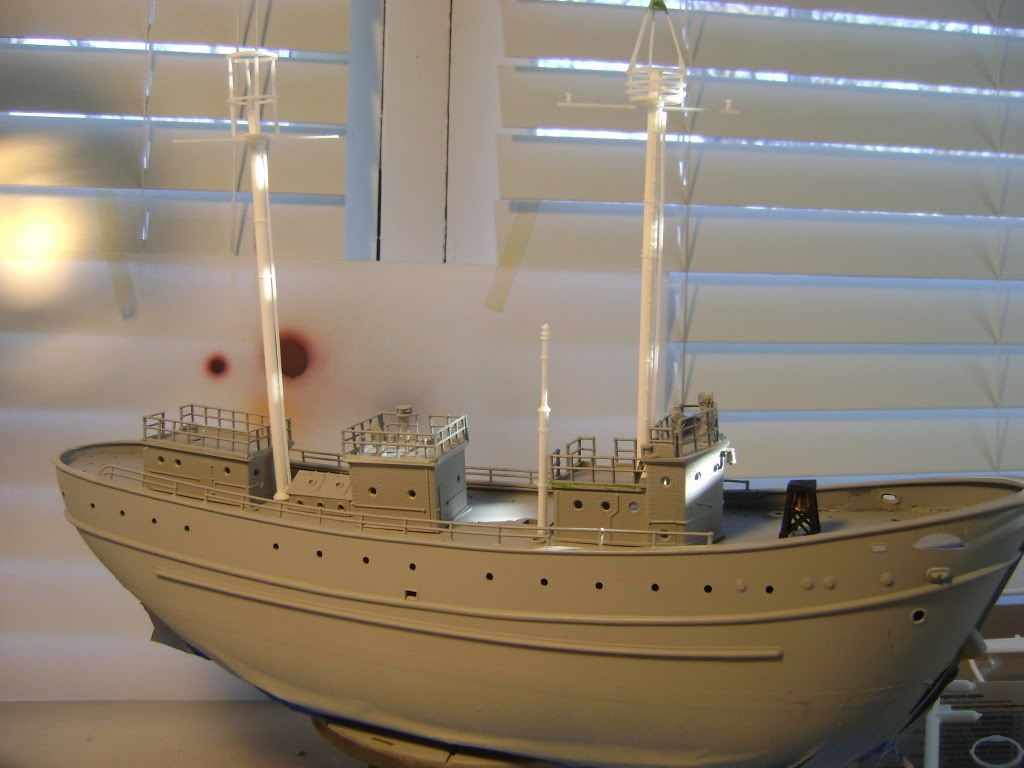
  

The next steps are painting the deck, painting the hull, then assembling the major components. 

Here are my questions:  

 1.  Does anyone know where I can get some PE ladders in 1/95.  These ones are a bit clunky.

2.  Any tips on the rigging?  It comes with black thread.  I have never done a ship with rigging.  Words of wisdom here?

3.  The directions call for a grey deck.  I want to show some wear patterns where the crew would walk.  Suggestions on this?  Airbrush them in?  Just use weathering pigments??


Enjoy, and I will post more pictures as I make progress.   Comments and suggestions welcome.

  • Member since
    May 2006
Posted by thunder1 on Thursday, April 9, 2009 10:02 AM

 Howdy

  First off, keep in mind this model made its first appearence in 1955 as a PYRO kit. Lifelike and now Lindberg offer it but never upgraded or improved upon the Pyro molds. Wait, I take that back, I have an original kit, the letters on the hull were raised, the builder, if steady handed, could paint "NANTUCKET" on the hull. For some reason the raised letters disappeared from the molding process by 1968.  As this kit dates to the 1950's,  your model presents the LV(light vessel) in it's 1950's guise. Since you are taking a good deal of time to build this kit, consider the following. The single biggest screw up most folk make is the paint job. The ship went through many paint scheme changes over it's long life. When built(1930's), the LV sported a red hull, red lifeboats, red davits, red masts, black ventalator funnels, black smoke stack, black fog horn, no railings on the roof of the radio shack or fog signal compartment. And NO RADAR! There were white painted railings atop the pilot house. When the Coast Guard absorbed the Lighthouse Service the masts, ventalators, davits and deck gear(bitts, chocks, capstan) were painted "spar", and lifeboats painted white. The CG also placed safety railings on the radio and fog signal houses as well as pipework on the fantail for the placing of awnings in hot weather. Radar appeared after WWII. In the 1960's the CG removed the ventalator funnels, cut down the smoke stack, removed the fog bell on the bow and upgraded the radio, radar, and radio beacon.  I'm not sure if the directions show the radio beacon antenna, they consist of four wires(seperated by wire spreader rings) stretched between masts. A lot of info I know, but you appear to going the extra mile on this kit. Just pick a time period and adjust accordingly.Big Smile [:D]

As to your specific questions: there are a number of folk who have commented on ship rigging on this site. Go to search and type in ship rigging, I'm sure something will turn up. Just make sure you use NYLON not COTTON thread. So many beautiful models get ruined by cotton thread with its "fuzzy" look. Some builders use fishing line or even stretch sprue. The ladders are clunky, try to find a hobby shop that deals with HO train aftermarket supplies. They have a wide assortment of PE and metal ladders, and the scale is close. You could even construct them from Evergreen plastic strips and rods. And unless you plan to "WEATHER" the entire ship, having just the decks "worn and weathered" would appear, IMHO, kind of silly. Keep in mind, on station the crew had little to do but scrape and paint the ship to keep busy, the weather decks on the Nantucket were pristine.  By the way "SPAR" paint can be purchased from Snyder and Short, the paint guys. Don't make the mistake of painting the "Spar" items on the model with tan, yellow, mustard, or some other awful color, "Spar" is almost impossible to duplicate. Even rail road "buff" is wrong. And that makes most Light Vessel models look in-accurate.

Good Luck on your project

Mike M.


  • Member since
    January 2008
  • From: Chicago
Posted by DerOberst on Thursday, April 9, 2009 4:05 PM

Mike,

Thanks for the input.

I have ordered the SPAR paint and it is already on it's way.  Great tip.

I have not picked an exact year for the model, but I have ordered some 48-star cloth flags, so I guess that limits me to pre-60's.

I am also looking at some PE watertight doors.  There is one door that is molded open, but the mold is pretty weak.  I might grind that off and put the PE on there.

There is no radar nor 4-wire radio beacon indicated.  There are cross-beams on the masts with notches on them, so presumably they go there.

I will post more as I go, and again, excellent help!!!

I am in your debt.  


  • Member since
    March 2007
  • From: Carmel, CA
Posted by bondoman on Thursday, April 9, 2009 4:43 PM
 thunder1 wrote:

 Keep in mind, on station the crew had little to do but scrape and paint the ship to keep busy, the weather decks on the Nantucket were pristine.

And make baskets.

  • Member since
    March 2007
  • From: NJ
Posted by JMart on Thursday, April 9, 2009 4:44 PM

aber makes railins & ladders at 1:100 scale, probably close enough!

http://www.greatmodels.com/~smartcart/cgi/display.cgi?item_num=AB10003

look forward to the build


  • Member since
    August 2008
Posted by tankerbuilder on Friday, April 10, 2009 12:35 PM
HI ! the kit is the old REFINED PYRO as LINDBERG released it . I usedEVERGREEN plastic to detail it and CORNERSTONE h.o. rails and ladders on it .  The ship had an unknown sister off of dogger bank (SCOTLAND I believe ) That ship was run down and sunk . Colors were similar but I don,t know what her name was .
  • Member since
    March 2007
  • From: Carmel, CA
Posted by bondoman on Friday, April 10, 2009 2:06 PM
Oh, now I want one too! Father's day wishlist. A successor to this one was run down and sunk by the Olympic.
  • Member since
    January 2008
  • From: Chicago
Posted by DerOberst on Friday, April 10, 2009 3:50 PM

Ok, guys, here is what I have learned:

Lightship 112 LV-112 at World Financial Center Main article: Nantucket Lightship LV112

In 1936, Pusey & Jones of Wilmington, Delaware built Lightship 112, the largest lightship ever, for $300,956.00. This ship was paid for by the British government as reparation for the deadly collision between Olympic and Lightship 117.[2]

During WWII, Lightship 112 was withdrawn from the Nantucket Shoals station and used as an examination vessel in Portland, Maine. On January 5, 1959 she was blown 80 miles off station in hurricane force winds accompanied by fifty-foot seas. This event effectively put her out of communication for several days due to water-damaged electronics. Lightship 112 outlasted all other lightships assigned to that station, having marked it for 39 years.

This site give the complete history:

http://www.fcgh.org/index.php?option=com_content&task=view&id=144&Itemid=26

Here is the sister ship Chesapeake. She has not been modified as much as Nantucket, and appears closer to what I am trying to build:

And here are the Radio beacon wires that were mentioned above:

Lord help me if I try to model those!!


  • Member since
    March 2007
  • From: Carmel, CA
Posted by bondoman on Friday, April 10, 2009 4:07 PM
That's cool, however the Lindberg model is I believe of LV 85, built in 1907. LV 112 followed quite a bit later.
  • Member since
    January 2008
  • From: Chicago
Posted by DerOberst on Friday, April 10, 2009 5:01 PM

Bondo,

I am just learning here, but I am pretty sure the model is of LV112.

According to Lightship Sailors Org:

http://www.uscglightshipsailors.org/nantucket_lightship_station_history.htm

1896-1907: LV-66

1907-1923: LV-85 / WAL-510

1923-1931: LV-106 / WAL-528

1931-1934: LV-117

1934-1936: LV-106 / WAL-528

1936-1942 LV-112 / WAL-534

1942-1945: marked by a buoy during World War II

1945-1958: LV-112 / WAL-534

1958-1960: WLV-196

1960-1975: LV-112 / WAL-534

According to Wikipedia;

Lightship 85

Lightship 85, a wooden lightship, was built in 1907 at Camden, NJ for $99,000.00. Lightship 85 was transferred to the U.S. Navy by Executive Order on April 11, 1917, along with the entire Lighthouse Service. While in the Navy during World War I she continued her former peacetime routine warning shipping away from Nantucket Shoals and also aided in guarding nearby waters against German U-boats. Sailors from the Lightship aided in the rescue of people after the Boston Molasses Disaster, partly because it was docked nearby. After peace was restored in 1919, Lightship 85 was returned to the U.S. Commerce Department. Lightship 85 was placed in relief service following replacement by Lightship 106 in 1923.

So the model has rivets and the box art work looks like the picture of 112 below:

Plus... as I fish through the parts I find that the RADAR parts are included, although the directions do not call for them.

So I am sticking with the plan to model her as she appeared post-WWII and pre-refit.

Coast Guard colors, 48 star flag, radar(!) and SPAR paint!


  • Member since
    March 2007
  • From: Carmel, CA
Posted by bondoman on Friday, April 10, 2009 5:26 PM
Well you may well be correct, I can only find one reference that it was the 1907 ship, and I don't have the kit in front of me (yet), so I'm with you.
  • Member since
    November 2003
Posted by steve14 on Friday, April 10, 2009 7:00 PM

I have built this kit and it is not the 1907 ship.  It is the later one prior to her modernization when her stack was cut down (when I believe she was reengined with a diessel). 

The problem with trying to identify lightships is that they were not assigned names, only numbers.  The name on the side of a lightship was actually name of the station where she was assigned.  A specific lightship could have served on several different stations during her career and would have carried the different station names on her hull, even though she was the same vessel.  Similarily a specific station would have had different lightships assigned over the course of time, and each would have worn the same station name when they were there.

Especially difficult to identify are the 'Relief' lightships that would take a station if the normally assigned vessel was away for some reason, but had not been permanently reassigned (ie yard work, etc.)  A district would have several lightships carrying the 'Relief' name, and they could have served on any of the stations within the district.

Steve 


  • Member since
    May 2006
Posted by thunder1 on Friday, April 10, 2009 7:28 PM

DerOberst

 Yes, you are correct, the Lindberg kit is the LV 112. Bear in mind that PYRO(/Lindberg) choose  the #112 for its historic aspect. Consider; it was the largest American Light Vessel built (149 feet in length, 915 tons) and was the most exposed lightship station in the world(65 miles south of Nantucket Island in the New York approach traffic lane). We used to say the first thing immigrants saw coming to America wasn't the Statue of Liberty, it was the NANTUCKET light vessel. While the other lightships served on different stations during their career, the #112 only served on one station, the Nantucket shoals.  Another thing that made the #112 interesting is that is was funded by Great Britian. The White Star liner OLYMPIC(sister ship of RMS TITANIC) rammed and sunk the lightship 117 in May 1934, killing 7 of the LV crew. In compensation, the British govenment paid for the construction of the LV 112.

If you find the naming and numbers of the lightships confusing think of them this way. When built, each light vessel was assigned a hull number for life. While that particular numbered vessel might be assigned a certain station with the name of that statiom painted on the hull, it was still known by its "assigned" hull number. There were 112 lightship stations in the United States; lightships could be transferred from coast to coast, changing their station name, but never the assigned hull number.

The photo you posted bears out the early paint scheme of #112. 

regards,

Mike M. 

  • Member since
    January 2008
  • From: Chicago
Posted by DerOberst on Friday, April 10, 2009 10:56 PM

Many thanks, again, Mike!

I have settled on the 1950's version, and I need some opinions:

Deck is grey; hull is red, superstructures are white.

Gear, masts, funnel and such are SPAR.

But what about the ventilators?  They were black in the pre-coast guard version, 'steel' in the kit directions, and some variants of "steel and spar", "spar and white", or white in the various source pictures.  And what of the interior color? Again, 'red' in the kit and most of the pictures, and I am not sure what to do!

Thanks for the input! 

And a WIP update:

Below all the tape is a German Grey waterline, Hull red below the line. Then we have Tamiya Flat Red airbrushed on. I elected to have the rails remain deck grey.   


I will do a big reveal when the paint is dry.  


  • Member since
    March 2007
  • From: Carmel, CA
Posted by bondoman on Friday, April 10, 2009 11:31 PM

This is a nice thread that'll generate a good amount of knowledge. Here's my subject, whether or not the Lindberg kit is useful, and I hope it is, because I'll build it.

  • Member since
    January 2008
  • From: Chicago
Posted by DerOberst on Friday, April 10, 2009 11:38 PM

Here is another shot of the San Francisco for you...

http://www.eastwindpublishing.com/gallery/sanfran.html 


  • Member since
    March 2007
  • From: Carmel, CA
Posted by bondoman on Saturday, April 11, 2009 1:46 AM

Thanks for that. That's the great thing about this forum; we all share knowledge and build better models. I'm very interested in a LV build. My family goes back 16 generations to Nantucket, but it's through marriage, so I don't pretend to come from the island. I have been there a number of times however and my dad owns a place there, and I've been to the museum while researching the whale ship mutiny. My last name is Comstock. Family is Macy.

I'm in for a Lindberg build, and if San Francisco is a player, so much the better. She was removed after Pearl Harbor as she would have been a beacon for invaders.

I built the Frog/Novo Trinity "South Goodwin" LV some years ago. I believe that's the sister, among many of the one that sank at Dogger Bank. Which is between England and Denmark.

  • Member since
    May 2006
Posted by thunder1 on Saturday, April 11, 2009 9:31 AM

DerOberst

According to the Paint and Coatings manual for the Light House Board, the inside of the black painted ventilator funnels, they are to be painted Vermillion. Vermillion is also called Chinese Red in some circles, I would put forth the idea a red/orange(more red than orange) paint for the funnel insides. According to the Coast Guard Paint and Coatings manual for 1940, all funnel ventilators are to be painted Spar. As for the smoke stack; "Smoke bands for cutters shall have an overall width(depth from top of hood) equal to 1/2 the fore and aft dimension of the stack". Please keep in mind these painting directives were often interpeted by the Coast Guard Lightship skippers. For example, many CG cutters paint exterior verticle ladders black, and the area(superstructure) behind the ladder black also. This is to keep the black marks associated with crewman's boots scuffing up white paint on the bulkhead. BUT...there is no such directive in the Paint and Coatings manual to justify this, it only reads "verticle ladders to be painted black". As the Nantucket only put into port for yearly dockside maintainence, few people at Headquarters ever saw the ship, it truly was an isolated station, more so than the "average" lightship say Boston or Portland or San Francisco. Speaking of which, the SF light vessel was a different lightship than the Nantucket. It was smaller and had a different layout topside, compare the two. That doesn't mean one can't "kit bash" the Lindberg Model, it just won't be super accurate. But ship modeling should be as enjoyable as it is accurate, a little kitbashing would be OK if one is not a "rivet counter". But the way I'd disregard the kit painting instructions, most are way off base, I recall Revell instructing builders of the USS Missouri to paint the gun barrels silver, what the heck was that all about??

By the way, to the poster that remaked lightship crews made baskets, I never did, I used to build Lyle guns in the machine shop in my off duty time. And with a little black powder, the guns fired nuts and bolts nicely. That is until the skipper almost ran into one.

Regards

Mike         

  • Member since
    January 2008
  • From: Chicago
Posted by DerOberst on Saturday, April 11, 2009 8:33 PM

Ok, things are progressing.

But unfortunately I left the anchors exposed to some salt water and mud.


  • Member since
    May 2003
  • From: Greenville, NC
Posted by jtilley on Sunday, April 12, 2009 1:36 AM
This most interesting and learned discussion reminded me of another thread, which I finally managed to find after some searching:  /forums/1063604/ShowPost.aspx .  Looks like we're seeing another excellent model based on that old Lindberg/Pyro kit in progress.

Youth, talent, hard work, and enthusiasm are no match for old age and treachery.

  • Member since
    January 2008
  • From: Chicago
Posted by DerOberst on Sunday, April 12, 2009 8:38 AM

Oh, sure, Tilley.  Go find and old thread that is designed to make me feel supremely inadequate!

Scratch built rain coats?? Puhleeease!

That is really nice work that he did. I like the open hatches. 

And I noticed that he filled in the portholes. Which is something I had not thought about.

And so I appeal again: should I leave the portholes as open holes or fill them in with some clear stuff?  And when in the process?  As you can see, I am well into the painting, etc.


  • Member since
    May 2003
  • From: Greenville, NC
Posted by jtilley on Sunday, April 12, 2009 10:45 AM

Several products on the market are designed for making clear windows and portholes on models.  Testor's makes one; I think it's called "Window Maker and Clear Parts Cement," or something like that.  [Later edit:  here's a link:  http://www.testors.com/product/136938/8876C/_/Clear_Parts_Cement_Window_Maker .]  Microscale, the decal manufacturer, makes another; it's called Micro Crystal-Clear."  [Later edit:  here's a link:  http://www.microscale.com/Merchant2/merchant.mvc?Screen=PROD&Product_Code=MI-9&Category_Code=FINPROD&Product_Count=3 .]  Both of them are thick, white liquids that, when wet, look remarkably like Elmer's glue.  (In fact I think that may, in essence, be what they are.)  Put a drop of this stuff in the opening and let it dry.  It'll stretch a gap of a quarter of an inch or thereabouts.  When it's dry, give it a coat of some clear gloss - but nothing water-soluble.  (Poly-Scale clear gloss, for instance, will soften it up and you'll have to start over.  Don't ask me how I found that out.)  It isn't a perfect solution; the surface of the "port" will be slightly concave.  But if you aren't trying to show off what's inside it, it probably will be satisfactory.

The best time to apply any of those liquid products is as late as possible - maybe as the last stage before you pronounce the model finished. 

I really like the lightship model in that other thread.  As I said in that thread, it's got about as much genuine character as any model I've ever seen.  But it looks to me like DerOberst is well on the way to building a model of the same standard.  I'll be really interested in watching its progress. 

Youth, talent, hard work, and enthusiasm are no match for old age and treachery.

  • Member since
    January 2008
  • From: Chicago
Posted by DerOberst on Monday, April 13, 2009 6:08 AM

Here is a quick WIP update before the week begins.  I am waiting for the SPAR paint and the PE Ladders, etc, so progress will be limited for a few days~


Comments and suggestions welcome!

  • Member since
    June 2008
Posted by Spotty on Monday, April 13, 2009 11:07 AM

What a great "fun" little boat.

LOVE the red!

  • Member since
    January 2008
  • From: Chicago
Posted by DerOberst on Sunday, April 19, 2009 7:45 PM

Folks,

Here is a quick update.  After a short delay, the PE has arrived.  The ladders and valves from Masterpieces in Minature http://www.minmbox387.com/index.html#Contents are excellent.

Here are some updated WIP pictures.  Again, the major assemblies are not glued down.

Some of the PE is not yet painted, but the ladders on the masts and the funnel have a coat of SPAR airbrushed on.  

And worse than that, I seem to have lost a few pieces!  Scouring the workshop looing for them!!

Enjoy!


  • Member since
    January 2008
  • From: Chicago
Posted by DerOberst on Sunday, May 10, 2009 10:41 AM

Greetings,

I am posting some updated WIP pictures.   The deckhouses and masts are not secured, and I am working on all the smaller details.   Items added (or to be added!) include:

Photo etch stairs and ladders

Hoses and reels

Oars

The pictures wash out some of the details, and much is still to be done, enjoy!


  • Member since
    January 2006
Posted by EPinniger on Monday, May 11, 2009 2:42 PM

You're doing a great job on this model! Thumbs Up [tup] This isn't a kit you often see built and you're definitely doing it justice. (The PE details really add to the model, too). What technique did you use to produce the rust effect on the anchors?

I built Frog's kit of the British "South Goodwin" lightship (in about the same scale) earlier this year (http://www.shipmodels.info/mws_forum/viewtopic.php?f=60&t=39427). I've now bought the Lindberg Nantucket lightship too (most of the Lindberg reissues are now available here in the UK) and plan to build it in a year or so. 

  • Member since
    May 2009
Posted by hazegry on Monday, May 11, 2009 4:17 PM
this is great I love light ships. I have a question though do you think this would be ale to adaptable to RC? if so I am going to have to look into it. you have done a great job its gonna look super!
  • Member since
    March 2007
  • From: Carmel, CA
Posted by bondoman on Monday, May 11, 2009 7:41 PM
 hazegry wrote:
this is great I love light ships. I have a question though do you think this would be ale to adaptable to RC?
But they never move!!! LOL yes I like this model too.
  • Member since
    January 2008
  • From: Chicago
Posted by DerOberst on Monday, May 11, 2009 10:55 PM
 EPinniger wrote:

 What technique did you use to produce the rust effect on the anchors?

The rust effect is Rustall.  Great stuff I learned to use making PzKfw exhausts look rusty!  (the Nantucket is my first ship model in 35 years..)

I painted the anchors red, then dry brushed a few steel spots. Then I used the Rustall Rust and black.  After a few coats I added some baking soda to give the rough surface effect.  There is also some work on the anchor chain, which is a re-purposed section of a 1/35 scale tow chain from a sherman tank.

There is also a bit of rust on places the anchors would touch, etc.


JOIN OUR COMMUNITY!

Our community is FREE to join. To participate you must either login or register for an account.

SEARCH FORUMS
FREE NEWSLETTER
By signing up you may also receive reader surveys and occasional special offers. We do not sell, rent or trade our email lists. View our Privacy Policy.