SEARCH FINESCALE.COM

Enter keywords or a search phrase below:

Rigging a 72 scale U-boat

13572 views
18 replies
1 rating 2 rating 3 rating 4 rating 5 rating
  • Member since
    September 2010
Rigging a 72 scale U-boat
Posted by modelnut on Saturday, October 23, 2010 12:26 PM

Guys!

I just bought a half-finished 72 scale u-boat off of eBay. There is railing that is busted and gone. The periscopes and masts need work. The seller removed them before packaging --- I'm not so sure they wanted to be removed . . .  Tongue Tied  And the Y-thingy that is part of the forward rigging is missing. So is the thread included in the kit for rigging.

So I need advice about making the rigging from scratch. I have two gauges of floral wire that I am almost certain are not thin enough. And I have some mono-filament fishing line. What do I do next?  :shock:

I need to make a string of insulators and other fiddly stuff but I ain't never done anything like this before. Can you help me out???

- Leelan

  • Member since
    December 2002
  • From: Lyons Colorado, USA
Posted by Ray Marotta on Saturday, October 23, 2010 7:51 PM

Leelan,

Rather than mono-filament fishing line I would recommend "invisible thread" which is available

at fabric/sewing/craft shops.  A 150 yard spool is less than $2.00.  Dragging it across the tip of

a Sharpie will make it visible.  For insulators I'd recommend small beads.  In 1/72nd scale, a 1/32nd inch

diameter bead is equal to 2 1/4 inches.  Tiny drops of white glue will also work.

As for missing parts, there is plenty of aftermarket stuff available.  For a little bit more fun, wander around

a hardware store.  You'll be amazed at all the stuff that is useful for modelers...

Good Luck, Good Hunting and Welcome to the forum...Lots of good helpful folks here!

Ray

 ]


  • Member since
    January 2009
  • From: Central CA
Posted by Division 6 on Saturday, October 23, 2010 11:00 PM

You may find some useful information in this build.

  • Member since
    March 2010
Posted by Bocks Suv on Tuesday, October 26, 2010 12:16 PM

That Y piece broke on my kit, and since I didnt trust it to hold any tension, I ran my antenna wire up and thru it to the "sail"   then attached a seperate wire to the left arm of the Y.  You can improve the kit's Y's and insulators with bent wire and some blobs of glue. The railings are trickier since soldering can be a REAL pain. Head to a hobby or train shop and go thru their plastic stock section.  THe periscopes can be made with slowly stretched thicker sprue or wood dowels.  BTW, for the antenna wire I used 1/32 black elastic thread from a craft stores's bead section.  Shiney, thin and you dont have to worry about pulling thread while tying it.  BUt the invisible thread also suggested might be more to scale, and easy to shop for.  I always keep an eye out for weird build supplies when I go to a new store. Youre bound to find something eventually useful.

  • Member since
    March 2005
  • From: West Virginia, USA
Posted by mfsob on Tuesday, October 26, 2010 3:25 PM

Beading wire from the craft section is another possible alternative for railings in that scale.

TRM
  • Member since
    May 2010
  • From: Massachusetts
Posted by TRM on Tuesday, October 26, 2010 4:21 PM

Hi Leelan,

I new to the U-boat modeling game and I myself am still getting up to speed on all the details, but have done some rigging before...with that said,   I would say really thin gauge copper, somewhere in the 24 to 26 gauge range, try even 28.  Take three or four strands, put the ends in a variable speed drill on one end and clamp them on the other end in a vice or with vice grips to your work surface.  Try to keep the clamped side slightly separated, about an 1 in. (25.4 mm) apart in this configuration:
                                                           X
                                                     
                                                      X        X
 
                                                           X

Slowly turn the drill on keeping the wire fairly tight.  The wire will begin to wind up and appear in the cable fashion.  You could experiment with the end of a pencil where all the threads of wire come together as you wind.  By sticking the eraser end in to fan out the wire slightly allows the wire to lay more concentric around itself.  Google "Rope-walk".  There are small jigs you can actually make, with scrap plywood and/or pine in about 1/2 hour to an hour and create some nice cable.   Along with coils of rope for the deck and rope for flags.

Note :  Use nothing more than 12" (30.48cm)  The longer you go, the more chances of it breaking. Play around with it,  Don't go too fast.

All said, you may even be able to use "Stranded" wire and just tighten the wire a little so it doesn't become un-stranded when forming it to your desired shapes.

Hope some of this helps.  Good Luck!

Cheers!

Regards,

T


In Flanders fields the poppies grow
Between the crosses, row on row,
That mark our place, and in the sky,
The larks, still bravely singing, fly,
Scarce heard amid the guns below.

~John McCrae

  • Member since
    September 2010
Posted by modelnut on Wednesday, October 27, 2010 7:16 AM

I bought some 32-gauge wire, and some braided wire at Michael's. I am not sure which will be best to use.I also purchased their smallest beads, seed beads which are more 1/8th inch than 1/32nd I think.

I don't have a variable speed drill, more's the pity. If I twist my own cable I will be using gravity and locking pliers.

I wonder if I can cut four grooves in each bead consistently enough to simulate what is happening on SubSim?

I don't know. I have never tried.

I plan on using floral wire to replace the top hand-rail around the conning tower. It should do the trick.

(Geez, lots of "I's" in this post.)

In the meantime, for some inspiration, I have rented Das Boot : The Director's Cut. Maybe I will get a good look at some real rigging before I start making it for the kit.

- Leelan

  • Member since
    March 2005
  • From: West Virginia, USA
Posted by mfsob on Wednesday, October 27, 2010 8:56 AM

modelnut - it's how we all learn!

TRM
  • Member since
    May 2010
  • From: Massachusetts
Posted by TRM on Wednesday, October 27, 2010 5:06 PM

Leelan,

 You should be able to cut the groove in the beads to get the appropriate concentric design. Should be 4 notches.  A small jeweler's file would work nicely.  I have seen them made out of Sculpy Clay as well.  mold it to any shape and you bake it at 225 for about 10 -15 minutes and it hardens up but can be sanded or filed and is paintable (Micheal's or AC Moore).  Comes in colors too, no painting!  I believe the insulators in question were green, or have a greenish color.

The wires - I got plans of google for a rope walk and made the handle from a wire coat hanger.  This would solve the rotary issue.  An old lamp cord stripped, would work well.

You can see in the last pic what I mean about the 4 notches....


Regards,

T


In Flanders fields the poppies grow
Between the crosses, row on row,
That mark our place, and in the sky,
The larks, still bravely singing, fly,
Scarce heard amid the guns below.

~John McCrae

  • Member since
    July 2005
Posted by caramonraistlin on Thursday, October 28, 2010 7:37 AM

Greetings:

Couldn't you use some of the wooden blocks that are used in the various wooden ship models such as the ones sold by Model Expo? They come in all sizes and shapes and even have groves running along their sides. Some are very similar in shape.

Michael Lacey

  • Member since
    January 2009
  • From: Central CA
Posted by Division 6 on Thursday, October 28, 2010 1:37 PM

There are a couple nice close ups of the blocks here The look to be ceramic of glass.

Lot's of detail pix can be found looking for U-995 / Laboe.

  • Member since
    September 2010
Posted by modelnut on Thursday, October 28, 2010 3:28 PM

But what size are these blocks? As bid as a man's head? As big as two hands fisted on top of one another? Or maybe the size of one fist?

At 72 scale the beads I have would be roughly 9 inches in diameter. Is that about right or too big?

I watched Das Boot yesterday and saw that the rigging cable is very thin. Maybe too thin to simulate using braided 32-gauge wire.

- Leelan

  • Member since
    September 2010
Posted by modelnut on Thursday, October 28, 2010 6:19 PM

Here is the U-995, a U-boat of the version VII-C/41:

The conning tower is different but the rigging is almost the same.

- Leelan


TRM
  • Member since
    May 2010
  • From: Massachusetts
Posted by TRM on Thursday, October 28, 2010 7:35 PM

Leelan,


The wooden blocks are a great idea!  I would venture to say, 3/16" single.  Even better go a little bigger, you can sand then down. 

I am leery of comparing some things off the U-995.  She has a tremendous amount of retro-fit items added after the war and after her final placement. If you want to try to stay to VII C accuracy, you may want to consider looking around    

http://amp.rokket.biz/

I have been working on mine for about 7 months now.  Still working on the hull framing.  adding vents and such.  There is a superb .pdf by the creators of the site.  Covers everything about pretty much all U-boats including proper colors, rigging, vent placement, etc. 


There is a lot of great actual footage at U-boat.net as well.  Post a couple of pics too as well.  I would like to see what you have going on!

The state of mine...might open a thread sooner or later....She is my depiction of U-69.
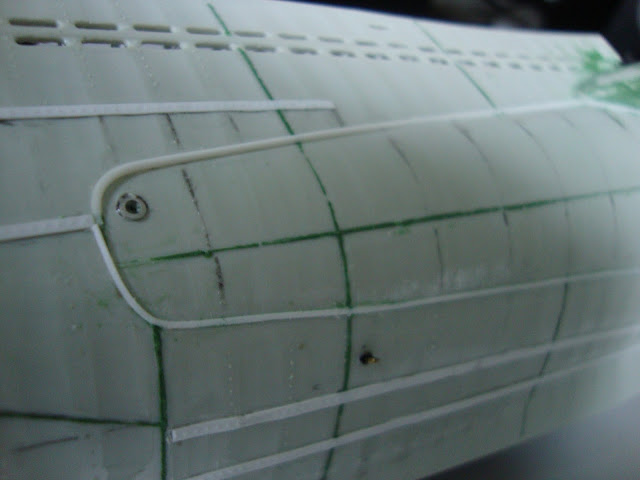
"oil canning" effect, weld lines
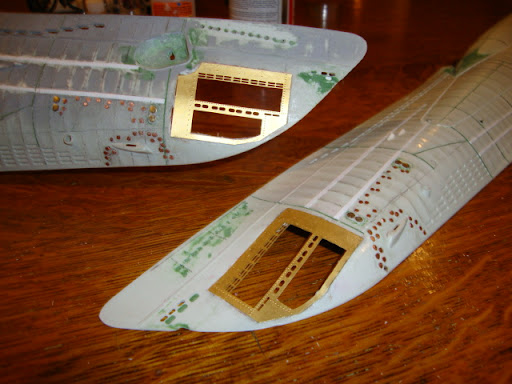
Torpedo doors, moved the anchor well forward, changed and added vents...
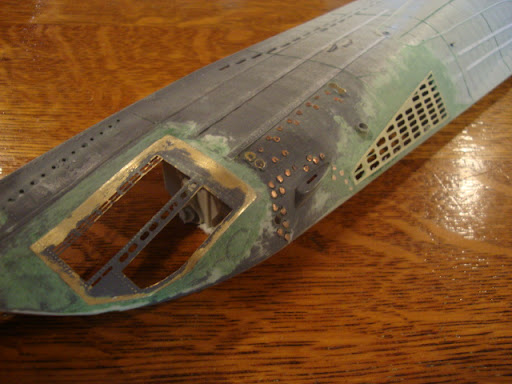
Lower vents added.


Trial and error is definitely par for the course, especially with scratch parts.  Keep us informed on how you make out.  The 1/72 VII C is a great project!Wink


Cheers!

Regards,

T


In Flanders fields the poppies grow
Between the crosses, row on row,
That mark our place, and in the sky,
The larks, still bravely singing, fly,
Scarce heard amid the guns below.

~John McCrae

  • Member since
    January 2009
  • From: Central CA
Posted by Division 6 on Thursday, October 28, 2010 8:40 PM

Rough estimate from looking through lots of pictures I'd say about 8" long maybe 5.5" dia, some of the boats look to have some a little smaller.

This is using images looking down on the con with crew present.

If need be you could contact the guy's over on Subsim that visited the boat and took the pictures and ask them.

  • Member since
    September 2010
Posted by modelnut on Friday, October 29, 2010 3:37 PM

My VIIc is not mint. I waited until my local shop got rid of its 72 scale u-boat before I decided I had to have one.Since I am married with a kid now I couldn't justify spending the +$100 I would have to spend to get a new kit. So I found one on eBay for $32 but it was partially assembled. Sad  So unless I want to get really mean and add tons more work than I planned on I will just have to go with what I got. By mean, I mean tear the boat apart and hope I don't screw up something I can't repair.

No new torpedo doors etc. Though I like that doohickey I see on the bow of the sub. What is it called? Is that the S-Geraet I see listed on the AMP PE list?

I just found beads that are 1/32 inch dia at HobbyLobby. That would be 2.25 inches in 72nd scale. If the insulators are in the order of 8 inches then the 1/8th inch beads I already had would work. I will go ask at SubSim just in case.

- Leelan

  • Member since
    February 2006
  • From: Boston
Posted by Wilbur Wright on Friday, October 29, 2010 4:04 PM

As in most ship or submarine rigging you should use beeswax to coat your thread. Run the tread through the wax. This will get rid of the fuzz and make it appear more like wire.

I have built this 1/72 scale sub and it worked out well for me. The plastic Revell blocks worked fine, just be patient when using them. Take your time.

TRM
  • Member since
    May 2010
  • From: Massachusetts
Posted by TRM on Friday, October 29, 2010 5:05 PM

I am sure your model will turn out just fine with kit parts.  Remember, the nice thing about plastic, it can always be fixed if broken.  If the only thing you like out of the AMP kit is the S-Gert bow device you could try to scratch build it.  Use and aluminum can for material, and made a pattern.  If you mess up, throw it out and try again.  If you decide to change youe mind and buy the kit...try http://www.freetimehobbies.com part#WEM7232.  Just under $25 US.  Most modifications for this boat can be made with aluminum cans, .01 sheet stock and putty.  Most railing stock and cables from copper wire and thread.  I have done a few models just rummaging through the basement.

A couple of pics you may need...

Covered S-Gert bow device, when the unit became outdated...

Good Luck!


Cheers!

Regards,

T


In Flanders fields the poppies grow
Between the crosses, row on row,
That mark our place, and in the sky,
The larks, still bravely singing, fly,
Scarce heard amid the guns below.

~John McCrae

  • Member since
    September 2010
Posted by modelnut on Monday, November 1, 2010 5:50 PM

Thanks, TRM!

Those images will come in handy.

Wilbur,

The thread was not included with my kit. Remember, I got my boat slightly used.


- Leelan

JOIN OUR COMMUNITY!

Our community is FREE to join. To participate you must either login or register for an account.

SEARCH FORUMS
FREE NEWSLETTER
By signing up you may also receive reader surveys and occasional special offers. We do not sell, rent or trade our email lists. View our Privacy Policy.