SEARCH FINESCALE.COM

Enter keywords or a search phrase below:

Old Ironsides - Revisiting the classic Revell 1/96 kit

209385 views
510 replies
1 rating 2 rating 3 rating 4 rating 5 rating
  • Member since
    March 2009
  • From: brisbane australia
Posted by surfsup on Wednesday, November 14, 2012 2:45 AM

You work is pleasure to look at. Am enjoying this build immensely.....Cheers mark

If i was your wife, i'd poison your tea! If Iwas your husband, I would drink it! WINSTON CHURCHILL

  • Member since
    June 2010
  • From: Irvine, CA
Posted by Force9 on Tuesday, November 13, 2012 10:57 PM

Thanks Steve for the encouragement

Here is my effort to replace the pitiful kit provided brake pumps:


I bulked them up a bit using a bit of octagonal styrene, some brass eyelets, and a small length of brass rod. The stems protruding from the bottoms will aid in positioning them on the deck thru holes drilled in the appropriate spots and hopefully keep them more secure.

I should pause to say that the OOB pumps should NOT be placed in the bow as the Revell instructions instruct:

This positioning is almost too bizarre to merit discussion... Suffice to say that the pumps are better positioned on the gun deck. The guidance I've used is from Chappelle's layout of the President taken from the drafts made of the captured ship by the British. It shows four brake pumps - two near the aft part of the main hatch and two a bit farther forward near amidships. The layout of the Revell deck does not lend itself to positioning two pumps near the main hatch. Instead, I've elected to place them in the more traditional location near the main mast in between the chain pumps. The other two were placed in the pre-existing holes on the deck that would normally have eyelets inserted.

I think these are also referred to as "Elm Tree" pumps - something to do with that being the preferred wood for the rot-resistance qualities when exposed so long to moisture.

I think these will do well enough as is and I'm on to the camboose...

  • Member since
    July 2010
  • From: Tempe AZ
Posted by docidle on Saturday, November 3, 2012 6:46 PM

F9,

As I have said before phenomenal work!  Thanks for sharing and showing the process of how you're scratch building the pieces.

Steve


  • Member since
    June 2010
  • From: Irvine, CA
Posted by Force9 on Saturday, November 3, 2012 12:25 PM

Jim -

Thanks for popping in and checking on my progress.  The deck planking went more smoothly than I expected and I am very pleased with the result so far...

I was going to wait until I had the brake pumps completed, but here are some quick snaps of the current state of things:

I've got the bitts completed (except for some rings for the stoppers that'll wait until after the initial painting):

Also have completed the cisterns and covers for the chain pumps - still need to fashion some handles:

Just for a bit of extra fun... I've left off the cover on one of the cisterns to "expose" the underlying chain wheel:

It started with me strolling through the model train store for something to use for my capstan drumheads. I didn't find anything suitable, but this little packet did catch my eye:

And I thought, hmmmm...

So after forking over too much hard earned cash (I think each wheel ended up being over a buck!) I trimmed them up slightly and glued on some small lengths of styrene rod then snipped off the ends. I suppose some spare PE railings or scale ladder bent around the circumference would've worked as well:

They are really cable sheaves and aren't quite perfect for the job, but at this scale, and barely visible thru the openings, it should suffice well enough. I'm just gonna paint it black then leave well enough alone - I don't fancy trying to replicate the chain. That'd be too fiddly and would likely diminish the effect.

And just to make sure people know these things don't all work out on the first try... Here is my debris field:

Thanks for following along

  • Member since
    February 2003
Posted by Jim Barton on Tuesday, October 30, 2012 6:04 PM

This is coming along beautifully! I especially like the work you did on the deck planking. (It's been a while since I've been here; I don't usually look at the ships forum and kinda forgot about this build, plus ever since the retooling of this website a few months back, I've found my computer sometimes has problems with it.)

"Whaddya mean 'Who's flying the plane?!' Nobody's flying the plane!"

  • Member since
    July 2010
  • From: Tempe AZ
Posted by docidle on Monday, October 8, 2012 1:17 AM

Thanks for the "how to" F9 it is most appreciated.  I know I can do this even though I lack a drill press with the explanation you gave.  I also love the hatches you have made as well as the capstan.  Beautiful work.

Steve


  • Member since
    June 2010
  • From: Irvine, CA
Posted by Force9 on Sunday, October 7, 2012 11:07 PM

Now it is on to the deck details - starting with the capstans. The one provided in the kit sucks and begs for replacement. I also need to provide one for the gun deck.

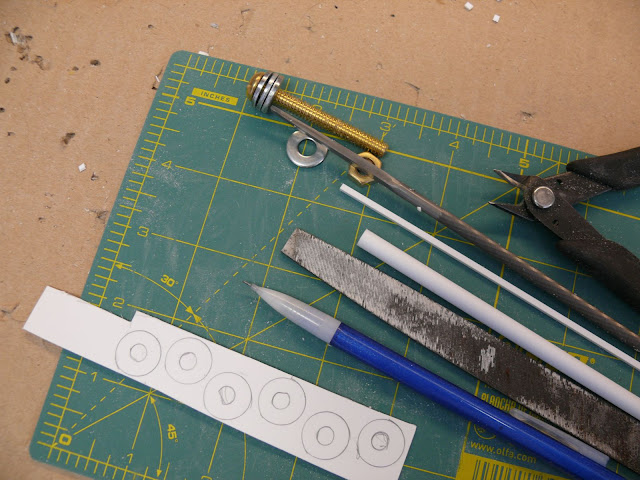
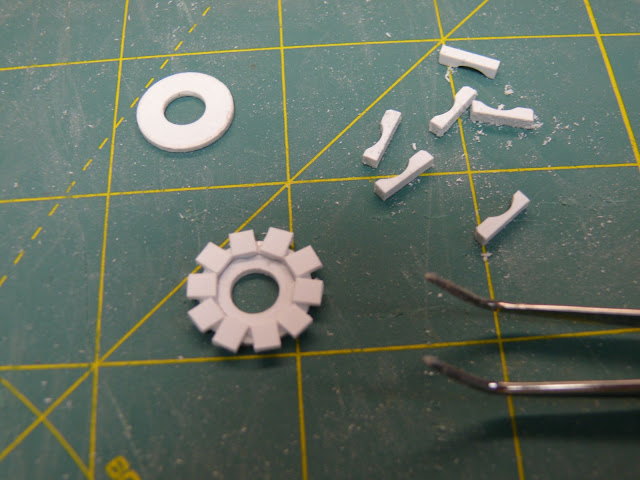
But how to do the drumheads - especially when using styrene? I pondered and pondered and finally came up with an approach that worked reasonably well. The key was to visit the local hardware store to acquire some metal washers of appropriate size - 1/8" (#6) did the trick. The washers will serve as the outline of the circles as we spin everything around on the drill press and use a file to shape the drumhead.

Here are the raw materials:

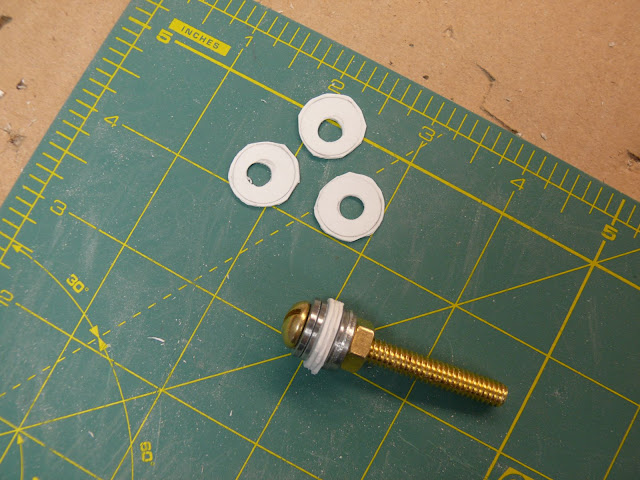
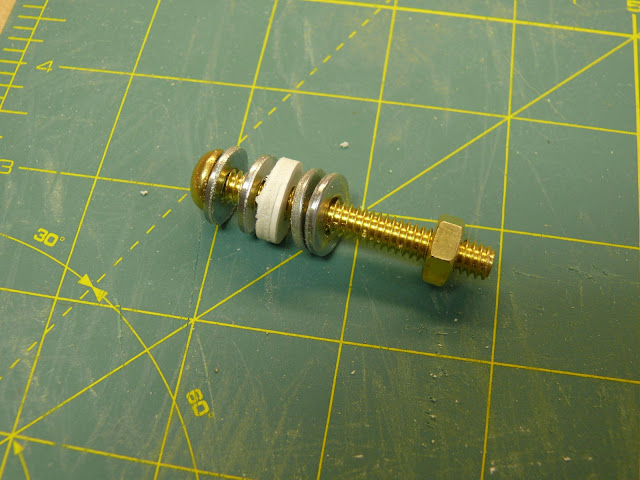
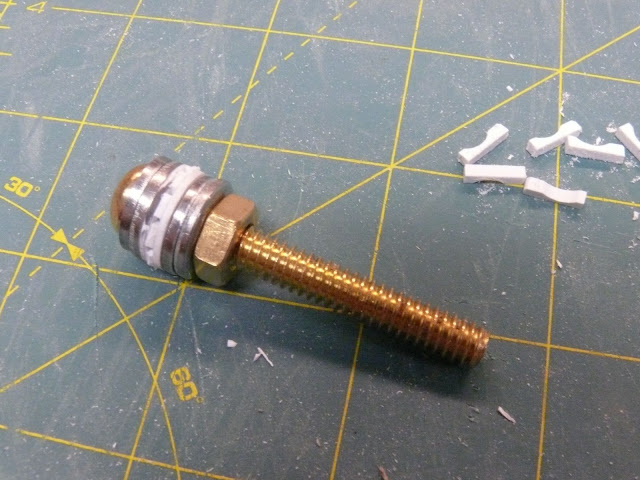
After outlining the circles on some sheet styrene (using the washers as a template), I punched the centers and rough cut the shapes. Those were then mounted on a bolt sized to the washer opening with two washers sandwiching each side of the styrene. Everything was then clamped tight with the nut:

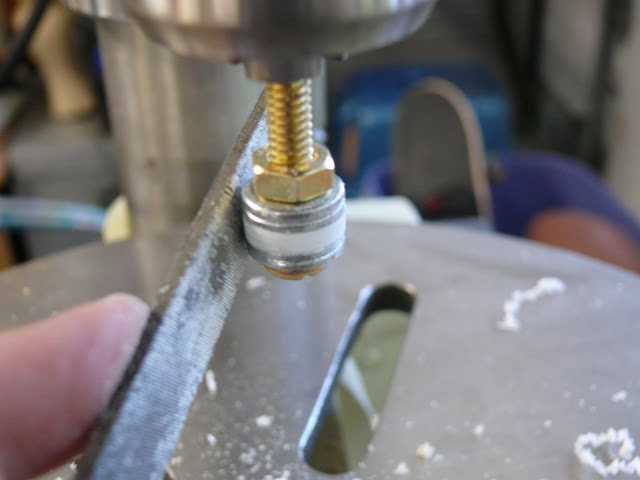
I mounted the set up in the drill press, gave it a whirl, and filed the edges even with the washer templates:

After removing the styrene from the bolt - viola!

Next I snipped some small styrene stock (.040 x .080 Evergreen 144) and glued them around the perimeter leaving spaces in between to represent the bar openings:

After sandwiching those between two of the styrene "washers" I nipped off any protruding material, mounted the rough drumhead back in my bolt assembly and gave it another spin with some light filing to clean the final shape.

The whelps were easily managed - just stuck some short pieces of .080 x .080 (Evergreen 164) styrene to some tape and used a round file to carve out the centers:

Everything was glued to a small length of styrene rod (6.4mm - Plastruct 90864) and a few small details were added to complete the effect. Coincidentally, the rod fit exactly into the center openings defined by the washers.

Here is the gun deck capstan:

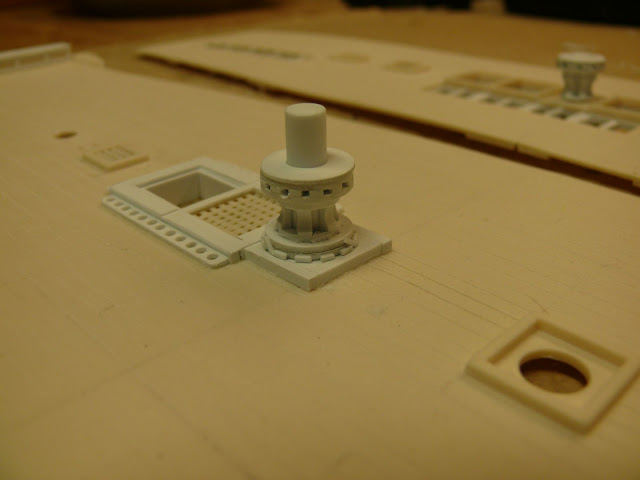
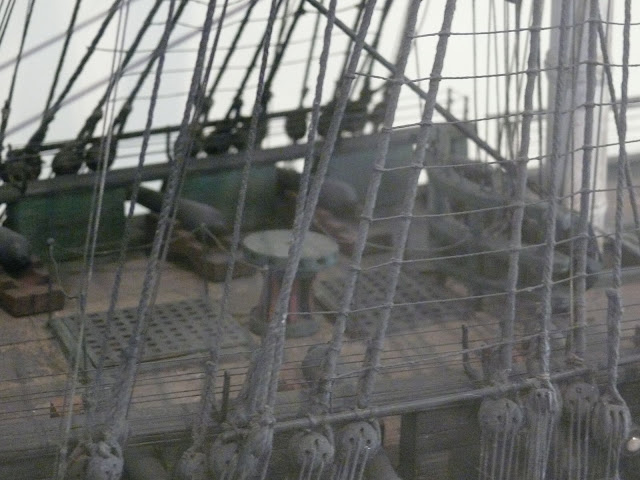
I wanted the spar deck capstan to look more like the one on the Hull model in the PEM - more mushroom shaped and svelte in comparison to the stockier gun deck capstan:

Thanks for enduring the process explanation!

  • Member since
    June 2010
  • From: Irvine, CA
Posted by Force9 on Sunday, October 7, 2012 11:04 PM

Steve - thanks for following along.  The shot racks were done using a drill press and a very simple set up:

The strip styrene was aligned to the small ruled straight edge and advanced two ticks between punching each hole.  I could mass produce multiple strips in a very short time.

I do like the tips provided for fashioning cannon balls - I just wish I had a torch!  Mine were purchased from Bluejacket at a very minimal cost - likely the same available in finer tackle or gun shops.

  • Member since
    September 2012
Posted by GMorrison on Tuesday, October 2, 2012 2:16 AM

Mikeym_us

John I do believe you can also get away with using lead shot (for shotguns not fishing) as those come in several diameters and you get alot in a bag. though I also do believe steel shot is available as that would be more accurate.

Steel in my experience is a bad modeling material. Certainly it's useful in large scale applications where strength is a factor, like live steam.

But otherwise it's major disadvantage is that it rusts. Many years ago the cheaper model railroad preformed track was made from steel- nickel and brass were more expensive. But rust was such a problem that it quickly was off the market.

Piano wire and guitar string don't work well for the same reasons.

Brass is a great model material.

#9 bird shot is 2mm which scales to about 192 mm and would be an 8" ball, or way too big. A 24 lb. cannon ball is 5.5 ".

http://www.overstock.com/Jewelry-Watches/Sterling-Essentials-Sterling-Silver-20-inch-Bead-Chain-1.5mm/4743208/product.html

 Modeling is an excuse to buy books.


  • Member since
    March 2004
  • From: Kincheloe Michigan
Posted by Mikeym_us on Monday, October 1, 2012 11:49 PM

John I do believe you can also get away with using lead shot (for shotguns not fishing) as those come in several diameters and you get alot in a bag. though I also do believe steel shot is available as that would be more accurate.

jtilley

Here's a little trick for making miniature cannon balls.

Get hold of some brass wire.  (The thickness doesn't matter much; start with .020" and proceed by trial and error.)  Chop the wire up into pieces of precisely equal length, scatter them around on a fireproof work surface, and hit them with a small torch.  When the brass gets hot it will form itself into a tiny sphere.  You can change the size of the shot by varying the diameter and/or length of the wire.  As soon as it cools off, drop the shot into a container of chemical blackener (such as Blacken-It).  The result, for the work of ten minutes or so, will be a full outfit of shot. 

On the workbench: Dragon 1/350 scale Ticonderoga class USS BunkerHill 1/720 scale Italeri USS Harry S. Truman 1/72 scale Encore Yak-6

The 71st Tactical Fighter Squadron the only Squadron to get an Air to Air kill and an Air to Ground kill in the same week with only a F-15   http://photobucket.com/albums/v332/Mikeym_us/

  • Member since
    July 2010
  • From: Tempe AZ
Posted by docidle on Sunday, September 30, 2012 6:32 PM

Beautiful work F9!  Could you explain how you made the shot racks?

Thanks,

Steve


  • Member since
    May 2003
  • From: Greenville, NC
Posted by jtilley on Sunday, September 30, 2012 1:58 PM

Here's a little trick for making miniature cannon balls.

Get hold of some brass wire.  (The thickness doesn't matter much; start with .020" and proceed by trial and error.)  Chop the wire up into pieces of precisely equal length, scatter them around on a fireproof work surface, and hit them with a small torch.  When the brass gets hot it will form itself into a tiny sphere.  You can change the size of the shot by varying the diameter and/or length of the wire.  As soon as it cools off, drop the shot into a container of chemical blackener (such as Blacken-It).  The result, for the work of ten minutes or so, will be a full outfit of shot. 

Youth, talent, hard work, and enthusiasm are no match for old age and treachery.

  • Member since
    June 2010
  • From: Irvine, CA
Posted by Force9 on Saturday, September 29, 2012 3:41 PM

Additional gun deck detail

I've decided to add another hatch adjacent to one already existing on the gun deck... No two sources seem to agree on the general layout of the gun deck, but I figure that the adjacent hatches on the spar deck should be reflected on the deck below. This would more logically allow more rapid egress between multiple decks. It also affords me the chance to add more depth to my model - I'll eventually fashion a bit of the berth deck and have a companion ladder leading down another deck.

The hatch was done similarly to the other holes I whacked in the spar deck:

There is a compromise to accuracy noticeably present - I had to create a platform for the gun deck capstan. The position of the spar deck capstan does not quite align with the theoretical position of the underlying gun deck capstan - the lower hatch interferes slightly. I built up this platform to align with the hatch edge as my new capstan will overlap that coaming. So kill me!

The ship's stove will need a "tray" to rest upon. I scratched in a brick pattern on some sheet styrene and added it to the deck in the appropriate spot with a bit of edging around to complete the effect:

I also thought the Captain's day cabin could use some upgraded cabinetry detail:

You'll notice some shot racks added around the hatches as well... No provision for shot storage is made anywhere in the Revell kit. I think it would be general practice to include these around any large hatches on a frigate this size. Here is the basic deck completed and ready for the next wave of detail (bitts, capstan, stove, pumps, etc.):

Thanks for following along!

  • Member since
    June 2010
  • From: Irvine, CA
Posted by Force9 on Saturday, September 29, 2012 3:40 PM

The Gun Deck hatch coamings

I decided that the basic hatch coamings along the gun deck were too wimpy and needed to be bulked up a bit. I didn't want to increase the height since that would involve moving/redoing the gratings so I settled for widening them:


Once I had the width, I proceeded to plank the surface with thin styrene to hide the seams and better represent the coamings. I cut the pieces a tiny bit long and then came along at the end and filed everything even and smooth:


Much improved I think...

  • Member since
    June 2010
  • From: Irvine, CA
Posted by Force9 on Monday, September 10, 2012 10:19 PM

Folks -

I thought I should share another source of research material now available... The fine, newly updated version of the USS Constitution CD produced by the Naval History & Heritage Command (NHHC). The CD includes many plans compiled by the Boston Detachment of the NHHC. It mostly includes copies of Lt John Lord's drawings used for the 1927 restoration. As such, they are not necessarily pertinent to the 1812 period, but do have some useful drawings of details like whale boats, Anchors, etc. In particular, there are some historical references also included that I have found very interesting. Finally, the drawings often include notes and links to sub-references that clarify the differences between the 1927 and 1812-14 versions.


You can order your copy here:

http://museumstore.navyhistory.org/CD-Constitution-Plans-p/618.htm

It should also be pointed out that the updated website for the NHHC/USS Constitution includes a very nice virtual tour of the ship:

http://www.history.navy.mil/USSCTour/Movie.html

The tour includes links as appropriate to many (if not all!) of the articles/documents/plans included in the new CD. Click on the FILE REFERENCE tab:

http://www.history.navy.mil/USSCTour/frDrawings.html

This link contains good stuff! I highly recommend anyone interested in the great ship to peruse the link and explore the material available...

Enjoy!

  • Member since
    July 2012
Posted by Captain Isaac Hull on Tuesday, September 4, 2012 12:12 PM

Most capital!

  • Member since
    June 2010
  • From: Irvine, CA
Posted by Force9 on Sunday, August 26, 2012 6:48 PM

Finishing off the beams and carlings on the spar deck...


Here is a peek at the underside:


The beams are fashioned from .100 x .156" (Evergreen 177) styrene and the carlings are .080 x .080" (Evergreen 164)

Turned out reasonably well...

  • Member since
    August 2007
  • From: back country of SO-CAL, at the birth place of Naval Aviation
Posted by DUSTER on Friday, August 24, 2012 5:27 PM

Out standing!

Steve

Building the perfect model---just not quite yet  Confused

  • Member since
    June 2010
  • From: Irvine, CA
Posted by Force9 on Thursday, August 23, 2012 10:32 PM

Folks...

I've just returned from a business/vacation trip to the East coast. I somehow managed to be on hand when Old Ironsides put up her sails and proceeded along on her own power for the first time since 1997 - albeit for only 1,000 yards or so. It was done to commemorate her great victory over HM Frigate Guerriere exactly 200 years hence. After her brief sail, the tug brought her in close to the fort on Castle Island where she fired off her obligatory 21-gun salute to the roaring approval of the gathered throng.


Enjoy

  • Member since
    June 2010
  • From: Irvine, CA
Posted by Force9 on Sunday, August 12, 2012 12:54 PM

More building...

The SPAR Deck

Here again the deck is in three pieces and needs to be "seamlessly" melded together.

The seams were prepped with some supporting styrene beams and flat sections to help align everything when the glue was applied.

After everything was set I once again resorted to some 80 grit sandpaper to smooth everything down in preparation for scribing the planks on the deck.


I've scribed all of the planking and made another go at some joggling - both fore and aft. The planking was done using the same "stack, clamp, and scribe" method as used on the gun deck. The four-step butt pattern was applied as well.

This deck has the exposed beams. I've done the easy ones - main cross beams with carlings. All of the hatches have the underlying support structure in place. The opening over the waist gangway will be a bit more complex. In addition to beams and carlings, I'll need to add some lodging knees and the canted "diagonal" knees attached to the beams.


The skid beams caused me a momentary pause... The Bluejacket manual insists that ALL of the support beams are carried across the waist as skid beams. And this is based on research conducted by Mr. Arnot and Cdr Martin. Easy enough to make that happen, so I started trimming the appropriate Evergreen... But... The Revell kit is based ultimately on the Hull model and that artifact clearly shows that not all the beams span the waist. Only about every other one. Turns out the Chappelle plans of USS President based on the British drawings of the captured ship shows the same skid beams as the Hull model (and our Revell kit). I decided to leave well enough alone.

Work continues... I'll build up the hatch coamings a bit on both decks and start work on the gun deck features.

  • Member since
    September 2005
  • From: Groton, CT
Posted by warshipguy on Sunday, July 29, 2012 2:54 PM

I remember buying the white box in 1965  with a beautiful painting of the Connie in port; the kit was without sails.  I looked at that beautifully painted copper lower hull and wondered at how anyone could spoil that finish by streaking it.  I was 11 years old at the time.

I also remember that nice booklet of her history that also showed several paintings of the ship at different stages of her career. I wish that Revell would reintroduce that booklet!

Bill

  • Member since
    June 2010
  • From: Irvine, CA
Posted by Force9 on Saturday, July 28, 2012 11:31 PM

BTW - I forgot to mention that the tour guide on Old Ironsides told us they were training the crew in basic sail handling.  They are intending to SAIL her on August 19 - the Bicentennial of her great victory over Guerriere.

  • Member since
    March 2007
  • From: Carmel, CA
Posted by bondoman on Friday, July 27, 2012 6:55 PM

Yes they were. There was an instruction to streak them.

  • Member since
    September 2005
  • From: Illinois: Hive of Scum and Villany
Posted by Sprue-ce Goose on Friday, July 27, 2012 9:23 AM

David_K

Off-Topic quick question...Did some of the 1/96 Connie kits come with the hull pre-coppered???  I've seen some pictures of unbuilt kits that have totally black hull pieces, and some that are copper on the lower portion....

I had a mid-1960s issue 1/96 Cutty Sark kit that had the lower hull pre-painted with copper paint.
Presumably, the 1/96 Constitution of that era was also available with a pre-painted lower hull

Tags: Cutty Sark
  • Member since
    March 2012
  • From: Marysville, WA
Posted by David_K on Friday, July 27, 2012 9:19 AM

Off-Topic quick question...Did some of the 1/96 Connie kits come with the hull pre-coppered???  I've seen some pictures of unbuilt kits that have totally black hull pieces, and some that are copper on the lower portion....

        _~
     _~ )_)_~
     )_))_))_)
     _!__!__!_         
     (_D_P_K_)
   ~~~~~~~~~~~~~
    ~~~~~~~~~~~

Current Project:  Imai/ERTL Spanish Galleon #2

Recently Finished: Revell 1/96 Cutty Sark

Next Up:  ???


  • Member since
    June 2010
  • From: Irvine, CA
Posted by Force9 on Wednesday, July 25, 2012 8:56 PM

Here are some better photos with lighting that highlights the scribed lines...


The step pattern was initially laid out using the diagram in the Longridge book (Pg 121). Then it was a matter of coming along and scribing every fifth plank - either vertically or horizontally until the deck was complete.

The joggling on the starboard side isn't quite right - the sharp end needs to narrow down to about half the width of the plank.  I had narrowed the planks a bit too far.  The port side is better.  I'll get it right on the spar deck.  Only a few of the planks met the condition for joggling - the "snipe" (length of the surface contact between the deck plank and the margin plank) was at least 2x the width of the deck plank.

Thanks for looking

  • Member since
    June 2010
  • From: Irvine, CA
Posted by Force9 on Wednesday, July 25, 2012 8:55 PM

BondoM

I think I will include the manger - if only to hide the less developed details in the bow.  I am generally trying to depict her cleared for action going into the Guerriere fight - I'm not sure if protocol would've demanded the manger be dismantled and stored below (or tossed overboard) to minimize splinters...

You'll also see the riding bitts, pumps (chain and brake/elm), capstan, anchor cables (perhaps not messengers with the anchors already stowed) and camboose (galley stove) as well as a few details of the Captain's cabin.  The partitions will not be there - those I know would've been struck for battle.

Thanks for the continued interest!

  • Member since
    March 2007
  • From: Carmel, CA
Posted by bondoman on Wednesday, July 25, 2012 8:35 PM

Hey F9 don't forget to put the pig sty up at the peak. This model is very cool.

  • Member since
    September 2005
  • From: Groton, CT
Posted by warshipguy on Wednesday, July 25, 2012 8:18 AM

I am very impressed!

Bill

  • Member since
    July 2012
Posted by Captain Isaac Hull on Wednesday, July 25, 2012 6:40 AM
I agree. Most capital. This attention to detail is extraordinary. I look forward to the coming months. Especially to the rigging, and sails, if you plan on the completing them. Either way I am humbled.

- Captain Isaac Hull

https://www.facebook.com/profile.php?id=100003586910290
JOIN OUR COMMUNITY!

Our community is FREE to join. To participate you must either login or register for an account.

SEARCH FORUMS
FREE NEWSLETTER
By signing up you may also receive reader surveys and occasional special offers. We do not sell, rent or trade our email lists. View our Privacy Policy.