SEARCH FINESCALE.COM

Enter keywords or a search phrase below:

Old Ironsides - Revisiting the classic Revell 1/96 kit

208851 views
510 replies
1 rating 2 rating 3 rating 4 rating 5 rating
  • Member since
    January 2016
  • From: Canyon Country CA
Posted by RMorris61 on Tuesday, January 5, 2016 9:32 PM

Hello Force9,

I have decided to return to the wonderful world of ship modeling after many years away from it. I came across your thread and it really caught my eye since I have decided that my first build back would be the Revell 1/96 USS Constitution ! I am AMAZED at the remarkable work you've done, as well as the comments and input from your many followers and contributors. What I wealth of information and expertise ! 

I look forward to observing as you continue on. I think there is much I can learn from this gresat thread !

Thanks,

Ron

  • Member since
    February 2015
  • From: UT
Posted by ageofsail on Sunday, December 20, 2015 2:37 PM
Thanks for the reply Evan, that helped a lot, especially with regard to taking into account the curve of the hull. The BJ plans call for precisely what you suggested about notching rather the drilling holes for the deadeyes and the more I think about it the more sense it makes to reinforce the underside of the channels and beef up the attach points. It will save me a whole lot of time and accomplish the same purpose, a channel that will not break loose at the most inopportune time. I had already planned to attach the chains prior to hanging the channels on the hull and your advise confirmed the wisdom of that move. Looking forward to you posting some pics soon, I posted some a while back that for some reason didn't come through and I have been far to busy to fix it but now as the snow is flying and I have some time to work on her, I will address that issue as well as the channels. Dan
  • Member since
    June 2010
  • From: Irvine, CA
Posted by Force9 on Saturday, December 19, 2015 5:16 PM

Hello Dan

I considered scratch built channels, but I shied away after not finding any off the shelf styrene strip that was wide enough.  Otherwise I would need to fashion the channels from a wide sheet of styrene and that seemed to be more challenging to me.  I figured it'd be about the same effort to modify the kit channels vs scratching out the exact shape from the sheet.  At least the kit channels would already fit the curvature of the hull, etc. In general, I've taken the approach of modifying kit components wherever practicable instead of scratching out complete replacements.  I could've done this with the rudder and saved some effort with a similar result.  So far, I think the kit capstan was the only thing that really did not seem salvageable and needed a complete replacement.

Regardless of how you choose to go with your channels, I would recommend you take a different approach than I have done with fitting the deadeyes and chains.  I drilled holes thru the channels and inserted the Bluejacket stropped deadeyes.  Now I have to fit the chain links in place on the model instead of on the bench.  This can get tricky when you try to complete the middle link.  In retrospect, I would approach this similar to actual practice... Notch the edge of each channel with the slots for the deadeyes and glue a strip to the outer edge after the deadeyes and links are placed.  This would allow the deadeyes and chain links to be fashioned beforehand and fitted to the channels with less fuss.

I've only got a few channels done and I'm hoping to make some progress during the holiday break.

Glad to know you are progressing well on your build!


Evan

  • Member since
    May 2003
  • From: Greenville, NC
Posted by jtilley on Friday, December 18, 2015 4:15 PM

Ah, now it makes sense. Sorry about that; probably my fault.

I don't see much to choose between the kit channels and plastic sheet; a channel is, in essence, a big flat board (though probably with a decorative molding along three edges. I do suggest reinforcing the glue joints, where the channels meet the hull, with wire or pins. A loose channel flopping around will ruin your day.

Youth, talent, hard work, and enthusiasm are no match for old age and treachery.

  • Member since
    February 2015
  • From: UT
Posted by ageofsail on Friday, December 18, 2015 4:09 PM

And yes GMorrison, there are "a dang lot of them to lace up", but that is what single malt scotch was created for Wink

  • Member since
    February 2015
  • From: UT
Posted by ageofsail on Friday, December 18, 2015 4:05 PM

You are correct GMorrison, I was refering to the channels, not the deadeyes themselves, sorry for the confusion Professor Tilley. In my examining the channels as provided by Revell I find them, like the pin rails, rather flimsy, and as I being the klutz that I am see breakage in my future regarding them, I was curious if there was a specific reason why Evan chose to simply modify the kit provided pieces, notwithstanding his reinforcing the underside of them, they still seem not quite up to the task. I did order the deadeyes and blocks from Blue Jacket as well as their plans so I am now prepared to begin prepping those pieces however, if Evan has a valid reason why I needn't use .60 Evergreen to scratch make the channels, I would like to know before I dive into a lengthy and perhaps unnecessary modification.

  • Member since
    September 2012
Posted by GMorrison on Friday, December 18, 2015 3:47 PM

Dr. Tilley, I think terminology is being confused here. I hope that ageofsail is referring to "them" being the channels. In that case I'd probably replace them, except that they appear to have rather nice little chainplates molded as a part of them, and cutting those off, re-installing them seems to be a lot of work. The pro would be a beefier channel, allowing pins to be inserted, the con would be having to shape it to fit the hull. Not hard, just another step.

Home made deadeyes are a certain failure, if that's being implied. Curved faces, perimeter groove, properly located holes with grooves in the right direction. Just too many things to do when they can be bought easily.

Frankly I don't remember the kit ones being so horrible, and there are a dang lot of them to lace up.

 Modeling is an excuse to buy books.


  • Member since
    May 2003
  • From: Greenville, NC
Posted by jtilley on Friday, December 18, 2015 3:36 PM

I hope I may be forgiven if I jump in here. But I just don't follow the logic of making deadeyes out of plastic rod.

It wouldn't be practical to take on such a project without a lathe. And turning styrene on a lathe is a challenge, because it's so easy to melt the plastic.

Bluejacket sells excellent britannia metal deadeyes. And the wood ones from Model Expo are really nice too. (I don't like Model Expo blocks, but the deadeyes, which are made of walnut, are another matter entirely.) Syren Ship Model Company also makes excellent deadeyes, but each of them consists of three tiny pieces of boxwood that have to be glued together.

At any rate, unless a modeler is rejecting mass-produced parts altogether and working completely from scratch, surely aftermarket blocks and deadeyes make the most sense.

Youth, talent, hard work, and enthusiasm are no match for old age and treachery.

  • Member since
    February 2015
  • From: UT
Posted by ageofsail on Thursday, December 17, 2015 5:51 PM

Hello Evan, I just got my batch of stropped deadeyes and blocks for the shrouds as well as the dauntingly detailed Blue Jacket plans for the ship because people like you, Arnie, and Prof Tilley have convinced me never to build OOB again (my wife thinks you are all evil BTW Wink ) and I have a quick question for you. Is there a specific reason you just cut the plastic deadeyes off the Revell channels and modified them rather than scratch making your own? I ask this because I am planning on scratch building mine using .80 Evergreen and am curious whether you saw an advantage other than saving time in using the kit provided pieces.

Thanks,

Dan

  • Member since
    April 2014
Posted by Petegee on Monday, August 10, 2015 11:07 AM

Evan, 


Thanks for the heads up. Until this challenge I did not really pay attention to that element of construction. Silly me...I thought that since the gundeck fit was good that the spar deck would follow suit. Anyhow, I did manage to 'add' some extra spar deck using extra tabs under the deck and creating a filler strip out of some Evergreen. Seems to fill the bill. 


Many thanks for your blog and to the many others from which I am learning a great deal. 


Pete

Petegee

  • Member since
    June 2010
  • From: Irvine, CA
Posted by Force9 on Sunday, August 9, 2015 1:59 PM

Pete -

If you look closely at some of my photos, you'll see some extra "tabs" that I've added along the inner hull just under the ledge for the spar deck.  I hope these will provide enough additional surface area to allow the glue to hold the spar deck tight against the edges.  I won't use CA for this - just the regular liquid cement that melts the mated surfaces together.  As you've noted, I'll need to clamp this together to make sure it is pulled tight all along the edge as everything dries.

Thanks for following along... I'm slowly working thru the dead eyes and chains.


Evan

  • Member since
    September 2012
Posted by GMorrison on Thursday, August 6, 2015 11:26 AM

Yes you got that right, good observation.

 Modeling is an excuse to buy books.


  • Member since
    April 2014
Posted by Petegee on Thursday, August 6, 2015 11:25 AM

Thanks for that great idea. That would be a lot less pressure on the hull, and there would be no real verttical pressure on the joints. I think I have to be careful with the deck placement because of stepping the masts correctly. 

Petegee

  • Member since
    September 2012
Posted by GMorrison on Wednesday, August 5, 2015 11:21 PM

That is a common problem. In my opinion no. Forcing and clamping with CA will break later.

One of the most important things to remember in a build like this is that it will in the end be the result of 1000 decisions, and it will be an important thing to you.

Adding width to the spar deck isn't difficult with plastic strip if thats what it takes. But try to get all of the parts together, with plastic glue, at rest.

 Modeling is an excuse to buy books.


  • Member since
    April 2014
Posted by Petegee on Wednesday, August 5, 2015 10:12 PM

I really appreciate the excellent work I discovered in this log. I have almost daily (well, when I am at the modle desk) referred to this log, and have used the information from it to very good ends. Thanks for the excellent model work and commentary. I hope that I am not intruding. 

I have been following your log for several weeks now, as I am returning to model ship building afer having retired (finally!). I build a Cutty Sark—Revell plastic OOB so many years ago I can't even remember some of the porcesses I used. I also did an H.M.S. Bounty solid hull wooden that did not turn out too well, but it was the first (a gift) and it was considerable fun as I recall. So I consider myself a newbie—a Seaman Apprentice, if you will. 

I have started the Revell U.S.S. Constitution; plastic with the decks in three sections (Ugh!). I love the kit and am progressing very slowly, and that is OK with me. I do have many questions certainly, but the one that is hanging over me like a blade is: What cement is stong enough to overcome the (very) loose registration between the spar deck and the hull. I think I am going to have to clamp as much as 1/8", if not a bit more in spot. Will CA hold that amount of stress or what?

Thanks, PeteGee


Petegee

  • Member since
    February 2015
  • From: UT
Posted by ageofsail on Friday, June 12, 2015 12:14 PM

Absolutely beautiful work Evan! I am on a serious hiatus as summer is biking, rock crawling (with my class 5 Blazer, not my body Big Smile ) and working on my landscaping, so Connie is taking a break. However, I am so happy I am trailing you on the build as I get to receive sound advise and inspiration from you as well as others before I dive into the rigging. BTW, are you using Syren cordage? And if so, I am having issues with it fraying on the ends when I cut it, and have not come up with a solution to prevent it, any thoughts?

I will be posting some photos on my page showing the progress on the guns on the spar deck as soon as I can find the time. Again, great work Evan!

Dan

  • Member since
    May 2003
  • From: Greenville, NC
Posted by jtilley on Friday, June 12, 2015 2:49 AM

I've encountered that rig for the foremost shroud in a gang several times. (I've also heard it referred to as a "stiffener." The theory is that, when the ship is working to windward, the shroud on the lee side can be slacked off a bit, letting the lower yard swing a little further. The yard truss can also be slacked off a bit.

Seems like a lot of trouble for not much advantage. It's hard to believe that hauling that one shroud (out of nine) on the weather side taut would strengthen the rigging structure significantly. But the evidence is there: that's how she was rigged.

Looking great. While you're working on the channels you may want to set up the lower blocks for the Bentinck shrouds - which are also on the Isaac Hull model, as I remember. (And on the Revell instructions.)

For heaven's sake, keep that soldering iron away from the britannia metal fittings.

Youth, talent, hard work, and enthusiasm are no match for old age and treachery.

  • Member since
    June 2010
  • From: Irvine, CA
Posted by Force9 on Thursday, June 11, 2015 11:25 PM

Lads...

I've been laboring away at the build but haven't taken many photos along the way... And some that I have taken have gone missing in the nether world of my old hard drive.

I'll pick up here with my progress and get the build log up to snuff.

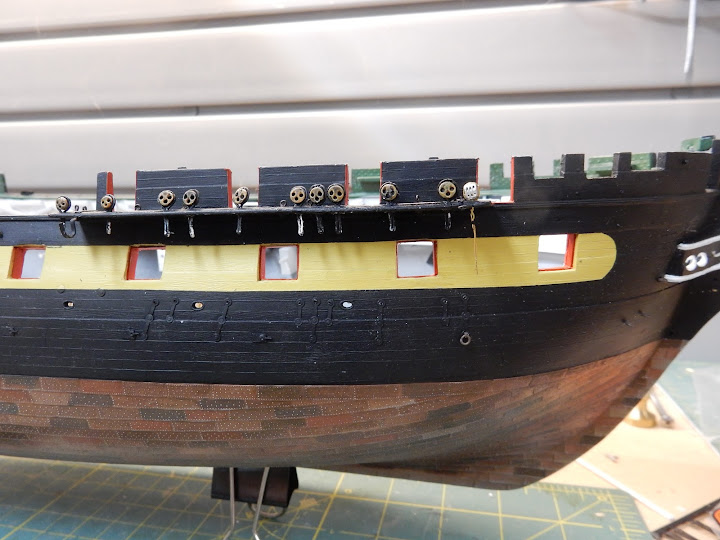
Firstly, I decided that my original location for the main sheet sheave holes was too far forward. They really should've been positioned aft a bit - centered in the gap between the main and mizzen shrouds. So I filled in the first version and laid in a new row of inner planking with rivet detail, etc. and painted it all to match. Then I redid the sheave holes and moved the cleat.

You'll notice the addition of more cleats along the bulwark. My understanding is that halyards were NOT tied off to pin rails... Those tie off to cleats or bollards at the ends of the pin rails. I used the guidance from Olof Eriksen to position appropriate cleats to tie off the various halyards on either port or starboard. The cleats were quickly fashioned from Styrene I-Beams from Evergreen using the handy Chopper:

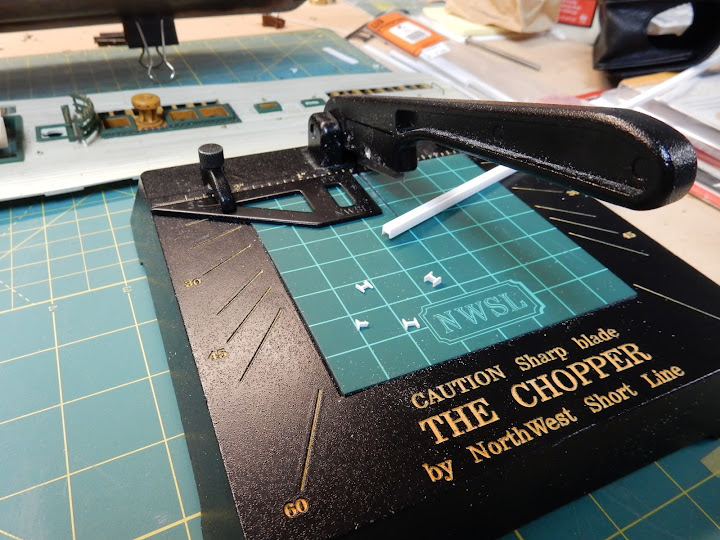
Once sliced off of the stock piece, one end would be snipped and the remainder filed to shape and glued into a hole drilled almost thru the bulwark to maximize the surface area for holding power when glued. After the glue dried, I came back and painted with wood brown.

Deadeyes:

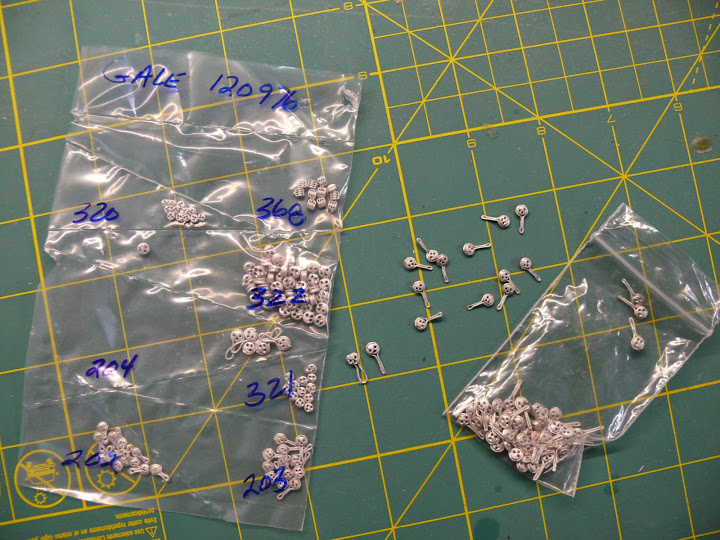
I've got the deadeyes all primed and painted to resemble wood with iron strops and light tarring (just smeared them with a dark wash). I wanted them to be wood-like- not entirely black.

I've reamed out the holes in the channels and test fitted the initial batch on the fore channel.

You'll also notice that the forward most shroud will lead to a triple block instead of a standard deadeye. (I've got a test version mocked up for now and should have something in place after I put the solder iron to work on the wire strops.)

The Hull model in the Peabody Essex museum clearly shows the triple blocks fitted on the forward shrouds on the fore and main channels. The mizzen does NOT have this block - just the standard deadeye.


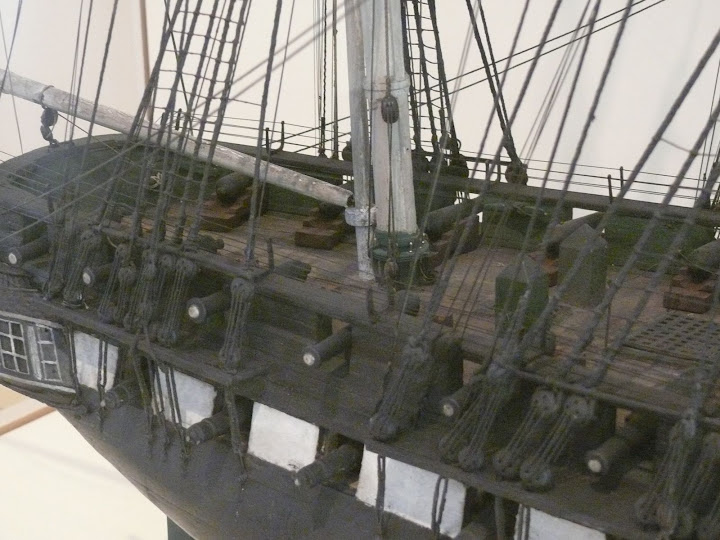
This contradicts the guidance from Larry Arnot in the BlueJacket kit manual, but Mr. Eriksen confirms this approach against the Brady Naval Apprentice Kedge Anchor (Ed. 1841) Apparently these first shrouds would be eased or tightened as the ship changed tacks. As such, Eriksen refers to these as "Swifters" - although that term is a bit ambiguous to me. I know, for example, that the aft most shrouds on a channel were often referred to as the "Swifters" - they are not paired with another shroud when rigged and seem to have evolved from some sort of backstay in an earlier time.

All part of the mysteries of rigging as I venture forth.

Sorry for the delayed update and thanks again for all the kind interest.

Evan

  • Member since
    May 2003
  • From: Greenville, NC
Posted by jtilley on Monday, May 11, 2015 4:16 PM

Mike's right. Unbelivable though it seems, McNarry built five models of the Constitution to the same scale, 1/16"=1' (or 1/192). One is at Annapolis. The Smithsonian owns another one. I've never seen the two side by side, but I think they're close to identical with full hulls, curled sails, and complete (and I mean COMPLETE) rigging. He also built at least one waterline version, with billowing sails and a "sea" base.

When I was working at the Mariners' Museum (1980-1983) I got wind that the Smithsonian was taking many of its ship models off exhibition, with no intention of exhibiting them again in the foreseeable future. (Don't ask me why.) I got in touch with one of the Smithsonian curators and discovered that its McNarry Constitution was available for long-term loan. The trip from Washington to Newport News, with that model (inside a custom-built plywood crate) in the back of the MM's station wagon, may have been the most nerve-wracking two or three hours I've ever spent. I made sure the model got prominently displayed, but that gallery has been completely rebuilt since then. I don't know whether the MM still has the model or not.

I wish the Naval Academy Museum would put its version back on exhibit. On the other hand, I remember learning the hard way that small models don't have much impact on the typical museum visitor. On the other hand, any serious ship modeler will be blown away by that model - and just about every serious ship modeler eventually makes the pilgrimage to Annapolis.

Youth, talent, hard work, and enthusiasm are no match for old age and treachery.

  • Member since
    November 2003
  • From: Virginia
Posted by Mike F6F on Monday, May 11, 2015 3:21 PM

Evan,

I believe McNarry built the model to 16' to the inch, what ever that works out to.

I think I had the opportunity to view that model at the Mariner's Museum 30+ years ago. Dr. Tilley could confirm that.  It was on loan to the MM when he worked there and he called me in to see it before it went on display.

I was building my Revell Constitution then and I remember sharing the same feelings you've described as I looked at it.

I have a copy of McNarry's "Ship Models in Miniature."  I've treasured it for years.  I recommend a copy if you can track one down.  There are detail construction photos of this model in the book.  IIRC he built five models of Constitution, all representing the ship's time frame as this one does.  One was a waterline model under sail.

Mike


"Grumman on a Navy Airplane is like Sterling on Silver."

  • Member since
    June 2010
  • From: Irvine, CA
Posted by Force9 on Sunday, May 10, 2015 5:21 PM

Ahoy...

Apologies for the long interim... Had some computer issues and had to upgrade my system to get back on track.

I have made some progress on cleats, dead eyes and such and will post some pictures soon. In the meantime, I had a nice visit last week to the US Naval Academy museum... They have the other set of the Michel Felice Corne paintings of the Constitution vs Guerriere battle that were commissioned by Captain Hull. These are exquisite and I think I stared at them for at least 30 minutes:

The series is hung in a bit of a jumble, but very visible.

Here are some details of the stern. The ventilation ports under the counter are clearly visible - I'm glad I added those to my version.

Rigging detail:


Here is a detailed view from the Corne painting of the Tripoli campaign:

The basement of the museum contains the gift store and the model maintenance workshop. It turns out that if you stare through the viewing window long enough (it helps to have a forlorn puppy dog expression as well) someone in the workshop will take pity and invite you inside for a tour. Jack was extremely generous with his time and showed me all the projects and some of the terrific tools - including a very nice rope serving set up and a clever/inexpensive micro-torch he built for detailed solder work.

At some point I mentioned my own "learner's" project on the Revell Constitution and I was invited into the Curator's office to have a look at a "small Constitution" model kept on top of a file cabinet.


It should be readily apparent that this is no ordinary model. In fact, this is a Donald McNarry masterpiece showing Constitution's early appearance. The pictures don't give a true perception of the small scale... I'd think it is 1/192 or thereabouts (less than half the length of my project) and each element is executed with unfathomable detail. The guns, boats, wire rigging, etc. are all incredible. I urged the curator to find a way to get it on the display floor, but he explained that there is not much room in the current display area for all of the incredible models in the museum collection. Gawd only knows what the thing is worth - especially after the passing of Mr. McNarry.

The museum is a true treasure trove of American history. The collections include the original "Don't Give Up The Ship" flag, the actual table (and tablecloth) used for the Japanese surrender on board the USS Missouri (it was a mess table quickly adapted for use after the beautiful wooden table provided by the British turned out to be too small for the surrender documents), and the spur that snapped off the boot of John Wilkes Booth when he leaped off the balcony and got caught on the flag bunting - breaking his ankle on the landing.

Folks should make the effort to visit Annapolis if at all possible - well worth the side trip!

I'll post some more project pictures later this week to catch everyone up on my progress.

Thanks
Evan

  • Member since
    June 2010
  • From: Irvine, CA
Posted by Force9 on Friday, April 3, 2015 11:16 PM

Twenty something bucks I think... They don't always let you buy the PE... Sometimes they don't have any extra in stock.

  • Member since
    February 2015
  • From: UT
Posted by ageofsail on Friday, April 3, 2015 11:48 AM

Thanks Evan, when I order my belaying pins I will order these as well, do you remember what you paid for the hammock cranes?

  • Member since
    May 2006
  • From: Chapin, South Carolina
Posted by Shipwreck on Friday, April 3, 2015 9:02 AM

Thanks Evan thay is very helpful.

On the Bench:

Revell 1/96 USS Constitution - rigging

Kinetic 1/48 YF-104A 5-2957

Trumpeter 1/350 USS Hornet CV-8

Revell 1/48 B-1B Lancer Prep & Reasearch


  • Member since
    June 2010
  • From: Irvine, CA
Posted by Force9 on Thursday, April 2, 2015 11:00 PM

Folks

Here are some quick images of the deadeyes:

The untouched version is on the left, the cleaned up version is on the right.  I use needle nose pliers to close and straighten the stems and a small jewelers file to clean off any small burrs. These will fit thru holes drilled into the channels with a #60 micro bit.

Here are the counts of each that I needed for the Olof Eriksen rigging plan:

Qty 12 - 3/32" F0202/F0320 (Royal/Skypole Backstays on channels)

Qty 40 -1/8" F0203/F0321 (Topmast Backstays on channels, Topmast deadeyes)

Qty 42 -5/32" F0204/F0322 (Lower mast shrouds)

Qty 8 - F0368  1/8" Triple Blocks (Fore and Main "Swifters" Shroud#1)

I have not done a similar count for the Revell plan.

Hope this helps!

Evan

  • Member since
    March 2015
Posted by niart17 on Thursday, April 2, 2015 2:34 PM

Thanks again guys. I appreciate all the advice and welcome. I am definitely looking forward your next progress shots Evan. I'll hope to start a build thread here soon and I'm sure I'll be bugging you guys quite a bit for help.

Bill

  • Member since
    February 2015
  • From: UT
Posted by ageofsail on Thursday, April 2, 2015 11:04 AM

Not naysaying at all Arnie, I just know from experience what a daunting build it is, I just think it is better to see a good result from a less difficult build and be inspired to reach higher with your next one than to to bite off more than you can chew and end up discouraged and never attempt another one. It is almost exactly what happened to me, I built Thermopylae in 1975 as my first non car/plane/modern Naval ship model and was very disappointed and as a result did not attempt another 1/96 ship unil 1990, and it wasn't until Cutty Sark that I felt I was gaining the skill to be happy with the results. Then I see what you and Evan are doing and I feel like, Wow, I wish I had that level of skill. But if this were my first attempt, believe me, I have been building models long enough to know I would do it straight out of the box to get my feet wet.

Bill mentioned in a second post he is an experienced modeler, just new to this genre, so I personally give him major props for jumping into what I feel is the ultimate in modeling, sailing ships, plastic or wood, and I will follow his progress on this build with great interest. But John is right, far more of these ships are started that I believe are ever finished, and there is a reason for that, to do it correctly takes commitment, patience, and a good supply of single malt Big Smile . You and Evan have inspired me to step up my game with my current build and I am grateful, especially as this forum and others like it didn't exist when I built Cutty Sark so I was essentially on my own.

Happy modeling!

Dan

  • Member since
    June 2012
Posted by arnie60 on Thursday, April 2, 2015 10:43 AM

I guess that I need to chime in here since my work has been referred to a few times.(thanks for the kudos BTW)

I concur w/ Evan. Anyone can do this provided they have extreme patience (coming up on two years for my build), perseverance, and good references to draw from. [This is only my fourth model ever, and I have relied heavily on other peoples build logs for "tips and tricks"] I have the same approach as Evan, breaking it down to 100's of little separate models, so to speak. If I am rigging a yard, that is all I care about doing even if it takes me weeks to do it.

I also agree w/ Evan in that there is a lot of tedium to overcome, and sometimes you just have to put it aside for a while (as I have done on several occasions) to keep from going nutso and giving up. I just started another build of the CSS Alabama to get away from the Connie for a while [now I get why people have two or three builds going on at the same time] and take on a new challenge.

And again I agree w/ Evan.... POOH POOH on the naysayers. If you want to build a certain model, just do it. You have nothing to lose. It's really all about the process and the learning experience, and if you are disappointed w/ the outcome, just do it better next time.

  • Member since
    February 2015
  • From: UT
Posted by ageofsail on Thursday, April 2, 2015 10:26 AM

I think I disagree slightly here John insofar as, judging from what Force 9 has done so far, he is less than halfway done in 3 years, as scary as that sounds. His commitment to detail on the hull and decking is just a foregleam I'm sure of what he has in store for us on the masts and rigging. I am so looking forward to what's on the horizon regarding these parts of his build which to me is where the real work begins, and it is also my favorite part of the a ship project, Arnies method for hanging rope on the pinrails will be put to good use!

Now I have a question for you or Evan concerning running rigging. On my last project, Cutty Sark, I did the whole furled sails thing in a manner I'm sure you disapprove of as they are wadded up in the yards and very prominent, instead of rolled neatly into the yards and I incorrectly shrouded the jibs up on the sheet linees rather than running them down to the bowsprit. Now that I know how they should be furled, and I will be furling them in the yards, I am curious what your take is on how to present the sheet, clew, and bunt lines and other running rigging used to work the yards and sails. On Cutty Sark I actually tied sheet lines to the sails and "hoisted" them, thus presenting them as I thought they would look with the sails furled. It came out OK but clearly not correct in how I presented the sails.

Revell's instructions provide for no sails with instruction on how various sheet and clew lines were tied off when the salis aren't in place. As I agree with you that furled sails look great I will be furling sails again (this time correctly) and I foresee an issue with how to rig these lines as it will be very difficult to tie them to the silk span I will be using to represent the sails being as they will be rolled tightly onto the yards. I am months away from this part of the project however I would like your opinion on how I might accomplish this given the limitation of not actually "hoisting" the sails to the yards via the sheet and clew lines so as to ponder my options.

Happy modeling!

Dan

  • Member since
    March 2015
Posted by niart17 on Thursday, April 2, 2015 10:01 AM

Thanks for the info Evan. I think I'll just wait til the kit comes in so I can have a visual about how I want to attach the dead eyes to see if I want to go with the pre-stropped like you're using or go another route. Those on BJ website stropped to the chain plates look great but not sure how to go about attaching them to the kits channels. Looking forward to seeing how you accomplish all of this.

Thanks again,

Bill

JOIN OUR COMMUNITY!

Our community is FREE to join. To participate you must either login or register for an account.

SEARCH FORUMS
FREE NEWSLETTER
By signing up you may also receive reader surveys and occasional special offers. We do not sell, rent or trade our email lists. View our Privacy Policy.