SEARCH FINESCALE.COM

Enter keywords or a search phrase below:

Continental Frigate Hancock

10923 views
29 replies
1 rating 2 rating 3 rating 4 rating 5 rating
  • Member since
    May 2003
  • From: Greenville, NC
Continental Frigate Hancock
Posted by jtilley on Tuesday, July 30, 2013 11:56 AM

Well, the time has come for me to make my first effort to post pictures in the Forum.  I've bought a new computer (a Mac) and a new copy of Photoshop Elements 11,  and I've set up a Photobucket account.  Here goes nothing:

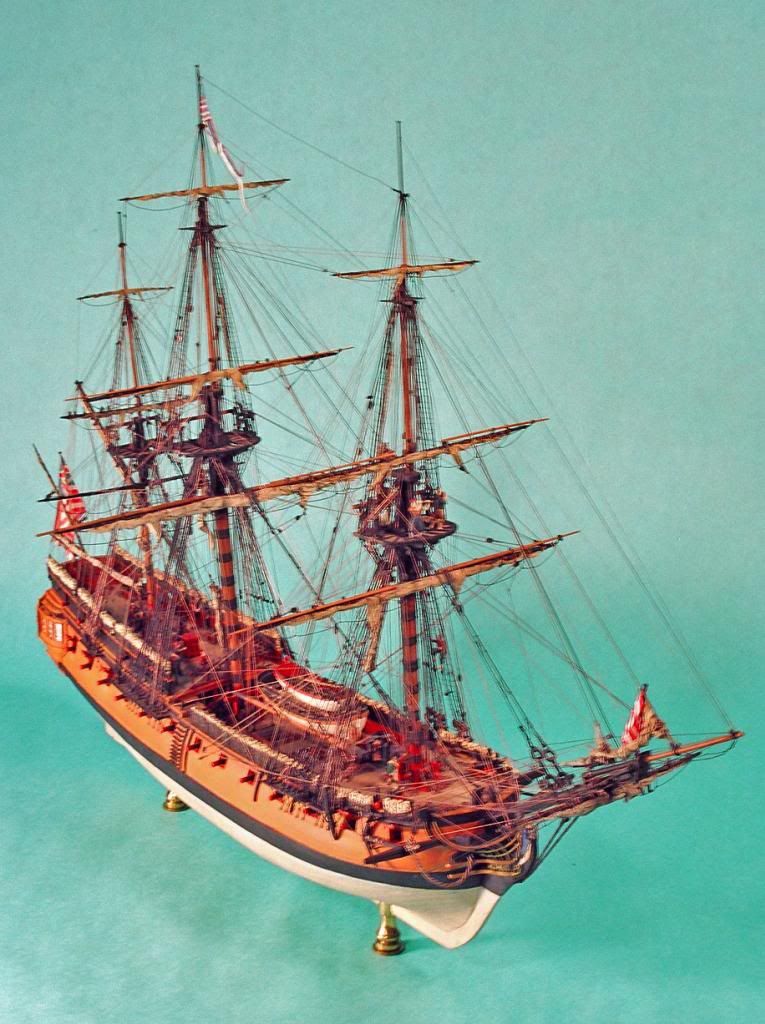
 So far so good.  I built this model of the American Continental Frigate Hancock between 1977 and 1983. The scale is 3/32"=1', or 1/128, giving it an overall length of about 20".  It's scratchbuilt, with some manufactured parts (mainly the blocks, deadeyes, and crew figures).  The construction method is "plank-on-hollowed-out-solid," with the hull carved from basswood lifts glued either side of a plywood "keel plate."  The hull planking is strip styrene.  I'm not sure I'd use that method again, but it worked.  The glue that holds the planks to the hull has now been holding just fine for more than thirty years.

It's based on the drawings that the British made after they captured the ship - the "Admiralty draught."  Howard I. Chapelle traced those drawings for publication in his great book, The History of the American Sailing Navy.  I bought prints of the Chapelle drawings from the Smithsonian (where almost all of his drawings are held), took them to an architectural printing firm, and had them reduced from the original 1/48 to 1/128.  In those days that reduction process was was rather complicated, requiring big, expensive equipment.  Nowadays an architectural printer with a good xerox copier can do it in a few minutes - and if the original isn't bigger than 8 1/2"x11" I can do it at home on my Epson printer.

Nobody's found the Hancock's spar dimensions.  After a good deal of thought I decided to use those of the Raleigh, another 32-gun frigate that was under construction at the same time.  The Raleigh was built at Portsmouth, New Hampshire; the Hancock at Newburyport, Massachusetts.  James Lees's fine book, The Masting and Rigging of English Ships of War, was an enormous help in this model.  It seems pretty safe to assume that American shipwrights and riggers in 1775-6 generally followed British practice.

My late father (a retired architecture professor, who had extensive training in sculpture and aesthetics) helped me out in designing the mounting pedestals.  Getting the height, diameter, and placement of those things is pretty important to the overall appearance of the model.  I think we got it about right this time. 

The model normally lives in a plexiglass case with a walnut base.  (That's the big reason why it's lasted thirty years.)  For the pictures I ran a Savage paper photo backdrop behind and under it. 

The figurehead of the real ship was slightly larger than life-size.  By pure coincidence it turned out that an HO figure from the extensive Preiser line who had his arms folded across his chest was just the right size.  He had to get a new hat, coat, and legs.  A letter from Commodore Sir George Collier describes the color scheme of the figurehead in remarkable detail.


Making the stern was quite a little project.  It's built up from styrene sheet, styrene strip, Milliput epoxy putty (wonderful stuff), and clear plastic (though there's nothing inside except a little sign reading "Sorry, no interior detail.")  The letters for the ship's name are from a set of styrene alphabets that used to be available from Slater's, of England.  The serifs are doctored with Milliput. The muntons in the windows are white decal stripes; the "Don't Tread On Me" lettering is from an N-scale decal sheet from Microscale.

In real life the transom is about 3" wide.  Blowing up this image on a nice new Mac screen is a humbling experience.  I can see now that the top of the left hand window is a little crooked.  My bad.


The crew figures came from several plastic kits that happened to be just about on the right scale:  the Revell Bounty, Santa Maria, and harbor tug Long Beach (!) and the Airfix Endeavour.  They got pretty extensively modified with plastic sheet and Milliput.  (The green-coated Continental Marine on the forecastle deck a couple of shots back started life as a helmeted Spanish soldier on board the Santa Maria.)  The only sign of the model's age is the green patina on that guy's telescope.  The scope is brass; I varnished it, scraped it, and cussed at it, but it kept turning green.  Sometime after I took these photos I finally gave up on it, decided it's a leather-wrapped telescope, and painted it black.

The wheel rims and hub were turned from brass, and drilled with the Unimat's indexing head.  The spokes are plastic rod, built up to profile with a mix of PollyS paint and white glue.

The two binnacles in front of the wheel have compasses inside them, made from a set of 1/72 aircraft instruments.  Actually only one binnacle has a compass.  I succumbed to irresistable temptation and put an altimeter in the other one.

The boats were made with a technique I learned from an old book by Ewart Freeston called Modeling Open Boats. I started by cutting a piece to form the keel, stem, and sternpost from a piece of holly.  Then I cut two blocks (also holly) to form the two sides of the hull - with the growth rings of the wood radiating out from the centerline of the hull at the top.  (That's important.)  Then it was a matter of carving the exterior to shape, and hollowing it out.  The trick there is to hold the workpiece over a light bulb as you carve.  When light starts to show through the wood - STOP.

Here's a trick for making oars on this scale (and smaller).  Heat up a straight piece of brass wire over a candle, let it cool, and mash one end of it in a vise.  The mashed part becomes the blade.  Cut and file to shape.

The hammocks are tissue paper, treated with my favorite mixture of acrylic paint and white glue.  I don't remember how long it took to make all of them.  The netting is nylon material from a fabric store.  The trick is to find netting with square mesh.  Most of it is hexagonal or octagonal.  With 20/20 hindsight I realize that the mesh I used is actually too fine for the scale.  Noted for next time.

The deck gratings are britannia castings from Bluejacket.  Unfortunately the company doesn't make them any more.  The berth deck only runs under the hatches, where it can be seen.

The gun barrels were turned from brass on my dear old Unimat lathe.  The trucks (wheels) for the carriages, and the handles on the quoins, were turned from boxwood.  (Great stuff if you can find it.)  The other parts of the carriages are made from styrene sheet.

The spars are turned from degama, an extremely dense hardwood that can be turned down to a really fine diameter and almost refuses to bend.  (It does, however, break.  I found that out the hard way - more than once.)

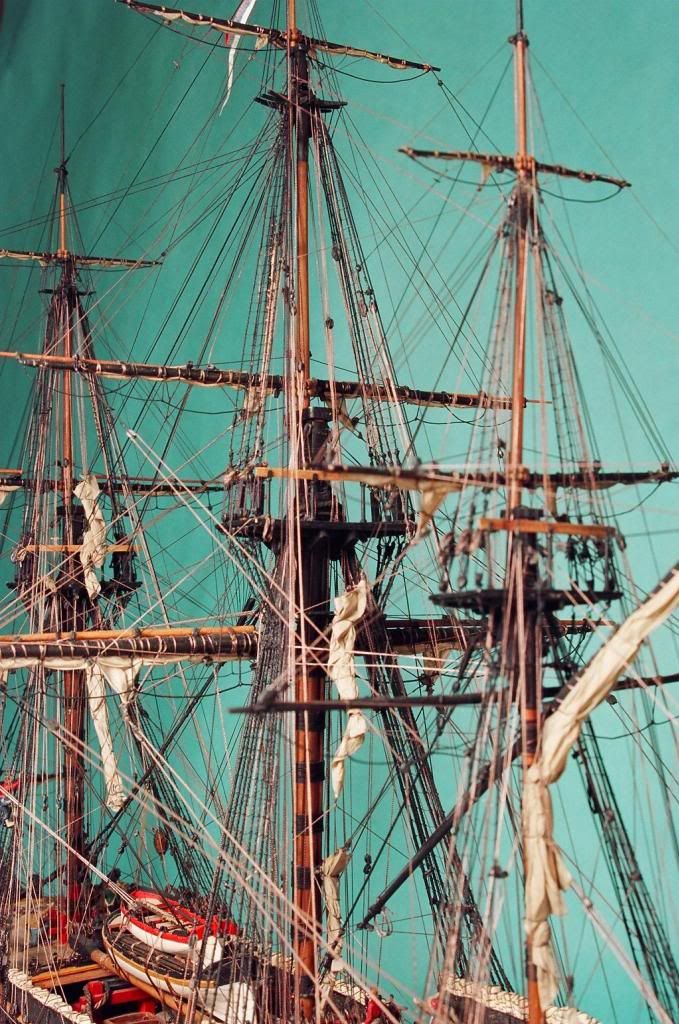
Most of the rigging is silk thread, spun up into several dozen diameters on my primitive "rope-making machine."  (I made it from a Lego set, and it worked just fine.)  The big exceptions are the ratlines, which were made from nickel-chromium wire.  (A friend picked up a spool with several miles on it at a military surplus store.)  That turned out to be great stuff for the purpose:  it can be tied in a clove hitch, and teased so it sags between the shrouds.  The footropes are brass wire.  The blocks and deadeyes are britannia metal castings from Bluejacket.  I lost count of how many I had to buy, but the expense was spread over several years.  I got six years (with several long gaps) of modeling out of less money than a 1/350 Trumpeter battleship costs today.  (That doesn't count the plexiglass for the case, which, as I remember, was the biggest single expense.)

According to the tables in David Steel's Elements of Rigging and Seamanship, a 32-gun frigate like this was issued with about fourteen miles of rope.  I believe it.

Looking at this thing now I have to wonder whether my 62-year-old fingers and eyeballs would be up to doing it again.  I doubt it.

The sails are made from lens tissue, treated with a mixture of PollyS paint (as it was called in those days) and white glue.  I've described the technique elsewhere in the Forum.  Why I thought all those sailors should look so anemic I have no idea.

The skinny little bundle of spar and canvas lashed inside the topmast shroud is the fore topgallant royal yard and sail.  During this period the topgallant royal was a temporary, fine-weather sail set above the topgallant, with minimal rigging; when it was furled the yard and sail were sent down and stowed like this.  By a decade or so later the topgallant royal had morphed into the true royal, whose yard that was more-or-less permanently secured to the mast.

The photos, if anybody's interested, were taken with my dear old Pentax 35mm film camera, before I went digital.  (It still works perfectly - though most of the time I use my digital Pentax K-10.)  The background, as mentioned earlier, is a Savage paper one (about $25 from Adorama or B and H Photo), and the light came from three daylight-balanced blue photo bulbs mounted in "clip light" reflector fixtures from Lowe's, with cheesecloth diffusers.  (I've got a better lighting setup now, with umbrellas.)  The film is Fuji Reala.  I had the negatives made into a digital disc, so I could Photoshop them. 

Thanks for looking.  Someday soon I'll try posting some pictures of other models.  Getting the pix from Photoshop Elements on a Mac to Photobucket to the Forum is a little complicated, but I think I'm getting the hang of it.

Youth, talent, hard work, and enthusiasm are no match for old age and treachery.

  • Member since
    March 2003
  • From: Towson MD
Posted by gregbale on Tuesday, July 30, 2013 11:58 AM

Great to see your photo post, Professor! (I know it's been vexing you for a while.)

Look forward to seeing more. Always...more....

Greg

George Lewis:

"Every time you correct me on my grammar I love you a little fewer."
 
  • Member since
    March 2004
  • From: Spartanburg, SC
Posted by subfixer on Tuesday, July 30, 2013 12:32 PM

It's good to see your Hancock again, it has been quite a while.

I'm from the government and I'm here to help.

  • Member since
    May 2006
  • From: Chapin, South Carolina
Posted by Shipwreck on Tuesday, July 30, 2013 1:04 PM

That is beautiful work Dr. Tilley. Did you know that Mac users are discerning people? Congratulations!

On the Bench:

Revell 1/96 USS Constitution - rigging

Kinetic 1/48 YF-104A 5-2957

Trumpeter 1/350 USS Hornet CV-8

Revell 1/48 B-1B Lancer Prep & Reasearch


  • Member since
    May 2003
  • From: Greenville, NC
Posted by jtilley on Tuesday, July 30, 2013 1:11 PM

Many thanks, gentlemen.  I don't know that Mac users are any more discerning than anybody else, but they're happy.  There seems to be general agreement in the photography world that the Mac is preferable to Windows for photo editing.  I don't have enough experience with the Mac yet to form an opinion, but I can say that it works mighty well.  It obviously has considerably more photo editing capacity than I do.

Youth, talent, hard work, and enthusiasm are no match for old age and treachery.

  • Member since
    September 2012
Posted by GMorrison on Tuesday, July 30, 2013 2:17 PM

That's wonderful to see, and congratulations for tackling the posting issue. I think it's a wonderful model; the builder obviously understood rigging!

If I were to ever build something like that, I'd consider it a lifetime achievement. Well done.

Are those studding sail booms, and if so when did that come into usage on fully rigged ships?

I'll host you a bottle of Malmsy in officers mess!

 Modeling is an excuse to buy books.


  • Member since
    May 2003
  • From: Greenville, NC
Posted by jtilley on Tuesday, July 30, 2013 2:32 PM

Many thanks, GMorrison.  Yes, studding sails came into use in the late seventeenth century.  In a few minutes' digging on the web I couldn't find any pictures of the Hancock that showed her with studding sails set, but inventories of two other Continental frigates, the Raleigh and Alliance, do make it clear that they had studding sails.  I think it's a fair assumption that the Hancock set them too; she would have been an unusual frigate if she hadn't.

Youth, talent, hard work, and enthusiasm are no match for old age and treachery.

  • Member since
    March 2012
  • From: Marysville, WA
Posted by David_K on Tuesday, July 30, 2013 5:52 PM

Wow, what can I say?  

That is very, very impressive.  Dang.

        _~
     _~ )_)_~
     )_))_))_)
     _!__!__!_         
     (_D_P_K_)
   ~~~~~~~~~~~~~
    ~~~~~~~~~~~

Current Project:  Imai/ERTL Spanish Galleon #2

Recently Finished: Revell 1/96 Cutty Sark

Next Up:  ???


  • Member since
    September 2005
  • From: Groton, CT
Posted by warshipguy on Tuesday, July 30, 2013 6:01 PM

John,

Your Continental Navy Ship Hancock is a beautiful model, as is your HMAV Bounty. It's terrific to see your work here.

Bill Morrison

  • Member since
    November 2009
  • From: Twin Cities of Minnesota
Posted by Don Stauffer on Wednesday, July 31, 2013 9:33 AM

Looks great!

Don Stauffer in Minnesota

  • Member since
    December 2010
  • From: Salem, Oregon
Posted by 1943Mike on Monday, August 5, 2013 5:32 PM

John,

It's so nice to see the Hancock once more! I'm delighted that you're posting pictures again and look forward to many more images of your models.

Mike

Mike

"Le temps est un grand maître, mais malheureusement, il tue tous ses élèves."

Hector Berlioz

  • Member since
    August 2005
  • From: Seattle, WA
Posted by Surface_Line on Tuesday, August 6, 2013 12:27 AM

This looks great, Prof.  It feels especially good when a model looks so good after so many years, anemic sailors notwithstanding.

Great work!

Rick Heinbaugh

  • Member since
    September 2012
Posted by GMorrison on Tuesday, August 6, 2013 1:06 AM

BTW just noticed. Why are the muzzles of the cannons red?

Obvious answer- "because they were in reality".

New to me.

 Modeling is an excuse to buy books.


  • Member since
    May 2003
  • From: Greenville, NC
Posted by jtilley on Tuesday, August 6, 2013 6:00 PM

That color scheme shows up (albeit not consistently) in quite a few eighteenth-century frigate models.  It seems to have been a matter of aesthetics.

Sometimes just the flat face of the muzzle was red; sometimes the red extended back to the first reinforce.  I suspect it depended on somebody's taste.

With 20/20 hindsight, I wish I hadn't used such a bright red.  My excuse is that I based that choice on contemporary models.  It's been pretty firmly established now, though, that the inboard works (of British warships, at least) were painted with a dull "red ochre" - and that it was intended to serve as a general-purpose primer, not, as we thought for many years, to camouflage blood stains.  (My guess is that it eventually came to be a tradition with not a lot of thought behind it, and that hiding blood was considered a useful benefit.)

Youth, talent, hard work, and enthusiasm are no match for old age and treachery.

  • Member since
    July 2010
  • From: Tempe AZ
Posted by docidle on Friday, August 9, 2013 2:31 AM

Thank you Professor for posting this.  It is truly awe inspiring and what I try and strive for with my ships although I know a have a ways to go.  I really love the rigging on this and your other ships, but then again I really like the hulls too.

Steve


  • Member since
    August 2013
  • From: Essex, England
Posted by Aubrey-Maturin on Friday, August 16, 2013 8:44 AM

WOW!

That certainly is a beautiful ship, your talent and patience in building such a thing is astonishing, I hope at some point in the future to even build a ship half as nice as that.

You must be a proud owner! Didn't think it was even possible to fully rig a ship model as such at any tabletop scale!

Pete

Finished: 1/180 Airfix HMS Victory, 1/50 Revell Viking Ship, 1/130 HMS Flora (Lindberg Jolly Roger), 1/400 Airfix Mary Rose

Current: 1/196 HMS President (Revell Constitution), 1/110 Revell HMS Bounty

Flickr Albums

  • Member since
    March 2004
  • From: Kincheloe Michigan
Posted by Mikeym_us on Sunday, August 18, 2013 10:14 PM

What amazes me John is that the Hancock was represented as Plank on Bulkhead. But I have never seen a ship model of very many of the ships from the War of 1812 namely any of the ships of the Lake Erie fleet like the USS Niagra. And I see the Niagra almost regularly once a year when she sails through the Soo Locks where I work.

BTW John styrene actually does make a better option than actual wood since it would usually be cheaper than wood with one sheet making lots of planks. And if you have an idea how many planks you need per side dictates how many sheets of styrene you need. And if I remember Evergreen styrene sheets still cost under $10 a pack. I think it might be interesting if someone can make plastic bulkheads and keels to make a cheaper but sturdier plank on bulkhead ship kit.

On the workbench: Dragon 1/350 scale Ticonderoga class USS BunkerHill 1/720 scale Italeri USS Harry S. Truman 1/72 scale Encore Yak-6

The 71st Tactical Fighter Squadron the only Squadron to get an Air to Air kill and an Air to Ground kill in the same week with only a F-15   http://photobucket.com/albums/v332/Mikeym_us/

  • Member since
    May 2003
  • From: Greenville, NC
Posted by jtilley on Monday, August 19, 2013 12:53 PM

Mikey, I'm afraid I don't understand your first comment.  My model of the Hancock certainly isn't plank-on bulkhead.  It is, as I said in the first post of this thread, plank-on-solid.  I'm unaware of any Hancock kit, in any format.  Where was it "represented as plank on bulkhead"?

Model Shipways offers a very nice plank-on-bulkhead Niagarahttp://www.modelexpo-online.com/product.asp?ITEMNO=MS2240 .

Whether styrene is a better material than wood for planking is questionable.  Basswood strips are a good deal cheaper than styrene ones - generally speaking.  In my opinion the best planking material of all is holly.  If you have a miniature table saw (which I didn't when I built the Hancock) you can rip your own planks from a sheet of holly veneer, which costs about $1.50 a square foot. 

Youth, talent, hard work, and enthusiasm are no match for old age and treachery.

  • Member since
    September 2012
Posted by GMorrison on Monday, August 19, 2013 2:07 PM

This *ost takes me down a slight alley in my memory. Apologies in advance for the detour.

Way back in middle school in the 60's there was still a course called "Industrial Arts", or "shop" for short. Imagine, we still had a society where learning how to make things with machine tools was a good living.

So in "architectural drafting", we designed houses. But here's the nasty part. This particular teacher's idea of an architectural elevation was to draw the framing at 1/4" = 1'-0" scale. All of the elevations, floor plans and roof framing. And not a framing plan like is made for a steel building,with single lines indicating each member. No, double lines spaced a scale 1 1/2" apart. Drawn on a paper that was just like the stuff "manila folders" are made out of, only light green. With a 4H pencil, which meant mistakes could not really be erased without leaving a groove, or tearing the facing off the paper. Which of course meant starting over. And hand cleanliness was enforced by inspection, and if necessary, remedy with a "Navy brush". Needless to say we were all terrified of the teacher, and got pretty good at drafting.

Once the drawings were "done", we stretched waxed paper over them and cut and glued strip wood together with white glue. Mr. Costarella spent all afternoon at a table saw making the stuff for us. I got as far as placing my pyramidal pier blocks on my base. I think one boy got his floor framed and a wall up.

But I sure learned some wood modeling skills.

Eventually, in spite of this, I did become an architect. But as soon as those plans solidified, I was banned forever by my father from using table saws.

I have been stalled for a while on my big Victory with how to plank the upper gun deck. The middle and lower are just painted, which is fine, but the upper is of course more visible through the boats etc. My earlier idea was to replace the plastic decks with scribed sheets of wood. But it's not going to be satisfactory in terms of the end joints, or the caulking of the long seams.Having looked at some recent posts, and reading some of yours from earlier, John; I've come to the conclusion that if I do it "one board at at time" it will be easier in the long run, better looking and allow for some details such as the king plank, joggled planks and so forth. Thanks for the fine example set.

 Modeling is an excuse to buy books.


  • Member since
    May 2003
  • From: Greenville, NC
Posted by jtilley on Monday, August 19, 2013 5:35 PM

Kit manufacturers have been trying for years to figure out ways to make decks out of single pieces.  The worst offenders, to my eye, are the HECEPOB companies that try to make decks out of plywood.

A ship's deck, with rare exceptions (e.g. aircraft carriers), is curved in two dimensions:  sheer from fore to aft, and camber from port to starboard.  That means that the surface of a deck is a compound curve.  Plywood, or any sheet of any other rigid material, doesn't like to be forced into a compound curve.  Our ancestors figured out hundreds of years ago that the solution is to make the deck out of narrow planks.  On a model, that takes some time (though not as much as lots of people apparently think), but is actually easier than trying to force a sheet of some material into the requisite compound curve.

I'm a big booster of holly for the purpose, but if you don't want to go that route basswood is a good second choice.  If you're planking over genuine beams, the deck probably should be at least 1/32" thick.  If you're laying the planks over a styrene deck piece, you might want to look into the .020" strips that Bluejacket sells specifically for planking:  http://www.bluejacketinc.com/fittings/wood3.htm . 

I also saw recently, on the Freetime Hobbies site, a line of thin maple planks with pressure-sensitive adhesive on the back.  As I remember, the narrower widths sold out almost immediately.

Youth, talent, hard work, and enthusiasm are no match for old age and treachery.

  • Member since
    September 2012
Posted by GMorrison on Monday, August 19, 2013 5:43 PM

Thank you, several good sources. I'll see what I can find. The lower two plastic gun decks are flat, as they were split down the middle so that they could be fidgeted down into the hull. I haven't looked at the upper two in a while. I can live with a flat upper gun deck, and I think that the weather deck may be a single piece with camber.

So, the Bluejacket price is $33.60 for one sq. ft. of the 1/16", $ 25.60 for the 3/32" and $ 21.60 for the 1/8".

That seems affordable. I also would block out a rectangle for each gun on the upper gun deck, so they don't sit high in the ports. I've heard of people clipping off the bottom of the trucks, but that seems a little radical. And of course, except for under the boat skids, the pattern of the butt ends wont much matter, plus that area has a lot of gratings too.

I'm glad, your model has inspired me to get back to work on mine.

 Modeling is an excuse to buy books.


  • Member since
    May 2003
  • From: Greenville, NC
Posted by jtilley on Monday, August 19, 2013 5:55 PM

My recollection is that Heller included styrene beams (fewer than the actual number, understandably) that were supposed to set the camber on all the deck parts.  (That marked a big improvement over most of the company's earlier kits, including the Soleil Royal and the two French eighteenth-century ships of the line, which had flat decks.)  I wouldn't be surprised to learn that, due to the quality control problems that seem to be plaguing Heller kits these days, the "beams" don't have the right camber any more.

Many plastic kits ignore deck camber.  The one that deals with it most successfully, in my experience, is the Airfix Bounty.  It has very narrow, cambered beams molded integrally with the deck.  Unfortunately that kit has almost nothing else to recommend it.

Youth, talent, hard work, and enthusiasm are no match for old age and treachery.

  • Member since
    September 2012
Posted by GMorrison on Monday, August 19, 2013 6:14 PM

Heller did on the lower decks, but they famously were mis-numbered in the directions and gave many modelers terminal anxiety. I happened to have the Imai version with the vastly superior instructions, but in the event I replaced them with square brass tube. The originals just weren't rigid enough, as they were channels and had a notch in the middle for the batten that was cast in one deck half underside for the other to mate with. I solved that issue by shaving off an inch of the batten at each beam. I ignored the camber issue on the lower two gun decks, although curving my brass tubes would have been easy, but would certainly like to address it on the upper two. I've also added a detail that tends to get ignored, as I go up. The tween decks in these ships had a lot of columns, in particular to support the muntins and lesser subframing around openings. I've been adding quite a few.

EDIT: I pulled out the weather deck and it's cast thick and flat. Probably going to stay that way.

 Modeling is an excuse to buy books.


  • Member since
    March 2004
  • From: Kincheloe Michigan
Posted by Mikeym_us on Wednesday, August 21, 2013 2:08 PM

jtilley

Mikey, I'm afraid I don't understand your first comment.  My model of the Hancock certainly isn't plank-on bulkhead.  It is, as I said in the first post of this thread, plank-on-solid.  I'm unaware of any Hancock kit, in any format.  Where was it "represented as plank on bulkhead"?

Model Shipways offers a very nice plank-on-bulkhead Niagarahttp://www.modelexpo-online.com/product.asp?ITEMNO=MS2240 .

Whether styrene is a better material than wood for planking is questionable.  Basswood strips are a good deal cheaper than styrene ones - generally speaking.  In my opinion the best planking material of all is holly.  If you have a miniature table saw (which I didn't when I built the Hancock) you can rip your own planks from a sheet of holly veneer, which costs about $1.50 a square foot. 

John wouldn't Holly be best used for the decking while Pine could be used for general planking. But you would need to construct a steaming rig to soften the wood for bending. But I meantioned plastic because the sheets of plastic can be cut to any length and width and you don't need to steam them to bend them.

BTW what material would you recommend for caulking between the joints on the hull and deck?

On the workbench: Dragon 1/350 scale Ticonderoga class USS BunkerHill 1/720 scale Italeri USS Harry S. Truman 1/72 scale Encore Yak-6

The 71st Tactical Fighter Squadron the only Squadron to get an Air to Air kill and an Air to Ground kill in the same week with only a F-15   http://photobucket.com/albums/v332/Mikeym_us/

  • Member since
    September 2012
Posted by GMorrison on Wednesday, August 21, 2013 2:24 PM

Mikeym_us

BTW what material would you recommend for caulking between the joints on the hull and deck?

And for gluing wood strips to plastic decks?

 Modeling is an excuse to buy books.


  • Member since
    May 2003
  • From: Greenville, NC
Posted by jtilley on Wednesday, August 21, 2013 8:21 PM

It's been a long time since I made a deck by gluing wood strips to a plastic kit part, but I did do it on a Revell 1/96 Constitution. I used good old Revell "Type S" tube cement.  It's not available any more, but I imagine Testor's would work. The idea was to soften the upper surface of the plastic so it could soak into the surface of the wood. It worked fine.

I didn't worry about caulking between the hull planks, because the joints were going to be hidden under the paint.  For the deck planks I recommend a trick that's old as the hills:  run a fairly hard pencil around all four edges of the plank before fastening it down. 

I don't recommend pine for any modeling purpose - except maybe baseboards.  It has a coarse, out-of-scale grain and a nasty habit of emitting icky "pine juices" for years.  Holly, in  thin strips, actually is remarkably flexible stuff - though not as flexible as styrene.  Holly's big, huge advantage is its grain.  On the raw wood the grain is scarcely visible, but with a little bit of stain it really pops out - and actually looks like miniaturized wood. Wonderful stuff, if you can find it.

Youth, talent, hard work, and enthusiasm are no match for old age and treachery.

  • Member since
    March 2004
  • From: Kincheloe Michigan
Posted by Mikeym_us on Wednesday, August 21, 2013 11:14 PM

Well you are talking about Pine Tar John so it would be sticky. But I was actually talking about the Pine veneer that is sold in sheets like the Holly. But if I remember shipbuilding the structural members like the Keel and Bulkheads would have been made with hardwoods like Oak or Walnut and the hull planking was Pine as was the rest of the exterior and interior of the ship. I believe the decking was either Pine or some other soft wood.

jtilley

I can't recall ever having made a deck by gluing wood strips to a plastic kit part, but I suspect the same adhesive I used to glue the plastic hull planks to the wood hull of the Hancock would work.  I used good old Revell "Type S" tube cement.  It's not available any more, but I imagine Testor's would work.

I didn't worry about caulking between the hull planks, because the joints were going to be hidden under the paint.  For the deck planks I recommend a trick that's old as the hills:  run a fairly hard pencil around all four edges of the plank before fastening it down. 

I don't recommend pine for any modeling purpose - except maybe baseboards.  It has a coarse, out-of-scale grain and a nasty habit of emitting icky "pine juices" for years.  Holly, in  thin strips, actually is remarkably flexible stuff - though not as flexible as styrene.  Holly's big, huge advantage is its grain.  On the raw wood the grain is scarcely visible, but with a little bit of stain it really pops out - and actually looks like miniaturized wood. Wonderful stuff, if you can find it.

On the workbench: Dragon 1/350 scale Ticonderoga class USS BunkerHill 1/720 scale Italeri USS Harry S. Truman 1/72 scale Encore Yak-6

The 71st Tactical Fighter Squadron the only Squadron to get an Air to Air kill and an Air to Ground kill in the same week with only a F-15   http://photobucket.com/albums/v332/Mikeym_us/

  • Member since
    September 2012
Posted by GMorrison on Thursday, August 22, 2013 10:38 AM

All very interesting.  One thing about pine as a building material in any scale, is that even in this global economy, it is not really available or used in the west where it's not grown to be harvested. Everything here is Douglas Fir, a great species for building a house but is a wholly unsuitable modeling material.

I've never much favored building models out of any of the "soft" (non-flowering) woods.

And, I'm sure you'd all agree that what works best in 1:1 does not translate to scale, oak and steel being two ready examples.

Per John's recommendation, I've been looking at holly veneers online. First, my initial prejudice was that it would be dark brown. As it turns out, supposedly the whitest of hardwood veneers. Also pretty available and not horribly expensive. It does however need to be stripped, which I would have to pay someone to do. More on that as I look for a local vendor so that I can pick my pieces. I've also read of a number of ways to simulate deck caulking, but since I've only ever used the method of darkening the groove in scribed sheet with a pencil, cannot comment on the others. I am inclined to try the idea of rubbing the edges with a pencil before gluing.

 Modeling is an excuse to buy books.


  • Member since
    May 2003
  • From: Greenville, NC
Posted by jtilley on Thursday, August 22, 2013 12:54 PM

Any discussion like this needs to take place under the umbrella of one big general observation:  how a modeler wants to build a model is that modeler's business.  Personally, I'm a big believer in using a variety of materials as they are appropriate for the particular job at hand.  That's why my little Hancock has a couple of dozen materials in it.  Others take other approaches - and they certainly have every right to do so.

I think there's a pretty general consensus among experienced modelers that pine just isn't a good modeling material.  It's soft, it's splintery, and it secretes sap (the yellow stuff - not tar, which has to be extracted deliberately).  Here near the east coast, when we talk about pine we're usually discussing white pine; some dealers sell yellow pine, and a few sell heart pine.  I can't recommend any of those materials for scale modeling purposes.  (White pine used to be a favorite material of manufacturers of machine-carved, solid wood hulls, but those companies switched over to basswood or European whitewood quite a few years ago.)

Mr. Morrison makes an excellent point about wood species.  Experienced modelers almost (not quite) universally reject the idea of using the prototype species in a model - unless it's on a very large scale.  Oak, for instance, is one of the most common woods in wood ship construction, but it's a lousy wood for building models.  (Hard as a rock, and with an extremely conspicuous, open grain.  A 1/96 sailor would trip over the grain in full-sized oak.)

I can't recall having encountered walnut as a shipbuilding wood - except for ornamental carvings. Pine is, indeed, a favorite wood for prototype hull and deck planking.  But I strongly recommend holly (if you can  get it), with basswood as a good second choice.  

Other woods favored by the present generation of serious saiilng ship modelers include cherry, apple, boxwood, and pear - all hard woods with very close grain. 

One caveat about walnut.  Serious American scale modelers rarely use it in actual ship models - though it's a superb wood for baseboards and cases.  In Europe, though, lots of modelers make fittings and other small components out of European walnut, which seems to have a much finer grain than the American stuff.

Anybody who's interested in "taking the plunge" into really serious sailing ship modeling (from scratch or via extensively modified kits) would be well advised to invest in a miniature table saw.  Mine is from MicroMark:  http://www.micromark.com/microlux-mini-tilt-arbor-table-saw-for-benchtop-hobby-use,7500.html , but there are several other good ones on the market.  The initial price is high (especially when you throw in some accessories), but believe me, the ability to cut wood precisely to your own requirements is worth the money.  (Compare this thing to the prices of kits these days, and it doesn't look so bad.) 

On the other hand, I used to have a full-sized table saw - the cheapest one Sears made.  It cost me about a hundred bucks.  With a "hollow-ground satin-finish veneer" blade, a homemade zero-clearance insert, and some patience in setting it up, I could cut really nice strips of holly and basswood as narrow as 1/32". The kerf of the blade, of course, was such that I was turning about half my stock into sawdust, but it was hard to argue with the results.

Being able to cut your own wood really takes the hobby to a different, and highly enjoyable, level.

Youth, talent, hard work, and enthusiasm are no match for old age and treachery.

  • Member since
    March 2004
  • From: Kincheloe Michigan
Posted by Mikeym_us on Thursday, August 22, 2013 8:08 PM

Another tool John is the miniature scroll saws which is the best for making delicate curves like those found in bulkheads and for shaping the keel as well.

On the workbench: Dragon 1/350 scale Ticonderoga class USS BunkerHill 1/720 scale Italeri USS Harry S. Truman 1/72 scale Encore Yak-6

The 71st Tactical Fighter Squadron the only Squadron to get an Air to Air kill and an Air to Ground kill in the same week with only a F-15   http://photobucket.com/albums/v332/Mikeym_us/

JOIN OUR COMMUNITY!

Our community is FREE to join. To participate you must either login or register for an account.

SEARCH FORUMS
FREE NEWSLETTER
By signing up you may also receive reader surveys and occasional special offers. We do not sell, rent or trade our email lists. View our Privacy Policy.