SEARCH FINESCALE.COM

Enter keywords or a search phrase below:

Zvezda 1/72 English Medieval Ship Thomas - Fin 28 April 2014

37443 views
138 replies
1 rating 2 rating 3 rating 4 rating 5 rating
  • Member since
    July 2010
  • From: Tempe AZ
Posted by docidle on Monday, April 28, 2014 11:18 PM

Dave and Arnie,

Thank you gentlemen I really appreciate the remarks.  Now, back to the Nina and Pinta!

Steve


  • Member since
    June 2012
Posted by arnie60 on Monday, April 28, 2014 8:39 PM

Excellent finish!

I love how simple a ship she is, but still reeks of character which you have done a fine job of emphasizing. Thanks for sharing your work here.

  • Member since
    March 2012
  • From: Marysville, WA
Posted by David_K on Monday, April 28, 2014 7:50 PM

Magnifique!  Hard to believe she's actually done!

You are a master of your craft, Steve!

        _~
     _~ )_)_~
     )_))_))_)
     _!__!__!_         
     (_D_P_K_)
   ~~~~~~~~~~~~~
    ~~~~~~~~~~~

Current Project:  Imai/ERTL Spanish Galleon #2

Recently Finished: Revell 1/96 Cutty Sark

Next Up:  ???


  • Member since
    July 2010
  • From: Tempe AZ
Posted by docidle on Monday, April 28, 2014 6:42 PM

                                                                            Fin


  • Member since
    July 2010
  • From: Tempe AZ
Posted by docidle on Monday, April 28, 2014 6:21 PM

Here are some closeups.


  • Member since
    July 2010
  • From: Tempe AZ
Posted by docidle on Monday, April 28, 2014 6:14 PM

As promised, here are some final pictures of the Thomas.

Enjoy,

Steve


  • Member since
    July 2010
  • From: Tempe AZ
Posted by docidle on Sunday, April 27, 2014 8:57 PM

I actually secured the Thomas to it's base this evening.  I put two coats of dull coat on her and called her done.  I will post final pictures tomorrow or Tuesday...... I still have to take them.

Steve


  • Member since
    July 2010
  • From: Tempe AZ
Posted by docidle on Friday, April 25, 2014 8:44 PM

Getting ready to mount the Thomas.  I stained the board in Dark Walnut and used Deft Clear Gloss lacquer finish.  I think on the next build I'll go back to the Satin finish. The brass pedestals are from ModelExpo.

Steve


  • Member since
    July 2010
  • From: Tempe AZ
Posted by docidle on Friday, April 25, 2014 8:38 PM

These are finished photos of the Tack and Sheet lines from block to tie off.

Steve


  • Member since
    July 2010
  • From: Tempe AZ
Posted by docidle on Friday, April 25, 2014 8:35 PM

Here are photos of the completed braces at the block and the tie off.

Steve


  • Member since
    July 2010
  • From: Tempe AZ
Posted by docidle on Wednesday, April 23, 2014 12:47 PM

The beginning of the rigging for the braces.

Steve


  • Member since
    July 2010
  • From: Tempe AZ
Posted by docidle on Wednesday, April 16, 2014 9:26 PM

In the last set of photos, you can see a bit of the aft castle.  I have glued it down and added a bunch of rubber bands to hold it together.  The rudder is on now too.

Enjoy,

Steve


  • Member since
    July 2010
  • From: Tempe AZ
Posted by docidle on Wednesday, April 16, 2014 12:21 AM

Thanks Dave, I have the wooden base sanded and hope to start staining it tomorrow, or at lease this weekend.  I also filed the brass pedestal notches so that the keel will fit into them.  The aft castle is on and the rigging attached, so I'll post some pics tomorrow or this weekend, so stay tuned!

In regards to the lines being weathered or not, I do make a distinction according to where the line is and what is its purpose.  Such as, the anchor rope, I used a thick Coral line and weathered it with a Burnt Umber oil wash first, then when that's dry, I used a bit of Pthalo Green to represent sea weed and muck from the harbor bottom, etc...  Other weathered lines were done with combinations of artist oils.  On other running rigging lines which would get an abundance of use, I left some of them pristine because the older ones were worn out and were replaced by the crew.

I actually used seven different sized lines on the Thomas, although I did not measure for the exact size, I just eyeballed them and used what looked right to me.

Steve


  • Member since
    March 2012
  • From: Marysville, WA
Posted by David_K on Tuesday, April 15, 2014 6:15 PM

Almost there, Steve...Looks great!

I notice that some of the coiled line on deck is *weathery* looking, while some of the coils are still shiny and new....what do you use to weather your line?  Or do you just keep some of it looking new on purpose?

        _~
     _~ )_)_~
     )_))_))_)
     _!__!__!_         
     (_D_P_K_)
   ~~~~~~~~~~~~~
    ~~~~~~~~~~~

Current Project:  Imai/ERTL Spanish Galleon #2

Recently Finished: Revell 1/96 Cutty Sark

Next Up:  ???


  • Member since
    July 2010
  • From: Tempe AZ
Posted by docidle on Sunday, April 13, 2014 9:12 PM

Here is the rigging of the sheet lines.  The first photo is measuring the sheet lines to make sure I have enough.

Please note the port sheet line goes through the shrouds.

Again, I tied off at the aft cleat and coiled the line

The line is now fed through the sheet block.

This shot shows again that I left the tack and sheet lines unsecured at one end so that I can adjust them if needed.  They will be tied towards the end of the build.

The last shot also shows that I finally  attached the aft castle.  In the instructions the aft castle is glued down fairly early but that would make rigging some of the lines really difficult.


  • Member since
    July 2010
  • From: Tempe AZ
Posted by docidle on Sunday, April 13, 2014 6:58 PM

And now back to our regularly scheduled download.

Here is the process I used for the sheet and tack lines.  On both I started with the cleat tie off and the coiling of the line since it starts to get crowded with the different lines getting rigged.  I usually start the running rigging with the bow then work back towards the stern along the middle of the deck, then continue at the bow again and rig up from the inside and work out.  If you have been following this thread you'll notice that I started at the stern and worked forward.  I did it this way because the yard/sail had to be set up before I could start with the running rigging.

Before I raised the yard/sail, I set up all the blocks to make it easier to connect.  I always do this because it is easier to rig and serve the blocks while on the work desk then while hanging from the masts in midair

Here are the blocks first, tack forward, sheet aft.

At this point I am measuring lines both on the sheet and tack to make sure I'll have enough.

Now that I have an idea how much line I'll need I start to tie off at the forward cleat.

After I tied off the tack line at the cleat I coiled the line just like in previous photos.  You'll notice that I haven't finished the tie off at the chesstree.  This is to make sure I have the ability to adjust the tack lines later.


  • Member since
    July 2010
  • From: Tempe AZ
Posted by docidle on Friday, April 11, 2014 8:51 PM

Dave,

The line is from Syren and as Arnie says, it can get expensive; however, it looks great and it does not unravel like MoRope although I really like their served line. Check out www.modelbau-takelgarn.de, this is were I will be getting my served line from, although I would love to learn how to make my own line.

I dilute my glue with a 50/50 mix.   I will go with more water when I am draping the line over the rail and you could use a small drop of CA to hold the top of the line over the pin, although it works well without it.

I did a double line on the same rail so check it out.

Steve


  • Member since
    March 2012
  • From: Marysville, WA
Posted by David_K on Friday, April 11, 2014 6:11 PM

I see....I really like the idea of using tape to help hold it down!  I guess it's not really necessary to make a jig to simulate the angle of a pinrail...

What kind of line is that?  Is it from the Syren company you mentioned before?

Also, how dilute do you make your elmer's when you use it to stiffen the coils....pretty much straight glue, or is it quite dilute?

I'm definitely going to do some more experimenting!  

Thanks!

        _~
     _~ )_)_~
     )_))_))_)
     _!__!__!_         
     (_D_P_K_)
   ~~~~~~~~~~~~~
    ~~~~~~~~~~~

Current Project:  Imai/ERTL Spanish Galleon #2

Recently Finished: Revell 1/96 Cutty Sark

Next Up:  ???


  • Member since
    July 2010
  • From: Tempe AZ
Posted by docidle on Thursday, April 10, 2014 4:23 PM

Dave,

I agree with you, having coiled line on pin rails and on the deck does make a difference between a well made model and a model that stands out.  Don't get me wrong, a poorly built model ship does not magically become a masterpiece just because you coiled some lines for it. However, that being said, it is up to the modeler to make whatever decisions they want for their build and hopefully have fun building the dang thing.  

I have a hunch that it's the line you are having issues with and not your coiling technique. Especially after the rigging you did for your amazing Chebec.  I did an experiment with some line that was not Model Expo nor kit line.

Here is a series of photos to show you how I did this with a belaying pin rack, although it is really the same process I use with line coiled on the deck.  I just set it up with the length being greater than the width.  You might say that it is not a small coil but if you look at pictures of working ships, the length of the coil varies even on the same rail.  If you want, I'll set up a smaller length on the pin rail.  I hope this helps.

Steve

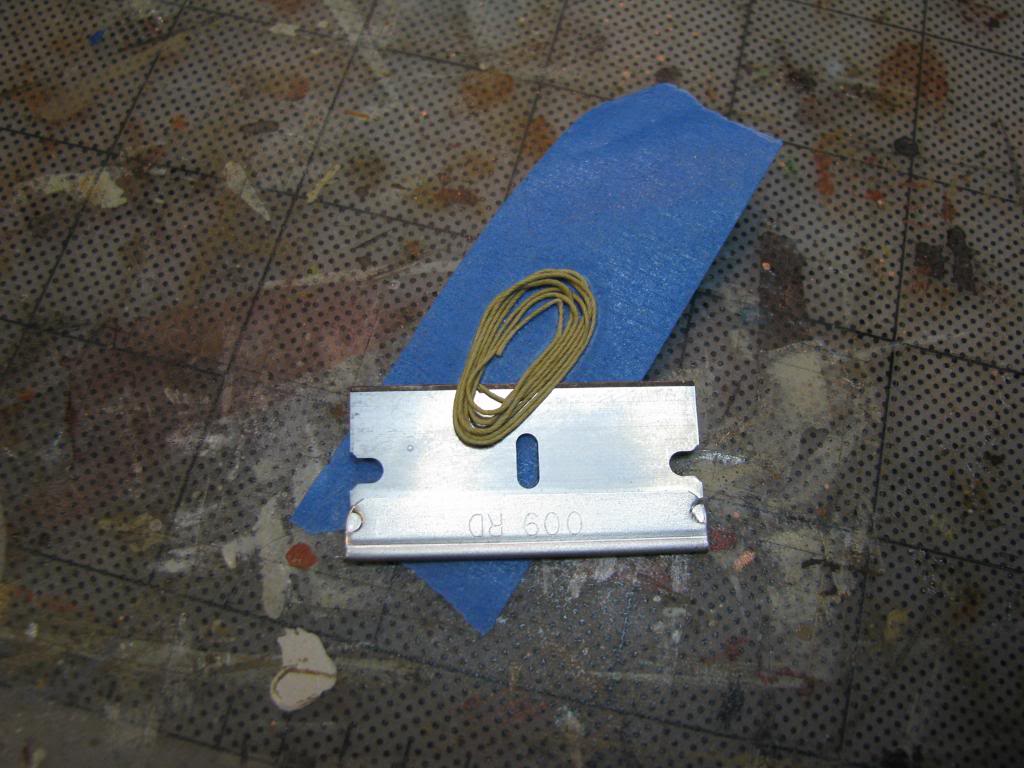
Here is the coil on the painter's tape already brushed with glue.

I use a straight safety razor blade to slip the coil off the tape.

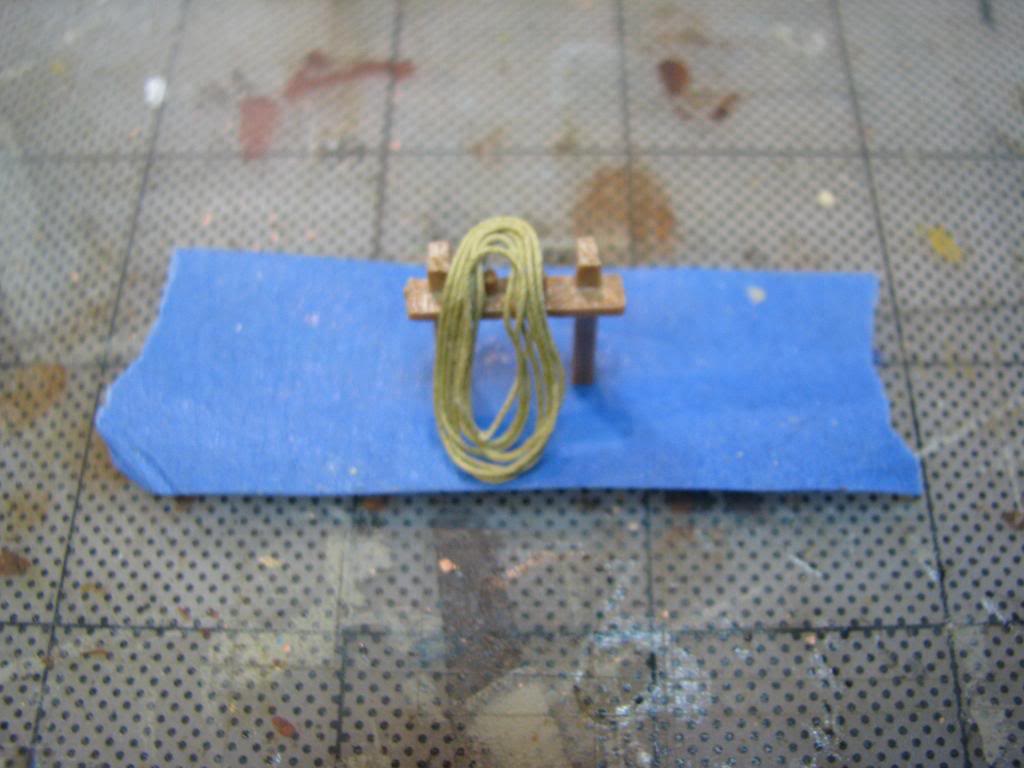
Sorry this one is a bit blurry but this is the coil laid over the pin

And here is the coil brushed with water and just a bit of glue.  I played with it a bit more so that it lay better.

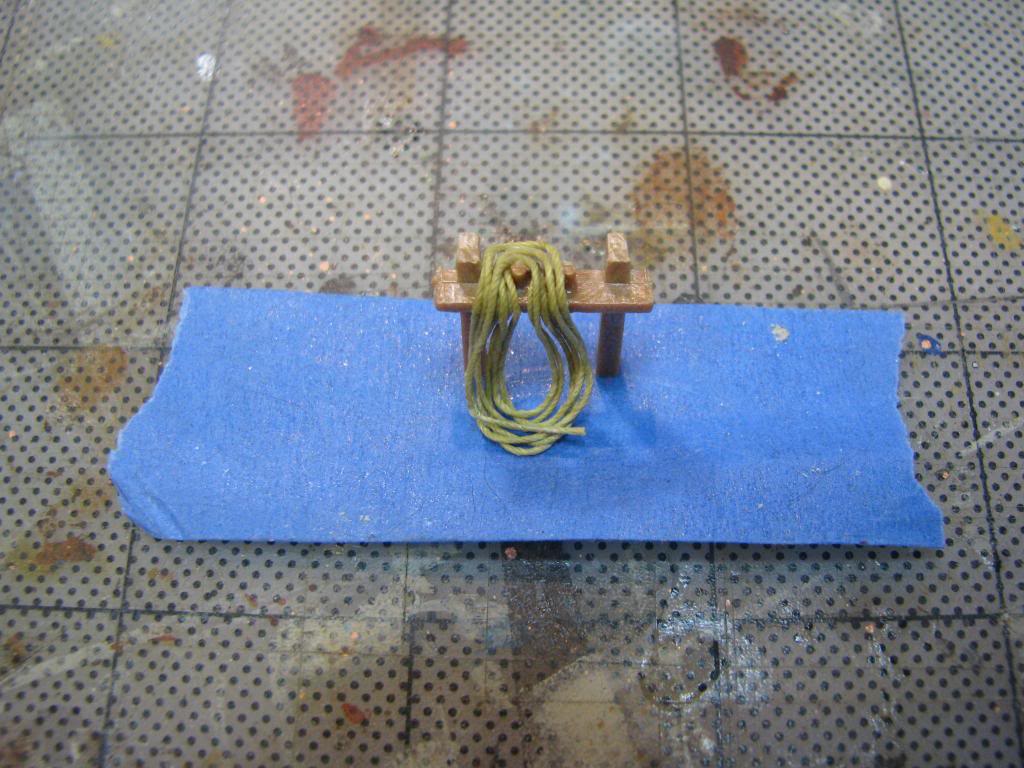
Once that dries, you have a coil laid over the pin rail.  As I said, to really make it look great, it needs to be moved around a bit.


  • Member since
    March 2012
  • From: Marysville, WA
Posted by David_K on Saturday, April 5, 2014 9:29 AM

Hmmmm...let me apologize for hijacking your thread a little bit Steve!

But...how many people use kit line, and how common is it to source line from companies like Syren?  Is there a seriously noticeable difference?  I'm a bit of a cheapskate, so I usually make do with the stuff from the kit (unless it's terrible [the stuff in the new Revell Vasa was BAD!])....but if it really makes for better performance, I guess I should give it a whirl...By the way, I bought a bunch from Model Shipways for cheap last year, but I found it plastic-y and lame....The line in all my Imai kits seems good...I never have any trouble, except if I'm trying to make coils!

I use dilute elmer's when I'm trying to stiffen line for coils...the anchor rope for the Chebec worked out great, but that's easy, since it lies on the deck in a coil (all I did was shape it, brush it with glue+water, and put some clothespins on it to hold it in shape until it was dry)...the stuff that hangs from pinrails seems trickier.  This is a technique that I really want to learn, coiled rope feels like an important detail.

Dave

        _~
     _~ )_)_~
     )_))_))_)
     _!__!__!_         
     (_D_P_K_)
   ~~~~~~~~~~~~~
    ~~~~~~~~~~~

Current Project:  Imai/ERTL Spanish Galleon #2

Recently Finished: Revell 1/96 Cutty Sark

Next Up:  ???


  • Member since
    July 2010
  • From: Tempe AZ
Posted by docidle on Saturday, April 5, 2014 12:54 AM

Dave,

I think the jack in the box outcome has to do with not using the tube glue.  I'll do a test and see if that is it or not.  For liquid cement, do you use the Model Master brand and if so is that what you're you using on the line while wrapped around the rod?  You might want to try the painters tape and white glue mix to see if it comes out more to your satisfaction.  Please let me know how it comes out.

Arnie,

That is amazing that you can get the line to lay the way you want to.  I have a little bit left so I think I'll give it a test.  I'm glad that you find Chuck's line suitable.  Personally,  love his products which is why I recommended it to you.  I agree, it is a bit pricey but well worth it!

I will post some more pictures this weekend on the build, so stay tuned, same ship channel same ship station.....

Steve


  • Member since
    June 2012
Posted by arnie60 on Friday, April 4, 2014 6:41 PM

You are going to laugh at this, I use the rod technique you show above, but I soak it w/ plain water before I pull it off the rod. Surprisingly they tend to hold their shape even after I hang them w/ out using any glue. Sometimes I have to re soak them to reshape them a bit, but then they seem fine. The only glue I use is to attach it to the belaying pin. Might depend on what kind of cordage you are using. All mine comes from Syrene. A bit spendy, but well worth it.

  • Member since
    March 2012
  • From: Marysville, WA
Posted by David_K on Friday, April 4, 2014 5:48 PM

Here's a pic from the book...

        _~
     _~ )_)_~
     )_))_))_)
     _!__!__!_         
     (_D_P_K_)
   ~~~~~~~~~~~~~
    ~~~~~~~~~~~

Current Project:  Imai/ERTL Spanish Galleon #2

Recently Finished: Revell 1/96 Cutty Sark

Next Up:  ???


  • Member since
    March 2012
  • From: Marysville, WA
Posted by David_K on Friday, April 4, 2014 5:42 PM

The problem I have is that the coils don't want to stay coiled, especially when removing them from the jig..soon as they are flexed, the whole thing comes undone like a jack in the box!

Mastini, in Ship Modeling Simplified, uses a similar technique, but he suggests tying loops like a woolding (with the ends of the seize being tied under, and then together outside the loop) around a rod (or exacto handle), and then sliding them off...same problem, though...I can't get them to stay in a loop...maybe more glue??

I never use the tube type cement...I hate that stuff  :)

I guess I'll keep experimenting, but I've failed with about 30 attempts!

lol

        _~
     _~ )_)_~
     )_))_))_)
     _!__!__!_         
     (_D_P_K_)
   ~~~~~~~~~~~~~
    ~~~~~~~~~~~

Current Project:  Imai/ERTL Spanish Galleon #2

Recently Finished: Revell 1/96 Cutty Sark

Next Up:  ???


  • Member since
    July 2010
  • From: Tempe AZ
Posted by docidle on Friday, April 4, 2014 12:41 AM

Thanks Dave,

On this build and the Nina, I have been experimenting with the Elmer's glue and water mix to fairly good results.  I am still using CA on the contact points for lines, but for coiling line I built a jig made of wood and small nails (finishing nails).  The nails are of various distances from each other and these are what I use to coil line.  

I wax the line as usual, by running it through a block of bees wax and then pass it  over a small flames couple of times and then soak the line line until it is limp.  I then take a length of this line and wrap it around a couple of nails that corespond with the height of the belaying pin rail and also how much rope I want to display.  At this point you paint the line with the 50/50 mixture of white glue and water, let dry and then lay it over the the pin.  I then paint the line again with a bit of the glue/water so that it will sag, mostly with a little help from your rigging tool.

Otherwise, if you are using the Wilkins' method, are you using the old tube plastic cement to coat the line when it is on the rod? And using liquid cement while holding the line on the pin and forming it with some form of rigging tool?

I started using the white glue/water mix because I really did not like the look of the Wilkins' method.  It was probably me using FAR too much glue than was needed!

I do not know what method Mastini  recommends but if you want to give me a run down on how it works, I would appreciate it.

Hope this help bud,

Steve


  • Member since
    March 2012
  • From: Marysville, WA
Posted by David_K on Thursday, April 3, 2014 6:03 PM

I like your technique for laying the rope coils...I always struggle with rope coils...hey Steve, do you have a preferred method for making coils to hang on pinrails?  I can never get them to work the way Mastini or Wilkins say in their books...

        _~
     _~ )_)_~
     )_))_))_)
     _!__!__!_         
     (_D_P_K_)
   ~~~~~~~~~~~~~
    ~~~~~~~~~~~

Current Project:  Imai/ERTL Spanish Galleon #2

Recently Finished: Revell 1/96 Cutty Sark

Next Up:  ???


  • Member since
    July 2010
  • From: Tempe AZ
Posted by docidle on Thursday, April 3, 2014 4:13 PM

Here is the tie off at the blocks.  Note the angle of the yard. I hope I am not boring too many people with the "process" photos.

Steve


Adjusting the lines again

And finally the tie off.  I use painter's tape and wrap my lines on them.  Then a 50/50 mixture of water and Elmer's glue is painted on them them and are then left to dry.


  • Member since
    July 2010
  • From: Tempe AZ
Posted by docidle on Thursday, April 3, 2014 3:59 PM

I'm using a bulleye on the bowline instead of the a single block used per the instructions.  The instructions have single blocks off the "bowsprit(?)" which makes much more sense.  I also added the cleats on the inside aft portion of the forecastle for the tie off.

Steve

Checking the length for the lines.


Tied off at the sail


  • Member since
    July 2010
  • From: Tempe AZ
Posted by docidle on Thursday, April 3, 2014 3:45 PM

Sorry about having to post one picture per post, I have been posting from my iPad.  It is a bear and then some to try posting more than one at a time; however, I am on the big boy computer so here are a couple more photos of the build.

Enjoy,

Steve


JOIN OUR COMMUNITY!

Our community is FREE to join. To participate you must either login or register for an account.

SEARCH FORUMS
FREE NEWSLETTER
By signing up you may also receive reader surveys and occasional special offers. We do not sell, rent or trade our email lists. View our Privacy Policy.