SEARCH FINESCALE.COM

Enter keywords or a search phrase below:

Revell 1/96 USS Constitution (Take 4)

7992 views
16 replies
1 rating 2 rating 3 rating 4 rating 5 rating
  • Member since
    February 2014
Revell 1/96 USS Constitution (Take 4)
Posted by Smitty on Saturday, February 1, 2014 3:03 AM

Hello folks!

  I have been reading these forums for quite some time now and am absolutely amazed at some of the work you folks have been doing. It is truly inspiring to see the beautiful examples of craftsmanship here. I, personally, have been building models since I was around 6 years old. Nothing real fancy and almost always aircraft. Sure there was a car or two in there somewhere, but my passion was always with aircraft. I'll admit that i was never that fantastic at it. I usually rushed through them just to see them completed. But as I grew, my appreciation (and patience) grew along with it. When I was around 12 years old, I had taken notice of a 1/96 scale model of the Cutty Sark in my grandparents' basement. It was in pretty rough shape and looked like it literally went through a hurricane. My father explained that it was meant to be that way. I couldn't understand why, but I was immediately drawn to the ship. I loved the detail and I knew how much of a challenge it would have been. I expressed in interest in building one of my own. Next thing I knew, I received for my birthday a 1/96 USS Constitution. My parents explained that they couldn't find the Cutty Sark so I would have to settle for this one. I didn't care. I was thrilled! Off to my room I raced with the box and tore into it, marveling and the sheer number of parts! I looked through it all eager to begin. Fast forward a few months. We had to move because my father, being in the Navy, was transferred to another duty station. The movers came and started packing up the house. I hung out in my bedroom to watch the guy pack out my room. He was mostly done when he decided to pack up my Constitution. At this point, the hull and masts were completely assembled and most of the running rigging was done. I was so proud of this thing. I have never spent so much time and effort on a single model in my life. I told the mover to pack that ship extra carefully because I didn't want it to get broken in the move. Well, he didn't have a box that the ship would fit in, so he was supposed to make a box for it. Apparently he thought it wasn't worth the effort so he decided to make it fit into one of the boxes he had. He accomplished that by snapping off the masts and telling me that I can fix it when I get to my new house. I was devastated. The model arrive in even worse shape due to the move. It was a complete loss. That was my first attempt at the Connie.

Fast forward about 15 years. I decided to try the Connie again. By this time, I was married and wanted to present the model as a gift to my in-laws because they were infatuated with the colonial period. That one took me over a year to finish. Well, I can't really say "finish" because it never got finished. My wife basically forced me to give them the mostly completed model because she was sick of the amount of time I was spending on it. *sigh* Alright. Another failed attempt to complete this ship.

Five years, a divorce, a remarriage, and a stint in the Navy go by and I want to try it again. I purchase the model and get to work. I get the hull completed and am ready to start the work on the masts. The day before Christmas Eve, two months after I get home from the Navy, my house catches fire. The Connie is destroyed. *sigh* 3 failed attempts.

So that brings us to now. If you actually read through my long-winded post, you can see that this ship has become my "Eleanor". Don't get me wrong, I am fascinated with the Connie! I personally think a square rigged ship is a thing of beauty and will always feel that way. I want to finally exercise the demons of my past builds and go above and beyond anything I have ever done. Up to this point, I have never done anything more than out of the box. That isn't going to be true with this build. I intend to add many details that this kit is sorely lacking. I plan to test my capabilities and see just how far I can take this!

I will openly admit that I was hesitant to post a build log on this site because, in many ways, I was intimidated by the quality of he builds found here. But I figured that I could use all the help and encouragement I can get! :) I refuse to let this build be another failure! Anchors aweigh, shipmates! It's going to be a lengthy voyage.


Work in progress: Revell 1/96 USS Constitution

  • Member since
    August 2012
Posted by JimNTENN on Monday, February 3, 2014 9:13 AM

That's a fascinating story especially the part about the movers. A number of modelers on here have had similar experiences with moving companies handling their models. I haven't had that pleasure yet but I believe if I ever move somewhere that requires everything being moved at once I'll rent my own Uhaul and do it myself. I'm beginning to think professional movers are evil. And I understand about being hesitant to post your work on here. I've built models of all kinds for 35-40 years and never had constant fellowship with other modelers so I guess it was easy, as I saw my skills grow, to put myself in the category of advanced modelers. After being on here a little over a year and seeing the work others have done, I feel, in many ways, like I'm still a beginner. But I'm learning and so will you. I'm looking forward to see what you do with Old Ironsides. 

Current project(s): Hobby Boss: 1/72 F9F-2 Panther

                                  Midwest Products: Skiff(wood model)


  • Member since
    February 2014
Posted by Smitty on Monday, February 3, 2014 2:34 PM
To be honest, I‘m looking forward to see what I do with her as well! As I mentioned earlier, I plan on testing myself on this one. I‘ve already made some progress and I am very pleased with the results thus far. I will get some pictures up as soon as I can.

I‘ve been following Force9‘s build rather closely and plan on "borrowing" a number of his ideas.

A short list of things I would like to do:
1) Thickening of gun deck bulkheads and spar deck bulwarks
2) Add a lot more detail to the gun deck, including bitts, chain pumps, properly detailed capstan, a great room, and properly rigged cannons
3) A fully framed and partially planked spar deck to allow better viewing of the gun deck
4) Highly detailed rigging
5) Lighting with fiber optics and scratchbuilt period lanterns
6) Anything else that tickles my creative fancy :-)

I plan on rigging her with furled sails folowing jtilley‘s advice.

Work in progress: Revell 1/96 USS Constitution

  • Member since
    January 2014
Posted by thibaultron on Monday, February 3, 2014 2:48 PM

When I was a kid we moved to another town, but had to stay in an apartment for 6mo. while our house was being built.  My mother looked for the vacumn clearner for a couple weks, then gave up and bought another. When we finally moved into the house, and unpacked all the boxes, she found the vacumn.  The movers had packed it in same box as her mother's china, and marked the box China!!!  No wonder she couldn't find it.  Thankfully, those movers were a bit more careful with the padding than most, and the china survived.

  • Member since
    June 2012
Posted by arnie60 on Monday, February 3, 2014 3:22 PM

Welcome to the forum Smitty;

I am sure you will find considerate advice and help if needed from all the good people here, as have I myself.

From my perspective,you could not have picked a better build than Force 9's for ideas and inspiration. I also have a WIP on the Connie that I have been doing several modifications on that may or may not be of interest and/or help. (plenty of snafus logged there). I too am totally stretching my abilities and skill level on this one, which shows in the amount of time I have spent on her already (close to a year now).

Anyway, looking forward to your build log, and here's the link to mine.

http://cs.finescale.com/fsm/modeling_subjects/f/7/t/155174.aspx

  • Member since
    February 2014
Posted by Smitty on Monday, February 3, 2014 8:13 PM

Arnie, I am SO sorry. I forgot to mention your build and that is the first one I should have mentioned. It was your build that I first found when I started to look for ideas. As a matter of fact, it's your fault that I've decided to go as detailed and hog-wild as I am! Force9's build just reinforced it (which I stumbled across because of your post as well) The amount of time you are spending on her shows just how much you're paying attention to the detail! I'm expecting to spend a couple years at least on my build. I check your log and Force9's nearly everyday for updates. So once again, I apologize not mentioning your build. Please forgive me! :-)

Now, about the movers and my first attempt at the Connie. I've moved many times in my life because my father was in the Navy. That is the first time that I, personally, had a bad experience. As a matter of fact, the last time I moved, when I got out of the Navy, I couldn't have asked for a more professional and friendly moving company. The people who packed out the house took their time and made sure everything was packed securely and logged properly. When we got home, we had to move in with my brother (long story). We had to throw everything in storage about 10 miles from where we were living. While the movers unpacked the truck into storage, my wife and I would tell them what to set aside so we could bring it to our place. When all was said and done, the drivers offered to load everything that we set aside back onto the truck and deliver it to our house. When we asked if there was an extra charge for that, they responded "Well, there's supposed to be, but we'll just report it as an 'extra long carry' and not even report that we had to drive somewhere else." So, not all movers are evil. Unfortunately, it's the classic example of the few ruining it for the rest.


Work in progress: Revell 1/96 USS Constitution

  • Member since
    June 2012
Posted by arnie60 on Monday, February 3, 2014 10:28 PM

Smitty;

No apologies necessary. I was definitely not fishing for compliments, just thought you might find some use out of checking out my build. There are many exceptional modelers. some who even do museum level restoration work, who chime in frequently with much more authority than I can claim to.

Again, I am looking forward to your posts. I will have another one in a week or so.

  • Member since
    February 2014
Posted by Smitty on Tuesday, February 4, 2014 1:39 AM

Alright, as promised, time to start posted some photos. I've already been working on this build for a little over a month and have already logged well over 100 hours, so I've made some progress. :)


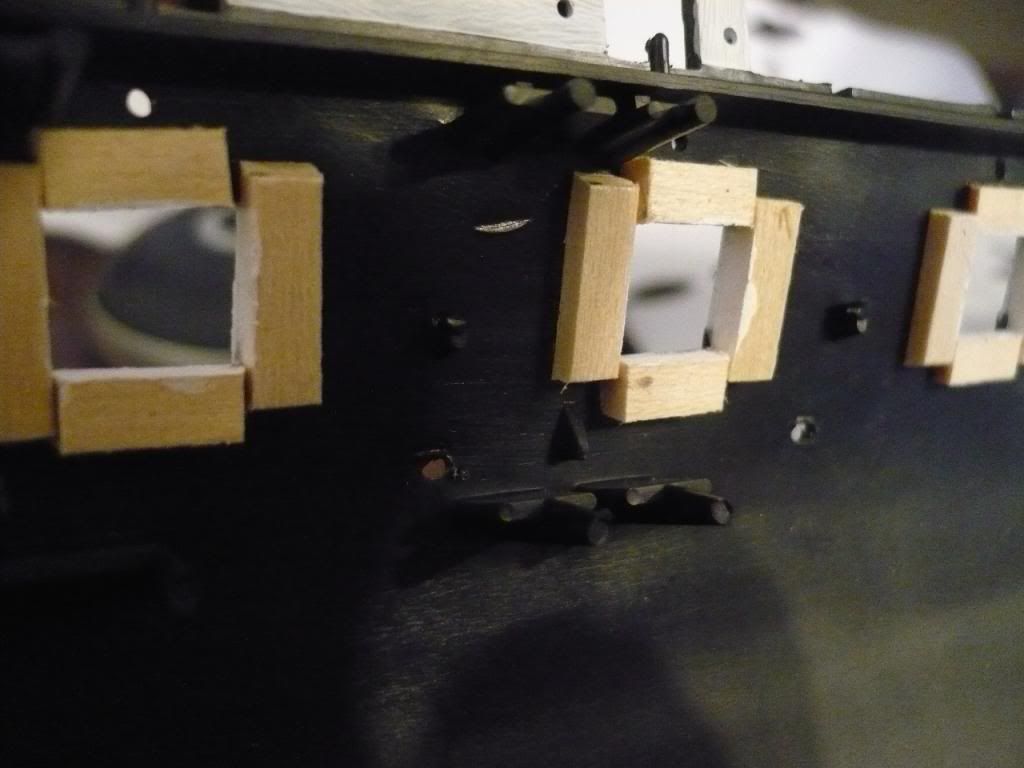
Here, I've started with adding some interior bulkheads to the gun deck. I'm going to be using mainly wood for any scratch built items.


This is a shot of the bulkheads in their completed state. I sanded the strip down to eliminate as many of the seams as possible, then used a straightedge and a blade to scribe in the individual planks. You can see that I've added some thickness to the spar deck bulwarks as well.


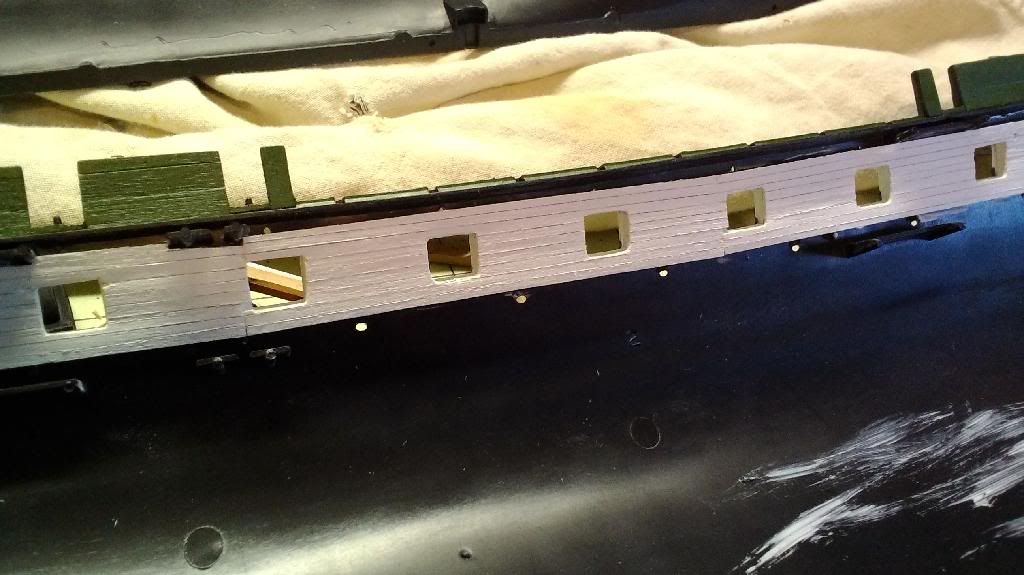
Since I'm going to be adding 3/32" thick planking to the deck, I needed to raise the coamings by that height as well. These will actually be painted green to match the spar deck bulwarks. in the background, you can also see that I removed the raised ridge that was present all along the edge of the deck.


I started by laying the outer-most strips first (sorry, I don't know the actual name of them) and then I found the centerline. From here on out, I would spend an unknown amount of hours laying out individual planks.


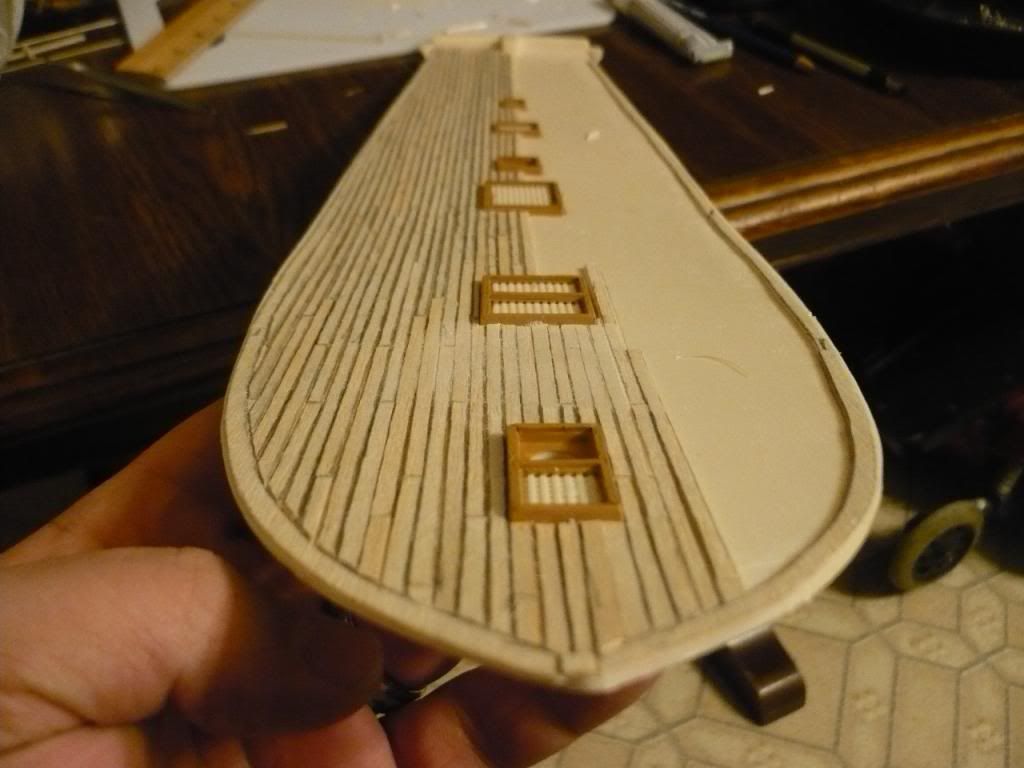
A little over halfway done here. I followed jtilley's suggestion of using a pencil along the edges of the planks to simulate the caulking between the boards. I used balsa here, and I regret it. The wood was too soft and some of the planks got messed up. I'll probably use a different wood for the spar deck.


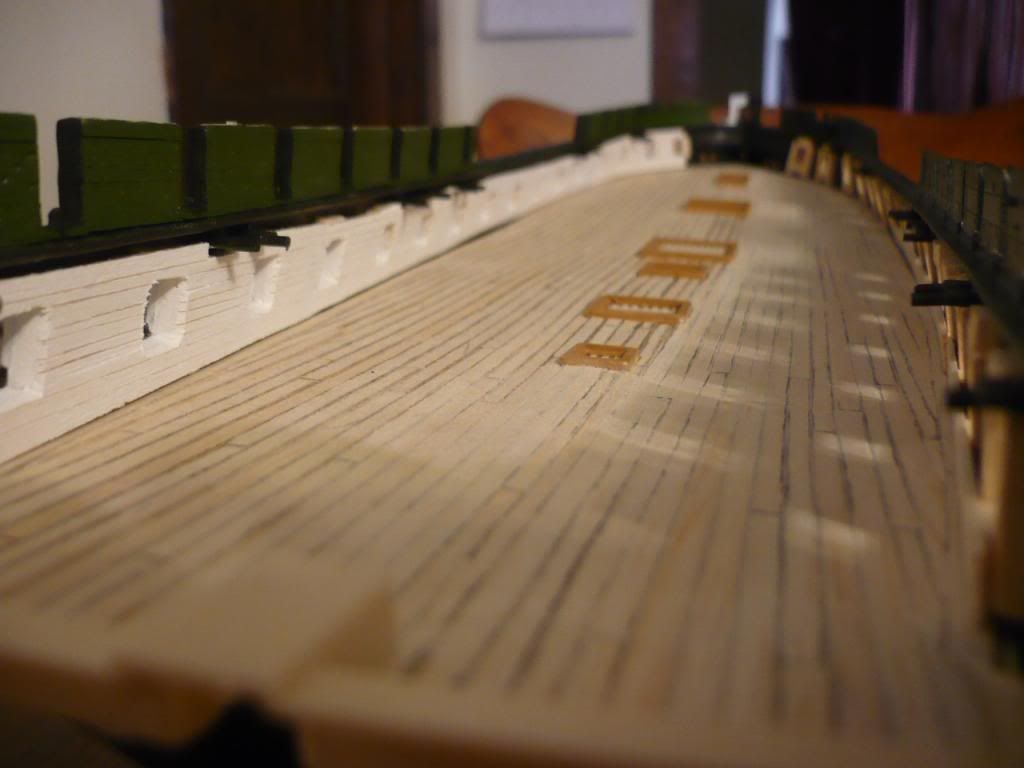
The planking is done on the gun deck. Now it needs a liberal dose of sanding to smooth it out. Once that's done, I will be applying polyurethane as a topcoat. I'll be leaving the wood its natural color.


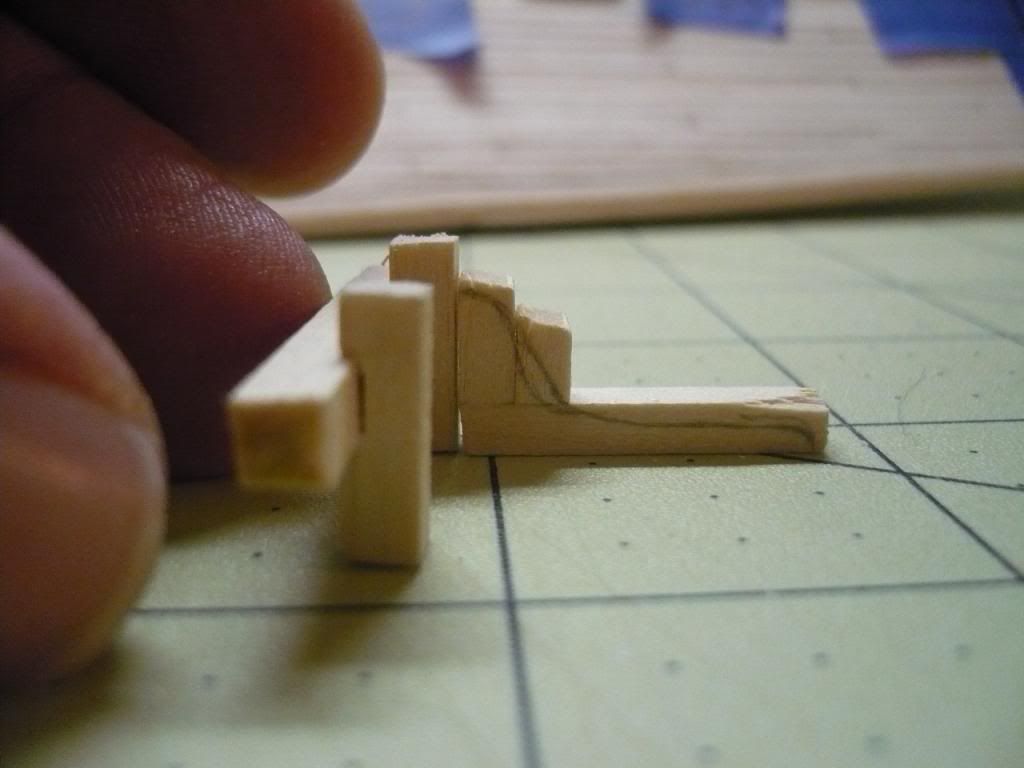
Staring work on the anchor bitts.


The bitts are assembled. One is painted. I tried to "weather" the painted one a little bit, but I'm not sure I'm satisfied with it. I left the half-round piece on the front its natural color to show that it was usually made of a different wood (usually fir) but I'm not too sure it's going to stay that way.


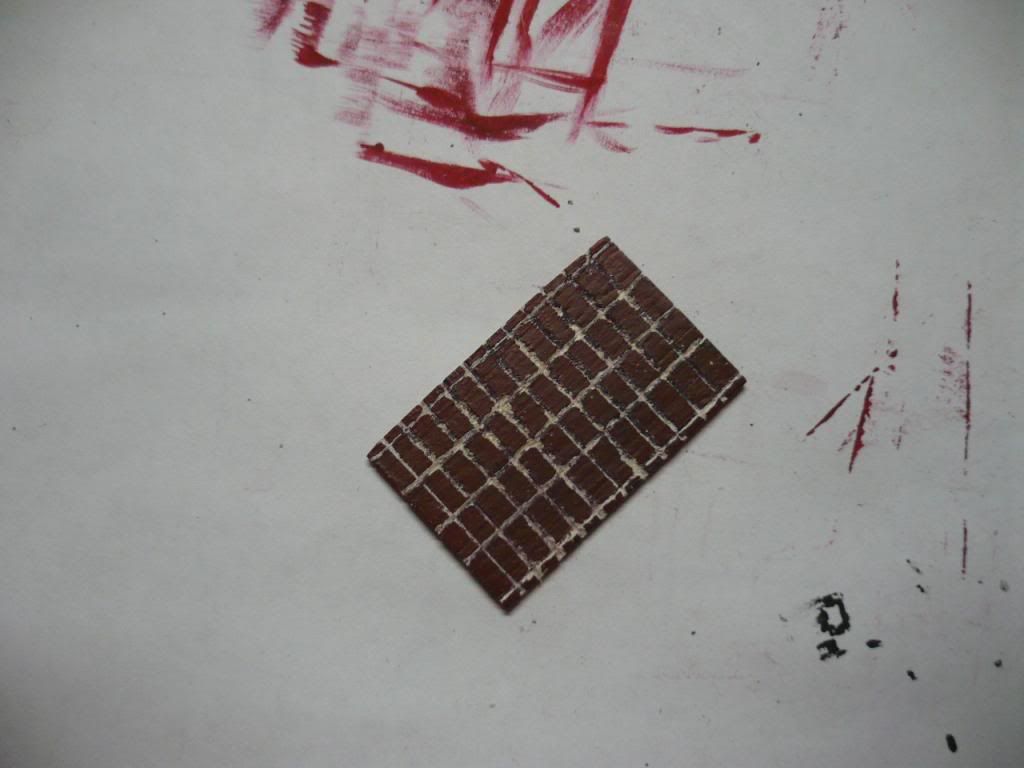
This is the brick that will be placed under the camboose. I started with a 3/32" thick piece of balsa wood, then gave it three coats of paint: white, then black, then red. I left the red coat a little thin to let the black show through. All of this was done before the paint was completely dry. Then I used a straight edge and a blade to scribe the lines in. I didn't want the paint to dry because I wanted the edges to look "rough". I'm pleased with how this turned out.


One of the chain pumps. Still need to build the rest.


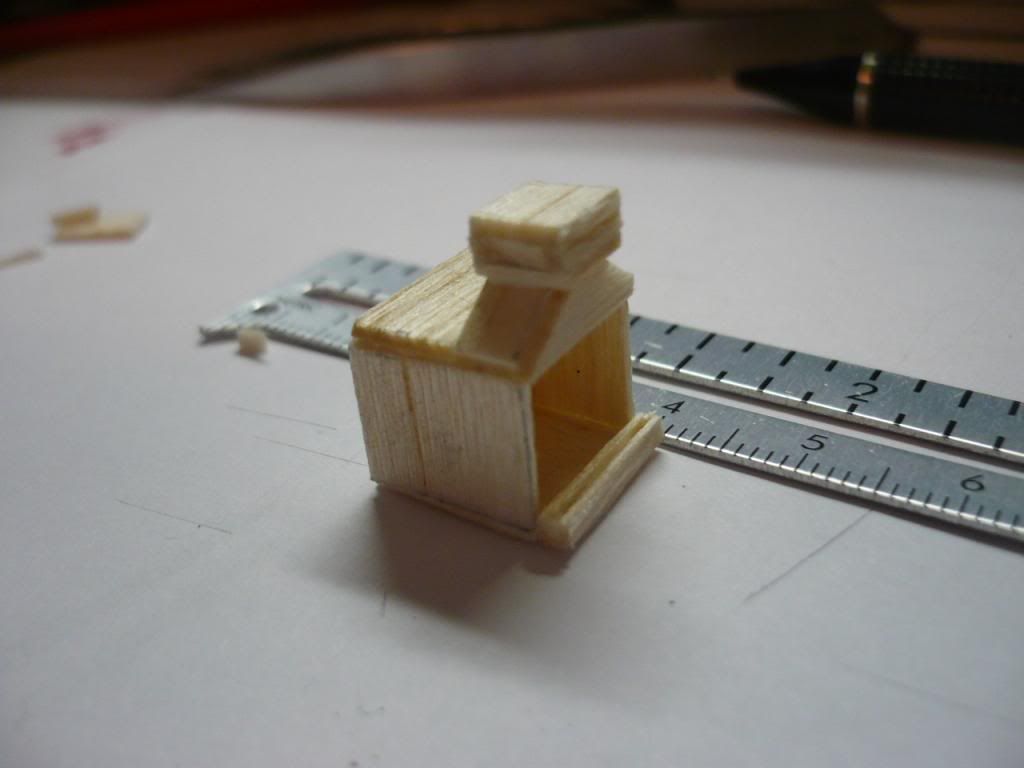
Building the camboose. I've since changed the drip pan because the one in this picture was to small and flush to the ground.


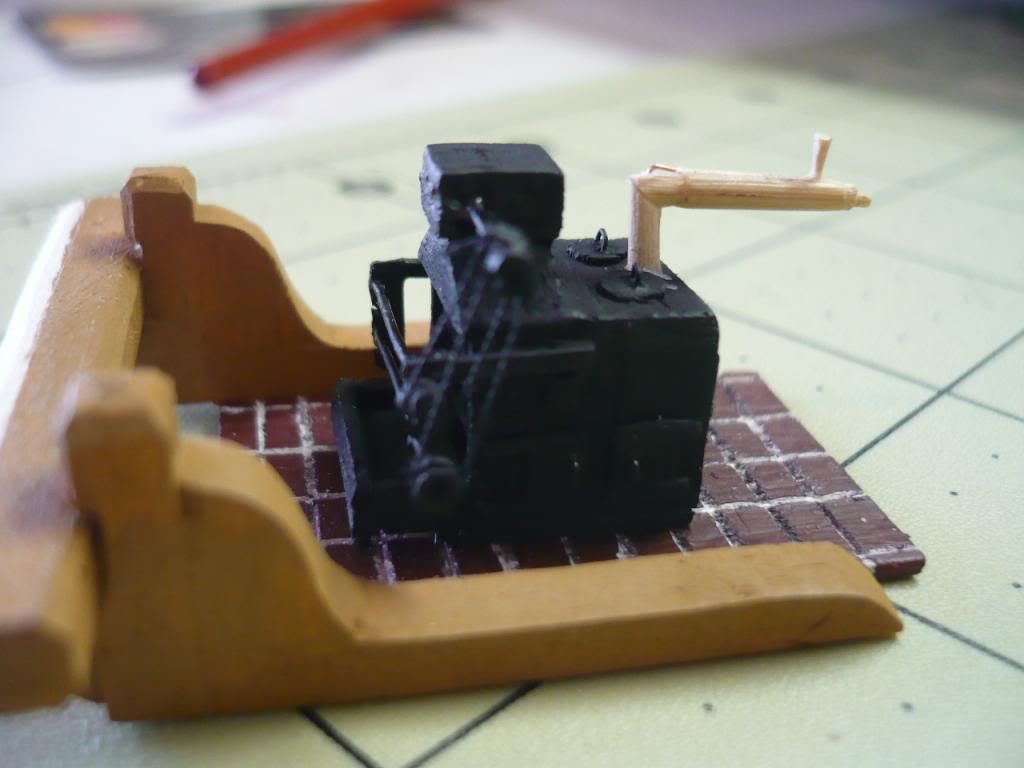
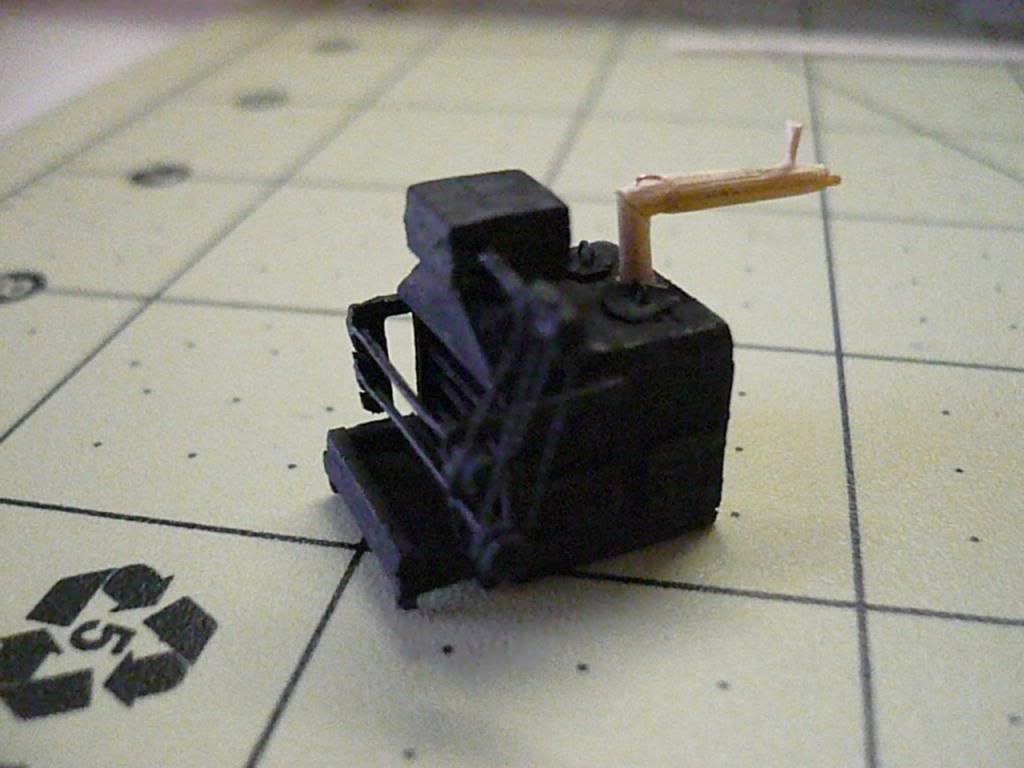
Roughly three days of work produced this little beauty! I am absolutely thrilled as to how the camboose turned out. The condenser still needs to be painted.


Another view of the camboose.


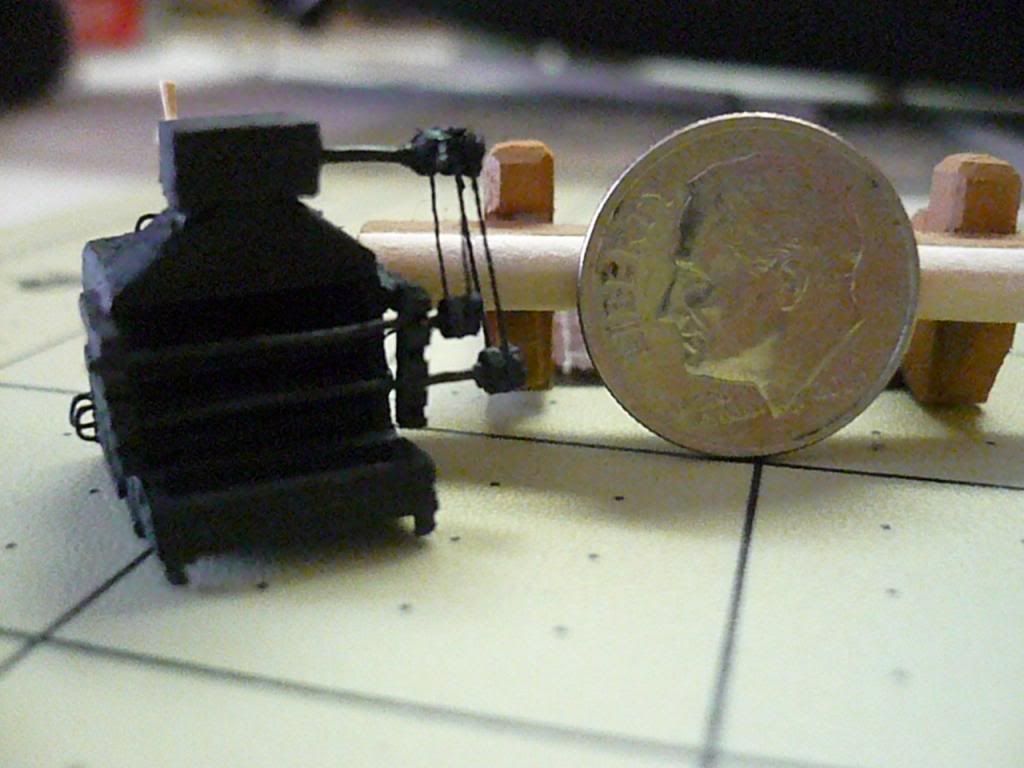
Here's the camboose sitting next to a dime just for size comparison.


I do have one question for the community. I would like to simulate the rivet pattern on the spar deck bulwarks. I've seen how Arnie and Force9 did theirs, however they used plastic and their method won't work with wood. I've tried a number of different methods, none of which resulted in a workable solution. Any suggestions?

That's all I have to post for now. I will definitely post more as I go along.

Thanks for checking in!


Work in progress: Revell 1/96 USS Constitution

  • Member since
    June 2012
Posted by arnie60 on Tuesday, February 4, 2014 11:17 AM

That's a heck of a lot of progress! Looking great Smitty.

Here's a link for raised rivet decals that I originally considered using. They're HO scale, but that's pretty close to 1/96 so that they might work just fine. I used HO scale items for the freight I staged on the gun deck and I would bet no one could tell they are not the correct scale. The decals are a bit spendy, but you would only be out less than $20 if they don't work out.

http://www.micromark.com/ho-scale-decals-with-raised-3d-rivets-and-other-surface-details,9968.html

  • Member since
    March 2013
Posted by Marcus.K. on Friday, February 7, 2014 2:03 PM

Another beauty is developing! I am now a follower!

  • Member since
    February 2014
Posted by Smitty on Friday, February 7, 2014 2:34 PM

Thank you for checking in Marcus. I hope to have some more photos soon, but progress has slowed a bit.


Work in progress: Revell 1/96 USS Constitution

  • Member since
    February 2014
Posted by Smitty on Sunday, February 9, 2014 1:02 PM

Well here's a little update. I figured that the rudder should have copper plating as well. I sanded down one side to get rid of the wood grain, scribed in some lines then gave it a real quick copper paint job just to see how it looked. I'm pleased with the outcome. Now to do the other half.


Work in progress: Revell 1/96 USS Constitution

  • Member since
    May 2003
  • From: Greenville, NC
Posted by jtilley on Sunday, February 9, 2014 1:46 PM

I'll take the liberty of offering a small suggestion - which I wouldn't make if it wasn't so easy to make the fix  without messing up any of Smitty's excellent work.  

The pintles and gudgeons on a copper-sheathed hull and rudder can't be made of iron.  When iron and copper are fastened to each other and submerged in salt water, electrolytic corrosion takes place and the copper starts to dissolve.  The first shipwrights to try copper sheathing, in the early eighteenth century, fastened the sheets to the planking with iron nails; the copper around the nail holes promptly got eaten away, and the plates started falling off.  So they started using copper spikes for the purpose.

The pintles and gudgeons have to be cast from either copper or bronze.  Meaning, for modeling purposes, that they should be just about the same color as the copper sheathing - not black.  Like I said, it's an eay fix.

Youth, talent, hard work, and enthusiasm are no match for old age and treachery.

  • Member since
    February 2014
Posted by Smitty on Sunday, February 9, 2014 7:10 PM

Professor Tilley,

 Thank you for that suggestion. I hadn't painted the pintles or gudgeons yet. I just painted the copper plates to see how it would look. That being said, I HAD planned on painted them black, thinking they were iron. Now that I have this useful bit of information, I'll probably just paint them copper as well, not knowing what they were actually made of. :-)

  Thank you for checking in and please feel free to make any suggestions.


Work in progress: Revell 1/96 USS Constitution

  • Member since
    February 2014
Posted by Smitty on Tuesday, February 11, 2014 8:12 PM

I love my wife so much! While working on my build one day, I make an off-hand remark about how I wish I had a table top magnifier because I was tired of having to remove my glasses and get in so close to the model that my nose almost touches so I can get the fine detailing done. Next thing I know, this shows up on my doorstep:

These things are awesome!


Work in progress: Revell 1/96 USS Constitution

  • Member since
    May 2018
Posted by Richwood7 on Tuesday, January 29, 2019 11:49 PM

There is another way of rigging sails that I just found out about.  It is called brailed up.  The ships do this when becalmed and the sails can be dropped quickly should wind comes up.  Just a thought.  Not to sure the advantage of brailing up.  If there is no wind, let the sails hang.  However in a combat situation and no wind maybe it is a good idea rather than letting them hang.  Don't know.  Maybe the sails can be brailed up from the deck and  do not need to sailors up to unfurl them as you would have to do if reefed.  If the wind did pick up and it was not an advantagous wind leaving them hanging might be bad idea.  Certainly a good idea in combat to keep the sailors at the guns and not aloft!

  • Member since
    December 2002
  • From: Derry, New Hampshire, USA
Posted by rcboater on Wednesday, January 30, 2019 7:56 PM

I wonder whatever happened to Smitty’s build?  (Hopefully not another move or fire!). Five years dormant....

Since Richwood7 brought it up, I’ll chime in on brailing up a sail, the result of which is a sail “hanging in its gear”.  As he guessed, a sail can be brailed up from the deck- no need to go aloft.  To brail up a sail, you ease the sheets and haul on the clew, leech, and bunt lines. This pulls the bottom edge of the sail (the “foot“) up to the yard. 

Here’s a quick illustration from my old copy of Eagle Seamanship:

Dousing a sail like this on a model can be a good alternative to having all the sails set.  It will allow you to see all the detail of the masts and yards, yet still give all the running rigging a reason to be there. (Without sails on the yards, a lot of the running rigging has nowhere to go- no purpose.)

FWIW, on Eagle, sails were only doused like this for short periods of time, perhaps to temporarily reduce speed. Most often, sails were not left in their gear - as soon  as this was done, we would go aloft and furl the sail onto the yard.


-Bill

Webmaster, Marine Modelers Club of New England

www.marinemodelers.org


JOIN OUR COMMUNITY!

Our community is FREE to join. To participate you must either login or register for an account.

SEARCH FORUMS
FREE NEWSLETTER
By signing up you may also receive reader surveys and occasional special offers. We do not sell, rent or trade our email lists. View our Privacy Policy.