SEARCH FINESCALE.COM

Enter keywords or a search phrase below:

Trumpeter 1/350 HMS Dreadnought 1907

35005 views
113 replies
1 rating 2 rating 3 rating 4 rating 5 rating
  • Member since
    March 2006
Posted by TD4438 on Wednesday, September 24, 2014 3:19 PM

That is seriously nice.Well done.

  • Member since
    July 2004
  • From: Texas
Posted by wbill76 on Tuesday, September 23, 2014 10:02 AM

Evan

thanks for the kind words!

BeerGroot

I'm glad you enjoyed the build and hopefully picked up some things along the way...I'm no ship expert so everything I applied on this one were just standard model-building techniques or things I picked up from studying other ship-builders' approaches to things. Happy to pass them along if it helps in your own efforts! Smile
  • Member since
    June 2013
Posted by RobGroot4 on Monday, September 22, 2014 8:54 PM

Wow, I've built a few ships but none of them this good.  Thanks for teaching us a few tricks!

Groot

"Firing flares while dumping fuel may ruin your day" SH-60B NATOPS

  • Member since
    June 2010
  • From: Irvine, CA
Posted by Force9 on Monday, September 22, 2014 8:19 PM

Bill - I'll add my kudos to the heap... Simply outstanding!

Evan

  • Member since
    July 2004
  • From: Texas
Posted by wbill76 on Monday, September 22, 2014 7:43 PM

Thanks Steve! Glad to hear you enjoyed the learning experience along with me. Wink Next victim is more familiar territory, Meng's 1/35 French FT-17 Light Tank. Beer

  • Member since
    July 2010
  • From: Tempe AZ
Posted by docidle on Monday, September 22, 2014 7:33 PM

Bill,

A most excellent job on your Dreadnought! I really enjoyed following along and learned a thing or two.... six or severn really.

So what is next on your bench?

Steve


  • Member since
    July 2004
  • From: Texas
Posted by wbill76 on Saturday, September 20, 2014 1:56 PM

Thanks Marcus! Glad to hear my build has helped you with yours, looking forward to seeing it get completed! Beer

  • Member since
    September 2013
  • From: San Antonio, Texas
Posted by Marcus McBean on Saturday, September 20, 2014 12:29 PM

Bill,

Great job on finishing her up.  I can only hope I can do half as good of a job as you done.  Following your build has really helped me along getting my assemble.  

Marcus.

  • Member since
    July 2004
  • From: Texas
Posted by wbill76 on Friday, September 19, 2014 7:06 PM

Thanks Jack! I guess I can claim to be a 'shellback' now then? Big Smile Had a blast building her for sure. Beer

  • Member since
    April 2006
  • From: ON, Canada
Posted by jgeratic on Friday, September 19, 2014 5:10 PM

Bill - that is one fine majestic build you have there.  Yes

I've been following along the whole time, and have to say a great build report on your part.  With this launch, I'd say you can consider yourself an old hand at nautical subjects.  Congrats!

regards,

Jack

  • Member since
    July 2004
  • From: Texas
Posted by wbill76 on Friday, September 19, 2014 4:08 PM

After giving the Dreadnought a once-over, I decided to add some additional pin-wash application to the port holes and other fine details like the coal scuttles to improve their depth/look. I used a 10/0 spotter brush and the same gray wash applied to the hull earlier.

Then it was time to seal it all up and remove the residual gloss/shine from the Future application. I used Testors Model Master Lusterless Flat in the spray can to dull the finish and tie everything together. One unexpected side effect of applying it is that some of the EZ-Lines that had a little bit of slack to them went out of tension but as soon as the lacquer dried out, the lines went back to their 'stretched' alignment. I did have to gently tease apart a couple of the signal flag lines that got slightly stuck together but otherwise everything went fine in that department. I did have to leave it in the spray booth with the vent fans going for a while before it thoroughly dried out and the lines went back to their intended tension but that's largely down to the fact that we've had 90%+ humidity lately due to lots of rain from Hurricane Odile's remnants passing through.

Then it was time for Dreadnought to pull into the dock and get her final walk-around shots in the photo booth.

Hope you enjoyed the voyage along with me!

  • Member since
    July 2004
  • From: Texas
Posted by wbill76 on Friday, September 19, 2014 1:19 PM

Thanks Mike! Just put the finishing touches on her and now have to see what I can do with my photo setup to try to capture her in her finished state! Wink

  • Member since
    February 2007
  • From: Brunswick, Ohio
Posted by Buckeye on Friday, September 19, 2014 11:36 AM

You sir, are a true artist!  Outstanding work! Bow Down

Mike

  • Member since
    July 2004
  • From: Texas
Posted by wbill76 on Friday, September 19, 2014 10:11 AM
hogfanfs

I have to apologize, Bill, but I can't seem to understand where you intend to attach the road wheels! Big Smile

Otherwise, this has been one incredible build to follow!

After this build, I don't believe you should be known as just an armor modeler but, be credited as a truly gifted modeler of any subject!

Thanks Bruce! I can understand your consternation...I had the same confusion, but at least it has turrets and big guns! Big Smile Glad you enjoyed following along, it's been a great project for me and includes several firsts, always a good thing to help stretch the envelope a bit and broaden the horizons. Appreciate the comments and support! Beer
  • Member since
    May 2013
  • From: From the Mit, but live in Mason, O high ho
Posted by hogfanfs on Thursday, September 18, 2014 8:36 PM

I have to apologize, Bill, but I can't seem to understand where you intend to attach the road wheels! Big Smile

Otherwise, this has been one incredible build to follow!

After this build, I don't believe you should be known as just an armor modeler but, be credited as a truly gifted modeler of any subject!

 Bruce


 On the bench:  1/48 Eduard MiG-21MF

                        1/35 Takom Merkava Mk.I


  • Member since
    July 2004
  • From: Texas
Posted by wbill76 on Thursday, September 18, 2014 7:12 PM
Charles_Purvis

1943Mike

Bill, Just outrageously wonderful work!! Bow Down

Mike

Amen!  What a lovely, astonishing bit of work.  Very nicely done, Bill . . . and thank you as well for the way you use your story to TEACH, as well as tell.  Bravo!

Charles

Thanks to you both Mike and Charles! Appreciate the kind words and interest along the way. Beer
  • Member since
    June 2014
Posted by Charles_Purvis on Thursday, September 18, 2014 6:21 PM

1943Mike

Bill, Just outrageously wonderful work!! Bow Down

Mike

Amen!  What a lovely, astonishing bit of work.  Very nicely done, Bill . . . and thank you as well for the way you use your story to TEACH, as well as tell.  Bravo!

Charles

  • Member since
    December 2010
  • From: Salem, Oregon
Posted by 1943Mike on Thursday, September 18, 2014 6:06 PM

Bill, Just outrageously wonderful work!! Bow Down

Mike

Mike

"Le temps est un grand maître, mais malheureusement, il tue tous ses élèves."

Hector Berlioz

  • Member since
    July 2004
  • From: Texas
Posted by wbill76 on Thursday, September 18, 2014 5:37 PM

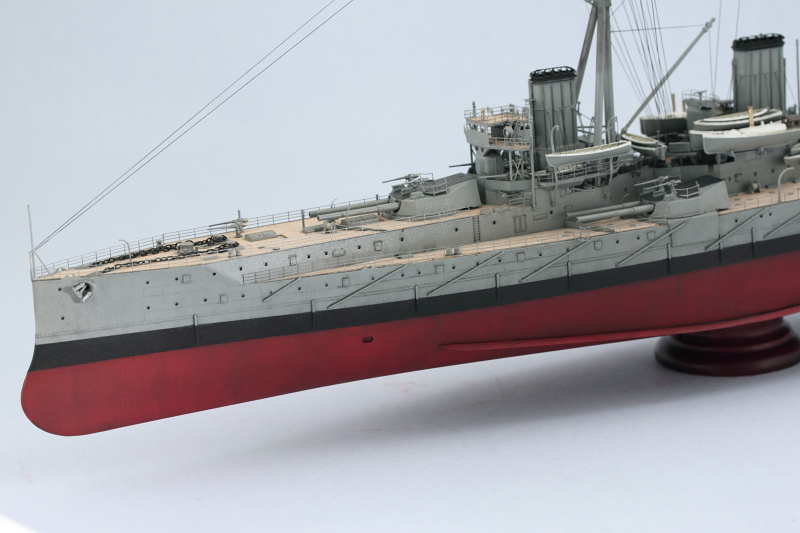
Continued on with the weathering process in a big way today so lots of pics in this update! First up I applied an overall wash of roughly 90/10 paint/thinner using Model Master Panzer Schwarzgrau as it's a nice dark gray but not too overpowering. The wash was added to the boot stripe and light gray areas only. This allowed it to do double duty as both a filter and a wash to tie those two colors together.

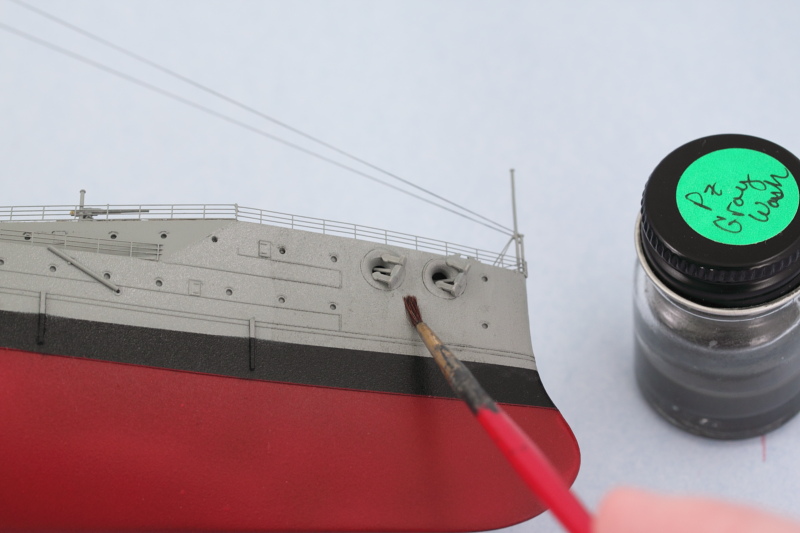
Then using some clean thinner and various brushes, I adjusted the wash and used it to get the raised detail on the hull and various places to 'pop' a bit more. In some key areas, more of the Panzer Gray was added as a pin wash with a 10/0 pointed brush as needed to produce the desired result.  

For the hull red areas, I applied a 90/10 paint/thinner wash of MM enamel Burnt Umber.

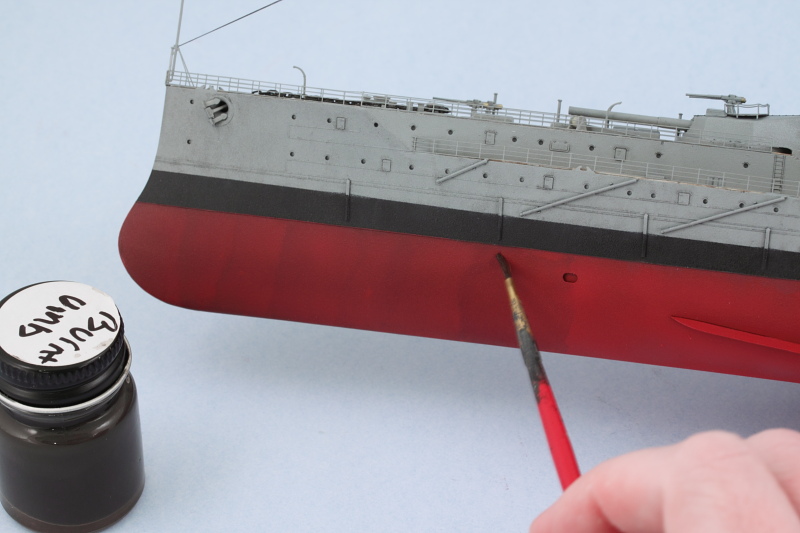
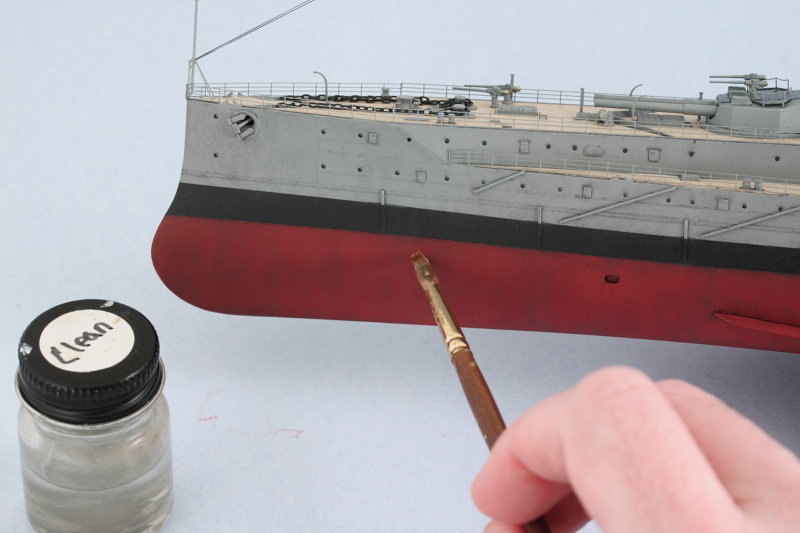
Because the lower hull has complex curves as well as such a large area, I used the wash as a start point and then made additional adjustments/removal using a square tip blender brush lightly dampened with thinner. This approach allows for some nice streaking effects as well as removing the 'tide' marks that are inevitable when applying a wash over such a large area.

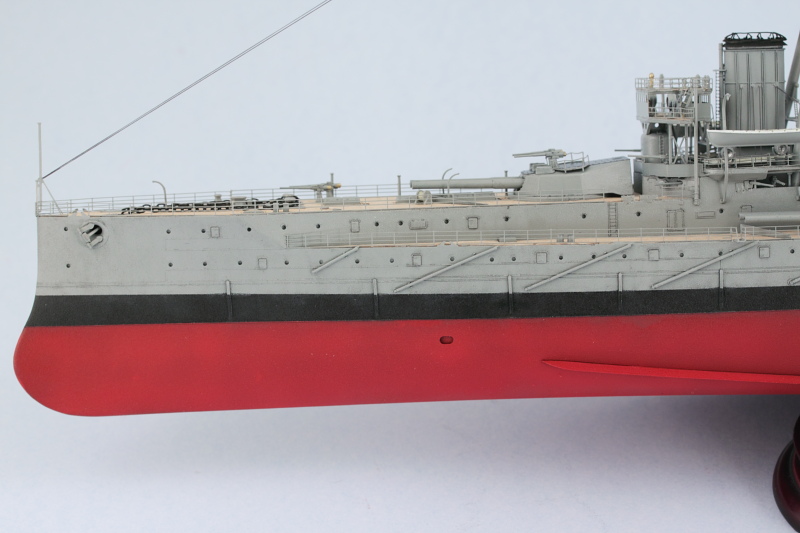
It's a little tough to capture the full effect adequately but the combination of the different weathering adds a good bit of depth to the overall finish. Some residual shine is still present from the protective Future coat and will be dealt with once I'm happy with how everything looks and am ready to seal it all together with a dull coat application.

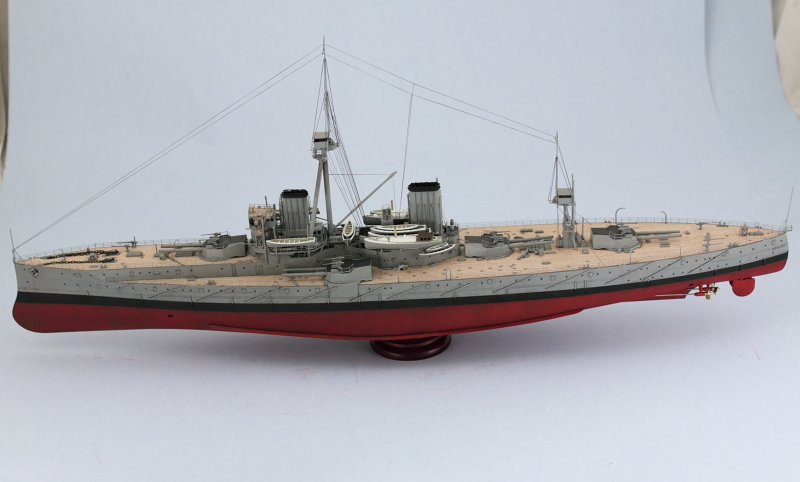
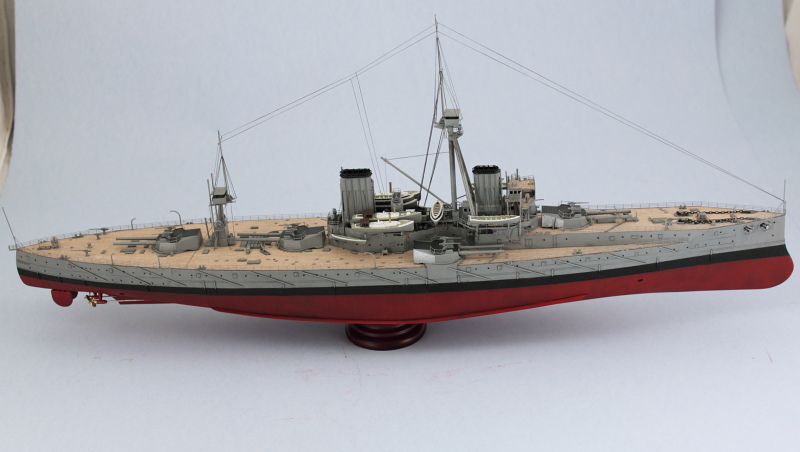
The 18-inch long hull is a challenge to photograph, but here's how the big girl stands as of now.

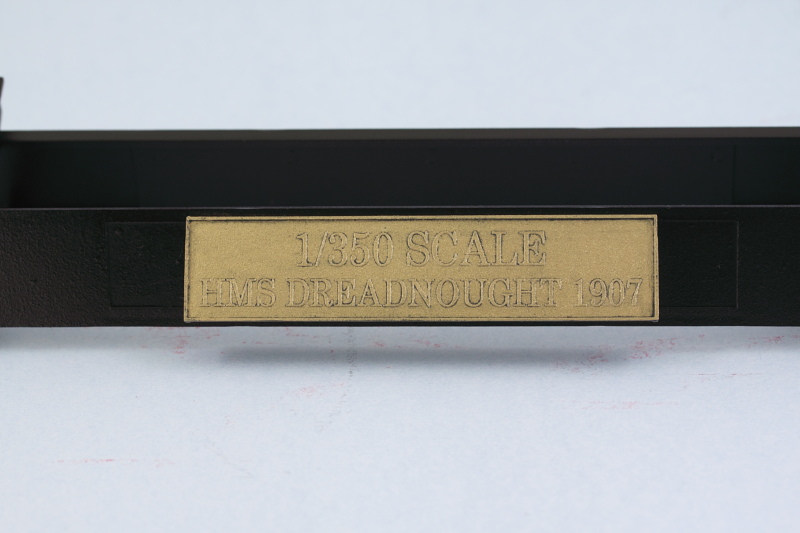
I also did some wash weathering on the 'brass' plaque for the stand. The metalizer finish was sealed with a coat of Future and then a wash of MM enamel Gunmetal applied over it to age the finish and provide some depth to the lettering. I used a thinner-dampened q-tip to 'polish' away most of the wash and then used fine point brushes to adjust it further. A coat of Model Master Gloss lacquer in the spray can sealed it together and restores some of the 'shine' to the brass. Another one of those hard-to-capture effects in person but looks pretty good in person, especially once the ship is on place on top of the stand.

I'll let this sit overnight so I can look it over with 'fresh eyes' tomorrow to see if I need to make any further adjustments. Almost done!

  • Member since
    July 2004
  • From: Texas
Posted by wbill76 on Thursday, September 18, 2014 12:06 PM

Thanks Mike! Almost to the finish line with this one. Beer

  • Member since
    February 2007
  • From: Brunswick, Ohio
Posted by Buckeye on Thursday, September 18, 2014 11:28 AM

Beautiful work, can't wait to see it with the weathering!

Mike

  • Member since
    July 2004
  • From: Texas
Posted by wbill76 on Wednesday, September 17, 2014 3:34 PM

Took care of the last remaining details today to wrap up the construction phase. Trumpeter provides the leadman's platforms on either side of the hulls as simple 'planks' of PE, so I added to their detail level by cutting down some left over railings from the Eduard sets and adding them to the 'plank'. This also meant carefully cutting some gaps in the railings I installed yesterday, that was done using some fine pointed Tamiya sprue cutters. It's a small detail but one that I could address and enhance with the materials available. I also decided to leave the gangways off as those are only appropriate in a 'docked' scenario and I prefer to show Dreadnought as if she were at sea and ready for action.

A small start to the weathering involved applying some black artist pastel to the tripod mast where coal soot from the fore funnel would accumulate. It was one of the notorious features of this design that stack gasses often caused problems with the unfortunate gunnery officer stationed in the fire direction platform depending on which way the wind was blowing. Definitely wouldn't envy him for sure!

Also applied the Future coat and am letting that set overnight so it can be nice and cured before starting in on the hull weathering.

  • Member since
    July 2004
  • From: Texas
Posted by wbill76 on Wednesday, September 17, 2014 12:32 PM

Thanks Mike! Getting the railings in place was fairly straightforward. The Eduard set provides them as long sections so there were only a couple of places where they needed to meet/join. Since the hull has a gentle curve to it in some places, I shaped the rails to conform as close to that as possible, then used CA gel to secure a decent section at one end, then applied small amounts of regular CA with the tip of a wooden toothpick to secure the sections further and guide the railing into position as needed. The fact that the wooden deck created a small lip for the rails to mate up against helped a lot as well in getting them nice and straight. HTH! Beer  

  • Member since
    February 2007
  • From: Brunswick, Ohio
Posted by Buckeye on Wednesday, September 17, 2014 11:33 AM

Amazing build!  How do you get all that railing in place??

Mike

  • Member since
    December 2010
  • From: Salem, Oregon
Posted by 1943Mike on Tuesday, September 16, 2014 9:31 PM

Thanks Bill, it does.

Mike

Mike

"Le temps est un grand maître, mais malheureusement, il tue tous ses élèves."

Hector Berlioz

  • Member since
    July 2004
  • From: Texas
Posted by wbill76 on Tuesday, September 16, 2014 7:42 PM

Thanks Mike! The Future will be applied by airbrush. There's no need to mask anything above the hull with this type of application. The Future will be applied using a mist coat approach and not a heavy wet pass. I did some tests early on with the wood deck to see how it would respond to this type of treatment (and the usual dull coat that's applied over the weathering to finalize it) and had no problems with it. Hope that answers your question? Wink

  • Member since
    December 2010
  • From: Salem, Oregon
Posted by 1943Mike on Tuesday, September 16, 2014 6:30 PM
Bill, As usual, your work is just excellent. I have what may be a rather naïve question of you: How are you going to paint the future on her - via airbrush or hand painting? If airbrushing, how will you mask everything above the hull? Perhaps your skill, steady hands and pre-planning will allow you to airbrush the future on the hull where it is needed without masking? Just curious. Mike

Mike

"Le temps est un grand maître, mais malheureusement, il tue tous ses élèves."

Hector Berlioz

  • Member since
    July 2004
  • From: Texas
Posted by wbill76 on Tuesday, September 16, 2014 5:12 PM

Today's efforts focused on getting the remaining boats finished and installed. First up, each of the cutters needed rudders, so I scratch-built some using sheet styrene and one of the left over rudders on the PE fret as a sketch stencil.

Then it was time to paint them. Same drill as with the other boats, hull gray color by airbrush, then hand detailing for their interiors and trim. The middle deck cutter got the 4th whaleboat added for its 'short stack' configuration.

Then the real fun began in installing the two for the davits. Originally I was going to try to replicate the canvas holding straps that help hold the boat in place but trying to accomplish that proved problematic due to the fragility of the davit parts. I ended up using lengths of EZ line to suspend them from the davit pulleys along with some strategic CA glue applied to the sterns to keep them from swaying in the breeze.

With all the boats in place, the wing turrets were permanently installed as well to round things out for the day.

Just a couple of small details left to do before I seal it up with some Future and add some weathering to the main hull.

  • Member since
    July 2004
  • From: Texas
Posted by wbill76 on Monday, September 15, 2014 7:57 PM
I just got back from checking my mail and the extra 32 ft. lifeboat cutters that I needed had arrived. Steve at Celtic Werks did an awesome job. The original kit part is on the left and the resin casts are on the right.   Given the nature of the omission by Trumpeter and the general interest in this kit with both the 1907 and 1915 versions out there with the same issue, Steve let me know that he made additional molds in the event that anyone else needing additional cutters was interested in them to populate the davits. Just drop him a note at info@celticwerks.net and he'll be happy to work something out for you.
JOIN OUR COMMUNITY!

Our community is FREE to join. To participate you must either login or register for an account.

SEARCH FORUMS
FREE NEWSLETTER
By signing up you may also receive reader surveys and occasional special offers. We do not sell, rent or trade our email lists. View our Privacy Policy.