SEARCH FINESCALE.COM

Enter keywords or a search phrase below:

Heller Soleil Royal (WIP)

70009 views
575 replies
1 rating 2 rating 3 rating 4 rating 5 rating
  • Member since
    September 2005
  • From: Groton, CT
Posted by warshipguy on Saturday, July 9, 2016 6:57 PM

Mike,

You are correct.  I just went through the directions for each shade. The directions specify the use of an airbrush.  Still, the paints are rather thick, so I do not see a problem modifying the techniques for a paint brush.

Bill

  • Member since
    March 2014
Posted by kpnuts on Thursday, July 14, 2016 3:36 PM

Superb work Dave. 

  • Member since
    March 2012
  • From: Marysville, WA
Posted by David_K on Friday, July 15, 2016 2:35 PM

Thanks, knputs!

The rest of the standing rigging should go pretty quickly now, only the topgallant masts remain...unfortunately, I let myself run out of a certain rigging line, so I'm now waiting for a Syren delivery.  They're usually quite speedy with shipping, so I hope to be able to continue working on it soon...

Something intersting to note, regarding a mistake in the plans, with regard to standing rigging:

All the sets of instructions I have (original Heller French, Aurora English, and Imai Japanese) call for the shrouds to be assembled using the contraption they include with the kit (sort of a loom or something?), and then the shrouds are to be set over the top of the mast, and finally attached via deadeyes.

Well, that would work fine for all the lower and topmasts, but when it comes to the topgallant masts, they are all premolded with the mastcap/heel and also the flagpoles atop them...meaning, there's no way to pull the shrouds down around them.  It's the same in the instructions for the backstays, and the stays...there are steps beforehand that call to have seizings (or a mouse, or a loop, or whatever) but they cannot be attached the topgallant masts if assembled previously.

I don't use the ratline loom anyway, and my advice for anyone would be to avoid using it (making shrouds and ratlines on the model is really easy, and honestly I think it would be terribly frustrating to try doing it any other way)...but even for me, I normally make my shrouds pairs off the model and seize them in a vise, then transfer them to the mast....but with the flagpole (?) and the mastcap molded on, that won't work either...so for the topgallant masts, all the shrouds, backstays, and stays need to be installed on the mast directly....and preferably, BEFORE installing those masts on the model!

Anyway, hope that makes some sense, and hope it might help someone avoid unnecessary backtracking!

Thanks,

Dave

        _~
     _~ )_)_~
     )_))_))_)
     _!__!__!_         
     (_D_P_K_)
   ~~~~~~~~~~~~~
    ~~~~~~~~~~~

Current Project:  Imai/ERTL Spanish Galleon #2

Recently Finished: Revell 1/96 Cutty Sark

Next Up:  ???


  • Member since
    March 2012
  • From: Marysville, WA
Posted by David_K on Wednesday, July 27, 2016 7:23 PM

Hey All-

This is a Red-Letter Date!

I've finished installing all the standing rigging, as well as all the mast parts...

Boom!

I've actually taken the yards out of the box, for the first time in over a year!

Now I'll set about applying oil paint to them, and then I get to start fiddling with blocks, sail material, and the never-before-visited (by me)....parrels?

Anyway, there's not much in the way of pics to share now that would be of much interest, but I suspect I'll have plenty to post soon, as I learn some new stuff and try out some ideas...

Just wanted to give a heads-up! 

Dave

        _~
     _~ )_)_~
     )_))_))_)
     _!__!__!_         
     (_D_P_K_)
   ~~~~~~~~~~~~~
    ~~~~~~~~~~~

Current Project:  Imai/ERTL Spanish Galleon #2

Recently Finished: Revell 1/96 Cutty Sark

Next Up:  ???


  • Member since
    March 2012
  • From: Marysville, WA
Posted by David_K on Sunday, August 21, 2016 9:43 AM

I've had a little time for modeling this past week, so I figured I would check in and post some progress.

Now that I'm getting into sails and running rigging, I find that I have a lot of details to keep sorted out.  Trying to make sure I remember in which order to install parts is a big one!  Since I've sorta departed from the plans in a few ways, I have to keep stopping to make sure I'm keeping all my ducks in a row...I have notes and drawings all over my work area!

Current progress is that I have attached blocks to the sprit yards for all the running rigging that will be displayed, including clews, lifts, and brace pendants....and also some *halyard* lines...

Here's a pic of the Sprit Yard

I was concerned when I saw how widely-spaced the clew blocks looked in the plans, but with some reading ahead I realized that those clews don't go to blocks on the sprit top, but instead run directly to blocks on the forestay, then to the belaying point, so they aren't necessarily spaced very closely like all the other clew blocks.

I was planning to get blocks on all the yards before I move onto sail fiddling, but now I think it's best if I go ahead and fit the sprit yards with sails, and get them installed on the model to completion (rigged, and with Parrels) before I move on to the other yards.  The reason is so I can decide if there are any problems with my *plan of attack* before I get ALL the yards set up, and then hopefully avoid any serious backtracking.

And now it seems that I'm at the point of making my first parrel (for the Sprit Topsail Yard) and a sling (for the Sprit Yard)....I think I want to get the parrel fitted BEFORE I attach the sail, so I won't have to wrestle with the sail being in the way while I attach the parrel...so that's happening next!

After that, I'll start messing with sails...

Dave

        _~
     _~ )_)_~
     )_))_))_)
     _!__!__!_         
     (_D_P_K_)
   ~~~~~~~~~~~~~
    ~~~~~~~~~~~

Current Project:  Imai/ERTL Spanish Galleon #2

Recently Finished: Revell 1/96 Cutty Sark

Next Up:  ???


  • Member since
    March 2014
Posted by kpnuts on Sunday, August 21, 2016 3:02 PM

Superb work, as always.

  • Member since
    March 2012
  • From: Marysville, WA
Posted by David_K on Wednesday, September 14, 2016 6:07 PM

Well....quick update.

I have been vexed by the Parrel Conundrum.

Despite the help and advice offered by various members here, I have not been able to come up with a feasible method to fix parrels...yet.  After a few laughable and tedious attempts, I decided to procrastinate that particular detail and instead went ahead and attached blocks to all the yards for all the masts.  Finished the Mizzen yards today.  So I guess I have no other distractions with which to further postpone the parrels.  *sigh*

I suppose I could go ahead and start cutting out material and attaching the sails, but I really feel it's best if I focus again on this parrel situation....

Not sure why it's so hard for me to get my head around it?

Anyway, hopefully it won't be long before I have some more exciting news!

Dave

        _~
     _~ )_)_~
     )_))_))_)
     _!__!__!_         
     (_D_P_K_)
   ~~~~~~~~~~~~~
    ~~~~~~~~~~~

Current Project:  Imai/ERTL Spanish Galleon #2

Recently Finished: Revell 1/96 Cutty Sark

Next Up:  ???


  • Member since
    December 2010
  • From: Salem, Oregon
Posted by 1943Mike on Wednesday, September 14, 2016 11:23 PM

David,

Don't worry about it! Keep it enjoyable!!

Your talent in building these ship kits is so fine that taking your time to figure things out or choose a different plan of attack shouldn't be a stress-producing path.

Very much looking forward to your exciting news.

P.S. I'm sure the more you see of parrels the closer you'll be to figuring out how to represent them.

https://upload.wikimedia.org/wikipedia/commons/e/e6/Machoire_de_corne.jpg


Mike

"Le temps est un grand maître, mais malheureusement, il tue tous ses élèves."

Hector Berlioz

  • Member since
    September 2005
  • From: Groton, CT
Posted by warshipguy on Friday, September 16, 2016 11:12 AM

Dave,

I have seen many models where the parrels have been simulated by rows of painted beads. They look fine.

Bill

  • Member since
    July 2013
Posted by steve5 on Saturday, September 17, 2016 2:27 AM

is this any good to you dave, about half way down the page

http://www.radekshipmodels.cz/en/list-of-kits-and-accessories/accessory---other


  • Member since
    May 2003
  • From: Greenville, NC
Posted by jtilley on Saturday, September 17, 2016 11:48 AM

Dave, I really think you're making a bit of a mountain out of a molehill.

The parrels you showed in your other thread look fine - both the Amati ones and the ones you made yourself. I'm sure the Radek ones are good too.

The experts (R.C. Anderson and James Lees) say that there's little firm evidence of how seventeenth-century parrels were rigged. Some sources (all quite vague) say at least one end of the parrel rope came down through a thimble (bullseye) to the deck, so the parrel could be slacked off. Others don't show that detail. If I were you I'd ignore it. I'd start by tying the parrel rope to the yard on the port side of the mast, with both ends free. Assuming the parrel ribs have two holes each (the ones for the lower yards probably had three), run the rope through one row of holes in the ribs, alternating with beads. (I like to do this with the yard off the model, tied to a dowel clamped in a vise.) Then run the parrel rope around the yard to starboard of the mast. Wrap it around the yard several times and tie it off.

Do the same thing with the other part of the parrel rope (the one that's still dangling from the yard on the port side). Now you've got ropes running through two rows of rib holes and beads.

Now tie the middle of another line around the yard just to starboard of the mast. Take the two ends of the line around the grooves on the edges of the parrel ribs. Tie the end to the yard just to port of the mast. Wrap the bitter end of the line around the yard a couple of times, then tie off. Bundle all the linessrunning through or around the ribs together with a short piece of light line.

If the ribs have two holes, you're done. If there's a third hole in each rib, tie another line off at the yard, bring the line through all remaining holes and beads, then tie it to the yard and lead the end around the outside of the ribs. Include that line in the bundle when you finish off.

One detail that shows prominently in old models is the parrel ropes wrapped around the yards. I've seen models that have seven or eight lines wound around each side of the yard. So don't try too hard to make the whole parrel assembly neat and tidy. In reality, it isn't.

Dave, I gotta tell you that this is pretty precise, nitpicky detail. Your self-imposed image as a guy who doesn't really care about historical accuracy is in serious jeopardy.

You can do this. Good luck.

P.S. That photo that 1943Mike showed us in his last post seems to show a twentieth-century fore-and-aft-rigged Continental European fishing vessel or yacht. I've never seen that arrangement of parrel rollers elsewhere; in any case it's obviously a parrel on a fore-and-aft-rigged vessel - maybe a schooner. I wouldn't use it as a template for a seventeenth-century full-rigged ship.

Youth, talent, hard work, and enthusiasm are no match for old age and treachery.

  • Member since
    September 2012
Posted by GMorrison on Saturday, September 17, 2016 11:54 AM

jtilley

Dave, I gotta tell you that this is pretty precise, nitpicky detail. Your self-imposed image as a guy who doesn't really care about historical accuracy is in serious jeopardy.

You can do this. Good luck.

SNORK! Knew it would happen. Whats great is to be explore little know but interesting details. Keep up the great work.

 Modeling is an excuse to buy books.


  • Member since
    September 2012
Posted by GMorrison on Saturday, September 17, 2016 11:58 AM

J. Tilley:

"P.S. That photo that 1943Mike showed us in his last post seems to show a twentieth-century fore-and-aft-rigged Continental European fishing vessel or yacht."

Right, those deals are a replacement for sail hoops.

 Modeling is an excuse to buy books.


  • Member since
    March 2012
  • From: Marysville, WA
Posted by David_K on Saturday, September 17, 2016 12:27 PM

*Dave, I gotta tell you that this is pretty precise, nitpicky detail. Your self-imposed image as a guy who doesn't really care about historical accuracy is in serious jeopardy.*


lol JTilley! 

Thanks for the encourangement, you guys!

It's true, I have been frustrated by this detail for some time, and I was making a bigger deal about it than necessary....but.....wait for it....

I figured it out!

Yesterday after work, I determined to sit down and fiddle some more with the ribs, beads and thread until I came up with a workable (and hopefully manageable) method.  got a good system figured out immediately!  I was prancing around the house, showing my completed prototype off to my wife and son, exclaiming

"look, you guys, I got it!  A Parrel!"

Some recent dinner table conversation has been centered around my monologue of what my next plan of attack would be regarding parrels...you can guess that my family, while supportive, were very much confused as to what the big deal was!  They would stare at me, glossy-eyed, and listen patiently as I blathered on.  So yesterday was a big success for me, and for them it signaled the end of...well, something.  I'm sure they still don't exactly know what a parrel is for, and why I would care about it  :)

Anyway, it's a basic setup, and the means of attaching aren't going to be authentic, but they'll be there, and now I can go ahead and prepare the assemblies.  They will be out of scale, since I'm using the same size beads for all of them, but I don't mind.

Let me see if I can get a pic uploaded real quick to share it.

There won't be any tackle leading it to deck, either.  It's basically just a parrel, tied around the yard on either side of the mast.  The knots will end up covered by the furled sail material.  Again, very simply appointed, but should still get the effect across.  Plus, I think it will install pretty easily among the standing riggging.

I'll take some more pics as I refine it and start preassembling them and again when I begin installing to the model...most of that progress will be documented on the thread I recently created on the subject of parrels...guess I might as well link that thread here:

http://cs.finescale.com/fsm/modeling_subjects/f/7/t/171838.aspx


So again, thanks for the support, and I'm glad to report I now have direction, wind in my sails, if you will.

Dave


        _~
     _~ )_)_~
     )_))_))_)
     _!__!__!_         
     (_D_P_K_)
   ~~~~~~~~~~~~~
    ~~~~~~~~~~~

Current Project:  Imai/ERTL Spanish Galleon #2

Recently Finished: Revell 1/96 Cutty Sark

Next Up:  ???


  • Member since
    December 2010
  • From: Salem, Oregon
Posted by 1943Mike on Saturday, September 17, 2016 12:34 PM

Dave,

Glad you figured out how you want to do it. Looks good to me.

GM & John,

LOL!, No, I didn't want David to copy the arrangement of parrels in the picture I linked to a modern sailing vessel Big Smile. I just thought that the more images David saw of parrels, the more likely it might be that he'd think of a method of making them for his model. I guess I shouldn't have posted the picture .... sorry.

Mike

"Le temps est un grand maître, mais malheureusement, il tue tous ses élèves."

Hector Berlioz

  • Member since
    May 2003
  • From: Greenville, NC
Posted by jtilley on Saturday, September 17, 2016 12:44 PM

By George I think you got it.

One suggestion: tie a line around the yard around the yard on one side of the mast, take it over the grooves in the parrel ribs, and tie it off to the yard on the other side of the mast. If the parrel has three rows of beads, tie the middle of the line around the yard, take both parts of it around the ribs, and tie off on the yard on the other side of the mast. That's what those grooves in the ribs are for.

GM is right about 1943Mike's picture. The gaff parrel is the row of rubber rollers held by the big wire. The other gadgets, I guess, are the modern equivalent of mast hoops.

Actually, that parrel is almost exactly like a gaff parrel of earlier times. Change the rubber rollers for wood trucks, and the wire to a piece of rope, and you've got a gaff parrel for just about any gaff-rigged ship before about 1900. Unfortunately, the Soleil Royal doesn't have any gaffs.

Dave, you will need to fuss a little over the parrel for the lateen-rigged mizzen yard. That parrel has to be cast off every time the ship goes about. The mechanism is really simple; it's shown on p. 231 of Dr. Anderson's book.


Youth, talent, hard work, and enthusiasm are no match for old age and treachery.

  • Member since
    September 2005
  • From: Groton, CT
Posted by warshipguy on Saturday, September 17, 2016 2:17 PM

Dave,

Congratulations!  Perhaps not historically exact, but the correct impression of parrels is there.  When considering the exceptional job you are doing overall, you must consider a quote from the head of the Soviet Navy during the Cold War.  Admiral Sergeii Gorschkov said it best on a plaque over his desk.  "Better is the enemy of good enough!"

Great job!  Your parrels will look great on the model.  My hat is off to you, sir!

Bill

  • Member since
    March 2012
  • From: Marysville, WA
Posted by David_K on Saturday, October 1, 2016 3:18 PM

I have been making some progress on the ol' Ball and Chain lately!

Work has begun on standing rigging, and the installation of sails and yards.  YAY!

First I'll mention the sails.

Coffee Filter paper (I made attemps with shoebox tissue paper as some people have suggested, but I found it too wimpy and once it gets moistened, it just falls apart)....the widest yard of the SR is like 11.5 inches, so I had some trouble finding coffee filterr wide enough....after a few trips to different stores around town, and still nothing, I decided to call my local diner.  Imagine the puzzlement of the nice lady whoa snwered the phone when I asked how big their coffee filters were!  Well, it turns out, they did indeed have a commercially-sized coffee maker, and she was nice enough to flatten out a filter and measure it for me...over 12" in diameter!  Boom!

I drove over there, and they were more than happy to share a stack of their filters, and refused to accept payment.  Very cool!

Anyway, so I cut the filters out to a reduced size as usual for furled sails (to account for overscale thickness), and mixed up some dilute elmer's and tan paint.  BTW, those vacuum-formed sail sheets that come with so many kits these days?  I find they work great for getting dimensions of sails, and then I trace out my filter paper, cut it out, and lay the paper into the vacuum-formed sheets as I apply the glue and paint...then I use my wife's hairdryer to dry the sails, and peel them off...ready to go!

I keep getting sidetracked- sorry!

After poking holes in the sails for clewlines and a running stitch, I bend them to the yard, attach some line for clews in the corners, like so:

Then I hang the yard from a clamp-hands, thusly:

Moisten them with water and a brush, and begin the gentle pulling of the clewlines, and teasing the sails into a somewhat furled and gathered shape.

Most of the actually *furling* is accomplished as the gaskets are installed.  Tying the loops of line around the sail to pull it up to the yard gives some good resulting folds and creases.  I have to fiddle with it a little bit as I go, but it usually finds a nice, natural-looking effect.  Sometimes, I do find myself re-wetting the sail if I can get it right the first time, and trying again.  I re-did the Sprit Topmast yard a couple time before I was happy with it.

I will mention that I know a real-life furled sail doesn't look quite like this.  I prefer the loosely-gathered and loopy, droopy look, so I try to get as much of that aspect as I can.

Once I got the yard in place with the halyard and sling, I began routing all the lines I'll use (clews, lifts, halyards, braces).  I find that with all the close-quarters fiddly work coming up, it's good policy to route all the lines first, before actually bleaying anything...that way I can adjust tensions accordingly, and also not have to fight with even more limited space!

You can see that the lines are beginning to populate up here...it's going to be a busy, confusing mess for a bit until I get everyone in place and properly fixed.

Pic of the parrel of the sprit topmast yard.  For my first effort, it's okay....I'm sure they'll get cleaner and better-appointed by the end

Quick shot from the front, just to show the drape effect of the sails...now begins the final attachment of the bowsprit running rigging...should be moving along pretty smoothly now...

Anyway, thanks for watching....don't look now, but I started this ship Jan 1, 2015...in a couple months it'll be 2 years since I set out on this journey...yikes!

Dave


        _~
     _~ )_)_~
     )_))_))_)
     _!__!__!_         
     (_D_P_K_)
   ~~~~~~~~~~~~~
    ~~~~~~~~~~~

Current Project:  Imai/ERTL Spanish Galleon #2

Recently Finished: Revell 1/96 Cutty Sark

Next Up:  ???


  • Member since
    May 2003
  • From: Greenville, NC
Posted by jtilley on Saturday, October 1, 2016 3:47 PM

You got the idea on the sails, Dave. I like the color, and you figured out how to shape them on those particular yards.

The only suggestion I can make is that I think you got the methods of rigging the robands (the permanent lines that hold the head of the sail to the yard) and the gaskets (the ones that bundle the sail up when it's furled) mixed up. The robands go through holes in the top of the sail, around the yard twice, and are then tied off. (Dr. Anderson shows a particular knot for the purpose, but nobody will notice if you don't tie your robands that way.) The gaskets are a lot longer. They start at the yard, and get passed around the sail several times before being tied off to themselves - with some sort of knot that can easily be cast off.

Gaskets are the very last subject Dr. Anderson discusses in his book (p. 270). He says there were 8 to 12 gaskets on a lower yard, 6 or 8 on a topmast yard, and 4 on a togallant yard.

He concludes his discussion of sail furling as follows: "The upper sails (i.e., topsails and topgallants) were stowed with their bunts lashed to the mastheads and their clews projecting, not distributed beneath the yards." That's going to be trickier. The furled sail takes a completely different form than to lower ones: a skinny bundle along the yard and a big, fat bundle running vertically in the middle, lashed to the heel of the topmast (or topgallant mast), with the clews sticking out (and the clewlines and sheets rigged to them)> Way back when I built my model, I found figuring out the geometry of the topsails and topgallants was a bit of a challenge.

The reason for that arrangement would be clearer if Heller hadn't messed up the yard proportions. Each yard is supposed to be a little more than half the length of the one below it; the Heller yards are too long. I've watched the crew of the replica Susan Constant (obviously a much smaller ship than the SR) furl topsails. The guys didn't go out on the yard. The yard was lowered (by means of the halyard and lifts) to the lower cap, and several guys stood in the top platform and gathered the sail in. (The SC is a tiny ship. I'm not sure that little yard could stand the weight of several guys.)

You could, of course, ignore all that and furl the topsails and topgallants like they were in later centuries. But you know, of course, that your credibility as a person who doesn't care about accuracy is now shot. Anybody who spends a month figuring out how to make parrels can figure out how to make furled seventeenth-century sails - even if you don't want to chop off the yards to believable lengths.

Good luck.


Youth, talent, hard work, and enthusiasm are no match for old age and treachery.

  • Member since
    February 2011
Posted by cerberusjf on Sunday, October 2, 2016 8:14 AM

Dave, you're doing a great job!

Prof. Tilley, I was wondering if I got the shape of the topsail furling correct?  The first image is from van de Velde showing English practice

And the second from Album de Colbert showing French practice (I assumed a lot that is not visible)


The Album de Colbert seems to show the same arrangement for the spritsail topsail too.


Not sure I'd use this detail myself, but hope it might be useful for those that might want to.

Thanks,

John


  • Member since
    May 2003
  • From: Greenville, NC
Posted by jtilley on Sunday, October 2, 2016 9:18 AM

Well, I spent some time on the web looking for pictures that show this idea, but Cerberus has found better ones than I did. I question whether the real thing looked as neat and tidy as those artists showed them, but the principles are there.

I built my SR more than forty years ago, and I honestly don't remember how I  shaped the sails. As I look at those pictures I find myself thinking that the best way to do it would be to make each sail out of several pieces of tissue.

Dave, good luck.

Youth, talent, hard work, and enthusiasm are no match for old age and treachery.

  • Member since
    February 2011
Posted by cerberusjf on Monday, October 3, 2016 4:14 AM

Here's another image, this time of a merchant ship, perhaps a bit more realistic in its representation..


  • Member since
    December 2012
Posted by rwiederrich on Monday, October 3, 2016 9:56 AM

Fine job Dave....very fine.  I was wondering if foot ropes were being added a bit later?

Furled sails don't get that way by themselves.  Speeking of furled sails...fine job of that for sure....the filter paper wasn't too opaque or blochy?

I'm considering placing jibs and topsails on my great Republic myself..depicting gale rig.

Again..good to see you working and working very well.

Rob

  • Member since
    May 2003
  • From: Greenville, NC
Posted by jtilley on Monday, October 3, 2016 10:18 AM

Excellent picture choice, Cerberus. The spar proportions (to my eye) are off, as is common in sixteenth- and early seventeenth-century engravings, but the sail furling technique is clear.

The footrope was just coming into use in the SR'so time. It's quite possible that she didn't have any. The Anderson book covers the subject on pp. 52-55.

I suspect  one reason for that system of furling sails was that the later method would be clumsy - and terrifying - with no footropes. The only way for a sailor toget out on a about yard was to crawl on top of it.

Youth, talent, hard work, and enthusiasm are no match for old age and treachery.

  • Member since
    March 2012
  • From: Marysville, WA
Posted by David_K on Monday, October 3, 2016 12:00 PM

Thanks, guys!

Rob, no footropes are being installed.  I actually finished the sprit and sprit topmast yard installation yesterday, including the completion of rigging for that mast...looks pretty good!  (pics later)....I'm still leaving a few lines of standing rigging up there temporarily tensioned, so I can make adjustements later (the upper forestays, sprit top backstay crowsfoot, etc.) I'm sure as I add rigging tension to the foremast, it's going to pull on the sprit...and unfortunately, my sprit topmast is already leaning back a little bit from the *very light* tension I have applied with rigging already....but at least I should be able to correct some of it later, once everything is in place.

As for the filter paper.  If I hold it up to the light, yes there is a bit of inconsistency with regards to opacity, but it's not too bad.  And also, after I apply the glue/water/paint mixture to stiffen and color them, the effect is lessened, and I actually like it!  Honestly, now I'm thinking of using coffee filter paper for *set* sails on a possible future kit!  But let's not get ahead of ourselves!  Another thing to mention is that I'm now using the especially large coffee filters so they can span the length of the biggest yard (about 12")....and the filter paper is a bit thicker than the stuff used for a standard coffee maker.I'ts worth mentioning, because I could have actually reduced the size of the unfurled sail area even more and gotten a good-sized bundle once it was furled.  And for a ship model with shorter yards, the standard filter paper would suffice, and be thinner.

So next I'll go through and attach all the foremast sails to their yards, and get the fore yards and rigging done.  Might take a week or so, we'll see.

One other thing to mention:  Without gravity helping to actually hold the yards down, I find that while attaching the rigging, the lifts (for example) want to pull the yard up, lesseing the tension of the halyard lines....sheesh, I guess my parrels work better than I expected!  I may finally resort to gluing the yards in position, after all!
Dave


        _~
     _~ )_)_~
     )_))_))_)
     _!__!__!_         
     (_D_P_K_)
   ~~~~~~~~~~~~~
    ~~~~~~~~~~~

Current Project:  Imai/ERTL Spanish Galleon #2

Recently Finished: Revell 1/96 Cutty Sark

Next Up:  ???


  • Member since
    September 2005
  • From: Groton, CT
Posted by warshipguy on Sunday, October 9, 2016 11:40 AM

Dave,

That is a curious but effective way to make the sails. They turned out well, especially considering that a complete cloth set can be had commercially for over $80.00, and those really aren't better than what you created for a pittance!  I am most impressed!

I am thrilled to see you build the SR as a serious model. The excellence and thoroughness of your work shows just what can be accomplished with any model by a modeler with an eye for detail and the patience to see it through.

Your work is inspirational.

Bill Morrison

  • Member since
    March 2012
  • From: Marysville, WA
Posted by David_K on Sunday, October 9, 2016 4:08 PM

Thank you, Bill!

I suppose the term *serious model* can be intrepreted many ways...I'm sure there are those who see my SR as a serious model effort, and those who could list the numerous oversights and shortcuts I've taken....to each their own.  I am proud of my achievements so far, and I'm glad to know you like it, too!  :)

At this time, I'm installing yards.  Having finished the sprit yards and associated rigging to completion, I've moved on to the Fore and Main yards.  For the sake of maintaining availability of the necessary working space for close-quarters rigging, I've decided to install ALL the yards on ALL remaining masts with Halyard lines and Parrels, before moving finally to the Lifts, Braces, Clews, etc at the end....reaching up close behind the shrouds and having access to those tight areas with Braces, et al, in the way, would be far too frustrating!  lol

But I do have a question/obstacle, perhaps someone can help?

As usual, it might be difficult to explain, but here goes:

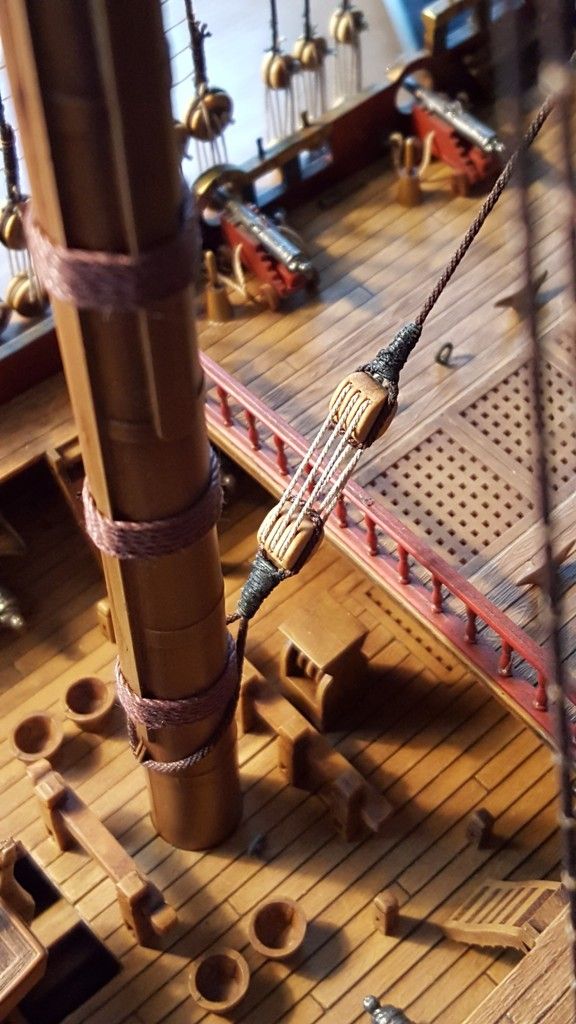
The Halyard lines for the Fore and Main yard are meant to run up over the mastcap (?) and down abaft the mast, next to a triple block, and finally ending in the 3-sheaved knighthead block on deck. 

BUT....

The stays are in the way.  They run very closely and above the knightheads.  For the Foremast, I had enough room below the mainstay and the knighthead to place that triple block under the stay, and still have room to reeve the lanyard (?).

The Main Halyard won't be as simple.  The mizzenstay has a triple-block deadeye contraption just abaft the mainmast, and that tackle is bulky, and in the way (hovering above the knighthead of the main mast)....

So, the question is this:  Do I position the main halyard triple block BELOW the mizzenstay , and let the halyard lines rub on the either side of the mizzenstay triple block assembly?

Maybe I can grab a pic real quick....

Any advice?  Where do I put the block?  And where to run the two halyard lines?  Around the outside of the lanyard?

Thanks!

Dave


        _~
     _~ )_)_~
     )_))_))_)
     _!__!__!_         
     (_D_P_K_)
   ~~~~~~~~~~~~~
    ~~~~~~~~~~~

Current Project:  Imai/ERTL Spanish Galleon #2

Recently Finished: Revell 1/96 Cutty Sark

Next Up:  ???


  • Member since
    February 2011
Posted by cerberusjf on Sunday, October 9, 2016 5:02 PM

Dave,

edited..  sorry I israd your post..  the fore mast block for the lift is offset to starboard in the Album de Colbert, not sure if you were having a problem with the foremast though?


As seen from aft

The Royal Louis/Louis XV model has them in the centreline, but it looks as if it is fowling the mainstay.


The mainmast one does appear to be in the centreline, but on the deck below in the references I've seen for French ships. The rope for the blocks (lifts?) seem to thread throught the mizzen stay block ropes in this image, with the upper halyard block above the mizzen stay.


This image is from a model from the Spanish museum with a similar arangement and the tackle just seems to go around the mizzen stay as there are no blocks in the way.


  • Member since
    March 2012
  • From: Marysville, WA
Posted by David_K on Sunday, October 9, 2016 6:02 PM

Well, that's a fine how-do-you-do....:)

Thanks for the info, cerberus...

I guess I'll just have to make it work, whichever way I go.  It seems like having the two lanyards threaded in between each other's tackle is a wonky mess....I may just run the upper block for the halyard BELOW the stay tackle, and let those two lines slightly foul the stay...you'r right, though...in many cases the knighthead is offset on the deck (my Golden Hind has it offset)....

To clarify, both the fore and the main mast of the Heller SR kit have the knighthead directly behind the mast, not offset.  I had a similar issue with the foremast, but there isn't a complicated lanyard block tackle there, so I just let the line run beside the stay.

Thanks again!

D


        _~
     _~ )_)_~
     )_))_))_)
     _!__!__!_         
     (_D_P_K_)
   ~~~~~~~~~~~~~
    ~~~~~~~~~~~

Current Project:  Imai/ERTL Spanish Galleon #2

Recently Finished: Revell 1/96 Cutty Sark

Next Up:  ???


  • Member since
    February 2011
Posted by cerberusjf on Sunday, October 9, 2016 6:41 PM

Sorry Dave :)  I'm thinking of building mine without masts again..


Maybe one way to solve the problem would be to wrap a rope round the mizzen stay block ropes..(sorry I've forgotten all my terminology) to bring them all together (seizing?)?  This is how it is represented in the Album de Colbert and in the Musee de la Marine plans.  It would let the ropes from the knight head (thanks for reminding me)to the block to go round the mizzen stay.  But it would tighten the mizzen stay unless you can slacken it off..  I'll upload an image tomorrow if you like, it's nearly 1 a.m. here atm


Cheers,

John.

undate :- here is an image form the AAMM plans, looks like they're representing hearts rather than blocks?


JOIN OUR COMMUNITY!

Our community is FREE to join. To participate you must either login or register for an account.

SEARCH FORUMS
FREE NEWSLETTER
By signing up you may also receive reader surveys and occasional special offers. We do not sell, rent or trade our email lists. View our Privacy Policy.