SEARCH FINESCALE.COM

Enter keywords or a search phrase below:

Copper weathering on USS Constitution

4308 views
9 replies
1 rating 2 rating 3 rating 4 rating 5 rating
  • Member since
    September 2016
Copper weathering on USS Constitution
Posted by OWOF on Saturday, September 17, 2016 8:24 AM

I'm interested to know in what different methods some of you use to put the green weathering onto the copper plating on ships like the Constitution. I haven't decided whether to do that or leave it fresh.  Of course I do t want to do it unless I can get it just right, so thought I would explore the options here. 

  • Member since
    November 2009
  • From: Twin Cities of Minnesota
Posted by Don Stauffer on Saturday, September 17, 2016 9:31 AM

One problem is that copper weathers a bit differently in water than in air, so observing weathered copper that normally lives in air is not a totally reliable reference.  However, one cannot really see the weathering when the ship is in the water.  So it is hard for anyone to prove your weathering wrong.  If you have an airbrush, you can put on a very thin coat of paint, very transparent, or make a wash and just brush it on.  I find the wash makes a more interesting look, but the airbrush is easier. 

On the other hand because of this problem, many folks do not weather it at all.


Don Stauffer in Minnesota

  • Member since
    September 2012
Posted by GMorrison on Saturday, September 17, 2016 11:49 AM

A subject of much discussion. It really does come down to personal opinion.


My own...

I tend to use real copper, the tape. I kind of like the bright copper look, although it is kind of flashy.

With something like the Constitution, the other option is copper paint. I like the look of a thin black wash, just enough to give it an antique quality.

What I do not recommend, although others might like it, is to in any way try to make it look like the real thing, in any way other than if the ship had just been cleaned. I cannot imagine that the bottom of a copperred ship was green while in the water, except perhaps at the waterline. Marine growth is nasty looking.

 Modeling is an excuse to buy books.


  • Member since
    September 2016
Posted by OWOF on Saturday, September 17, 2016 11:58 AM

I used copper paint and am happy with it so haven't decided whether to do anything more with it. I've seen some really good weathering jobs on here though. 

  • Member since
    February 2006
  • From: Boston
Posted by Wilbur Wright on Sunday, September 18, 2016 11:05 AM

Once you use the copper paint of your choice, this is what I have done.  I then use a small piece of a sponge and slowly dab on Tamiya olive-green thinned with water (not really wet, more like paste).  This will produce a slight green haze which I find is somewhat realistic to my eye.  It is also easy to wipe off if you get a section wrong or apply too much.  When it looks right just let it dry overnight.

  • Member since
    September 2016
Posted by OWOF on Sunday, September 18, 2016 2:56 PM

My copper paint is enamel, would I still be able to use a water soluble paint over it for the green?

  • Member since
    November 2009
  • From: Twin Cities of Minnesota
Posted by Don Stauffer on Monday, September 19, 2016 9:33 AM

OWOF

My copper paint is enamel, would I still be able to use a water soluble paint over it for the green?


As long as the enamel is dry, yes.  I have several modeling friends who use water colors for weathering enamel finishes, so they can remove the weathering if they don't like what they have done.


Don Stauffer in Minnesota

  • Member since
    December 2005
  • From: San Diego
Posted by jgonzales on Monday, September 19, 2016 10:56 AM

Hi all,

I used the following video among other things as a reference for my copper weathering. It is a time-lapse video of the Constitution moving into drydock and having the water drained to expose the ship for repairs:

I know we should not be using the current ship as a reference for appearance if we intend to model the ship as she appeared in the past, but this is the only example I can find that shows how a copper-bottomed ship that has been in the water looks like. I find the green patina that exists on the underwater hull quite striking.

I started with the Revell 1/96 "Museum Classics" Constitution, which means the hull was pre-painted. The model was in the box for years, and when I opened it, the pre-painted copper appeared to have aged, being much darker than the pictures on the box, and have even acquired a strong green tinge:
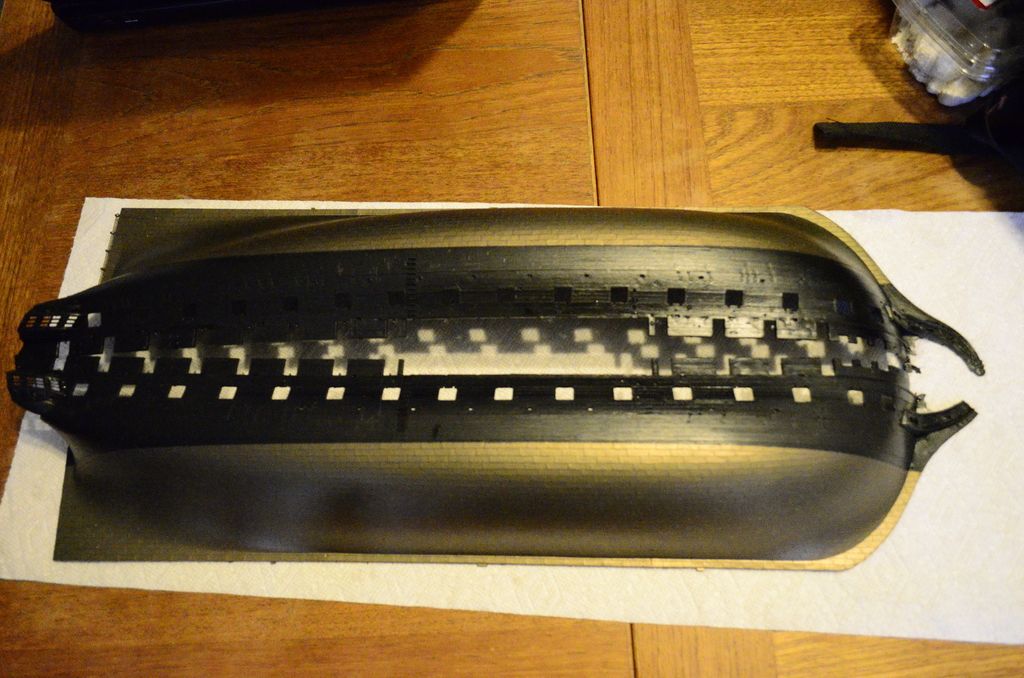
My initial intent was to copy Force9 and pick out individual copper plates, and paint them in different shades of copper or black; I even began painting a few individual copper sheets. However, I caught sight of the above video and decided to age the copper according to the appearance of the full size Constitution immediately after the draining of the drydock.
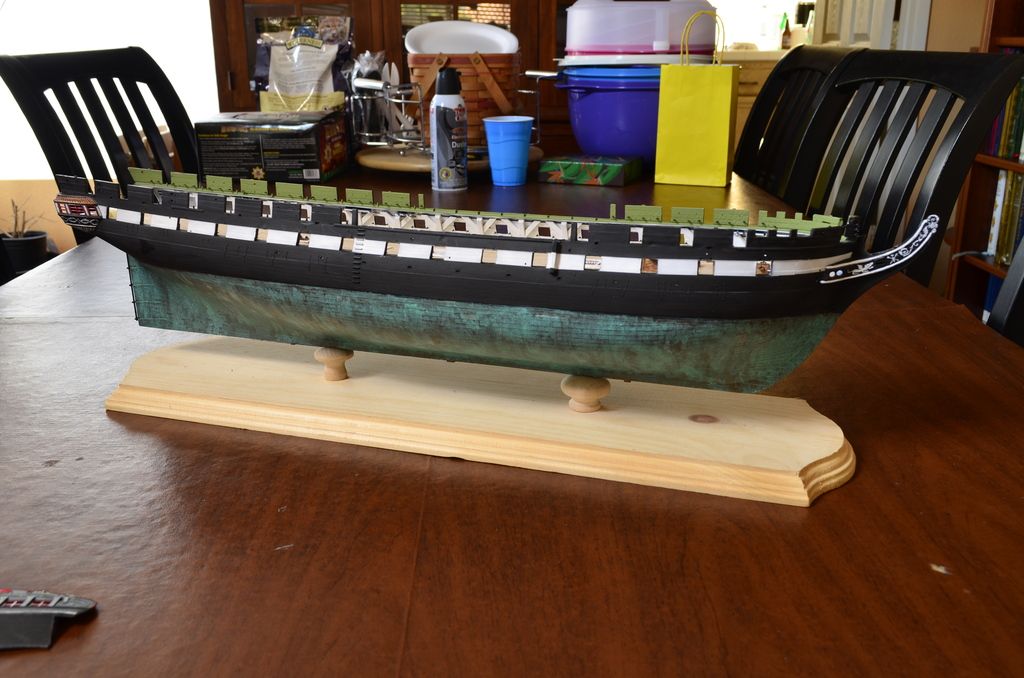
I inverted the hull, and took Modelmaster Acrylic Patina, thinned it slightly, and manually applied a wash with a brush, using strokes perpendicular to the length of the hull. I then took Modelmaster Acrylic white primer and added some random patches of white, and did the same with Modelmaster Acrylic flat black.

Best,

Jose

Jose Gonzales San Diego, CA
  • Member since
    February 2003
  • From: Lacombe, LA.
Posted by Big Jake on Monday, September 19, 2016 12:30 PM

OWOF

I'm interested to know in what different methods some of you use to put the green weathering onto the copper plating on ships like the Constitution. I haven't decided whether to do that or leave it fresh.  Of course I do t want to do it unless I can get it just right, so thought I would explore the options here. 


Hi, Read your thread and can offer the following.
On my Constitution the lower hull painting /Corrosion detail was done in the follow manner: You must use FLOQUIL Brand Paints for this step.
1. Coat the hull with Floquil Copper (ONLY this brand of paint will work), let dry 24 hours.
2. Using a #2 size brush, use Floquil Lt. Green, streak the hull in from the top of the plates to the keel in downwards strokes only.
3. Using a #2 size brush, paint Floquil Ant. White directly over the Lt. Green, and then while the paint is still damp wash the paint down with ONLY turpentine, any other solvent is too strong. Let dry over night, the smell is not that bad, but if you work indoors on your models you will want to do this outside and let dry their.
Parts # 3 and 5 are the fake cargo holds and the small boxes in them are to represent crates of Tea. The color was either green or red, I’ve seen both.  You can put a wash, but once you build the model you’re not going lift up the hatch to see in it any way so why bother. You can rig open or closed if you prefer.


  • Member since
    February 2003
  • From: Lacombe, LA.
Posted by Big Jake on Monday, September 19, 2016 12:32 PM


JOIN OUR COMMUNITY!

Our community is FREE to join. To participate you must either login or register for an account.

SEARCH FORUMS
FREE NEWSLETTER
By signing up you may also receive reader surveys and occasional special offers. We do not sell, rent or trade our email lists. View our Privacy Policy.