SEARCH FINESCALE.COM

Enter keywords or a search phrase below:

1/12 Lightning sailboat

2001 views
6 replies
1 rating 2 rating 3 rating 4 rating 5 rating
  • Member since
    May 2008
  • From: Wyoming Michigan
1/12 Lightning sailboat
Posted by ejhammer on Tuesday, June 13, 2017 9:06 AM

Started on this a while back. It's larger scale than I usually do. Following is what I've done so far. This is a commission build. I figure it'll work out to about 8 cents an hour Big Smile. I'll not get into detail, but the pictures tell the story.

The client wanted it to be built to his recollection of a boat his father had owned when the client was a kid. The first thing was it had to be waterlined so he could display it in a diorama he was making. Second, some of the details shown in the kit instructions, and the materials supplied needed to be altered. That included the rigging - I'll deal with that in the next post. Third, was colors. That was not a problem.

Waterlining - I built the hull as normal, then took it out in the shop and with the wide belt sander, ground the bottom off to a waterline shown on the drawings and scribed on the hull with a machinist's surface gauge.

I'm now up to installing the mast and spars, standing and running rigging.


Completed - 1/525 Round Two Lindberg repop of T2A tanker done as USS MATTAPONI, USS ESSEX 1/700 Hasegawa Dec 1942, USS Yorktown 1/700 Trumpeter 1943. In The Yards - USS ESSEX 1/700 Hasegawa 1945, USS ESSEX 1/700 Dragon 1944, USS ESSEX 1/700 Trumpeter 1945, USS ESSEX 1/540 Revell (vintage) 1962, USS ESSEX 1/350 Trumpeter 1942, USS ESSEX LHD-2 as commissioned, converted from USS Wasp kit Gallery Models. Plus 35 other plastic and wood ship kits.

  • Member since
    May 2008
  • From: Wyoming Michigan
Posted by ejhammer on Tuesday, June 13, 2017 9:40 AM

The rigging and sails,

The boat he remembers was built in the 60's and had wire rope for the standing rigging - backstay, jib stay and shrouds (2 each side). I found some picture framing wire to experiment with. 7 strands of .0115" forming a .035" wire rope. Stripped one strand out and used it to wrap the bends at the eyes. Was going to make something that looked like turnbuckles. Not knowing much about sailing vessels, I've been looking in a couple books I have on the subject, but most everything I find is for larger boats/ships. "The art of rigging" and "Practical small boat designs" are of some help, but any suggestions from the forum will be of great help.


I just got some brass turnbuckles that really work. This will help a lot in tensioning the rigging and getting the mast positioned exactly. I'll set the turnbuckles with a bit of threadlocker when done to prevent loosening but still allow them to be adjusted later if required. Also, some stainless steel wire, a bit smaller, .0085" per strand, 7 strands, .027" overall. It is much more symetrical than the picture wire.


Which do you think looks more like real wire rope used in sailboats and ships?

Lastly, the sails. They will be furled. The mainsail will be lowered and tied to the boom. The jib will be wrapped around the jibstay and tied.

The material in the kit is kinda like a very thin embossed plastic material. I've tried "bunching" it up to look like furling, but it is too stiff for that. Soaking in water didn't help at all. I ordered some silkspan, I guess used to make sails, but I'm not familiar with the stuff and how it would be used. It looks to me like very thin, unwoven filter material. I can see my hand right through two layers of it. Anybody know where I can find information on it's use?

I also played with a piece of an old, white bedsheet, that was just a bit yellowed, that the client brought over. I cut the sails out of it. The tunnel that slips over the jibstay was stitched on a sewing machine. I cut the sails from along an edge of the sheet, so one edge of each sail is a factory edge, The other edge was hemmed with a very narrow double turned hem and machine stitched. I havn't tried to install any of it yet, so I don't know what it will look like, as I'm still working on the standing rigging.

I thought Don, Tanker Builder, G Morrison or Prof Tilley might have some insight on this.

Thanks for any comments.


Completed - 1/525 Round Two Lindberg repop of T2A tanker done as USS MATTAPONI, USS ESSEX 1/700 Hasegawa Dec 1942, USS Yorktown 1/700 Trumpeter 1943. In The Yards - USS ESSEX 1/700 Hasegawa 1945, USS ESSEX 1/700 Dragon 1944, USS ESSEX 1/700 Trumpeter 1945, USS ESSEX 1/540 Revell (vintage) 1962, USS ESSEX 1/350 Trumpeter 1942, USS ESSEX LHD-2 as commissioned, converted from USS Wasp kit Gallery Models. Plus 35 other plastic and wood ship kits.

  • Member since
    September 2012
Posted by GMorrison on Tuesday, June 13, 2017 11:47 AM

I think your bedsheet may have the most promise. Silkspan is designed for "stick and tissue flying models. It is designed to be doped after application, and shrinks to a tight smooth finish. People who use it for sails seem to be working at smaller scales. It looks like paper.

It's not clear what the original sails would be. Back at that time cotton is certainly a possibility, "under canvas". But that was an older sail; nylon was certainly also  used then and makes for a far superior sail. Lighter, much faster drying, less likely to grow mold, and more durable. I'd suggest you look at thin nylon. It's a little hard to sew, but you are up to it.

BTW- NICE shop! And another great wooden boat build. Not to sound like a broken record, but anyone wanting to get into wooden boats would be smart to build a nice big scale sailboat, sloop, schooner etc. Plenty there to keep your mind racing.

The standing rigging, stays etc. fall under the generic of "aircraft cable". It would be smaller diameter, like 1/8", stranded and wound wire rope, stainless steel. It could also be clear or white plastic coated.

Picture wire is crappy stuff, isn't it?

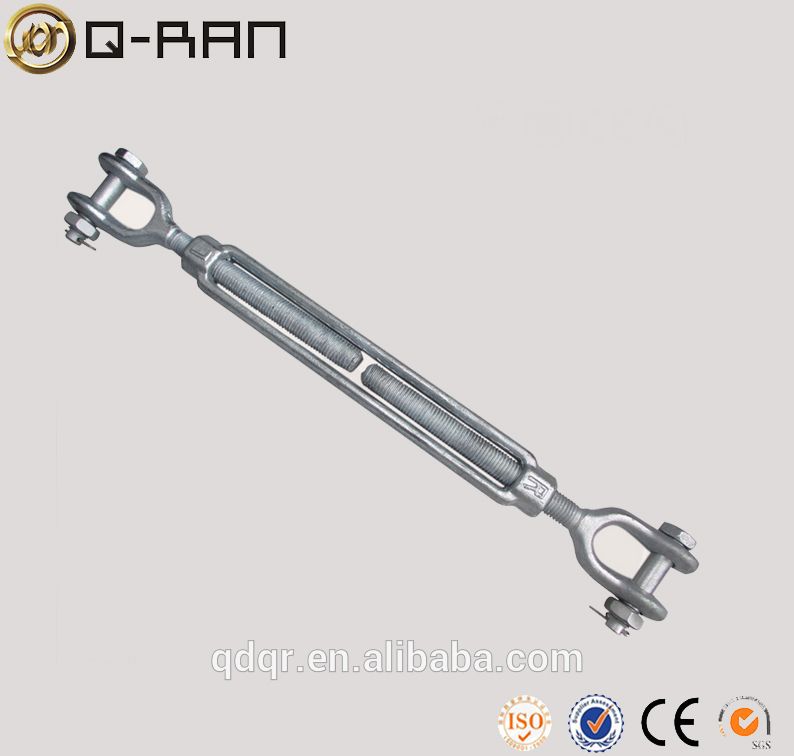
Tensioners could be a turnbuckle much like what you've got there, in SST. At each end, those little eyes would have a "U" shaped shackle with a pin through the open end. At one end, shackled to an eye on the hull. At the other, your wire has an end swaged onto it, like a cylinder with a flattened end and a hole for the shackle pin drilled through that. It makes for a quick disconnect without a lot of work to re-tension stuff when set up again.

Just one possibility, of many.

For the jib, I don't think this little boat had a roller jib back in her youth. The jib would be struck and piled up on the fore deck during a day sail. At the end of the day you'd go dry it on the lawn, then flake it and stick it in a sail bag.

Ditto the main. I wouldn't leave my sail on the boom overnight without a cover, unless it was a situation like an overnight trip to a camp without a wharf, and an early morning departure.

Or a couple hours in the Yacht Club bar prior to sailing home...

 Modeling is an excuse to buy books.


  • Member since
    May 2008
  • From: Wyoming Michigan
Posted by ejhammer on Friday, June 16, 2017 10:10 AM

GMorrison
BTW- NICE shop! And another great wooden boat build.


Thanks GM. I do like little wood boats. They always give me a new history to study and new challenges in building. Good ideas forming in my head from your rigging comments. Thanks.

Thanks for the comment on my shop. When I returned to modeling after a 40 year hiatus, (I'm 75), I was using my office. Having been the original "Tool Hound" all my life, all the new modeling tools opened up a whole new world of equipment to me. After a few years I just plain ran out of room, so, I took over a storeroom that was full of junk. Got rid of some junk and gave me a nice retreat to spend time in. It's really nice to have a space that was set up from scratch to accomodate the hobby.

This is what it looks like today, about 8' X 11'. The white tile floor is much easier to find bits on than the carpet monster was.

EJ

Completed - 1/525 Round Two Lindberg repop of T2A tanker done as USS MATTAPONI, USS ESSEX 1/700 Hasegawa Dec 1942, USS Yorktown 1/700 Trumpeter 1943. In The Yards - USS ESSEX 1/700 Hasegawa 1945, USS ESSEX 1/700 Dragon 1944, USS ESSEX 1/700 Trumpeter 1945, USS ESSEX 1/540 Revell (vintage) 1962, USS ESSEX 1/350 Trumpeter 1942, USS ESSEX LHD-2 as commissioned, converted from USS Wasp kit Gallery Models. Plus 35 other plastic and wood ship kits.

  • Member since
    December 2003
  • From: 37deg 40.13' N 95deg 29.10'W
Posted by scottrc on Friday, June 16, 2017 3:16 PM

I like your paint station setup.  

  • Member since
    May 2008
  • From: Wyoming Michigan
Posted by ejhammer on Friday, June 16, 2017 9:25 PM

scottrc

I like your paint station setup.  


Thanks. I made it with sheet metal. Has a non spark blower motor that I got used. Is set up as a downdraft booth, sucks the air through the pegboard, through two furnace filters and a sheet of poly filter material sandwitched between the furnace filters and the pegboard, into a plenum that is below the filters, runs up the back and out the top to the exterior of the house. I made it 36" long so I can spray 1/350 aircraft carriers in it. Has a 24" flourescent light behind the upper flat surface of the front. Works great. The compressor is below under the counter.


EJ

Completed - 1/525 Round Two Lindberg repop of T2A tanker done as USS MATTAPONI, USS ESSEX 1/700 Hasegawa Dec 1942, USS Yorktown 1/700 Trumpeter 1943. In The Yards - USS ESSEX 1/700 Hasegawa 1945, USS ESSEX 1/700 Dragon 1944, USS ESSEX 1/700 Trumpeter 1945, USS ESSEX 1/540 Revell (vintage) 1962, USS ESSEX 1/350 Trumpeter 1942, USS ESSEX LHD-2 as commissioned, converted from USS Wasp kit Gallery Models. Plus 35 other plastic and wood ship kits.

  • Member since
    November 2005
  • From: Formerly Bryan, now Arlington, Texas
Posted by CapnMac82 on Saturday, June 17, 2017 4:14 PM

Well, I can speak as a former Lightning owner and sailor.

The stays are made up using shakles which are flat plate  bent into a square-edge U.
The lines themselves are typically swaged (passed around an eye or thimble and into a sleeve about 1" long, which is then compressed hydralically arounf standing & bitter ends).

For 1/2, I'd be veruy inclinded to use guitar string, if I could find some at 0.016"
shroud

This site will likely help:  http://www.windrider.com/parts/parts-by-boats/lightning/hardware.html?p=2

This one, too:  http://www.apsltd.com/one-design-sailboat-parts/lightning.html

My jib hamed on to the forestay.  I though about a roller jib, but it was easy enough to just pull down for boat camping.

For boat camping, I'd gasket the sail to the boom (joys of velcro Smile ) and I had a specialised awning canvas (nylon) that went over the boom and covred the cockpit.  Otherwise, like G, I'd just put the sail cover on.  The jib would go in a bag and in the cubby with the spinnacre and genny.

60s era line is going tto be white.  Yacht braid was in use, so it will be smooth.  It might have a teeny blue speck or a red speck in the braid, but nothing you'd really be able to see even in 1/12.

20 years later, all of my running rigging was color coded--the main sheet was spiffy red, the jib sheets were yellow, the vang and all the spinnacre gear were all violet.

Not mine, but from an restoration series online: 

http://forums.iboats.com/forum/boat-repair-and-restoration/boat-restoration-building-and-hull-repair/455030-1965-lightning-sailboat

JOIN OUR COMMUNITY!

Our community is FREE to join. To participate you must either login or register for an account.

SEARCH FORUMS
FREE NEWSLETTER
By signing up you may also receive reader surveys and occasional special offers. We do not sell, rent or trade our email lists. View our Privacy Policy.