SEARCH FINESCALE.COM

Enter keywords or a search phrase below:

North Cormorant oil platform WIP

9702 views
39 replies
1 rating 2 rating 3 rating 4 rating 5 rating
dlh
  • Member since
    March 2017
  • From: Chambersburg, PA
North Cormorant oil platform WIP
Posted by dlh on Friday, November 10, 2017 9:50 AM

I can work on this build only several hours a day as my neck pain allows, so the build might get slow at times.

Here's a nice finished model (not mine)
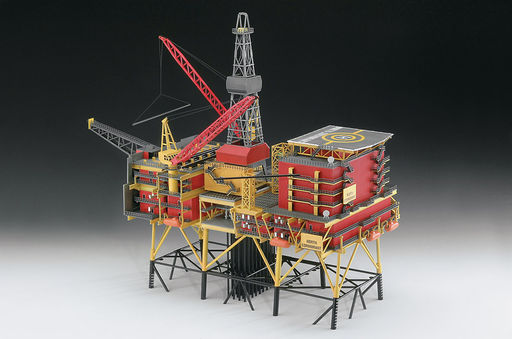
So far, I've primed the base of the model.  I've decided, from advice, to paint it black and then overcoat with yellow to get the weathering effect I've seen on another build.  Pictures of this later.

This model is built of modules, each a small build of its own, so I'm building it that way.  I'm using ModelMaster enamels because I'm a relative beginner and I'm familiar with how they spray.  I'm using Insignia Red and Insignia Yellow because I like the dark colors they produce.  I'm using MM Aluminum to paint the interior floors of the equipment areas; equipment will be brush painted.
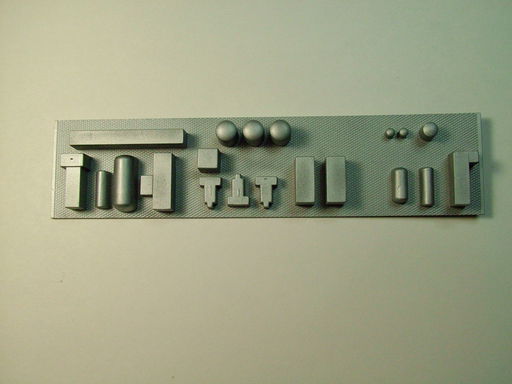
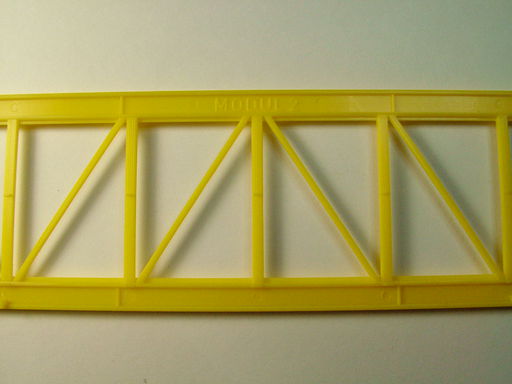
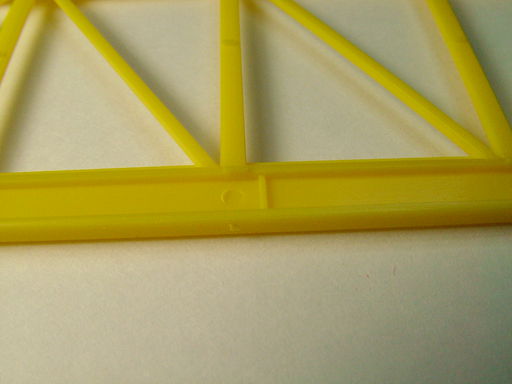
This kit requires quite a bit of cleanup as the part numbers are molded into the parts; some will not be seen, so I'm cleaning up areas that might be seen.  There are also some slight mold lines to smooth.

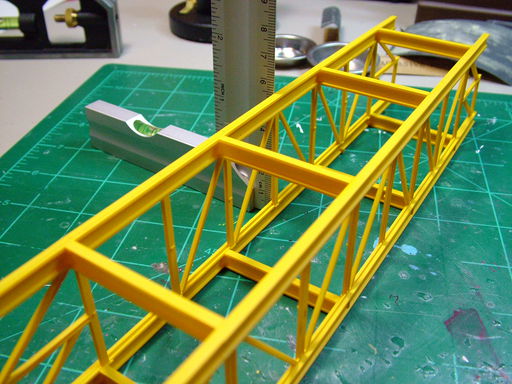
Here are pics of the module cross members as found and cleaned up and a pic of the module frame before cleaning up. Also shown are pics of the module frame, assembled first, then painted, not primed.
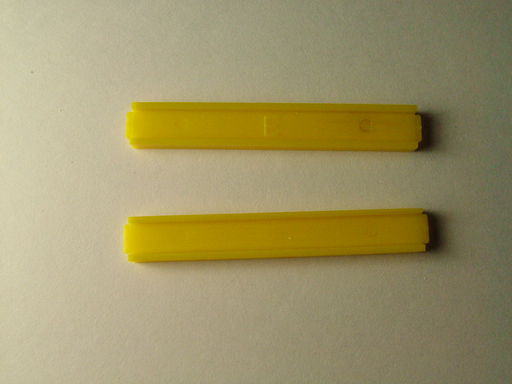
I experimented with priming and not priming the corrugated parts and could see not difference, probably because both yellow and red are flat colors.  I've included some comparison pics to show the colors before and after painting.  
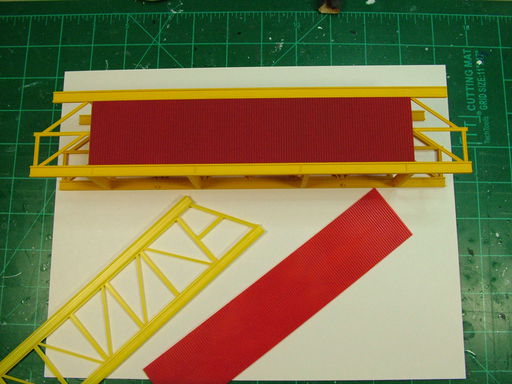
In this pic, you'll see locators on the frame for the cross members.  I spent quite a bit of time trying to figure out the instructions as to which side of that should be used.  So my pattern is to place the cross member to the "outside" of each locator.  That way they sit flush and don't encounter the small tab above that is used to mount each equipment level.  I used the square when attaching the cross members to the frame.  I glued each cross member to the frame with super glue and then set with accelerator.

I then attached the opposite frame to all four cross members at once.  This approach eliminates and clamping and waiting for the glue to dry.
 

One side of each corrugated panel is a cutaway revealing the interior detail. 
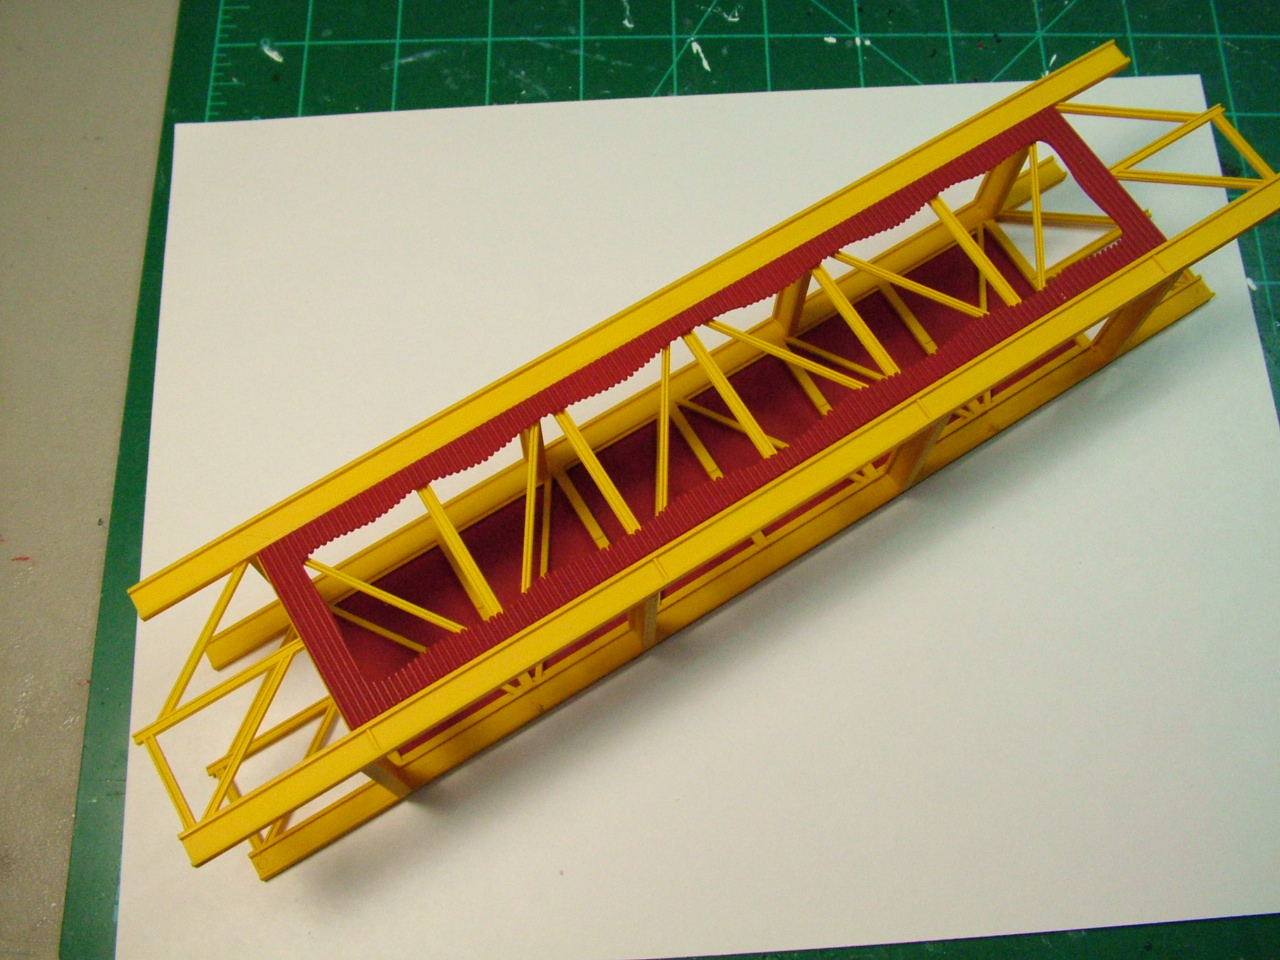
Once assembled, these can barely be seen.  I considered reversing each module with the cutaway to the outside but decided against that.  Maybe I'll do that on a second build of this monster.:nah:

  • Member since
    September 2013
  • From: San Antonio, Texas
Posted by Marcus McBean on Friday, November 10, 2017 5:20 PM

That will be one nice looking build when finished.  What scale is that and how big will it be?

dlh
  • Member since
    March 2017
  • From: Chambersburg, PA
Posted by dlh on Friday, November 10, 2017 9:01 PM

Marcus McBean

That will be one nice looking build when finished.  What scale is that and how big will it be?


Scale is 1/200. It's about 27" long and 19" high. Lots of plasticIndifferent

dlh
  • Member since
    March 2017
  • From: Chambersburg, PA
Posted by dlh on Monday, January 29, 2018 5:34 PM

Finally some progress on this. All module floors were sprayed with Testors Aluminum and then equipment was brush painted.  Gave me lots of needed practice with brush painting skills.

DSCF3045

Directions called for assembling the modules around the floors of equipment, but I wanted to spray the module frames completed.  Two modules weren't tall enough to allow sliding the top floor in place. So I inserted the top  floor first and then "lifted" it to its upper position.
DSCF3025

DSCF3019

I drilled some of the ducting openings and then squared them as best as I could with a Dremel and hobby knife. Also filled ejector pin marks on the side.

I spent two long sessions cleaning mold lines from the 40 well heads. (Boring!)

DSCF3013

DSCF3015

The two boom arms were a bit challenging as they had compound curves.  I held them at right angles using a piece of aluminum  angle and glued them with a touch-and-flow applicator.  I started in the center and worked outward in small steps, pressing the curve with my fingers.  Worked out well with very little, if any, glue visible.

DSCF3036

DSCF3037

DSCF3038

Then last session(s) was painting lots of red (Testors Insignia Red).  This took two coats in spite of the fact that the plastic was red to start.

DSCF3042

Now for railings and walkways!


  • Member since
    January 2015
Posted by PFJN on Monday, January 29, 2018 8:12 PM

Hi,

Your build is looking great.  I really like seeing models that are a bit different from some of the things you may typically see. Smile

1st Group BuildSP

  • Member since
    November 2009
  • From: Twin Cities of Minnesota
Posted by Don Stauffer on Tuesday, January 30, 2018 9:16 AM

Looking great.  Who offers the kit?

Don Stauffer in Minnesota

dlh
  • Member since
    March 2017
  • From: Chambersburg, PA
Posted by dlh on Tuesday, January 30, 2018 9:37 AM

Don Stauffer

Looking great.  Who offers the kit?


Revell of Germany

https://www.revell.com/germany/other/80-8803.html#.WnCRBTdG1aQ

dlh
  • Member since
    March 2017
  • From: Chambersburg, PA
Posted by dlh on Tuesday, January 30, 2018 9:43 AM

PFJN

Hi,

Your build is looking great.  I really like seeing models that are a bit different from some of the things you may typically see. Smile


Thanks.  I like the "different" models. Same with car models; I've built Messerschmitt, VW Samba, and BMW Isetta.  Working up courage to build my Italeri Mefistofele.

http://shop.italeri.com/Products/21661-4701-fiat-mefistofele.aspx

I'm very intimidated after seeing the build that Harry Pristovnik did.  He was a true master.  Thread here:

http://www.modelcarsmag.com/forums/topic/116263-1924-fiat-mefistofele/?tab=comments#comment-1681868

  • Member since
    July 2008
  • From: Summerville, SC
Posted by jeffpez on Tuesday, January 30, 2018 10:03 AM

Good luck with the Fiat. It's very high on my wish list but I haven't yet bought it.

  • Member since
    February 2010
  • From: Maine
Posted by Stage_Left on Tuesday, January 30, 2018 11:20 AM

Nice progress on a very cool subject Yes

Dave

  • Member since
    June 2014
  • From: New Braunfels , Texas
Posted by Tanker - Builder on Tuesday, January 30, 2018 12:33 PM

Hmm;

 That is quite a pile of plastic isn't it ? I used a second release for a New Bought  parts box , in and of itself . To answer Don's question It's an original Revell now Revell of Germany Kit .

 They used to have a Nuclear Reactor too . I wish they'd bring that and the large Rotary Excavator back !

  • Member since
    June 2014
  • From: New Braunfels , Texas
Posted by Tanker - Builder on Tuesday, January 30, 2018 12:44 PM

On the Modules .

 I have to say . I turned all mine outward . I just couldn't resist putting all kinds of stuff in there ." N" scale refinery stuff works great . I have one module done only . It has about a quarter of a " N" scale refinery piping set in it .

 Or at least it seems that way . There's pipes , valves and control panels everywhere . I fudge because I cannot get clear photos of the insides of them .

 One more thing In the " Parts Box " set .The cranes look great on work ships too .

dlh
  • Member since
    March 2017
  • From: Chambersburg, PA
Posted by dlh on Tuesday, January 30, 2018 1:32 PM

Tanker - Builder

On the Modules .

 I have to say . I turned all mine outward . I just couldn't resist putting all kinds of stuff in there ." N" scale refinery stuff works great . I have one module done only . It has about a quarter of a " N" scale refinery piping set in it .

 Or at least it seems that way . There's pipes , valves and control panels everywhere . I fudge because I cannot get clear photos of the insides of them .

 One more thing In the " Parts Box " set .The cranes look great on work ships too .


I'd love to see that. Any photos?

  • Member since
    June 2014
  • From: New Braunfels , Texas
Posted by Tanker - Builder on Wednesday, January 31, 2018 11:31 AM

Sorry ;

 Due to newbie stupidity I haven't got any photos of those boats to put in here . All are on old hard photos I'll have to send to the Gallery .

dlh
  • Member since
    March 2017
  • From: Chambersburg, PA
Posted by dlh on Friday, March 23, 2018 3:03 PM

It's been a while. Nearly completed the first 3 modules after washing with Citadel Nuln oil.

I've been putting off railings and stairs because of the limited amount of long runs of railing in the kit.  I knew this was an issue so I bought some 1/200 PE railings from Gold Medal Models.  I'm pleased with my first use of those on the long walkway on the flare boom.  I still won't have enough long sections of railing without sectioning some of it or using the other type of PE railing. The kit has enough length of railing just not enough long sections.

One sprue of railings from the kit

PE railings from Gold Medal Models

Module 4 contains a bunch of railings so I might use PE railings for that, but there isn't enough of the PE railings that exactly match the kit's railings.  So I might use the other style of PE railings to do module 4.  It's inside the module so it might not be noticeable.

I'm trying to paint the railings a darker grey than the decking; just adds a little more detail.  That means that I'd assemble every railing section, with bends and such, and then glue into place. But that might prove too difficult to do the whole model that way. I tried 3 colors on this test section.

I made a decision on the heli for the model after searching a long time for a 1/200 plastic kit.  I bought a diecast 1/200 that matched the colors on the Cormorant.  Not exactly accurate, but it looks good.

  • Member since
    June 2014
  • From: New Braunfels , Texas
Posted by Tanker - Builder on Saturday, March 24, 2018 10:14 AM

Yes !

 The helo looks okay .I would just stay with GMM models rails . If not , see what Tichy Train Group has . www.tichytraingroup.com . I believe that is correct .

dlh
  • Member since
    March 2017
  • From: Chambersburg, PA
Posted by dlh on Friday, July 13, 2018 4:37 PM

It's finally finished.  I anticipated running short on railing so I used some PE railings in some places.  I'm sort of new to PE work.  Otherwise I may have use PE on the whole model $$.  I'm glad I used a darker color on the railings.  Gives a bit more interest.  For many of the railings I asselmbled sections first, then airbrushed, to hide glue marks.

This model gave me LOTS of practice at repetative work on small stuff, something I needed.

I also sort of new to weathering so I was conservative.  I used Citadel nuln oil on most surfaces and a little Vallejo pigments on the supports. The soot on the flare pipe is also Vallejo.  (I need a lot of practice on weathering)

The helicopter is diecast.  It's the only thing I could find at 1/200.  It still looks large to me, but the colors are nice.
I used Molotow chrome pens on the helipad landing lights but they don't show up much in the photos.

I think my next project will be the Italeri Fiat Mefistofele, which I already have.  I've spent lots of time reading the builds of others.  There are lots of tips out there, probably the best of which came from the legend, Harry Pristovnik. So sad that he's no longer with us.


  • Member since
    January 2015
Posted by PFJN on Friday, July 13, 2018 6:22 PM

Surprise

Hi,

That turned out great

1st Group BuildSP

fox
  • Member since
    January 2007
  • From: Narvon, Pa.
Posted by fox on Friday, July 13, 2018 8:36 PM

N - I - C - E work. Bow Down 

Jim  Captain

 Main WIP: 

   On the Bench: Artesania Latina  (aka) Artists in the Latrine 1/75 Bluenose II

I keep hitting "escape", but I'm still here.

  • Member since
    April 2003
  • From: USA
Posted by keavdog on Saturday, July 14, 2018 12:15 AM

Wow!!! I'm just seeing this and what a really cool subject.  Striking colors and you did a great job.  I love that little chopper - nice find.  Really nice work.


Thanks,

John

  • Member since
    May 2008
  • From: Wyoming Michigan
Posted by ejhammer on Saturday, July 14, 2018 7:35 AM
WOW, really nice. Must have been a couple nautical miles of rail on that baby. Great job and colors.\ EJ

Completed - 1/525 Round Two Lindberg repop of T2A tanker done as USS MATTAPONI, USS ESSEX 1/700 Hasegawa Dec 1942, USS Yorktown 1/700 Trumpeter 1943. In The Yards - USS ESSEX 1/700 Hasegawa 1945, USS ESSEX 1/700 Dragon 1944, USS ESSEX 1/700 Trumpeter 1945, USS ESSEX 1/540 Revell (vintage) 1962, USS ESSEX 1/350 Trumpeter 1942, USS ESSEX LHD-2 as commissioned, converted from USS Wasp kit Gallery Models. Plus 35 other plastic and wood ship kits.

  • Member since
    June 2014
  • From: New Braunfels , Texas
Posted by Tanker - Builder on Saturday, July 14, 2018 8:31 AM

Nuts !

 I can see those landing lights just fine . What are you doing ? trying to be a perfectionist ? Don't ! Your model is beautiful ! ! Now find some at flea markets for scratch building . I did it ! T.B. -------P.S. That's a pwetty widdle boidy !

  • Member since
    February 2010
  • From: Maine
Posted by Stage_Left on Saturday, July 14, 2018 9:54 AM

I like the look of the finished product! Well done Yes

Dave

dlh
  • Member since
    March 2017
  • From: Chambersburg, PA
Posted by dlh on Saturday, July 14, 2018 10:24 AM

PFJN

Surprise

Hi,

That turned out great


ThanksBig Smile

dlh
  • Member since
    March 2017
  • From: Chambersburg, PA
Posted by dlh on Saturday, July 14, 2018 10:26 AM

fox

N - I - C - E work. Bow Down 

Jim  Captain


T - H - A - N - K - S  -  -  -  Geeked

dlh
  • Member since
    March 2017
  • From: Chambersburg, PA
Posted by dlh on Saturday, July 14, 2018 10:31 AM

keavdog

Wow!!! I'm just seeing this and what a really cool subject.  Striking colors and you did a great job.  I love that little chopper - nice find.  Really nice work.


Thanks.  All things must be color matched, even helicopters!Cool

dlh
  • Member since
    March 2017
  • From: Chambersburg, PA
Posted by dlh on Saturday, July 14, 2018 10:34 AM

ejhammer
WOW, really nice. Must have been a couple nautical miles of rail on that baby. Great job and colors.\ EJ
 

Thanks. I think about half of the build time was spent on railings.  I'm chased by tiny railings in my dreams. Sleep

dlh
  • Member since
    March 2017
  • From: Chambersburg, PA
Posted by dlh on Saturday, July 14, 2018 10:40 AM

Thanks to all. Keep advice coming

Dave

dlh
  • Member since
    March 2017
  • From: Chambersburg, PA
Posted by dlh on Saturday, July 14, 2018 10:41 AM

Tanker - Builder

Nuts !

 I can see those landing lights just fine . What are you doing ? trying to be a perfectionist ? Don't ! Your model is beautiful ! ! Now find some at flea markets for scratch building . I did it ! T.B. -------P.S. That's a pwetty widdle boidy !


Thanks.  Perfection, yes.  I should have lit the landing lights.  Also lit the interiors of the modules, motorized the cranes, displayed the rig in a wave tank.  I wish I could have found a model helo to build. I have RC helicopters.  It would be cool to have one hovering over the helipad.

(I have CDO.  It's like OCD but the letters are in the proper order as they should be)Bang Head

Dave

dlh
  • Member since
    March 2017
  • From: Chambersburg, PA
Posted by dlh on Saturday, July 14, 2018 10:43 AM

Stage_Left

I like the look of the finished product! Well done Yes

Dave


Thanks, from one Dave to another.

Dave (the other one)

JOIN OUR COMMUNITY!

Our community is FREE to join. To participate you must either login or register for an account.

SEARCH FORUMS
FREE NEWSLETTER
By signing up you may also receive reader surveys and occasional special offers. We do not sell, rent or trade our email lists. View our Privacy Policy.