SEARCH FINESCALE.COM

Enter keywords or a search phrase below:

Heller 1/200 Royal Louis

12642 views
58 replies
1 rating 2 rating 3 rating 4 rating 5 rating
  • Member since
    January 2021
Posted by jrod on Thursday, January 14, 2021 9:05 PM

You've inspired me to start again with my Royal Louis, last attempted in about 1979 . . . .

  • Member since
    October 2019
  • From: New Braunfels, Texas
Posted by Tanker-Builder on Tuesday, September 1, 2020 12:30 PM

Hi Cathy:

        I have followed your build this morning. I like what you've done for a first - timer! I think you will become a force to be reckoned with in the future. I used Heavier thread than that on my first one. It was a cheap clipper and the only thread around the house was crochet yarn for Crohchet projects.

    Like you I learned. Oh! in the future if you have graining problems, here's what someone taught me. 320 sandpaper( Wet) and a long sweep then another crossing the first a little and so on. Take an eraser guard and using the edge, Scrape the edges of the grooves on the surface, this will settle down the grain, making it unequal and natural looking.

      Just don't fill it with thick paint. A series of washes is Better. You must've done that to the decks, Looks spot on to me. My 10 yr old cat just looks at me and then settles in the model box top when I am not looking.

  • Member since
    December 2003
  • From: 37deg 40.13' N 95deg 29.10'W
Posted by scottrc on Tuesday, September 1, 2020 8:39 AM

Hi Cathy,

Nice work,  your ratlines turned out much better than mine and you added the futtocks. I used the kit supplied jig and now the ratlines have developed a bad sag over the years. 

I see you also have the problem I encounted with the bowsprit bending to the tension of the rigging.  the upper spars will do the same thing.  I glued some 1mm and 2mm steel wire to them and that helped.  Since then, I swore off using plastic spars and upper mast works and started making my own from wood.  Makes final rigging a lot less stressfull. 

Scott

  • Member since
    November 2005
  • From: Formerly Bryan, now Arlington, Texas
Posted by CapnMac82 on Sunday, August 30, 2020 7:09 PM

catheetiem

So the very tip of the bowsprit, where the stays are attached (is that still called the bowsprit there, or does that have its own name?) it's bending a little bit which you can see in this next picture. The lines aren't taut at all, but it's just too much on that thin little plastic :/


And then here is little Dexter on my first day of bringing Louis back out!

Taking over already!! Stick out tongue


Cats have an affinity for cardboard that spans cats of all sizes.

The spar that is stood out over the bowsprit is the jib boom.  In actual practice, it's taken in when tied to a pier or the like.  In English practice, there would be some lateral support to counter act the forestays.  But, I have no idea how the French coped.

Royal Louis was during the transition from spritsail top masts, to fixed and flying spritsails, and the use of forward staysails and jibsails.  Which created a lot of uplift on the jib boom.

So, the simple answer to get that curl out of the jib boom seems to not be available (stays back to the cap, or lifts to a flying spritsail).

Now, for future use, let me recommend something.  Which is to get a cake of beeswax fro mthe craft store.  Nothing large--I still have a 3x3x0.25 from thousands of years ago.  Drawing the line through the wax melts a trace amount onto the line and cuts down on the fuzziness. 

Looks great, especially for being the Heller kit, which is not easy.

  • Member since
    June 2017
Posted by Chemteacher on Saturday, August 29, 2020 6:32 PM
I just caught up on this thread. Beautiful job. You have some serious talents. Outstanding work.

On the bench: Revell-USS Arizona; Airfix P-51D in 1/72

  • Member since
    July 2019
Posted by catheetiem on Saturday, August 29, 2020 4:04 PM

CapnMac82


catheetiem
the picture isn't working!! I'd love to see her!


Changed the permissions, so it may be visible now (shows up for me, but, I have permission--sigh)


Oh yes, I can see her now!! She's adorable, congratulations!!!Heart

  • Member since
    July 2019
Posted by catheetiem on Saturday, August 29, 2020 4:02 PM

Good afternoon everyone, hope you're all enjoying the last weeks of summer! I can't believe it's almost September already D:

I have some progress to update with! When I posted last I had pictures I took right before my break; well it turns out I had gotten a little more done than that! I did the ratlines and painted the shrouds gray before I packed Louis up! So that was a nice surprise pulling him out of the cabinet lol.


I had started by actually tying the ratlines, which I thought looked great, but when I got further up the knots got so bulky looking that I ended up tying the first 2 or 3 lines on each and then just gluing the rest of them. I hate the look of the glue but it is what it is I guess!


And then I decided to try to make some makeshift gun carriage ropes because they looked kinda silly just sitting there on their own. I don't know if what I ended up with looks any better though haha. But it took time to do them all so they're staying this way!!


So for these pictures, basically all the white threads are what I have done since starting up again. I think I have all of the stays done, so next I'll be attaching the yards and starting on the rigging for those!

I've been following "Rigging period ship models" by Lennarth Petersson and the Heller rigging diagram (which leaves a lot to be desired!).

I have some blocks and things left over from other models I've done so I've been making use of those as best I can, I know they're not exactly accurate but I guess they get the job done!


So the very tip of the bowsprit, where the stays are attached (is that still called the bowsprit there, or does that have its own name?) it's bending a little bit which you can see in this next picture. The lines aren't taut at all, but it's just too much on that thin little plastic :/


So that's all for Louis for now. I might get some more done in the next couple weeks, but both my internship and my classes start on Monday so I'll probably be much slower!


I also did some painting on the "Barbary Pirate" ship as an experiment. I usually use enamel paints for the base and then use oils for the weathering, but of course the oils can lift up the enamel if I'm not careful. I bought a few acrylic paints and this cheap little model to see how I liked them, so I'll throw a couple of pictures of that up as well as I go along.


The cover is definitely thinner than enamel, but it ended up okay. I just did the first wash oer it and it's worked out quite well so far, so I think I'll be sticking with an acrylic base from now on if all continues to go well! Don't know what I'll do with the 30 bottles of enamel paint I have though Confused

And then here is little Dexter on my first day of bringing Louis back out!

Taking over already!! Stick out tongue

  • Member since
    November 2005
  • From: Formerly Bryan, now Arlington, Texas
Posted by CapnMac82 on Saturday, August 29, 2020 3:50 PM

catheetiem
the picture isn't working!! I'd love to see her!

Changed the permissions, so it may be visible now (shows up for me, but, I have permission--sigh)

  • Member since
    July 2019
Posted by catheetiem on Saturday, August 29, 2020 3:31 PM

TheMongoose

Well I just spent some quality time reading through your whole build. Wonderful paint and detail work. I especially like the wood grain you've done! Looking forward to more.


Thanks! Hopefully it'll be without a year long hiatus this time Wink

  • Member since
    July 2019
Posted by catheetiem on Saturday, August 29, 2020 3:30 PM

scottrc


HaHa Nino, I think a cat could probably interpret the Heller instructions.

Welcome back Cathy.  If it will make you feel better, I started my Royal Louis when in undergrad school and after grad school, three moves, four jobs, and three cats, finished it 16 years later.   My cat has been a good building buddy. 


Thank you! And truly that does make me feel better haha! I've felt very guilty dedicating my quarantine time to other activities these past few months D:


And yes, my last cat who passed back in October was a perfect modeling buddy, she just hung around and watched, sometimes would sniff at stuff but never touched! The new kitten is a little different; I've found I need to take the whole model and put it away in a cabinet if I need to get up for even a second haha.

  • Member since
    July 2019
Posted by catheetiem on Saturday, August 29, 2020 3:26 PM

Nino

You have had a Way Too Exciting Year. Glad to see you back.

First,  outstanding work on the standing rigging using the kits masts.

Second, You have done real good following Hellers instructions.

Third,  A cats view of a Heller sailing kit  (You started it...)


Reading Hellers instructions.


Darn-Heller-instructions-each-part-has-a-number-a-letter-and-another-Number...


Heller rigging instructions...


And,

Sail plan.


Your Kitty is going to love the running rigging.  Hope you can get a few sails on and photos done before any CATastrophes occur.

     Nino.


Thanks!! And hahahaha those pictures are too funny! You're not kidding though, the little guy has smacked poor Louis every chance he's gotten!

  • Member since
    July 2019
Posted by catheetiem on Saturday, August 29, 2020 3:23 PM

warshipguy

Cathy,

I am finally able to log back into FSM.  I have been unable to logi in for a few days this time, for months a month ago.

Anyway, you do fantastic work on these models! I am most impressed.  I have a book that I would like to recommend on rigging.  It is called "Rigging Period Ship Models" by Lennarth Petersson. It is very clear and is based around detailed srawings of each line.  You should check it out.

Bill


Thank you! And I actually have that one, it has been my constant companion for the past couple of weeks! It's been totally beyond helpful.

  • Member since
    July 2019
Posted by catheetiem on Saturday, August 29, 2020 3:22 PM

CapnMac82

Good to hear you made it through all those things, and on into this year that has become a form of profanity.

Nice looking cat, too.  We adopted a dog in February to then have 2020 hit.  Now that we have convinced her to not 2020 on the floor, it's gotten easier.  Os as easy as anything can be of late.

Here she is unimpressed by the Blue Angels fly over

And, you are still doing a laudable job on a less-than easy kit.


Thank you!! And oh no, the picture isn't working!! I'd love to see her!

  • Member since
    January 2015
Posted by TheMongoose on Sunday, August 23, 2020 6:45 PM

Well I just spent some quality time reading through your whole build. Wonderful paint and detail work. I especially like the wood grain you've done! Looking forward to more.

In the pattern: Scale Shipyard's 1/48 Balao Class Sub! leaning out the list...NOT! Ha, added to it again - Viper MkVii, 1/32 THUD & F-15J plus a weekend madness build!

  • Member since
    November 2005
  • From: Formerly Bryan, now Arlington, Texas
Posted by CapnMac82 on Monday, August 17, 2020 5:30 PM

scottrc
HaHa Nino, I think a cat could probably interpret the Heller instructions.

¿Écrit par des chats pour des chats, peut-être?

C'est logique.

Tie string here.
Play with string there.
Tease yarn.
Confuse hoomans

íPrécisément!

HRH The Splüüf approves

  • Member since
    December 2003
  • From: 37deg 40.13' N 95deg 29.10'W
Posted by scottrc on Monday, August 17, 2020 7:56 AM

Nino

You have had a Way Too Exciting Year. Glad to see you back.

First,  outstanding work on the standing rigging using the kits masts.

Second, You have done real good following Hellers instructions.

Third,  A cats view of a Heller sailing kit  (You started it...)


Reading Hellers instructions.


Darn-Heller-instructions-each-part-has-a-number-a-letter-and-another-Number...


Heller rigging instructions...


And,

Sail plan.


Your Kitty is going to love the running rigging.  Hope you can get a few sails on and photos done before any CATastrophes occur.

     Nino.


HaHa Nino, I think a cat could probably interpret the Heller instructions.

Welcome back Cathy.  If it will make you feel better, I started my Royal Louis when in undergrad school and after grad school, three moves, four jobs, and three cats, finished it 16 years later.   My cat has been a good building buddy. 

  • Member since
    July 2014
  • From: Philadelphia Pa
Posted by Nino on Saturday, August 15, 2020 6:45 PM

You have had a Way Too Exciting Year. Glad to see you back.

First,  outstanding work on the standing rigging using the kits masts.

Second, You have done real good following Hellers instructions.

Third,  A cats view of a Heller sailing kit  (You started it...)


Reading Hellers instructions.


Darn-Heller-instructions-each-part-has-a-number-a-letter-and-another-Number...


Heller rigging instructions...


And,

Sail plan.


Your Kitty is going to love the running rigging.  Hope you can get a few sails on and photos done before any CATastrophes occur.

     Nino.


  • Member since
    September 2005
  • From: Groton, CT
Posted by warshipguy on Saturday, August 15, 2020 6:33 PM

Cathy,

I am finally able to log back into FSM.  I have been unable to logi in for a few days this time, for months a month ago.

Anyway, you do fantastic work on these models! I am most impressed.  I have a book that I would like to recommend on rigging.  It is called "Rigging Period Ship Models" by Lennarth Petersson. It is very clear and is based around detailed srawings of each line.  You should check it out.

Bill

  • Member since
    November 2005
  • From: Formerly Bryan, now Arlington, Texas
Posted by CapnMac82 on Saturday, August 15, 2020 5:20 PM

Good to hear you made it through all those things, and on into this year that has become a form of profanity.

Nice looking cat, too.  We adopted a dog in February to then have 2020 hit.  Now that we have convinced her to not 2020 on the floor, it's gotten easier.  Os as easy as anything can be of late.

Here she is unimpressed by the Blue Angels fly over

And, you are still doing a laudable job on a less-than easy kit.

  • Member since
    July 2019
Posted by catheetiem on Saturday, August 15, 2020 3:34 PM

Wow, well, I'm really sorry for the abrupt and prolonged disappearance. I have some very good excuses though!

Right after my last post (nearly a year ago already, omg) I actually got appendicitis and had to have my appendix removed! It was very quick, one day I woke up not feeling well, I gradually felt worse and worse throughout the day until I was taken to the hospital at 11 PM, by 6 AM they figured out what was wrong with me, and then at like 7:30 AM, just about 24 hours after I woke up with my stomach bothering me, I was coming out of surgery minus one appendix!

After the surgery I couldn't really do anything except lay on the couch haha, sitting up or bending down wasn't something I could do for any real amount of time so the royal louis was just sitting, waiting.

Then I started up my final semester of undergrad, 3 days after the surgery (missed the first few days of classes-emergency surgery is like the best excuse in the book!), didn't have a lot of time for poor louis. 

Then I finished undergrad in December, but started graduate school in January-STILL no time!

Then in March we moved, so Louis got packed up and put in a cabinet until I figured out what to do with all these boats in our new place.

Then, you know, corona happened, school went online, job is gone, but my free time was spent setting up the new house, doing some artwork for the walls, all that. 

Then at the end of May we got a kitten! So there's no way I could get back to Louis with this playful little guy to attend to!

Now he's a bit older and I'm willing to trust him a little around all the small and delicate pieces. I am planning to start on the Louis again! I'm also ordering some more kits so I have something to work on while I take forever to do the rigging on it. 


Hopefully this will last for a while, although I have no idea what is going to happen. In September my college should be starting up again, and I think I will be doing an internship at an area high school, in person. I don't know how this will go or how long it will last. I'm in Connecticut, we have a pretty low infection rate, but I cannot imagine that starting up school is going to go well. So we'll see what happens there, but I might get tied up for a little bit.


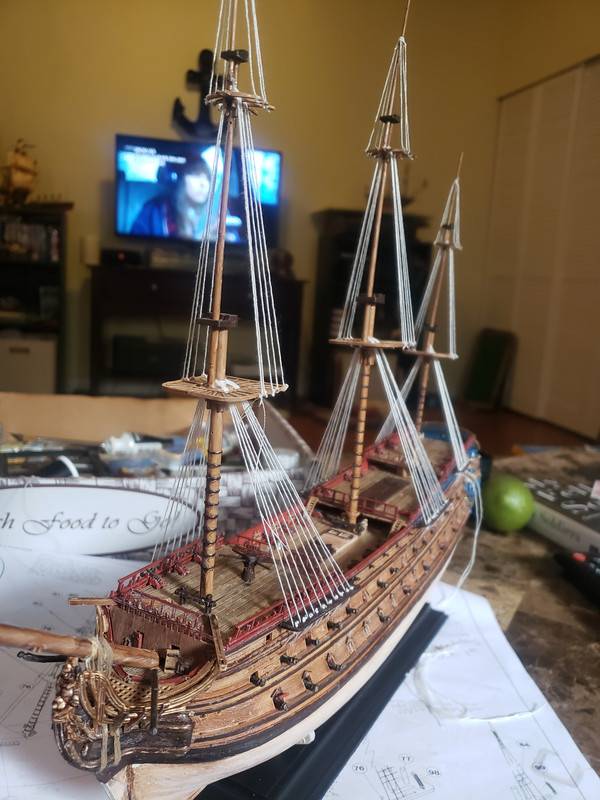
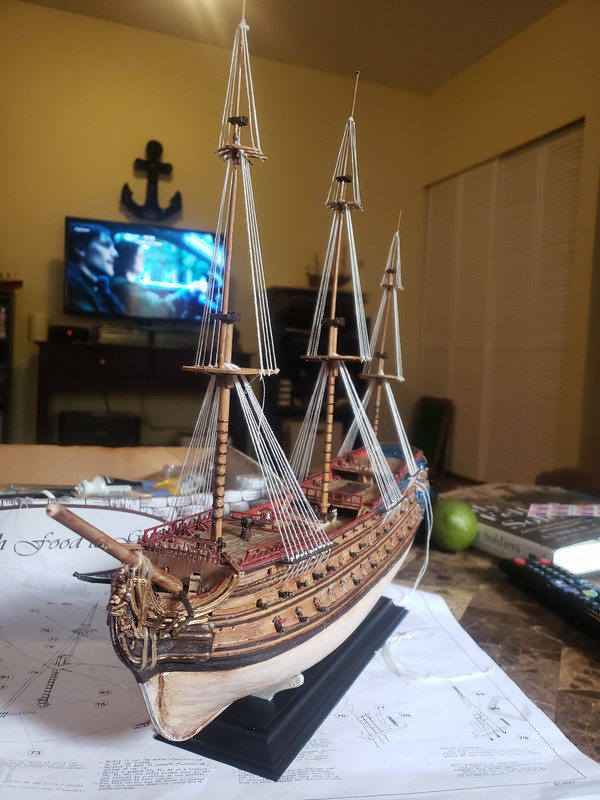
Anyway, here's some pictures of where I last left off with ol' louis, back in the old apartment. I had actually meant to post these pictures here right after I took them, but, you know, everything I talked about above Stick out tongue I've actually started some of the ratlines too, but haven't made enormous progress yet.


Oh, and here's the kitten!

nine weeks old

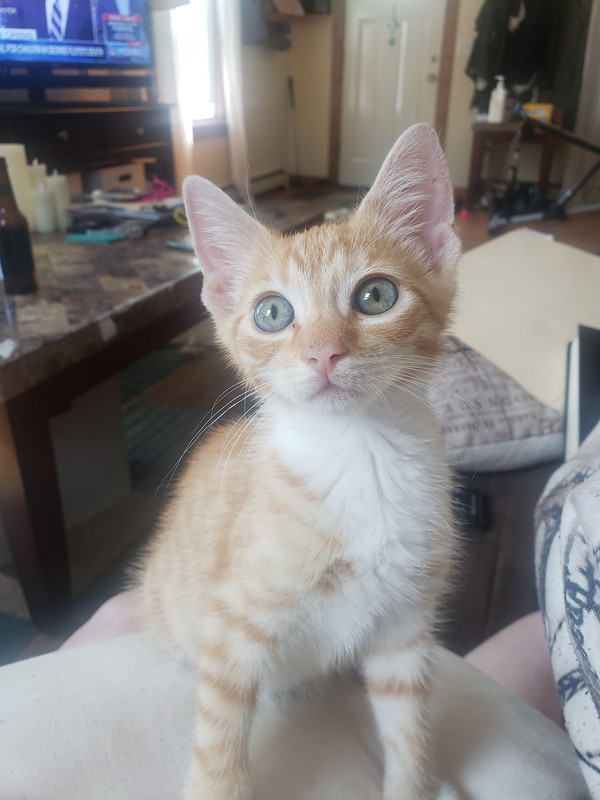
that's him at 9 weeks


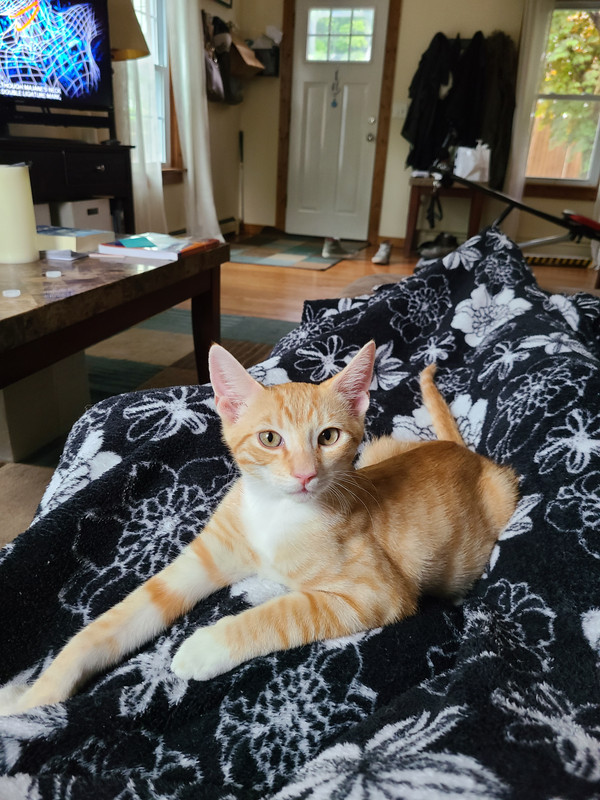
and here he is at around 4 months a couple weeks ago :)


thanks for looking guys, and sorry for the absence and 500 page explanation. I should be back soon with more progress!!


  • Member since
    September 2005
  • From: Groton, CT
Posted by warshipguy on Thursday, August 29, 2019 7:47 PM

Cathy,


You are doing a wonderful job on this model. I am impressed that you undertook the detailing on the lower hull.  However, there is one problem with the upper hull that most seem to miss. Although the wood grain is pronounced, there are no planks.  We used to have a member here named Dr. John Tilley who used to say that the hull looks as if it had been carved out of a very large log.

That said, I love your paint job and your overall progress. Planks are easily etched into the plastic.

I mean no criticism of your work but rather with the kit design.

Bill Morrison

  • Member since
    February 2019
  • From: Peoria, Illinois
Posted by jadowning17 on Thursday, August 29, 2019 3:02 PM
Your weathering looks fantastic!
  • Member since
    February 2019
  • From: Peoria, Illinois
Posted by jadowning17 on Thursday, August 29, 2019 2:59 PM
Your Royal Louis is looking great, Cathy! I have that kit in my stash and am watching your build with interest. Great job so far!
  • Member since
    July 2013
Posted by steve5 on Tuesday, August 6, 2019 5:11 PM

It took about a week for me to get activated . I know they have been hacked a few times . I really can't help other than hope  they hurry up for you . 


  • Member since
    July 2019
Posted by catheetiem on Monday, August 5, 2019 8:28 AM

CapnMac82

Sigh, the words "Heller" and "well-fitting parts" never seem to be i nthe same sentence (or paragraph, fo r that matter).

Now, Heller's rigging instructions are notorius (search here for user=JTilley for some sharp-edged comments).  Apparently Heller's person in charge of creating rigging instructions learned everything they know on the topic  from studying wooden ships of the sorts found in in Spanish tourist traps.

I am remiss in not saying ealier to not fully assemble Heller masts, but to make them in sub assemblies (e.g. lower mast; top mast; topgallant) as that makes the rigging much easier.  This alos aloows you to get brass wire in them, too.  Telle est la vie modélisation.

One of the fiddely details that may make you life easier with the shrouds is to lay them a bit closer to prototype.  One the ship, as you face the deadeys, the first shroud goes up from the foreward most deadeye, up and around the mast and back down to the next deadeye aft.  Where the shroud passes around the mast, it's bound together with a lashing that is very close to the bottom of the top platform.

Then the opposite side shroud is laid over that in a stack.  Note that this makes for a neater "pile" of lines all jammed in there between where the top mast "doubles" the lower mast.


Now, don't try for all that detail--that's a 1/96 scale ship.

In a perfect world, it can be easier to make the shroud up off the kit, then form the eye, then pass that over the mast (befoe th top mast is assembled) one after the other, then bring the lines to the deadeyes one by one.

Malheureusement, l'mond n'est pas parfait.

Keep up the good work, you are doing just fine.  You will be ables to use these skills to tackle other projects.

PS, in full disclosure, my first ship ket was a Cutty Sark and it had the horrible Revell vinyl-coated thread ratlines.  Having no other instruction, I trapped the bottom "thread" in the plastic deadeye assemblies, and since this was before CA glue, I had to find a way to tie all the little ends of the threads around the top of the mast.  Threads covered in vinyl resist knotting, even more so with a jillion knots right next to them.  That kit got left behind in a move, and was not sore missed.  Sigh.


Hahha yes, I've certainly learned that! And yeah, I've been looking for resources on french rigging. Steve poste a link that seems extremely helpful, but unfortnately I haven't been able to sign up for the site to view the posts! Seems like an issue with the site, I keep asking them to re-send my activation code and it never gets sent. Do you happen to know of any resources that might be of use? I have a couple of books on rigging/ships, but they're both focused on the english, not the french.


And aaaah, I see what you mean! And yep, oh well, it'll just make the next one that much better!


And hahaa it happens to everyone! My first couple are absolute disasters! I still have them somewhere, I think a revell victory and a bounty; they're really more a pile of broken parts than a ship at this point lol.

  • Member since
    July 2019
Posted by catheetiem on Monday, August 5, 2019 8:19 AM

David_K

Seems like plenty of people have offered suggestions for your shroud thickness, and I would tend to agree, though if I could add two extra notes:

-For the lower shrouds, either of those line sizes seem fine to me.

-For the upper shrouds, I think you might consider going with something even thinner than either.  Once you get up there, the thickness of shrouds will become obviously oversized, and also the tension it will take to keep thicker line tight could cause issues with upper mast bending.....just my 0.02

Anyway, it's impressive you've made so much progress in such a short time!  My Cutty Sark is still sitting on the shelf, waiting for braces lol

Great work so far.  Sorry you've had to deal with things like misalignment of parts and other examples of Heller's *headscratchers*...I'd like to see what you can do with a nice old Imai sailing ship kit...they're among the best quality in terms of part fit and molding.

Dave


Thanks for the tips! Unfortunately all the shrounds are done already, but I think I'll be mixing your suggestion and Don's suggestion- painting the upper shrouds a different color to give the illusion that they're thinner.


ANd thanks! Don't feel too bad though, I'm out of school for the summer so I have quite a bit of time to get things done. Come the end of august it's going to be quite a different story!


Yes, I've seen someone doing the Carrak on here and it looks like a nice kit! I'm definitely interested in getting my hands on one!

  • Member since
    July 2019
Posted by catheetiem on Monday, August 5, 2019 8:11 AM

scottrc

Hi Cathy,

Great work on this kit.  I have built it and as you have found out, it requires a lot of pre-filling, cutting, sanding, and fitting again of the rear galleries and much of the deck furnishings.  

Those masts and spars bend real easy.  I chose to use the ratline jig on this kit because its was a tit for tat trying to get the shrouds taunt without the masts bending.    Then when it came time to set the standing rigging, it was a mess, so I used the jig and tied up my pre-made ratlines after the standing rigging was done and the masts secured. I also built the Pheonix and had the same problem.  Also, as mentioned, use small diameter thread. I used a lot of coat thread on this kit because it was not so flexible.  

I have a few more of these Heller kits in the stash and swore that in the future, the masts and spars will be made from wood.  

Again, great work!!!

Scott


Thank you! And yes, certainly! Unfortunately all the shrouds are done at this point, oh well, I know better for next time now haha! But for sure the masts are pretty flimsy. I tried to correct as much as I could with the shrouds, but viewing the ship from the front the masts don't line up perfectly by any means! 

  • Member since
    July 2019
Posted by catheetiem on Monday, August 5, 2019 8:07 AM

Sigep Ziggy

I must say, pretty impressive for a first time. Love the oil wash and dry brush used. You have done a lot in a short period of time, keep up the good work.


Thank you! But as much as I'd love to take the compliment, this isn't my first ship haha. I've done maybe five or six prior to this one, just haven't posted them. I did a couple when I was maybe 10 too, but I don't count those ones; they were exactly the disaster you'd expect from a 10 year old trying to have any kind of patience haha!

  • Member since
    July 2019
Posted by catheetiem on Monday, August 5, 2019 7:50 AM

steve5

I agree with both don and G , the smaller thread would look better , this is a pic of my la glorieux , it's a slightly larger model than your's 1/150 , I think I used .45mm for themain rigging and .20mm for the ratlines .

and dk


DK grey look's more realistic than black , as don said .


Thank you! And your glorieux looks beautiful! Also, I was curious if you would be able to direct me how to access the thread you linked about the french rigging. I've tried to sign up to for the site a couple times and they haven't sent me an activation code so I can't get onto the site! 

JOIN OUR COMMUNITY!

Our community is FREE to join. To participate you must either login or register for an account.

SEARCH FORUMS
FREE NEWSLETTER
By signing up you may also receive reader surveys and occasional special offers. We do not sell, rent or trade our email lists. View our Privacy Policy.