SEARCH FINESCALE.COM

Enter keywords or a search phrase below:

The Black Pearl - Zvezda - 1/72

4339 views
19 replies
1 rating 2 rating 3 rating 4 rating 5 rating
  • Member since
    March 2020
  • From: South Florida
The Black Pearl - Zvezda - 1/72
Posted by Having-fun on Tuesday, March 16, 2021 8:52 PM


I have started to build of the Black Pearl of Zvezda, I have borrowed from Flint the idea of making the bottom of the hull look like it is encrusted with barnacles. I hope he won't be upset due to me borrowing his idea.

I also started to weather the ship to look old and bartered by the elements, attached are the 3 preliminary photos:

Loose parts


The next one is the bottom of the hull with the barnacles:

hull botton

And last is the top deck with preliminary weathering:

Top deck


I hope you guys like what I have done so far. I am planning to use cloth sails since the vacuum sails that comes with the kit are rather thick and not very realistic, also I will be doing the shrouds and rat lines instead of using the kit ones.


Thanks


Joe


  • Member since
    September 2012
Posted by GMorrison on Tuesday, March 16, 2021 9:46 PM

Check spelling in your title line.

I would make the sails as mangey as possible. Dirty, torn, generally in tatters.


Bill

 Modeling is an excuse to buy books.


  • Member since
    January 2011
Posted by Bugatti Fan on Wednesday, March 17, 2021 4:45 AM

Bill, I saw on one of the ship modelling websites how someone was making the distressed sails on their Black Pearl model. If you can find it perhaps it will help you achieve the look you want. HTH.

  • Member since
    March 2020
  • From: South Florida
Posted by Having-fun on Wednesday, March 17, 2021 10:23 AM

GMorrison

Check spelling in your title line.

I would make the sails as mangey as possible. Dirty, torn, generally in tatters.


Bill


I did checked the spelling using my word processor, but, I guess a missed something, ( It was after 10PM, well past my bed time, so I guess I was not fully awake....).

Yes, it is my intent to make the sails look ragged and very distressed, I welcome any subjection on how to make the sails attain the look. For sail material, I found this very thin cloth material usually used to make wedding dressers, I will make a trial sail to see how does it looks.

Thanks

Joe


  • Member since
    October 2019
  • From: New Braunfels, Texas
Posted by Tanker-Builder on Wednesday, March 17, 2021 11:20 AM

Hello Joe!

    I have aged cloth sails in the past. One way that has always worked for me is this. For lighter aging-Strong Cold( Rm.Temp) Tea. Let soak for four hours and then Wring out,dry and use. For really gukky sails then the solution is to put the cloth in your Mr.Coffee as a sn adjunct to your filter. Nice grungy sails when dry.

    I also would use Fine Irish linen or Egyptian Cotton ( Like an old Pillowcase ) for the cloth. You might have good cloth, but if it's a type of soft Taffeta It won't age either way. (That last from my Landlady)

  • Member since
    March 2020
  • From: South Florida
Posted by Having-fun on Wednesday, March 17, 2021 2:14 PM


I forgot to mention that I also intend to add LED lights to the model, mainly they will go inside the lower deck, the captain quarters, and inside the 3 lamps in the rear. I have ordered the light from an outfit by the name of EvanDesigns.com, very nice people to deal with, I can not show the lights because I have no received them as yet. If you look at the photo of the wooden base, you should see the lights on/off switch

I could have purchased the lights from the Internet, but, it would require me to deal with the lights setup which includes adding resistors and some electronics to make then flicker, this company sells the lights ready to go, the only thing you need to add is the power supply.

Joe


  • Member since
    December 2002
  • From: Derry, New Hampshire, USA
Posted by rcboater on Wednesday, March 17, 2021 8:01 PM

Having-fun


GMorrison

Check spelling in your title line.

I did checked the spelling using my word processor, but, I guess a missed something, ( It was after 10PM, well past my bed time, so I guess I was not fully awake....).

Joe 


Your spell checker won't tag "Black Pear" as an error.... 

Webmaster, Marine Modelers Club of New England

www.marinemodelers.org


  • Member since
    May 2011
  • From: Honolulu, Hawaii
Posted by Real G on Thursday, March 18, 2021 5:46 PM

Heh-heh, I was going to make a crack about expecting a WIP on a piece of spoiled friut  Stick out tongue

“Ya ya ya, unicorn papoi!”

  • Member since
    March 2020
  • From: South Florida
Posted by Having-fun on Thursday, March 18, 2021 8:10 PM

rcboater


Having-fun


GMorrison

Check spelling in your title line.

I did checked the spelling using my word processor, but, I guess a missed something, ( It was after 10PM, well past my bed time, so I guess I was not fully awake....).

Joe 


Your spell checker won't tag "Black Pear" as an error.... 


Sorry guys! It is not the speller, it is yours truly who can not spell worth a dam! That is why a speller is a very important tool for me. In school I was very good in math, but when I came to grammar and history I was always in trouble.


Joe


  • Member since
    December 2002
  • From: Derry, New Hampshire, USA
Posted by rcboater on Thursday, March 18, 2021 8:39 PM

If you edit your original post, you can fix the title....

Webmaster, Marine Modelers Club of New England

www.marinemodelers.org


  • Member since
    March 2020
  • From: South Florida
Posted by Having-fun on Wednesday, March 31, 2021 4:37 PM

rcboater

If you edit your original post, you can fix the title....


Thanks for the tip, I just fixed it.


I have not posted much lately because I had to stop building due to an error in the lights order, my som-in-law mistakenly order flashing lights instead of flickering, so I had to call the company and had them replaced, the company, Evans Design, worked with me to get the right lights. It is refreshing to find a company now days that still wants to make sure that their customer is satisfied.


Attached are some photos showing some progress:


Ship side


The cable in the photo is the power supply ( A 7 to 12 volt transformer), it goes to a switch that allows the lights to be turn on and off. I an still working on improving the weathering.


Fron the top

Back


The following photo I took it in my laundry room using a small flashlight as main light, so the ship lights could be seen, the bright lights in the back are the one that are going to be used for the lamps.


Lights on


In here the switch is visible. The reason I added the wooden base was to hide some of the wiring and also to have a place to put the switch.


BTW I did not buy Egyptian cotton, because my  local Joann Fabrics did not have any.


Thanks to all of you for you subjections and until next time


Joe


  • Member since
    March 2018
  • From: Chicago suburbs
Posted by Luvspinball on Wednesday, March 31, 2021 5:37 PM

Post title now says "Black Peal" instead of "Black Pearl".  Almost got it!

To find Egyptian cotton, go to Target, Bed Bath & Beyond, or anywhere that sells sheets and pillow cases.  Just buy a set of standard pillowcases in white Egyptian cotton.  Should cost you $10 or so.

Weathering looks great.  Lighting looks good too.  Keep up the good work.

Bob

Bob Frysztak

Luvspinball

Current builds:  Revell 1/96 USS Constitution with extensive scratch building

  • Member since
    March 2020
  • From: South Florida
Posted by Having-fun on Thursday, April 1, 2021 10:12 AM

Luvspinball

Post title now says "Black Peal" instead of "Black Pearl".  Almost got it!

To find Egyptian cotton, go to Target, Bed Bath & Beyond, or anywhere that sells sheets and pillow cases.  Just buy a set of standard pillowcases in white Egyptian cotton.  Should cost you $10 or so.

Weathering looks great.  Lighting looks good too.  Keep up the good work.

Bob


Thanks, this is the 3rd time I fixed it, hopefully is correct now, like I said, I am a lousy speller and typist.


I will try Target and Bed Bath and Beyond, thanks for the tip


Joe


  • Member since
    March 2020
  • From: South Florida
Posted by Having-fun on Monday, April 26, 2021 1:31 PM


Time for a progress report! The Pearl is coming along nicely, the masts are up, I just finished the shrouds and starting to do the rag lines. I am not using the kit provided shrouds, since they are not very realistic and they do not fit properly in the masts, next I will start the work on the sails, I have discovered that the mast that holds the sails provided by the kit is molded to the sails, which means that I will have to construct the mast then attached it o the my sails. I was lucky that I was able to find in Hobby Lobby a dowel of the right size, with a little sanding I may be able to create the taper to make it look like like the actual mast.


Following a side view of the ship with its lights on:


Ship side


Rear of ship were the lights can be seen in the lamps and also shows the on/off switch.


Rear of ship


Closeup of side were the shrouds lines can be seen and the starting of the rat lines.


Nest


Detail of the shrouds at the nest


Nest

Well, that is all I have today, unitl next time:

Joe


  • Member since
    March 2020
  • From: South Florida
Posted by Having-fun on Friday, May 28, 2021 4:45 PM

Hello there!

I have finish making the sails, I first sew the line on the sails, then added a border to them. Here is the first photo:

raw sail


The second photo shows the sail after painting it, I airbrushed it using Tamiya dark Grey then lightly sprayed it using Vallejo ochre.


Oainted sail


In here I attacked the sail with my hobby knife to create a distressed appearance.


Distressed sail


Finally, here shows 3 of the sails already mounted to the ship. Those of you who has build this ship knows that the rigging is rather complex, it takes me 1/2 hour to attache a small sail and 2 or more hours to mount the bigger ones.


sail on ship


I hope to have the ship completed by the end of next week at which time I will post some more photos of the completed project

See you  them!

Jo

  • Member since
    September 2012
Posted by GMorrison on Monday, May 31, 2021 10:27 AM

This is a fine model and you've put a lot of good work into it.

Your sails look really good, or bad, or..just right.

I'll put this suggestion in the "next time you might" category as it's not important.

The sails attached to the horizontal spar, or yard, with a series of individual ties. They might happen every three feet or so. The actual thing could get a little complicated with a knot at the edge of the sail, a couple of turns each way around the spar.

Just making them individual does the job too.

I can already smell the ship..


Bill

 Modeling is an excuse to buy books.


  • Member since
    March 2020
  • From: South Florida
Posted by Having-fun on Thursday, June 3, 2021 2:39 PM

The sails attached to the horizontal spar, or yard, with a series of individual ties. They might happen every three feet or so. The actual thing could get a little complicated with a knot at the edge of the sail, a couple of turns each way around the spar.


Thanks for you  comments, yes, the sails are hard to describe, are they good, or bad or OK? it is difficult to put a label on them. LOL


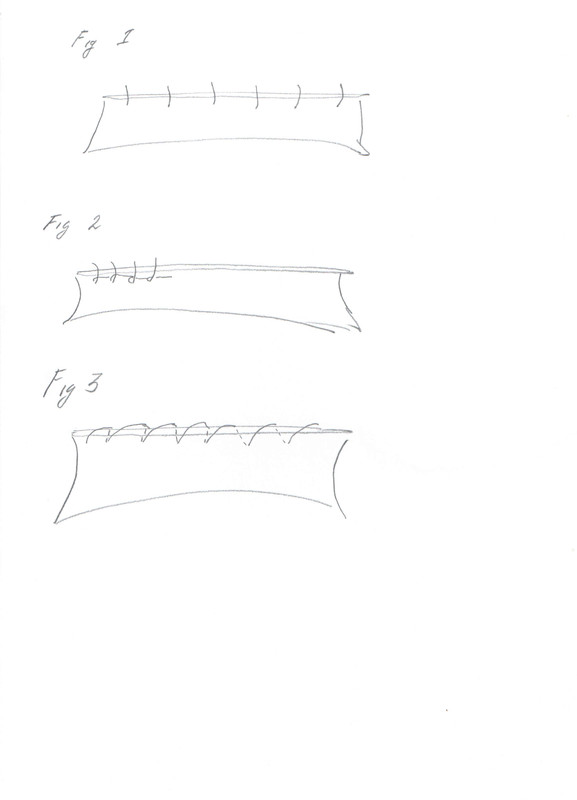
Your comment about how the sail is attached to the yard are, as usual, welcome, but, I am not sure how the sails should be tied to the yard. following is a very crude drawing were in Fig 1 I draw what I think you mean, Fig 2 is a way in  which I attached the sails to a previous model and Fig 3 is the way I did it with his model.


Could you tell me which one is the one you are subjecting?

 sails

I was going to provide photos of the completed ship. but, my son-in-law could not wait and took the ship home (The ship was build for him, he purchased it and also purchased the lighs) He is a professional computer graphics expert, and he is going to make a short movie with the ship, I easked him to ive me a copy so i can post it on this blog.

As always thank you for your recomendations.

Joe


  • Member since
    September 2012
Posted by GMorrison on Thursday, June 3, 2021 4:19 PM

Figure 1 is correct. These are lengths of marline, which is thin utility rope, called a roband in this application, and used to bend (tie) the head of the sail to the yard.

 Modeling is an excuse to buy books.


  • Member since
    March 2020
  • From: South Florida
Posted by Having-fun on Thursday, June 3, 2021 8:18 PM

Thanks, I make sure to do the sails next time as you indicated.

Joe

  • Member since
    March 2020
  • From: South Florida
Posted by Having-fun on Saturday, August 7, 2021 4:21 PM


I finally got the short movie made by my son-in-law of the ship. Please be aware that the reason he made the movie was to promote his services, so there is some advertisement content on the short movie. The following is the address in Utube, enjoy:

https://youtu.be/cXtNMlEg9Ts


Joe

JOIN OUR COMMUNITY!

Our community is FREE to join. To participate you must either login or register for an account.

SEARCH FORUMS
FREE NEWSLETTER
By signing up you may also receive reader surveys and occasional special offers. We do not sell, rent or trade our email lists. View our Privacy Policy.