SEARCH FINESCALE.COM

Enter keywords or a search phrase below:

U-Boat , up on her blocks- Update 11/14/06, page 2

27559 views
32 replies
1 rating 2 rating 3 rating 4 rating 5 rating
  • Member since
    December 2002
  • From: Whidbey Island, Washington
U-Boat , up on her blocks- Update 11/14/06, page 2
Posted by chukw on Saturday, April 8, 2006 3:04 PM
The hull is finally glued together- here's the painted pressure hul before I glue those decks down- take one last look!  


I futured it after painting the base dark grey and giving it some panel shading of highly dilute black.  All glossed up, it got washes of thin black oil paint and green acrylics (for algae), as well as some red-brown rust.  I hit it with  a flat coat and dry brushed it with deck tan.  No paint chips here- but now that I mention it, she's not sealed up yet!   


  • Member since
    February 2005
  • From: Australia
Posted by rokket on Sunday, April 9, 2006 3:04 AM
Looking very nice! Paint job has good look, especially around the greeblies and thin lines. Did you make a custom Conning Tower base?
AMP - Accurate Model Parts Fabric Flags, AM Uboat Goodies & More http://amp.rokket.biz/
  • Member since
    January 2003
  • From: arizona
Posted by cthulhu77 on Sunday, April 9, 2006 8:45 AM

  Boy, it's a shame you have to cover it up!  Looks fantastic.


                   greg

http://www.ewaldbros.com
  • Member since
    December 2002
  • From: Whidbey Island, Washington
Posted by chukw on Monday, April 10, 2006 10:43 AM
Thanks, Rokket!  here're some links to earlier stages in the build that'll show the custom (from junk!) bits and pieces....
http://www.finescale.com/FSM/CS/forums/582263/ShowPost.aspx
http://www.finescale.com/FSM/CS/forums/588015/ShowPost.aspx
http://www.finescale.com/FSM/CS/forums/605477/ShowPost.aspx

cthulhu77 - well, ya gotta do what ya gotta do.  I've been cleaning the deck-to-hull jopin areas with a micro-brush and rubbing alcohol- didn't have too much time at the bench this weekend.  My car, on the other hand, is very clean!  ;)
  • Member since
    December 2002
  • From: Whidbey Island, Washington
Posted by chukw on Monday, April 24, 2006 6:25 PM
Well, I've been sanding and filling seams- along the keel and around the decks.   I dropped a metal c-clamp and broke my glass tube applicator  :bandhead2:  so I switched over to the conning tower with one last section of deck to glue down.  Going by the instructions (like a good little modeler) I assembled the periscopes and their housings.  Fit here was terrrible- the molds were not lined up for my sprue.  Since I don't plan on playing up- and down-periscope with my model, I just cut the long tubes that house the scopes off below deck level.  The front scope housing was so poorly molded I built a new one from telescoping bits of aluminum tubing- easy!  The best part: the top ring from the Eduard set fit perfectly!  Modeling nirvana.... B)

I also built a new UZO mount from various crap.  It's a bit too tall now, so I have to trim it back.  Why is it that this sort of surgery is so much harder than the original scratchbuilding?    :huh: The main Pericope mount got the treatment, too- some carefully-bent copper wire and a compass were added.  The compass is one half of a 1/35 Tamiya MG 34 ammo drum, while the mount comes from an ancient Tamiya Schimmwagen propeller bracket.  My motto?  Never, never throw anything away!

On to upper segment: Eduard PE replaces the kit's molded-in wooden slats.  On the real thing these kept sailors from freezing to steel sides!  You can see where I've drilled out the speaking tube, and that there are still some seams to sand down.  I'm using Mr. Surfacer for all that.  

The two units are placed together and on the deck- no glue yet, but the fit here is excellent!  New Eduard hatches are evident, glued on with thick CYA, then flooded with Future.  It really seals 'em down!  

Another view into the con...


A final pullback- no filler was needed on the outer tower seams.   The deck needed a fair amount, but after all the grinding and modifications I've subjected it too, I'm not surprised.  It's starting to look like a submarine, kameraden! :woo:


  • Member since
    January 2003
Posted by Jeff Herne on Tuesday, April 25, 2006 12:37 PM
Looking good! I hope to get to my project this year sometime...lol.

Jeff
  • Member since
    December 2002
  • From: Whidbey Island, Washington
Posted by chukw on Tuesday, April 25, 2006 11:00 PM
Thanks, Jeff!  I was out from work a couple of days last week from the flu (making lemonade from lemons, I guess) and had some time to hash around with this whale.   Say hi to Dick McNally for me if see him wandering around the offices.  ;)
  • Member since
    December 2002
  • From: Whidbey Island, Washington
Posted by chukw on Saturday, May 27, 2006 6:16 PM
I've turned my attention to the deck gun.  With Marcus Nicholls' excellent Tamiya Model Magazine International ( June/July 04) article as inspiration, as well as every photo I could glean I set about detailing this teensy beastie.  Still to be added is the tampion line wound around the barrel- I've decided to add it and then paint the whole mess.
My Walron punch set earned its keep as the pics show.  Another new tool that has become indispensible is the Coleman Cold Heat solder pencil- what a honey!   I was able to solder all the new gunners' brace supports frorm brass tubing and music wire with ease.  I have a ceiling tile on my desktop to which the bits were pinned over a scrap of wax paper- the pen soldered the joints handily without harming the paper!  I've begun the conning tower railings from brass and copper wire and it's going so well I'll only be using the biggest, most complicated kit railings- 4 pieces in all.  I can't wait to try it on PE as well!   


  • Member since
    December 2002
  • From: Whidbey Island, Washington
Posted by chukw on Tuesday, July 4, 2006 4:16 PM
More progress: time to add all the fiddly bits.  Here's the running gear:


I've decided to replace as much railing and tubing with brass rod as possible.  The Coleman Cold Heat soldering pencil makes it easy, and works on PE, too.  Here are the forward railings- got them built yesterday.  Note the PE arms for the hatch- 6 parts per hatch

These are the rearmost rails- Note the soldered-on Eduard bits, as well as a pice of 1/32 OD brass tubing at the top to take the rigginng.  Those bases are floppy as they're just pinned with swaged iron wire (except for the one that has slipped off-grr).  They'll get a smidge of CYA once glued in location.  12 parts per unit!

My brother-in-law Art Homa is here for the 4th of July holiday and took these sweet snaps- here's a general profile.  Gun and conn are still unpainted for the most part.  

The main rails and a nice shot of the gun.

The conning tower rails got the treatment-


That's all for now- I'm pushing this boulder uphill slowly but surely.  I think I'll use the kit wintergarten rails- too crazy to think of soldering up that mess.  On to the remaining fragile details- then to painting!  :banana:
  • Member since
    September 2003
Posted by Leftie on Tuesday, July 4, 2006 4:55 PM

Looks Fantastic! You still might want to extend the trailing edge of the splash guard on the conning tower(don't know the proper name for it). And are you sure you want to leave Revell's oversized rivets on that beast?

   Either way, outstanding job and attention to detail. Just what we need more of.

   P.S. Which U Boat(number) are you doing? I may have a few detail shots for you.

  • Member since
    December 2002
  • From: Whidbey Island, Washington
Posted by chukw on Thursday, July 6, 2006 10:34 AM
Thanks, Leftie- I'll check my refs on that splash guard and see if I can motivate.... ;)  Rivets, schmivets!   I'm thinking of this as an overall illusion of a u-boat- the textures help to bring it to life, imho- huge weld seams included.   I'm building her a sthe U 69, so as to have the cable cutter on the bows- too cool not to!  The decals for the "la vache qui rit" has a heavy dot pattern for some reason- did the original?  I'm wondering if it was a poster shellaced to the con.....
  • Member since
    January 2003
  • From: arizona
Posted by cthulhu77 on Friday, July 7, 2006 12:06 AM

  beautiful is the word !  Looking really, really great...you've talked me into picking up a cold heat gun too!

              greg

http://www.ewaldbros.com
  • Member since
    January 2006
Posted by EPinniger on Saturday, July 8, 2006 2:31 PM
Nice work so far! I really like the scratchbuilt details on the armament, conning tower etc.
Is the pressure hull visible on the completed model, or will you be making some of the outer hull removable so you can see it?


  • Member since
    December 2002
  • From: Whidbey Island, Washington
Posted by chukw on Sunday, July 30, 2006 7:07 PM
It's time to begin painting.  I've touched up all the wear and tear on the hull- I had some dark gray left over and before I knew was adding shading.  It's coming to life!  Here's a shot of the stern- smudges, steraked grime and exhaust fumes were sprayed freehand over the details of the hul and running gear.  Bear in mind that there's much more to come- fading, rust, algae, scratches and chips.  All in good time!

More of the same up front- note the PE bits and diving planes- so easily smooshed and/or knocked off!  ;)

The conning tower is painted up but no weathering as of yet.  How plain it looks in comparison to the hull!  I haven't glued the top and bottom parts (or the AA gun) together yet so I can get into that cramped and crowded space to add a myriad of paint effects.  

Here's a closeup of the wintergarten- I bent that tiny gunsight from a single strand of speaker wire around a fine music wire rod.  

Up next: a coat of Future and on to washes!
  • Member since
    December 2002
  • From: Whidbey Island, Washington
Posted by chukw on Sunday, August 6, 2006 8:15 PM
More painting!  I've given her a coat of Future and let it cure for 6 days- that's the last time I could do any modeling!  I decided to go with an oil wash.  There's greater control possible, and the Future will protect the acrylic base colors.  For my base wash I thinned a mixture of black and burnt umber with Humbrol thinners. Here's a shot of the mix being brushed over the rivets and various details of the stern. 

After letting it dry for a few minutes (fussing around with another subassembly) I then blended the was around using a Q-Tip (or cotton bud, if you will).  A dry one generally does the trick, but if the wash is too dry to blend well, just touch a brush loaded with thinner to dampen the cotton.  I'm going for a subtle effect, and the wash gives lends things a nice, greasy atmosphere.

Here's the same action at the stern- note the general dribs and drabs of wash on the rudders.

Blended in the effect is pleasing.  The danged Q-Tips will leave a lot of little fibers that I'll pick out- those rivets are sharply moulded and grab at the cotton!

It's starting to come to life.

Here's an overall shot- there's a lot of area to cover- best done in thirds of a side at a time.

Those big, empty areas of the hull cry out for some variations in color and texture- note the rust patches in the upper right corner.  There'll be drybrushing, color washes and aribrushing to come, but the ball is rollin'.

I gave the gun the treatment as well- as well as some paint chips.  Word to the wise:  do the paint chipping first!  I'll have to tone those bright spots down.


I've added the decals- all three of them.  The upper part of the con has been largely un-washed- the lower part shows the effect.
  • Member since
    December 2002
  • From: Whidbey Island, Washington
Posted by chukw on Sunday, August 6, 2006 8:17 PM
Mmmm... grimy!

I'll add some warm wood tones on the planking lining the con.  It was there to keep the sailors from freezing to the steel.  I'll keep my ice in a glass, thank you!

I used more burnt umber in the mix when washing the decks.  The blue sheen in the photos is from the sunny southern California skies.

Blow it out yer hawse-hole!  Rust spots are burnt sienna oil paint, straight from the thirty-year-old tube!  Dark grey chips are Tamiya- the oils are much easier to brush-paint.

She's coming along!  Stay tuned for more.... :woo:


  • Member since
    June 2005
  • From: Missouri, USA
Posted by tedhealy on Sunday, August 6, 2006 8:57 PM
She's looking great!  That revell U-boat is just a joy to make.  The only difficult part is finding somehwere to display it.

Are you going to be adding any scale figures on the deck?
  • Member since
    December 2002
  • From: Whidbey Island, Washington
Posted by chukw on Sunday, August 6, 2006 9:13 PM
This thing is just plain fun.  It's going in our bathroom, on a long shelf over the tub. You know I'll post a pic!   I've got the Andrea 5-man crew to sail her on to destiny- nice figs!
  • Member since
    January 2003
  • From: Warwick, RI
Posted by paulnchamp on Tuesday, August 8, 2006 7:31 PM
Most impressive build!
Paul "A man's GOT to know his limitations."
  • Member since
    December 2002
  • From: Whidbey Island, Washington
Posted by chukw on Sunday, September 10, 2006 7:54 PM
I've done some color filters!  Using some ancient oil paints (getting the tubes open was a challenge in itself), I daubed straight pigments onto a section of the boat that I'd flooded with Humbrol thinners.  I mixed the colors into a thin wash right where they sat, using a patting action with a wide brush.  I then brushed the resultant mixture in downward streak to avoid a blotchy look and get a nice, weathered look.  I think the results are pretty effective- it lost that "one color" look.  What do you think?  

I've rebuilt the cable cutter from brassrod and Eduard's pe- all soldered. It's just dry-fitted here- I've since glued all the railings on. No washes on it yet.

An extreme view- look at the random colors on the hull.

I don't usually use the flash to photograph models- it' tends to flatten things out too much- but shows the color filter off in a new light. ;)

The conning tower has been flat-coated- the hull needs some time to cure, plus more washes.

Iworked in sections, one side at a time.  

At this point I've added all the photoetch- the only plastic parts left are the periscopes, which I've forgotten to paint.   That's all for now- your comments and crits are always appreciated!  
  • Member since
    April 2005
  • From: I am at play in the fields of the Lord. (Texas)
Posted by m60a3 on Monday, September 11, 2006 12:34 AM
 That boat is just incredibly too awesome!!!!!!  I love it!

                                                  -60
"I lay like a small idea in a vacant mind" - Wm. Least Heat Moon "I am at the center of the earth." - Black Elk My FSM friends are the best.
  • Member since
    December 2004
  • From: Stockton,Ca
Posted by Hippy-Ed on Monday, September 11, 2006 12:35 AM
Outstanding job!! Too bad yer gonna cover that upShock [:O] The Conning tower is great!!
Thanks for sharing this with usBig Smile [:D]

If you lose your sense of humor, you've lost everything
  • Member since
    June 2006
  • From: Netherlands
Posted by Grem56 on Monday, September 11, 2006 1:56 AM

Great workmanship and excellent weathering. Very nice indeed !

Julian


illegal immigrants have always been a problem in the United States. Ask any Indian.....................

Italeri S-100: http://cs.finescale.com/FSMCS/forums/t/112607.aspx?PageIndex=1

Isu-152: http://cs.finescale.com/FSMCS/forums/t/116521.aspx?PageIndex=1


  • Member since
    December 2002
  • From: Whidbey Island, Washington
Posted by chukw on Sunday, October 22, 2006 7:27 PM
Well, I'm still working up a nice keel-block base for her, but the fabled U-Baot is done at last.  Here's a first look, mainly of the central areas.  If you haven't followed the build, jump over here.
The rigging gave me fits- I owe Jan Levitner from the Czech Republic a big thanks for his helpful pointers and encouragement.  The insulators are the kit items, cut apart, drilled and finally rigged with fine wiree stripped from ancient speaker wire.  The long bits are 2-pound test monofilament. Finally, drink a tall one when finished. :beer4:

Lots of washes and paint-chipping, airbrushing and drybrushing- whew!

Glueing the deck gun down was a spiritual moment!

The directional loop was rebuilt from brass with a punched styrene cap.


Here's the same as shot with a flash.  That row of "Jenga pieces" to the side are the keel blocks for the base.

The Main periscope also gave me fits.  I know those wires should be flush with the scope, but that's as good as it gets for poor ol' me.   :bandhead2:

Close on the Wintergarten:


That's just a bit of stretched sprue for the dangling insulator- and yes- that wire is supposed to be all whangey and what!


That's all for now- I'll post more pix of the bow and stern later- thanks for looking!  I'll also gratefully accept any crits as well- I'm always looking to improve my modeling and painting.
  • Member since
    June 2005
  • From: Missouri, USA
Posted by tedhealy on Sunday, October 22, 2006 7:58 PM
The weathering looks great Wow!! [wow]

Looks like she just returned from a patrol in the North Atlantic.  The rigging looks very good too, well worth the effort.
  • Member since
    June 2005
  • From: San Tan Valley,AZ
Posted by smokinguns3 on Sunday, October 22, 2006 8:22 PM
Man that u-boat looks great man, outstanding job.
Rob I think i can I think i can
  • Member since
    December 2004
  • From: Stockton,Ca
Posted by Hippy-Ed on Monday, October 23, 2006 1:38 AM
 smokinguns3 wrote:
Man that u-boat looks great man, outstanding job.


Sign - Ditto [#ditto] One of the best I've seen on these boardsCool [8D] That wiring/ rigging looks like it took quite some time to do up...
If you lose your sense of humor, you've lost everything
  • Member since
    February 2005
  • From: Australia
Posted by rokket on Monday, October 23, 2006 6:48 AM
So well done, great attention to detail, beautiful weathering, Fantabulous! Be very proud of your work of art!!
AMP - Accurate Model Parts Fabric Flags, AM Uboat Goodies & More http://amp.rokket.biz/
  • Member since
    November 2005
Posted by Anonymous on Thursday, October 26, 2006 1:38 PM
WOW!!! Buy me a ticket on the Spindrift booked for the Land Of The Giants and I'll sprint to the Kriegsmarine recruiter!
  • Member since
    December 2002
  • From: Whidbey Island, Washington
Up on her blocks
Posted by chukw on Tuesday, November 14, 2006 7:26 PM

Thanks for your kind words, everbody!  Medric, I'm such a nerd I know exactly what you're saying!Shy [8)]

I made a base for her- I know keel blocks aren't grooved but I designed this thing in a whimsical way.  The base and blocks are poplar, cut, routed and sanded.   I put the blocks in a coffee can with a bunch of bolts and hardware and shook 'em up good- all beat up now.  I glued some fine model railroad ballast in random areas on the tops and sides with Future.  Then it was paint, paint, paint!


The blocks were carefully glued to the base, using the boat as a jig. I then masked off the edges of the base and painted it a mixture of grey-browns.  Thin white glue was brushed down and sprinkled with more ballast, and my secretweapon, dirt.


Bits of junk left over from building the U-69 were spot-glued here and there.  I drove a couple of model railroad spikes into 3 blocks- this one has a length of chain hung from it.  Note the rust stains and various random tints and splotches.  Using extreme low pressure I "speckled" paint in different shades, light and dark, over everything to unify the colors.

Here's a 1/72 paint can!  It's a short section of 1/8" aluminum tubing with a tiny bit of leftover wire glued in. Nutty! Clown [:o)]

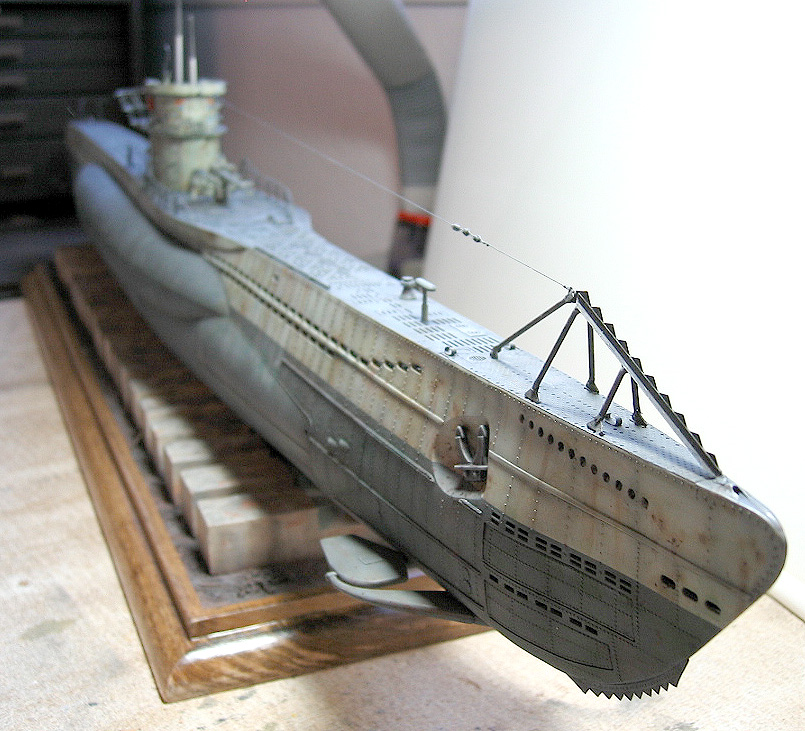
The base is harmonious with the boat.

The little bits of junk add  points of interest- and fun!

Another view...

The cable cutter is all brass.

I didn't mess with moving the hawser or torpedo doors... bad chuk!

The Eduard set added some nice little bits of focus over the various surfaces.  That chain on the base came from a Revell Cutty Sark I almost finished when I was a kid back in the early 70's.  Anyone else carry junk around forever like me?

Some stern details...

And she sails into the sunset!  Thanks for putting up with all this nonsense- and the downloads!


JOIN OUR COMMUNITY!

Our community is FREE to join. To participate you must either login or register for an account.

SEARCH FORUMS
FREE NEWSLETTER
By signing up you may also receive reader surveys and occasional special offers. We do not sell, rent or trade our email lists. View our Privacy Policy.