SEARCH FINESCALE.COM

Enter keywords or a search phrase below:

WIP-Something to do with all those Titanics FINALLY FINISHED!

4154 views
27 replies
1 rating 2 rating 3 rating 4 rating 5 rating
  • Member since
    December 2005
  • From: Seattle, Colorado
WIP-Something to do with all those Titanics FINALLY FINISHED!
Posted by onyxman on Thursday, June 21, 2007 5:15 PM

Several years ago a well-meaning friend, knowing about my hobby, gave me a Revell 1/570 Titanic kit. It sat in my stash until I recently took it out and opened it up. I wondered, does the world really need another completed 1/570 Titanic? But something about the hull looked familiar to me. Both the bow and stern reminded me of a photo I have of a ship my father served on as Radio Operator back in the early ‘50s. The ship was the Exermont, of American Export Lines. All American Export ships had a distinctive stern. You can see it on their liners, the Constitution and Independence. The Titanic had the same overhung stern.

So here was my idea. Why not use the Titanic hull to form a base for scratch building a model of the Exermont?

First of all, the Titanic hull was longer and narrower than the freighter's. Dividing the beam of the Titanic by her length, you get a ratio of .103. The Exermont was 473 feet long and had a beam of 66 feet. This gives a ratio of .139. So, the problem is, how much do you cut down the length of the Titanic hull to make the ratio .139? I figured I could cut a section out of the mid-body of the Titanic kit while keeping the shape of the bow and stern.

I'll spare you the math, but I calculated that I had to cut 133 mm out of the Titanic. When I was finished I calculated that the new hull would be 337.2 mm long by the original 47mm wide.

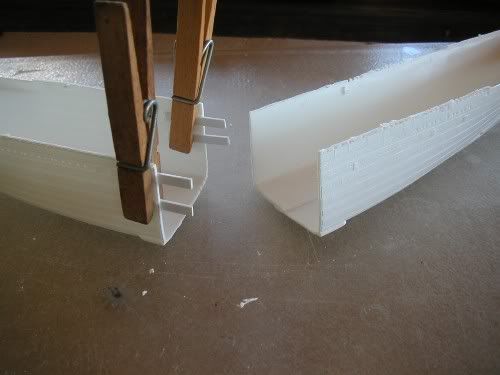
Here is the hull with a main deck added. I am going to waterline it. It was NOT fun to sand off all that plating detail.
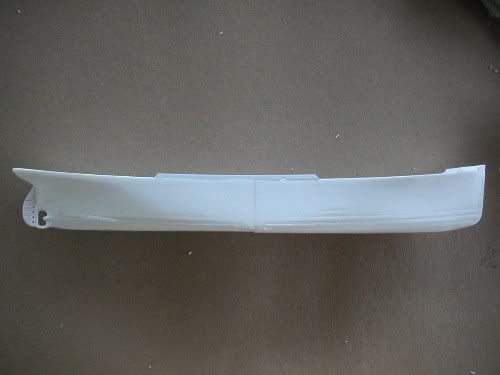
 

Comparing the model's length with the real Exermont's, the scale works out to about 1/425. ( I ended up with a slightly longer hull than I calculated)


  • Member since
    February 2006
  • From: Boston
Posted by Wilbur Wright on Thursday, June 21, 2007 5:34 PM

Nice work, Man.............I recently had to sand off all the out of scale molded on wood decking on my Snowberry...not fun!

Great to see the ambition. 

  • Member since
    May 2007
  • From: Seattle
Posted by PeeweeBiggs on Thursday, June 21, 2007 11:03 PM

I don't suppose a belt sander is an option here? I hope to see more photos of your scratchbuild.


peewee

Free worldwide shipping www.pacifictrading.hk
  • Member since
    August 2004
  • From: Omaha Nebraska
Posted by FireFox31 on Friday, June 22, 2007 7:48 AM
looks to be an interesting scratchbuilt. can't wait to see what comes next, good luck with it onyx.
"Simple" "Budget Builder From Hell" Mike
  • Member since
    December 2005
  • From: Seattle, Colorado
Posted by onyxman on Friday, June 22, 2007 8:20 AM
Thanks for the interest everybody. I have it waterlined now, at slightly less than the deep draft, and it looks pretty good compared to the photo of the ship. A belt sander might work, but I have learned the VERY hard way to be careful with power tools around styrene plastic.Censored [censored]
  • Member since
    June 2007
  • From: Albuquerque, NM, USA
Posted by styrenegyrene on Saturday, July 14, 2007 11:26 PM

I need some advice on Titanic models.  My youngest daughter, aged 9, has shown an interest in modelling.  We've done a couple of snap-together cars and planes, and she's done pretty good, but she doesn't have a lot of patience or small-muscle control.  In fact, those are two of the reasons I've encouraged her on modelling, and it has helped quite a bit!

She LOVES the movie "Titanic," and her eyes light up every time she hears or sees anything about it.  Mega Hobby has two kits that are in our price range.  One is the 1/570th kit, the other is another Revel kit in 1/1200 scale.  The little kit is obviously not going to be much of a model, but do any of y'all know if it's fit fodder for a little girl to mess with?  I'd be helping her, of course!  We need to hit the middle ground, where it's not overhwelming to her, but still worth building.  How about the 570th kit?  How complex is it?

Thanks!

Turning styrene into fantasies for 50 years!
  • Member since
    December 2005
  • From: Seattle, Colorado
Posted by onyxman on Sunday, July 15, 2007 2:50 PM

I don't know anything about the 1/1200 kit. I see from what's left of my 1/570 kit it has "over 50 pieces", but I don't think it would be too much for a 9 year old, with some help. It would make a more impressive ship than the little one IMO. They are also reletively inexpensive. The big problem I see is that all that molded-on plate detail on the hull would make it hard to paint a straight waterline. these folks are the experts:

http://www.titanic-model.com/

  • Member since
    June 2007
  • From: Albuquerque, NM, USA
Posted by styrenegyrene on Sunday, July 15, 2007 6:31 PM

Thanks, Onyxman.  Fifty pieces isn't so bad.  If I can keep MY wits about ME, she can probably handle that.  Painting is definitely an option.  She painted her Dauntless dive bomber pink and purple, with flower decals.  Darned nearly gave me a stroke, but she sure loved doing it!  It's an exercise in following instructions and patience, and practice using fingers for little stuff.  On the other hand, if it's history she's really interested in, it might make a difference.

I'm thinking the big one will be the right choice at this point.  Thanks again.

Turning styrene into fantasies for 50 years!
  • Member since
    March 2005
  • From: West Virginia, USA
Posted by mfsob on Monday, July 16, 2007 8:18 PM
styrenegyrene, I can recommend either 1/570 kit without reservations for your daughter - That was the first kit my 11-year-old daughter wanted to tackle after she saw me get back into modeling a couple of years ago, and we had a blast. We painted the hull with rattle cans and she painted the decks and upperworks with a brush (Dad helped with the molded-in benches and other really small details). We stuck to tube glue to avoid any CA disasters, and it turned out great. We did watch the movie as part of our "research," and I let her pick out the colors for the funnels, lifeboat covers, etc., at the hobby shop so it would be "her" model all the way.
  • Member since
    June 2007
  • From: Albuquerque, NM, USA
Posted by styrenegyrene on Tuesday, July 17, 2007 9:54 PM

Thanks for the feedback.  I think we'll take a shot at the 1/570th scale kit.  It's not like it's gonna break the bank if it doesn't work out.  If nothing else, she can play in the tub with the hull, and all those little ship-ey giblets can go in my scrounge box!


Turning styrene into fantasies for 50 years!
  • Member since
    December 2005
  • From: Seattle, Colorado
Posted by onyxman on Wednesday, May 5, 2010 4:00 PM

Well, almost three years since I started this, but I've been making some progress.

Now why is this pic so small?

(Edit:   Oh, I have to make a bigger upload to Photobucket....fixed now )  

Anyway, more to follow.


Fred


  • Member since
    March 2004
  • From: Spartanburg, SC
Posted by subfixer on Wednesday, May 5, 2010 9:32 PM

Wow! A real blast from the past. Keep it up!

I'm from the government and I'm here to help.

  • Member since
    December 2006
  • From: Jerome, Idaho, U.S.A.
Posted by crackers on Thursday, May 6, 2010 4:03 AM

Go for it Onxyman !  I would love to see a model that is a departure from the same old tired kits that are so prevelent for modelers. But please, PLEASE,  PLEASE post pictures of your work in progress !

   Montani semper liberi !      Happy modeling to all and every one of you.

                                            Crackers         Geeked

Anthony V. Santos

  • Member since
    December 2005
  • From: Seattle, Colorado
Posted by onyxman on Thursday, May 6, 2010 11:42 AM

OK, I used to know how to get bigger pics in here but now they all come out tiny.   What am I missing?

  • Member since
    March 2007
  • From: Carmel, CA
Posted by bondoman on Thursday, May 6, 2010 3:46 PM

onyxman


Now why is this pic so small?   

It's a small file, only 9K. Great model, and looking forward to more!

  • Member since
    December 2005
  • From: Seattle, Colorado
Posted by onyxman on Thursday, May 6, 2010 5:57 PM


OK, I think I got it.    Photobucket must have changed their upload standards.


All I have to do is the booms and rigging, but the dang weather is too nice!

Fred

  • Member since
    May 2007
  • From: Atlanta, Georgia
Posted by RTimmer on Thursday, May 6, 2010 7:40 PM

Onyxman - that is a really nice model, excellent kit-bash.  Did you work only from photos or did you also have some plans?

Cheers, Rick

  • Member since
    December 2005
  • From: Seattle, Colorado
Posted by onyxman on Friday, May 7, 2010 12:02 PM

Thank you Rick,

There is a nice line drawing on Frank Gerhardt's Maritime Commission website.   The drawing is 'as built' but I wanted to do the ship as she was post WWII, when extra passenger cabins and larger lifeboats were fitted.  For that I have a few of my father's color slides which show the changes pretty well.   The pic at the start of this thread is one of those.   It's amazing how well the color held up over 60 years!

Fred 

  • Member since
    August 2008
Posted by tankerbuilder on Friday, May 7, 2010 8:19 PM

HELLO! onyxman! Does this mean I HAVE to do the conversion of the "TITANIC" to a carrier with lots of little british biplanes cluttering the deck?? Man,oh man that is a nice job!! I have always thought that some of the old ship designs could lead to an interesting model.I have always been perplexed as to why the ships that did pick up "TITANIC,S "passengers?? Like the CALIFORNIAN and others. That would be neat!! Anyway ,again ,nice job!!!       TANKERBUILDER

  • Member since
    December 2005
  • From: Seattle, Colorado
Posted by onyxman on Sunday, May 9, 2010 3:01 PM

Thanks Tankerbuilder.   Yes, that 'clipper stern' was pretty much standard on a lot of ships up to WWII, and it's kinda hard to scratch build it.

Fred

  • Member since
    December 2005
  • From: Seattle, Colorado
Posted by onyxman on Monday, December 26, 2011 9:50 AM

Here are the finished pics.  I finally figured out how to show all those cargo booms topped, but that was a lot of fussy rigging!

  • Member since
    December 2006
  • From: Jerome, Idaho, U.S.A.
Posted by crackers on Monday, December 26, 2011 11:13 AM

Congratulations onxyman for your impressive model. I like it when people step out of the box and scratch build subjects from the usual line of predictable kits.

Hope you had a Merry Christmas and will have a prosperous New Year.

  Montani semper liberi.  Happy modeling to all and every one of you.

                        Crackers                      Geeked


Anthony V. Santos

  • Member since
    May 2007
  • From: Atlanta, Georgia
Posted by RTimmer on Monday, December 26, 2011 11:46 AM

Very nice - thanks for sharing.  Any hints on doing the booms?

Looking forward to seeing some more of your work in the new year.

Cheers, Rick

  • Member since
    December 2005
  • From: Seattle, Colorado
Posted by onyxman on Monday, December 26, 2011 1:43 PM

Thanks Rick and crackers, and a happy new year to you too.

The problems with topped cargo booms in this scale:

They are too thin to do with Evergreen plastic.  It's too flexible to hold tension of the rigging.  So I turned them out of brass rod.

Once the rigging is on, they are pretty secure, but until then, there isn't much contact for glue to hold them up.  I used a drop of CA gel, propped them up with a wooden block until that was dry, then carefully put on the topping lift wire ( the wire between the top of the boom and the mast )  This was .006 brass wire.  Once all that was dry it was solid enough to do the rest of the rigging with fly tying thread. Each boom has a wire stay ( black thread ) and a block and tackle affair  ( brown thread ) with wire pendants on each end.  The little knots look like the blocks, once you put on a dab of black paint. I think that's 4 knots and three glued attachments per boom! It will be a while before I undertake this again!

Fred

  • Member since
    March 2007
  • From: Carmel, CA
Posted by bondoman on Tuesday, December 27, 2011 1:57 AM

Wow Fred that looks great!

  • Member since
    March 2006
Posted by TD4438 on Tuesday, December 27, 2011 10:23 AM

That is spectacular.An absolute pleasure to view.Toast

  • Member since
    March 2005
  • From: West Virginia, USA
Posted by mfsob on Tuesday, December 27, 2011 2:13 PM

That, sir, is definitely a keeper - well done!     Yes

  • Member since
    December 2005
  • From: Seattle, Colorado
Posted by onyxman on Tuesday, December 27, 2011 5:31 PM

Thank you, guys.  The rigging went easier as I went along.  Now that I sort of have a method I might try for a dock scene with the booms swung out.  Let's see....look for that around 2014.Smile


Fred

JOIN OUR COMMUNITY!

Our community is FREE to join. To participate you must either login or register for an account.

SEARCH FORUMS
FREE NEWSLETTER
By signing up you may also receive reader surveys and occasional special offers. We do not sell, rent or trade our email lists. View our Privacy Policy.