SEARCH FINESCALE.COM

Enter keywords or a search phrase below:

Revell 1/24 Gemini- complete 8/26

22334 views
72 replies
1 rating 2 rating 3 rating 4 rating 5 rating
  • Member since
    July 2004
  • From: Sonora Desert
Revell 1/24 Gemini- complete 8/26
Posted by stikpusher on Monday, July 28, 2014 12:40 PM

I am building this for a another website as a review this kit, most kindly provided to us by Revell. Since this is a build review, no after market parts or scratch built add ons will be done on this project. The only modifications that I plan to make are in painting as the color call outs in the instructions and image searches of the real deal do not match up.

http://www.spamodeler.com/forum/index.php

So here we go with my build of this kit. The color call outs seem to be based off of a NASA illustration and off of early/pre operational Gemini mock ups and equipment. So the first thing that I did was to go thru various image searches and find photos of actual mission equipment. So I went thru the instruction sheet and annotated my own color call outs for use during construction. One thing that I do like about the instruction sheet is that it goes back to the old Revell tradition from back in the day where the parts are identified by name so that this kit can be educational during the learning process, naming this lever or that box.

Then I began cutting parts off of the sprues and gluing them together. The plastic itself is a tad on the soft side and not brittle at all so far. Mold seam and attachment stub clean up was quite easy with my needle files.

center console with control stick and release handle installed

overheard center console with lever installed

rear bulkhead attached to heat shield

and I have the front instrument panel and cabin sidewalls removed from the sprues but will not glue them in place until after painting is done in the next few days

with the sidewalls placed on the rear bulkhead

and finally the two Astronaut figures. I will not add their clear face shields until after painting

I know that painting all this will take longer than building it did 


F is for FIRE, That burns down the whole town!

U is for URANIUM... BOMBS!

N is for NO SURVIVORS...

       - Plankton

LSM


  • Member since
    July 2004
  • From: Sonora Desert
Posted by stikpusher on Thursday, July 31, 2014 8:13 PM

Not a lot of visits on the Space forum I see...

Well today I finally had some time to get in some un interrupted work at the bench here. So I started with the very mundane. Filling the seams on the Astronaut figures. Squadron white putty is seen here doing that task. I will let it dry overnite and sand it up tomorrow

Now as I said previously the instruction sheet color call outs appear to based off of a NASA illustrution and not off any of the preserved actual Gemini Spacecraft. So I am using this walk around of the National Air & Space Museum as my primary reference source.

http://www.cybermodeler.com/space/gemini/gemini_walk1.shtml

Now based upon those photos, I am gonna go with Light Gull Gray on the interior base color with the ejections seats (YES, Gemini had actual ejection seats rather than an escape tower type system as on Mercury and Apollo) in Dark Gull Gray.

the rear bulkhead and sidewalls

inner faces of the crew hatches

center console, instrument panel, and overhead console

and finally, just in case, I also got the areas of the nose cone, inner capsule surfaces, etc, that just might be visible when the capsule is all put together and the hatches are opened. And with that work went the last of my Gunze Aqueous semi gloss Light Gull Gray, which is sadly no longer available at any shops here in the USA

Tomorrow I will do detail painting, washes, etc. and get the Instrument panel decals on hopefully.


F is for FIRE, That burns down the whole town!

U is for URANIUM... BOMBS!

N is for NO SURVIVORS...

       - Plankton

LSM


  • Member since
    November 2010
  • From: Florida-West Central
Posted by Eagle90 on Friday, August 1, 2014 5:45 AM

Hey Stik...great review you are doing!  I have the older kit and I saw the newer decal sheet on the other web-site!  Very nice!  I'll be watching this one for sure!  Thanks for doing it!

Eagle90


  • Member since
    July 2004
  • From: Sonora Desert
Posted by stikpusher on Friday, August 1, 2014 10:43 AM

Thanks for looking in Eagle. I have a few weeks off of work right now, so I will be getting this one updated pretty often. Keep watching for more here or better yet on the other site. Please join us there if you feel so inclined.


F is for FIRE, That burns down the whole town!

U is for URANIUM... BOMBS!

N is for NO SURVIVORS...

       - Plankton

LSM


  • Member since
    February 2007
  • From: Brunswick, Ohio
Posted by Buckeye on Friday, August 1, 2014 11:21 AM

Will be following this.  Have been getting the itch to try some of these kits for something different.

Mike

cb1
  • Member since
    December 2009
  • From: D/FW Texas
Posted by cb1 on Saturday, August 2, 2014 8:45 AM

excellent! I have this as well so I am taking lots of notes! Yes Beer

  • Member since
    July 2004
  • From: Sonora Desert
Posted by stikpusher on Saturday, August 2, 2014 12:02 PM

IF, I was doing this for me and not as a kit review, I would recommend either some scratchbuilding in the cockpit for the sidewalls and center console, or an AM set for those. As well as for the ejections seats.


F is for FIRE, That burns down the whole town!

U is for URANIUM... BOMBS!

N is for NO SURVIVORS...

       - Plankton

LSM


  • Member since
    July 2004
  • From: Sonora Desert
Posted by stikpusher on Saturday, August 2, 2014 10:01 PM

So yesterday and today I have been working on detail painting and washes in the cockpit. 

Cabin doors/hatches

Overhead & center consoles and Instrument Panel

cockpit rear bulkhead, ejection seats, and sidewalls

and finally, the Astronaut figures. The instructions would have you paint them in one of the earlier type suits used for Mercury and pre flight publicity photos. But the actual Gemini flights were flown in a white suits of a few types that eveolved during the course of the program

I am still working on them, but looking at the decal sheet, the decals have the nametapes for the Gemini 3 crew, Grissom and Young, so now I have to fine tune my (needs improvement) face painting skills for those two gentlemen...

seated in their seats...

then of course I had to do a test fit of all the major pieces...

and of course I really have to wonder if Jim Henson got  his inspiration from Gemini....

"....PIGS IN SPACE.....!!!"

Stay tuned for more...


F is for FIRE, That burns down the whole town!

U is for URANIUM... BOMBS!

N is for NO SURVIVORS...

       - Plankton

LSM


cb1
  • Member since
    December 2009
  • From: D/FW Texas
Posted by cb1 on Sunday, August 3, 2014 4:52 PM

looking good!

  • Member since
    November 2010
  • From: Florida-West Central
Posted by Eagle90 on Monday, August 4, 2014 5:49 AM

Great work Stik!  I'm still trying to learn the wash technique, but yours is awesome!  Thanks for posting this!

Eagle90


  • Member since
    July 2004
  • From: Sonora Desert
Posted by stikpusher on Monday, August 4, 2014 1:19 PM

Thanks for the kids words. Eagle, washes are pretty easy to do. It just takes a bit of practice to get your own technique down.


F is for FIRE, That burns down the whole town!

U is for URANIUM... BOMBS!

N is for NO SURVIVORS...

       - Plankton

LSM


  • Member since
    June 2014
Posted by Hotdog on Tuesday, August 5, 2014 8:35 PM

What color do you plan to paint the capsule?

  • Member since
    July 2004
  • From: Sonora Desert
Posted by stikpusher on Wednesday, August 6, 2014 2:29 AM

The exterior? Thats gonna be black, with some red and gun metal areas areund the hatches and windows based on photos.


F is for FIRE, That burns down the whole town!

U is for URANIUM... BOMBS!

N is for NO SURVIVORS...

       - Plankton

LSM


  • Member since
    July 2004
  • From: Sonora Desert
Posted by stikpusher on Friday, August 8, 2014 8:41 PM

Ok, so I have not been overly motivated to be at the bench much this past week or so, but I have been doing little bits of progress here and there along the way. So here we go...

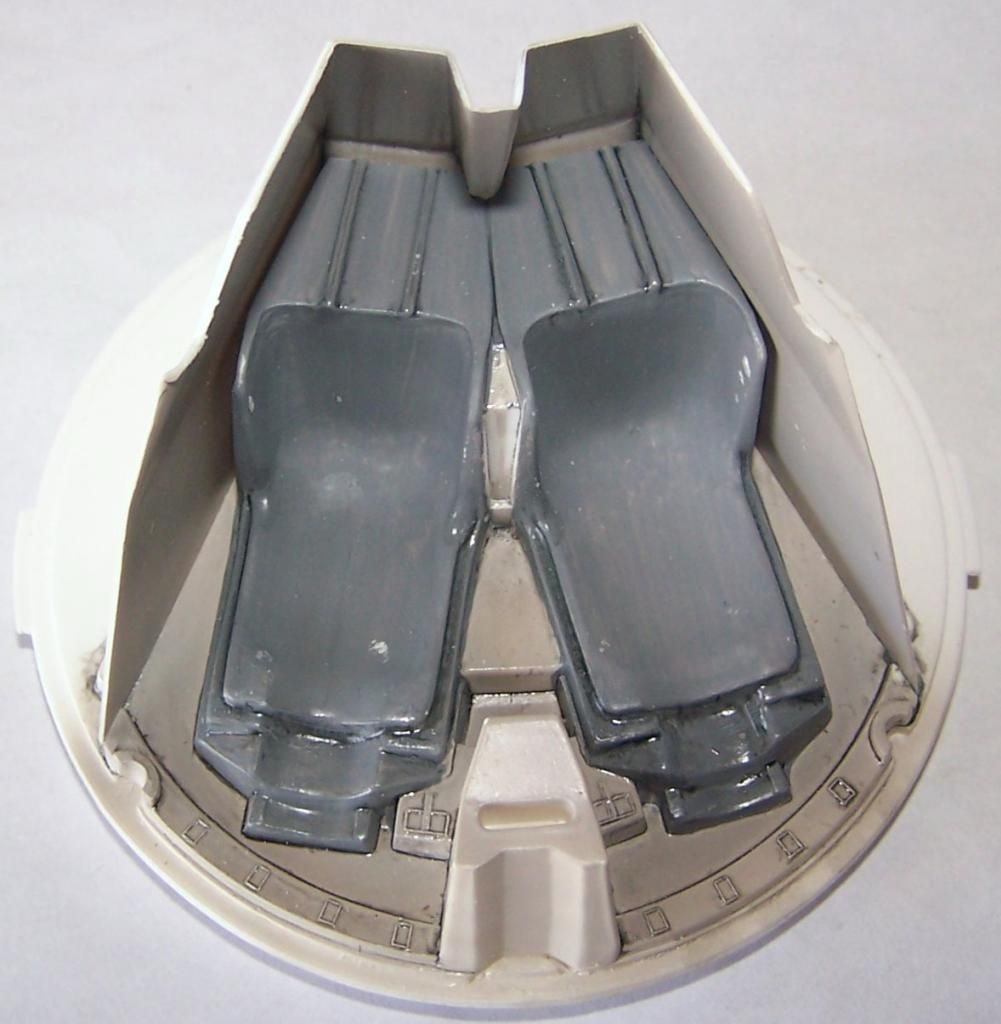
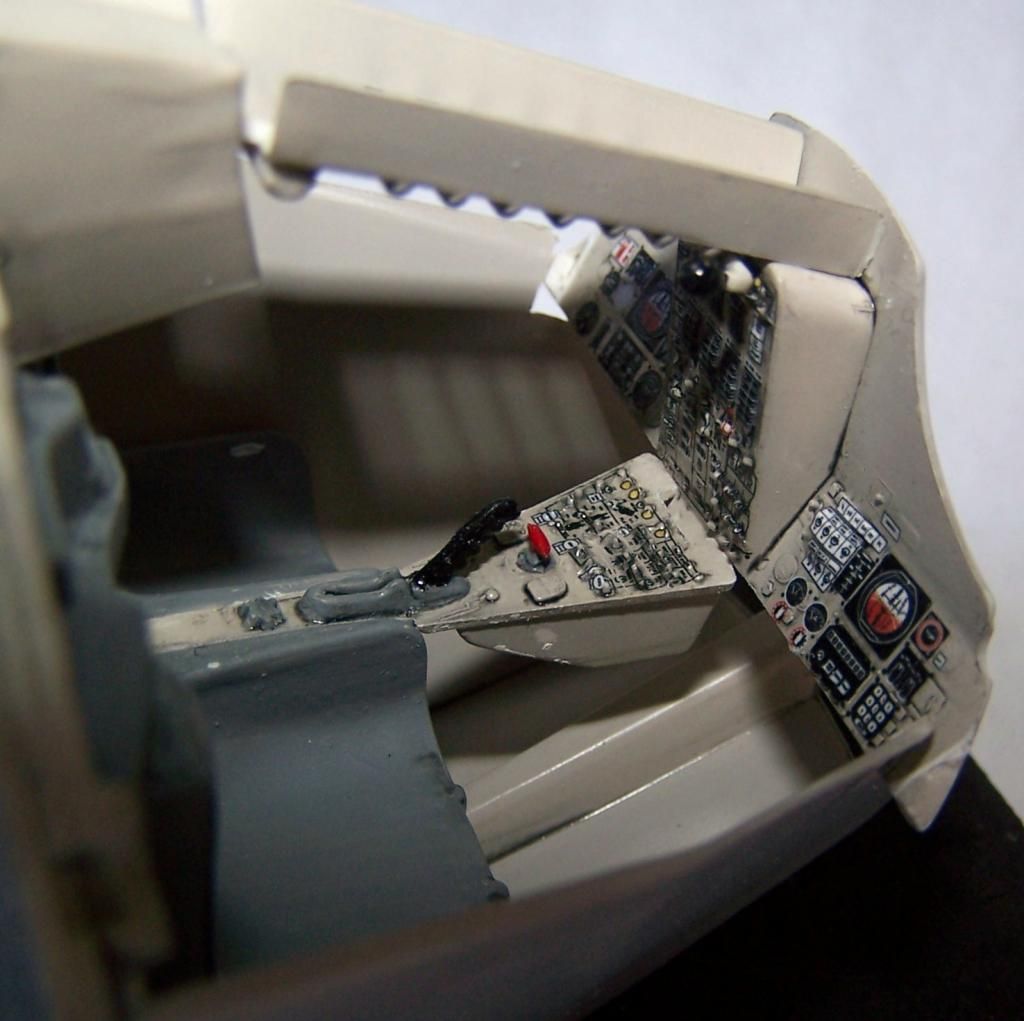
Step 2 is cockpit work so I glued the sidewalls to the rear bulkhead

and added the decals to the center console and instrument panels

now here is where there is a problem with the kit. The decals do not match the molded detail properly. Espcially the side parts of the front instrument panel- those would be best cut into 3rds on either side of the artificial horizon istrument and then placed accordingly. Also all the raised switches played a bit of havoc with the main decals, in spite of multiple dousings of Solvaset.

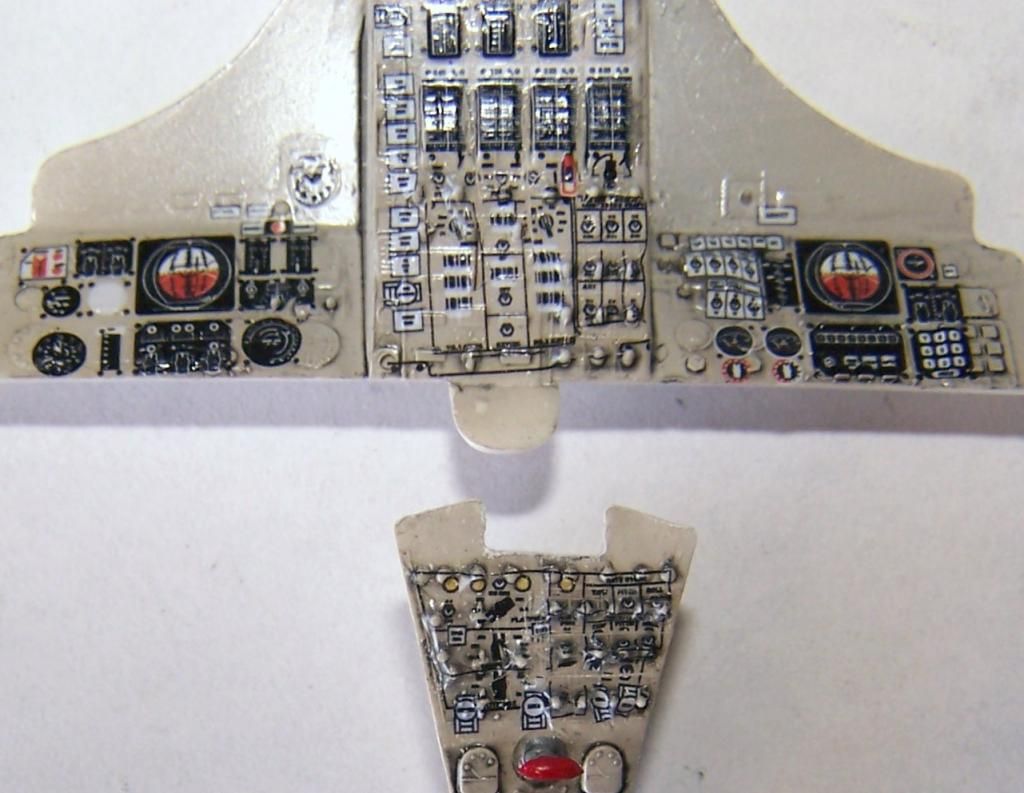
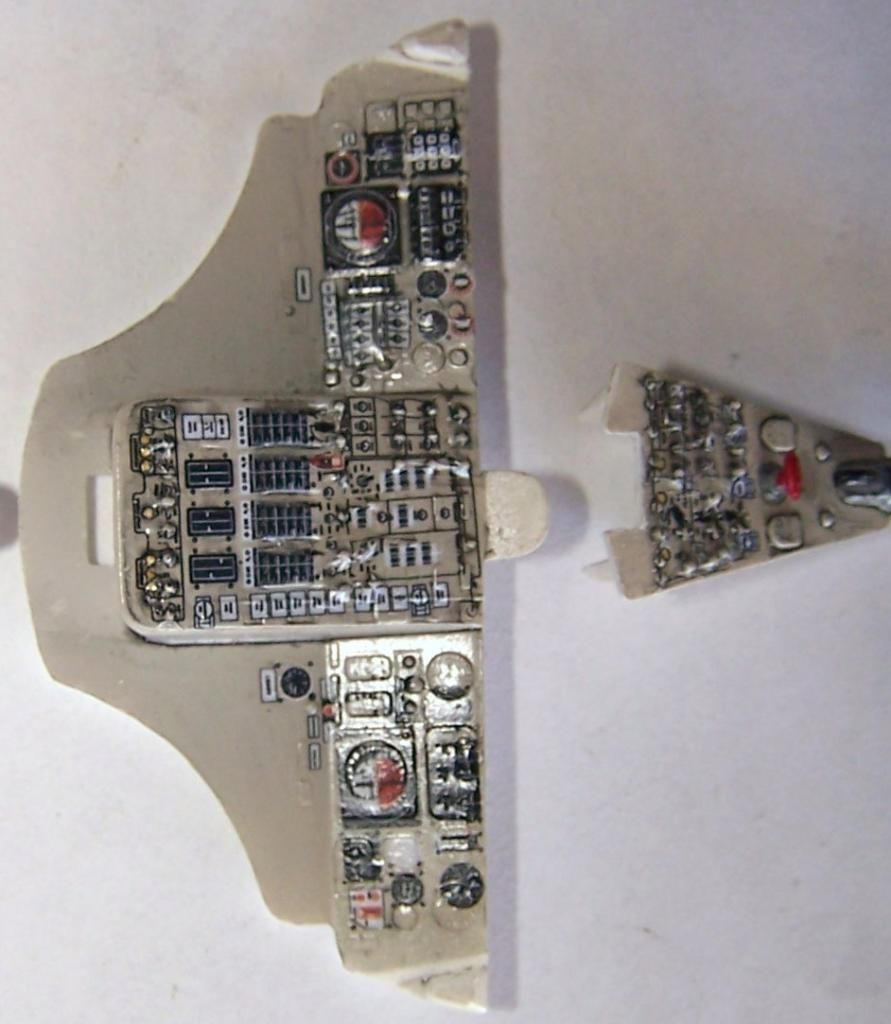
for those of you who plan to build this kit, cut up the IP decals into smaller sections and apply them in those portions. Combined with washes and highlight work painting the IP and center console really have serious potential. Live and learn.

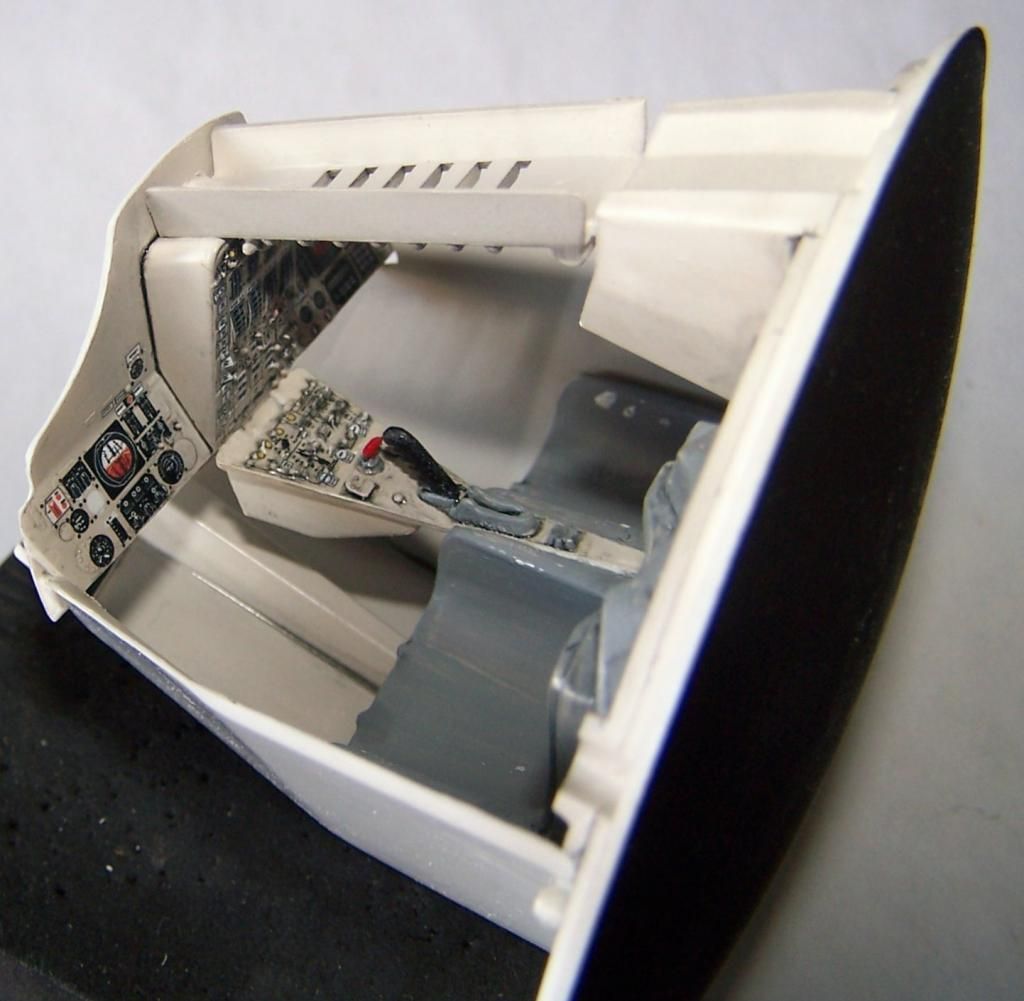
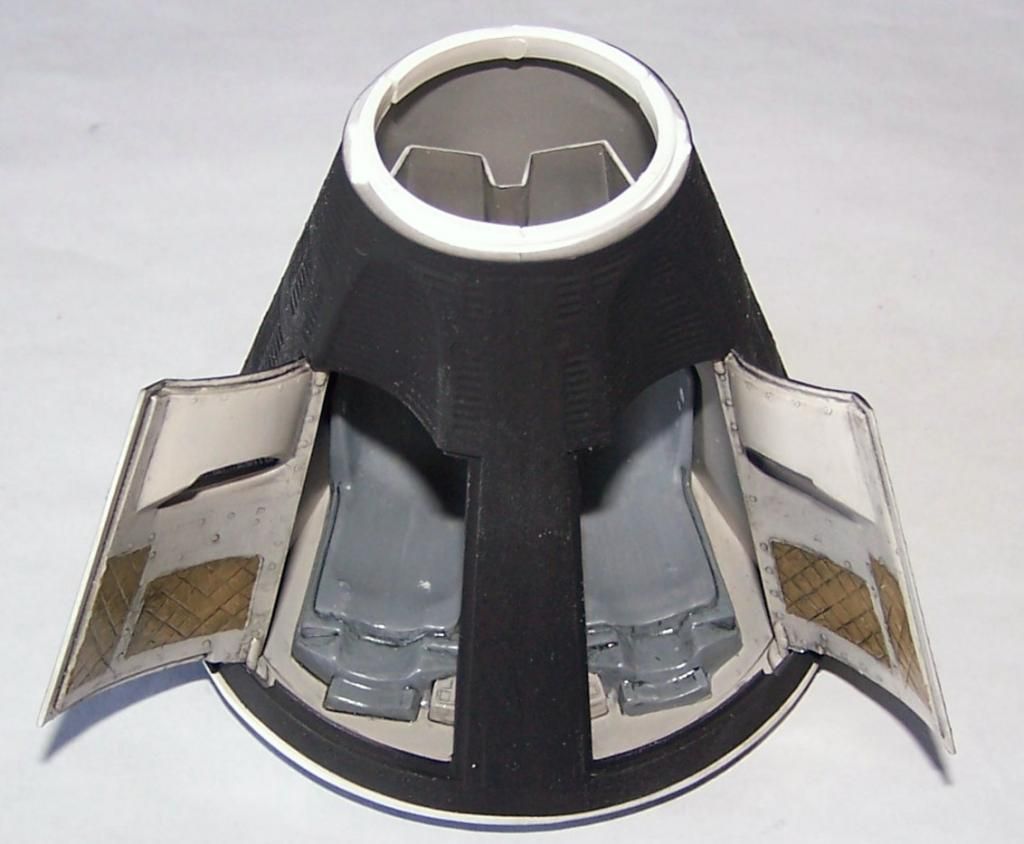
here are a couple views of the cockpit with the consoles in place but no exterior- I think it looks pretty good with what the kit provides, and some basic painting techniques.

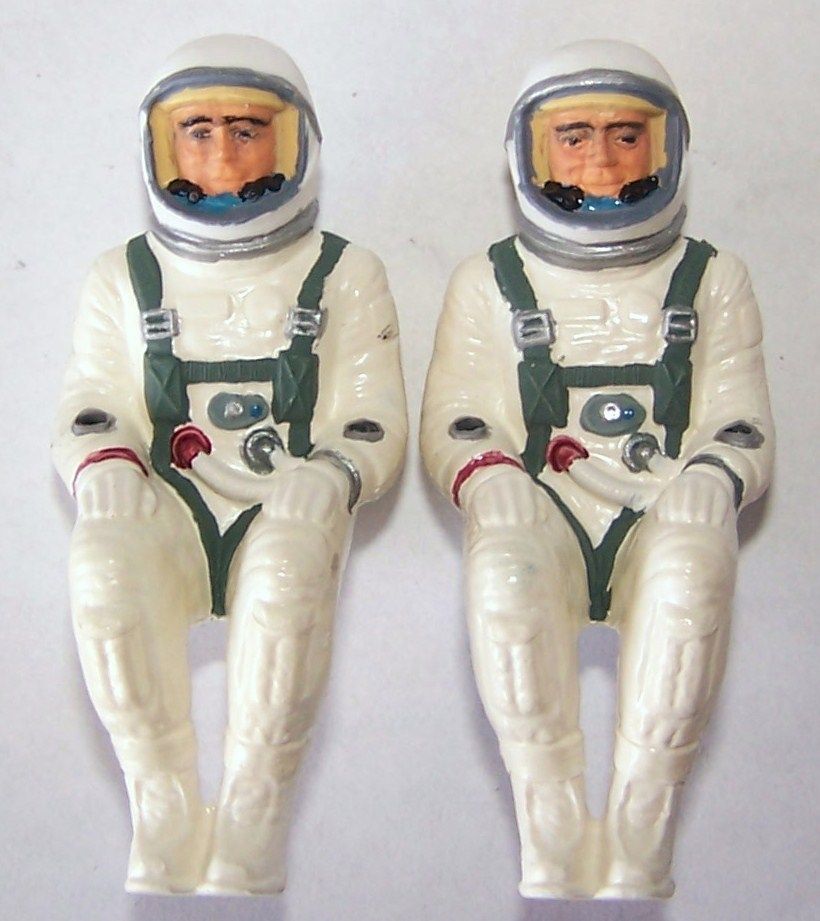
I also have done some more face work on the Astronaut figures. I still need to do some washes and highlights on the faces and suits, before I add the decals and face visors, but they are coming along well enough

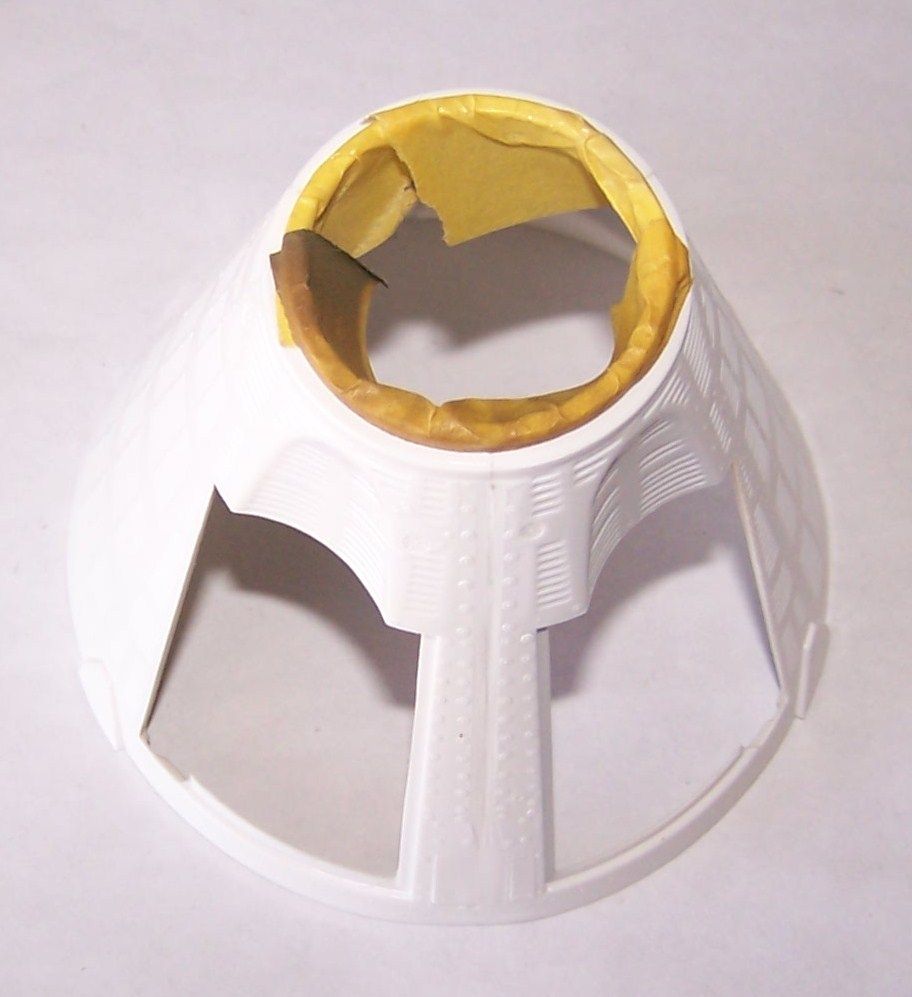
and the last portion of Step 2 has you build the capsule exterior

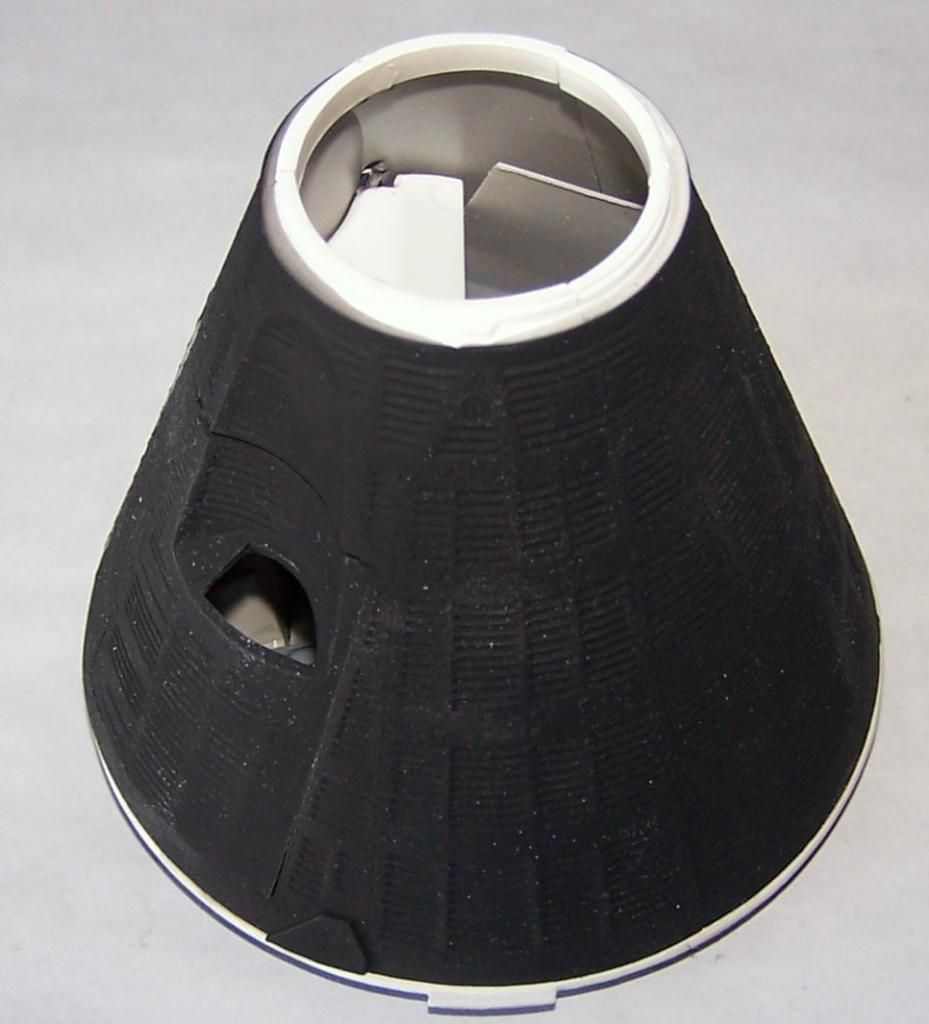
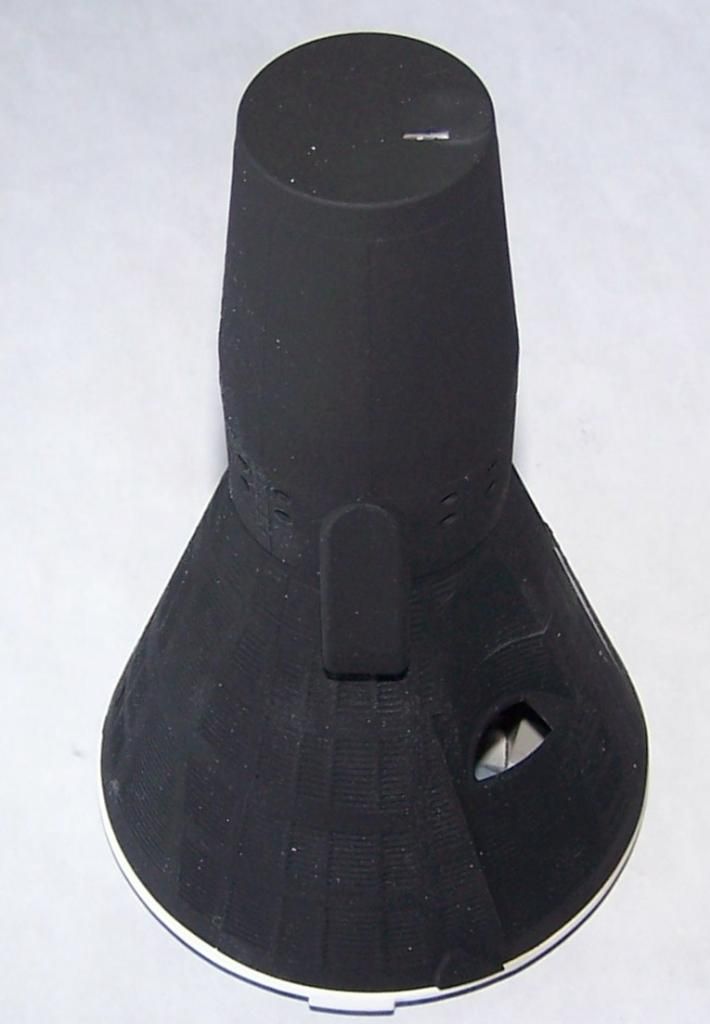
and then I finally began to add some paint- again, I am no following the kit call outs as they are inaccurate. I used Humbrol Matt Black for a primer coat on the capsule exterior

Step 3 begins with adding the nose section to the Capsule, which I painted up at the same time as the crew portion

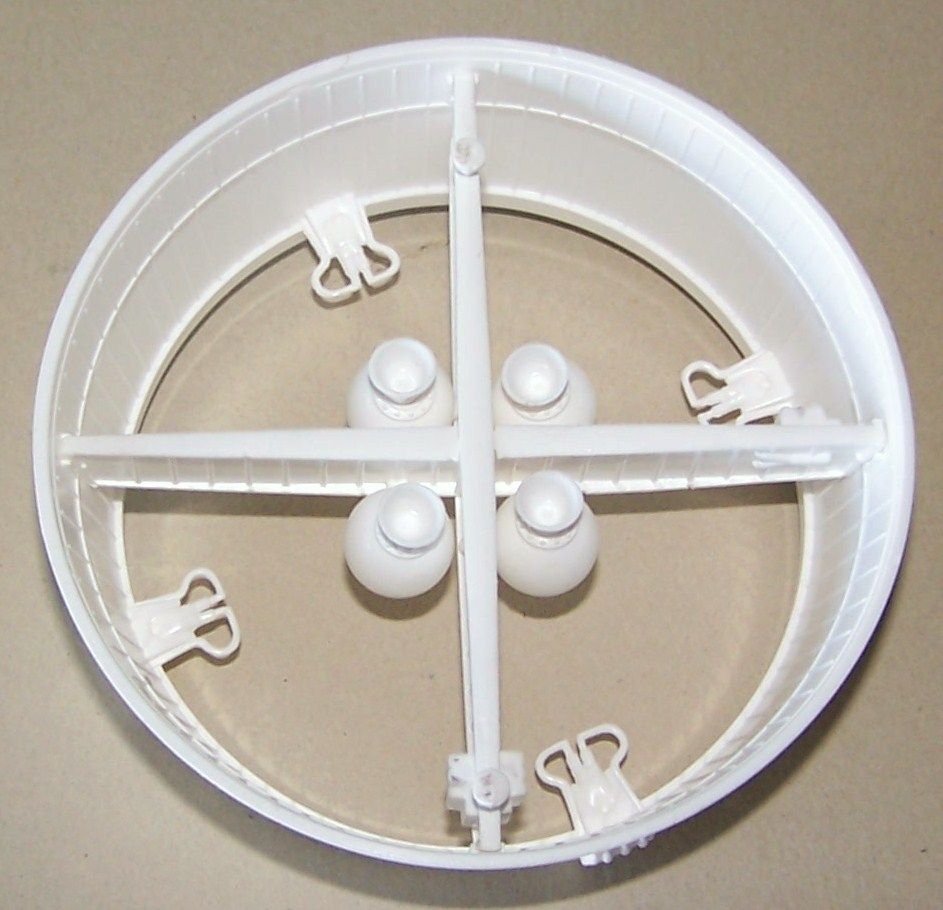
then you are next directed to build the retro rockets and their mounting assembly (I have not glued them in place until after they are painted

Then we are on to Step 4 and building the exterior of the Retrograde Section

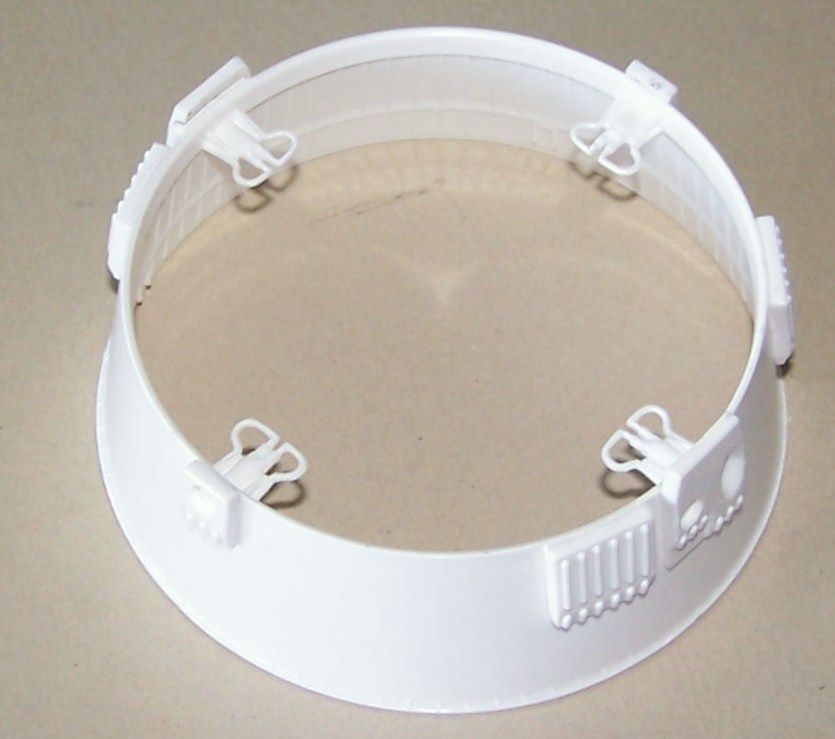
and gluing the Retro Rocket mount assembly into place

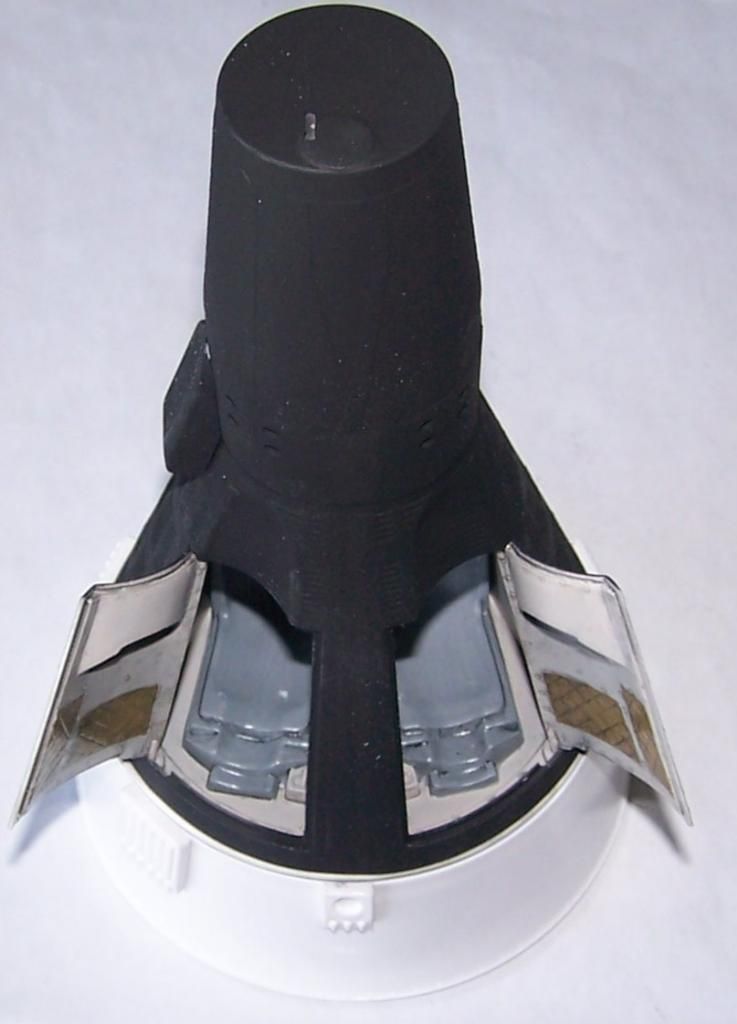
Then of course I had to do some test fit shots with the Cabin Section placed onto the Retrograde Section

more coming in a few days...


F is for FIRE, That burns down the whole town!

U is for URANIUM... BOMBS!

N is for NO SURVIVORS...

       - Plankton

LSM


cb1
  • Member since
    December 2009
  • From: D/FW Texas
Posted by cb1 on Friday, August 8, 2014 10:12 PM

looking good!

  • Member since
    July 2004
  • From: Sonora Desert
Posted by stikpusher on Saturday, August 9, 2014 3:15 PM

Thank you CB. This really is a cool kit, with so much potential for the scratch builder or somebody who loves AM additions.


F is for FIRE, That burns down the whole town!

U is for URANIUM... BOMBS!

N is for NO SURVIVORS...

       - Plankton

LSM


  • Member since
    July 2004
  • From: Sonora Desert
Posted by stikpusher on Sunday, August 10, 2014 10:19 PM

So during the week I built all the small sub assemblies for Steps 5 & 6, which are essentially the internal components that go inside the Equipment Stage. And I added the final external parts on Step 7, which is the nosecone radar antenna and the manuvering rocket nozzle housings on the Equipment Stage. After building those items, I did seam clean up, but I did not glue it all in place. Instead I superglued them on to toothpicks for handling during airbrushing. Then using the following photos that I found online as reference, I began my airbrushing session today.

Retrograde Section

Equipment Section

Retro Rocket

Retro Rockets and Manuevering Rockets (Testors Flat Steel). I still need to paint the nozzles and their attachment collars

Electronics:clockwise from upper right Electronics Package, Cooling Unit, Battery Power Cells, and Rendezvous Radar

Then we have the balls... Spaceballs that is. Oxidizers, Fuel, Reactant, Oxygen, and Pressure cells, along with the mounting framework for the Reactant Cells. The rest mount onto the top of the Equipment Stage (Model Master Oiled Steel and Dark Gull Gray)

Then based upon the above photos, and having read that the cover between the Retrograde Stage and the Equipment Stage was made from fiberglass, I opted to use MM Radome Tan, which is a standard US aerospace fiberglass color. And I gave the external portion of those Stages a base coat of Humbrol Matt White

Then I did a touch up coat of Humbrol Matt Black on the Capsule itself

More to come in the next few days...


F is for FIRE, That burns down the whole town!

U is for URANIUM... BOMBS!

N is for NO SURVIVORS...

       - Plankton

LSM


  • Member since
    June 2013
  • From: Jax, FL
Posted by Viejo on Tuesday, August 12, 2014 5:43 PM

EXCELLENT thread.  Goodonya, Stik.  I've got this kit in the stash (along with one from the 80's that I never finished).  I'll never be able to keep up with you guys on this board, but my chops are getting better, and I'm paying attention to the "pitfalls" you're coming across.

  • Member since
    July 2004
  • From: Sonora Desert
Posted by stikpusher on Tuesday, August 12, 2014 11:37 PM

Thanks Viejo! I have come across many things that could use updating or correcting in this kit, but really, there is nothing to stop you from building a nice generic Gemini Spacecraft OOB as I am doing here. But teh more research that I do, the more I am learning about mission specific configurations of this craft.

Todays update... it does not look like much, due mostly to it being lots of little detail painting work... interrupted by a few long errands and outings...
The retro  and after maneuvering rockets... I still need to paint the ablative coating color inside the nozzles
Cooling unit, Communications equipment, Radar Rendevous Target Device, Power Cells, and Fuel/Oxydizer/Water Tanks on mount. I still need to finish painting the wiring
Interior of the Equipment Section, I still need to paint the framwork brackets and wiring/plumbing
Crew section with a coat of Gloss Black and starting to do Red detail work painting
More to come in the next few days...


F is for FIRE, That burns down the whole town!

U is for URANIUM... BOMBS!

N is for NO SURVIVORS...

       - Plankton

LSM


  • Member since
    July 2004
  • From: Sonora Desert
Posted by stikpusher on Wednesday, August 13, 2014 12:08 AM

I know what I'll be doing tomorrow midday... Vandenberg AFB will be launching a satellite into orbit, so weather permitting I should be able to see the launch once it gets high enough to be visible locally... Sweet!

http://www.americaspace.com/?page_id=11236


F is for FIRE, That burns down the whole town!

U is for URANIUM... BOMBS!

N is for NO SURVIVORS...

       - Plankton

LSM


cb1
  • Member since
    December 2009
  • From: D/FW Texas
Posted by cb1 on Wednesday, August 13, 2014 4:21 AM

so, you painted the floor of the bay radome tan and the walls silver... am I seeing right? I'm making notes for when I do my kit. LOL

  • Member since
    July 2004
  • From: Sonora Desert
Posted by stikpusher on Wednesday, August 13, 2014 10:53 AM

Yes. If you look at the above photos, the walls of the equipment section look to be covered in a silver colored foil or mylar, and the top portion appears to be tan with gray framework and some portions in a bare goldish metal. The Gemini mock ups had this all in interior green, but photos of the actual operational craft show bare metallics before the bottom gold mylar cover is installed. Make all the notes that you need ;-)


F is for FIRE, That burns down the whole town!

U is for URANIUM... BOMBS!

N is for NO SURVIVORS...

       - Plankton

LSM


  • Member since
    July 2004
  • From: Sonora Desert
Posted by stikpusher on Wednesday, August 13, 2014 11:04 AM

BTW, if you plan on building a particular Gemini craft accurately, research it beforehand. The equipement sections varied considerably in payload and somewhat in configuration as well. The White colored Radar Rendevous Device that comes with the kit was only carried by Gemini 4. Other Geminis carried different items in that location. The cylindrical battery fuel cells were carried in varying configurations, as were some of the sphereical tanks in different amounts. Of course you can avoid this by getting an AM or scratch building a mylar cover for the rear opening. Also the exterior skin varied as well being ribbed or smooth.


F is for FIRE, That burns down the whole town!

U is for URANIUM... BOMBS!

N is for NO SURVIVORS...

       - Plankton

LSM


  • Member since
    February 2007
  • From: Brunswick, Ohio
Posted by Buckeye on Wednesday, August 13, 2014 11:50 AM

Looking good!

Mike

  • Member since
    July 2004
  • From: Sonora Desert
Posted by stikpusher on Wednesday, August 13, 2014 1:46 PM

Thank you Mikie. I am doing what I can here with this.


F is for FIRE, That burns down the whole town!

U is for URANIUM... BOMBS!

N is for NO SURVIVORS...

       - Plankton

LSM


  • Member since
    July 2014
  • From: Franklin Wi
Posted by Bakster on Wednesday, August 13, 2014 9:38 PM

Nice job.  Keep it up!  This kit is on my distant build list so I am enjoying seeing you build it.

  • Member since
    November 2010
  • From: Florida-West Central
Posted by Eagle90 on Thursday, August 14, 2014 5:39 AM

Stik!  Stellar job dude!  Lovin the detail you are doing!

Eagle90


  • Member since
    June 2008
Posted by lewbud on Sunday, August 17, 2014 11:44 PM

Nice work Stick!  The adapter sections were all smooth.  Some missions flew with taped stripes on them as a means of thermal control.  If you're interested, we have a rather lively space modelers group over in Yahoo Groups.

Buddy- Those who say there are no stupid questions have never worked in customer service.

  • Member since
    August 2014
Posted by Weird-Oh on Wednesday, August 20, 2014 9:37 PM

Very nice. I have two versions of that kit: The original and the History Makers version. I might build the HM model and keep the other one intact; would love to have a Gemini hanging in my office along with some of the other models. It's my favorite spacecraft of the 60s.

  • Member since
    July 2004
  • From: Sonora Desert
Posted by stikpusher on Thursday, August 21, 2014 6:21 PM

Thanks for looking in on this. I have hit a couple of speed bumps in my finishing process, and have finally finished correcting them. So in a day or so I should have some more photos of progress posted. There will be some good stuff I think.

Lew, I would debate you about all the adapter sections having smooth exteriors. There are some pretty prominent ribs to be seen in some in space photos. But thanks for the heads up about the Yahoo Group. I may need to take a peek in over there.

Weird-Oh, I think this would be a great office model. It has a very eye catching look to it. I knew so little about Gemini before starting this project. I certainly like it much more now after all that I have learned. The Para glider version really is quite fascinating to me.


F is for FIRE, That burns down the whole town!

U is for URANIUM... BOMBS!

N is for NO SURVIVORS...

       - Plankton

LSM


JOIN OUR COMMUNITY!

Our community is FREE to join. To participate you must either login or register for an account.

SEARCH FORUMS
FREE NEWSLETTER
By signing up you may also receive reader surveys and occasional special offers. We do not sell, rent or trade our email lists. View our Privacy Policy.