SEARCH FINESCALE.COM

Enter keywords or a search phrase below:

Photographing Models

4048 views
14 replies
1 rating 2 rating 3 rating 4 rating 5 rating
  • Member since
    August 2010
  • From: Belmont, CA
Photographing Models
Posted by tomgeotech on Sunday, July 24, 2011 11:25 PM

Does anyone have any advice or links to sites in regards to photographing models?  I have been trying to take some pictures of several of my models to submit to the magazine, but they don't seem to look as good as I see in the mag.   I've tried a wide lense up close to the models and also standing back and zoom the in to the subject.  It just doesnt sem that the details are showing up very well.   I have a Nikon D90 so I know the camera can do the job if I can get the right settings plugged in!

  • Member since
    November 2008
  • From: Crawfordsville, Indiana
Posted by Wabashwheels on Monday, July 25, 2011 12:25 AM

tomgeotech,  It's lighting, lighting, lighting.  There have been several good discussions over time about photography.  Look up to the right for the yellow box labeled SEARCH.  Type in photography.  There will be a couple of articles come up.  That could get you started. 

For me, it's a D70.  I use my favorite backdrop, a base runway and a cloud background.  Most people like to use plain colored backdrops so that there are no distractions when viewing their models.  You can try a simple two light set up.  A key is to get daylight bulbs that will give a true color to your subjects.  You can use the bulbs in simple reflector fixtures, available most hardware stores.  You then need to be able to attach the the fixtures so you can get the proper angle.  One light should be distinctly stronger.  It will be your main light source.  Place it well above the subject.  It is your "sun".  The other light should be on the other side of the subject at a lower angle.  It gives you filler light so that your shadows aren't so harsh.    Then of course there always is taking your subject outside and use natural light.  That's about the only way the real things could be photographed.

I like to put the camera on a tripod and shoot at slow shutter speeds, using either a remote trigger or the built in timer.  The slower shutter speeds allow you to use the maximum F-stop, giving you maximum depth of field.

Once you establish a basic setup then you'll need to adjust and experiment to get your ideal look.  Good luck,  Rick


  • Member since
    August 2010
  • From: Belmont, CA
Posted by tomgeotech on Monday, July 25, 2011 12:29 AM

Great ideas, will try!

  • Member since
    April 2011
  • From: GA, USA
Posted by Unreality on Monday, July 25, 2011 1:03 AM

Here's a few tips I've learned from the web and my own DSLR.

1. A tripod and a smaller aperture (higher f-stop number) will increase DoF. Also, a shorter focal length and/or greater distance to the subject will increase DoF.

2. If you can't get multiple lights (or powerful lights), get a piece of white foamcoare to use a reflector that can bounce light up underneath the model.

3. Speaking of lights, I prefer a 2 light setup because I like seeing distinct (but not harsh) shadows. For magazines, less harsh shadows are preferred. And turn off the flash.

4. Editing software is very important, but it can't fix everything. For high DoF pics, you'll find money is better spent on the camera than the software. Heck, I'm still happy shooting jpeg for model pics. Magazines prefer raw images.

5. Use colors for the background. A white background will "dull" the model. Blue is typical, but I use a dark gray (more on the yellow side than blue side) for my sci-fi models. Magazines prefer white for editing purposes.

6. It's easier to brighten an image (for underexposure) than to darken the image (for overexposed images). So, try lowering the exposure to lessen the saturation, cool down the whites, and give you more play room to brighten what you need.

7. Experience makes a huge difference. So try shooting a single shot in multiple settings. Try the "auto" setting to see what the camera thinks is best. Then use those setting to take a "manual" shot with any alterations you need (higher F-stop, lower exposure, etc.).


Check out this guide as well: http://www.scalemodelguide.com/guide/display/photography-1/


Cheers

Action Fleet Unlimited: Star Wars models, customs, toys, techniques, and scale lists (with a few non-SW models thrown in)

Cheers

  • Member since
    June 2010
  • From: Austin, TX
Posted by DoogsATX on Monday, July 25, 2011 2:12 AM

Agreed with pretty much everything everyone has said so far. I actually just wrote a post recently about five steps to improving model photography.

You can read the full thing here: http://doogsmodels.com/2011/07/15/5-tips-to-improving-your-model-photography/ - but basically:

1 - Get some off-camera lighting

2 - No distractions. I still tend to take a lot of WIP shots on my bench, but for final pics, IMO it detracts.

3 - Large depth of field

4 - Tripod

5 - Shoot in RAW (this one's more preference, but I've found I really like the additional processing options RAW affords).

On the Bench: 1/32 Trumpeter P-47 | 1/32 Hasegawa Bf 109G | 1/144 Eduard MiG-21MF x2

On Deck:  1/350 HMS Dreadnought

Blog/Completed Builds: doogsmodels.com


  • Member since
    October 2007
  • From: Scotland
Posted by Milairjunkie on Monday, July 25, 2011 4:46 AM

Tethered shooting was the most useful thing that I found to help get better pictures - with tethered shooting your camera is connected to your computer & images appear on screen as soon as you shoot them. Dependant on the software used you can also make adjustments with a mouse click, take another shot (from the computer, without going back to the camera) & see the effect of your changes immediately. In comparison to regular shooting, it means that you can make a multitude of adjustments & dial everything in easily, over a short period of time & it's perfect for static work like models.

For doing tethered shots, you only need the camera, the supplied USB cable & a tethering utility for your computer. I use a Canon which came with a tethering utility out of the box, but as far as I am aware Nikon don't supply one with their cameras - they do have one, but it's at extra cost & isn't cheap. There are however a number of freeware utilities available which allow tethering to your Nikon.

Here is a video on YouTube which explains it pretty well (it's on a Canon, but the concept is the same);

http://thephotogeek.com/choosing-nikon-dslr-camera-tethered-shooting-software/

Here is a link with various freeware tethering utilities;

http://thephotogeek.com/choosing-nikon-dslr-camera-tethered-shooting-software/


  • Member since
    November 2009
  • From: Twin Cities of Minnesota
Posted by Don Stauffer on Monday, July 25, 2011 8:40 AM

The D-90 is great for model photography, especially using the "kit" lens, the 18-55 mm one.

Do not stay back and zoom in.  Longer focal lengths (more zoom) compresses perspective and makes things look smaller.  For model photography you need to do the opposite- go close and use wider angle.  But not all the way wide.

Lighting is a key problem.  You either need very flat lighting, like a light tent, or direct sunlight.

There are two main genres of model photography.  The first is more common. It is the "model as art object," and uses very plain backdrop and flat lighting.  It is usually taken from a high viewing angle. This is the type that model mags seem to prefer.

The other type is the realistic photo which puts in the model in a realistic setting. It uses either a real background or a photo backdrop of a real setting.  Sunlight is the best light source for this type, and the shot should be from a low angle (scale eye level).

Again, the biggest problem with the "model as art object" photo is getting flat enough lighting.  You may need reflectors or multiple lights, or even a light tent.  There are some inexpensive ones on the market now, as this type of shot is also what is needed for eBay photos.

Don Stauffer in Minnesota

  • Member since
    August 2010
  • From: Belmont, CA
Posted by tomgeotech on Monday, July 25, 2011 6:58 PM

I will definitally try out these ideas.  I have a couple clamp in reflector lights in the garage already.  So seems I just need a good background panel and will give things another try!  Thank you everyone.  Tom

  • Member since
    February 2003
  • From: Allentown, PA
Posted by BaBill212 on Monday, July 25, 2011 7:37 PM

Tom

All the advice given was very good. If  you have a local (good) camera dealer, ask if they offer lessons. I studied photography years ago and cut my teeth on the, now, ancient manual 35mm SLR's. Truly a ground up way to learn the nuances.

A lesson or two, given by a pro, will help you immensly. There are a number of things they will point out (white balance, depth of field, exposure, lighting) which will make sense with a good teacher.

Good luck and lets see some photos here too , , , don't just save them for the magazine,,,  we like them just as much


Bill

Enjoy the ride!


  • Member since
    November 2009
  • From: Twin Cities of Minnesota
Posted by Don Stauffer on Wednesday, July 27, 2011 8:55 AM

Something I forgot to mention in my earlier post, but the guy who mentioned a tripod reminded me-

The D90 I believe is capable of either manual or aperture priority exposure.  Use one of the two- aperture priority is a bit easier because the camera still meters for you.  Model photography, a type of "macro" or tabletop photography, has problems with depth of field.  Part of the model may be in focus but part blurry.  To eliminate this, set up a very high aperture.  The Nikon kit lens goes up to about f/32.  This will give you very good depth of field.  However, exposure will be very slow, which is why you need a tripod.

Do not use auto focus.  The camera computer is not smart enough to know what part of the model to focus on for maximum depth of field.  Pick a point about 1/3 of the way between closest and furthest point on model, and focus on that.

The Nikon kit lens is an excellent macro lens.  You will not need extra closeup lenses unless you build very small scale stuff.

Don Stauffer in Minnesota

  • Member since
    June 2010
  • From: Austin, TX
Posted by DoogsATX on Wednesday, July 27, 2011 9:54 AM

Following off what Don says, if you're up for it, try shooting in manual selection mode. I usually shoot aperture priority if I'm shooting the kids or something, but I get much better consistency with model shots if I'm controlling the aperture and shutter speed myself.

Also, not the D90, but some Nikons (and a surprising number of point and shoots) allow you to select focus points. My D300s has a 54-point AF system, and one of the modes allows me to literally move a little box around the screen and place focus exactly where I want it. That and the excellent viewfinder are pretty much the reasons I splurged up to that versus a D90 (though I think the new D7000 may support AF selection - I know it's got a big pentaprism viewfinder like the 300s).

Don't have much experience with the Nikon kit lenses. My D80 came with an 18-135mm several years ago, but I I quickly switched to a 30mm prime lens (about 45/46mm in 35mm equivalency). I use Nikon's excellent 35mm lens on my D300s most of the time, with a dedicated 60mm macro when I want to really get in close, but I prefer the 35mm for general model shots.


On the Bench: 1/32 Trumpeter P-47 | 1/32 Hasegawa Bf 109G | 1/144 Eduard MiG-21MF x2

On Deck:  1/350 HMS Dreadnought

Blog/Completed Builds: doogsmodels.com


  • Member since
    July 2010
  • From: Tornado Alley
Posted by Echo139er on Wednesday, July 27, 2011 10:24 AM

I created an inexpensive light tent, easy to make and very CHEAP!

Plus with this you can play with different lights (colors and angles) without them being too bright on the model surface.

Below is a sample of a picture I took using my setup.  Its not the best solution but when you are on a budget and don't have the greatest camera it works great.

  • Member since
    March 2011
  • From: Montreal, Quebec
Posted by wizardz on Tuesday, August 9, 2011 12:20 PM

joeviz

I created an inexpensive light tent, easy to make and very CHEAP!

Plus with this you can play with different lights (colors and angles) without them being too bright on the model surface.

Below is a sample of a picture I took using my setup.  Its not the best solution but when you are on a budget and don't have the greatest camera it works great.

https://lh4.googleusercontent.com/-E3h8GwtlfWs/TTZPEtYfsyI/AAAAAAAAAB8/z6p19MQBYPM/s400/100_4016_2.jpg


thanks for the link!!! will definitly try this!! up until now my pictures where all coming from my cellphone, but now that i have a DSLR, thats what was missing!


thanks again!

WIP: 1/48 Italeri A-10 Thunderbolt II

  • Member since
    July 2010
  • From: Tornado Alley
Posted by Echo139er on Tuesday, August 9, 2011 12:40 PM

If you read the comments folks left on the bottom of that link.  You will find one where they took it a step further.  They left the flaps on the box (camera side) in place and covered them in white/reflective material.  this allows you to adjust them to reflect light and reduce or create shadows.

You can also see other folks sample pictures using this inexpensive box. Good luck!

Oh yeah, don't forget to post some samples of your photos using this setup.  Big Smile

  • Member since
    January 2007
Posted by Gigatron on Saturday, August 13, 2011 11:15 PM

You already have 99% of everything you're going to need.  Go to you local Michael's or equivalent art supply store.  Look for a roll of plain, single colored paper (I believe they're 2'x10' rolls, for a few bucks).  Light greys and light blues are the best for this type of photography.  Then just get some daylight temperature bulbs (they can be purchased at most supermarkets).

Take your clamp lights and place one higher than the subject, and the other roughly level with the subject (a little higher is better than a little lower).  Take the backdrop paper and create a layout so that, from almost any angle, the paper is in frame.

Center the subject on the paper.  Now aim you high light so that it bounces off the backdrop and down on to the subject.  Aim your level light so that it bounces up, eliminating any shadows created by the high light . You never want to aim the lights directly at the subjecy, as you'll create hotspots.  In photography, it's better to under-expose, than over-expose.  When you over-expose, you kill the data in those pixels - there's no bringing them back.  With under-exposing, data recovery is a very simple process.

Now, with the D90, assuming you have a tripod, set it for Manual mode, center-weighted exposure, f/13-f/15 (depending on the lens you're using) and check the DoF, using the small button, under the lens, on the right hand side (if you're standing behind the camera). Set the shutter for timer delay and set the mirror for exposure delay (option d10 in the settings).  Using the metering display (looking through the eyepiece) adjust the shutter speed, until the meter zeroes out.

Your photo should be more "top down", in order to show off more of the model.  Find a focal point somewhere in the first 1/3 of the subject and focus on a point of high contrast.  The D90's metering system has a bit of trouble with focus on monotone colors and contrast.  Let the autoficus do it's thing, press the trigger and give it a few seconds.  Between the timer and the exposure delay mode, you should have an absolutely shake-free picture.

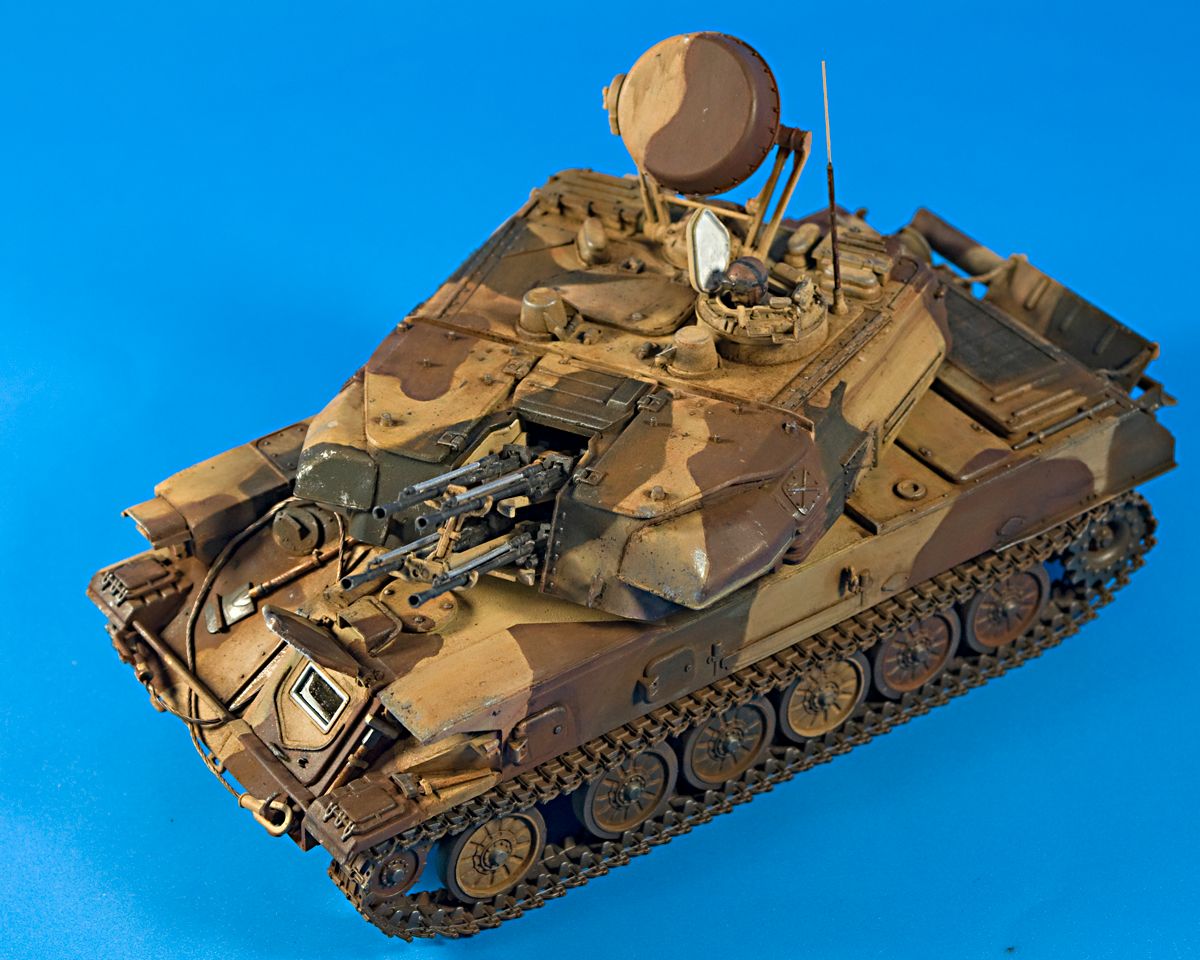
This one of the only pictures I have with the seamless backdrop (the rest were lost in an HDD crash)


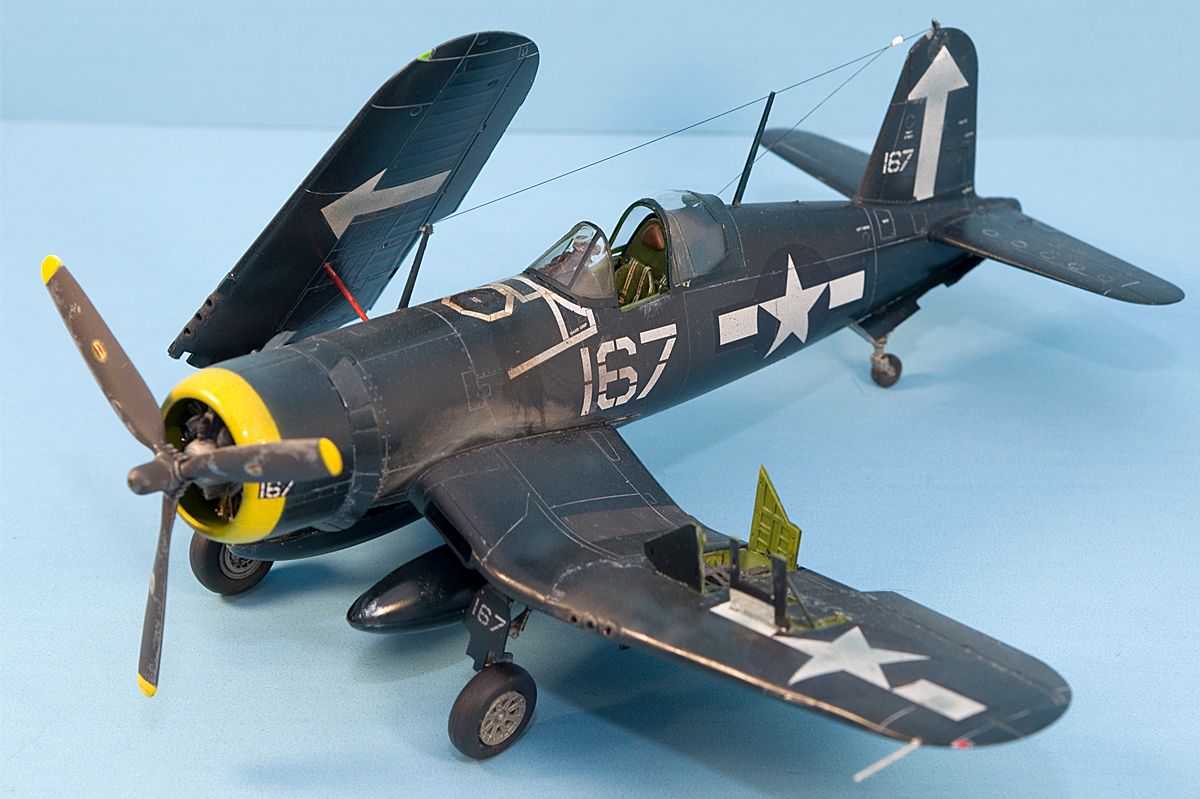
Here's an example with the old "2 foam boards" system.  Notice the distracting seam running through the model

-Fred


JOIN OUR COMMUNITY!

Our community is FREE to join. To participate you must either login or register for an account.

SEARCH FORUMS
FREE NEWSLETTER
By signing up you may also receive reader surveys and occasional special offers. We do not sell, rent or trade our email lists. View our Privacy Policy.