SEARCH FINESCALE.COM

Enter keywords or a search phrase below:

Hairspray white wash technique - it works!!

15947 views
9 replies
1 rating 2 rating 3 rating 4 rating 5 rating
  • Member since
    June 2009
  • From: Netherlands
Hairspray white wash technique - it works!!
Posted by kermit on Saturday, August 27, 2011 10:45 AM

Hey guys,

Picked up another Trumpy KV-2 today, my third....Embarrassed I just love this kit.Smile But this time i am contemplating doing a winterized white wash on it.

Browsing through pictures of white washed armor i tend to like the ones done with the so called hairspray technique...

Could someone please give me a hairspray 101? Any links...tips....sites? At this point i dont know anything about how this technique is implemented...

Thanks alot in advance peopleWink

Richard

"Success is the ability to go from one failure to another with no loss of enthusiasm." - Sir Winston Churchill

  • Member since
    April 2009
  • From: Carmel, IN
Posted by deafpanzer on Tuesday, August 30, 2011 12:16 PM

Bumping up... I'd like to know about this too because I am planning to do the same on my next build StuG III.  Maybe we should post this in Armor forum too?

Andy

  • Member since
    February 2007
Posted by mitsdude on Wednesday, August 31, 2011 2:23 AM

Youtube is your friend.    http://www.youtube.com/watch?v=7CNFdEZnQN8

  • Member since
    April 2009
  • From: Carmel, IN
Posted by deafpanzer on Wednesday, August 31, 2011 9:33 AM

Thank you mitsdude!  There were several great clips about hairspray.  Now I want to try it on the muffler of my current build Panzer IV...


Andy

  • Member since
    August 2006
  • From: Arkansas
Posted by K-dawg on Wednesday, August 31, 2011 9:57 AM

I have done this technique a number of time for various things and feel like I have a good grasp on it. It's deceptively simple and takes some practice but can be mastered in no time.

Step one: Base color, This is your basic vehicle color. You can go ahead and weather it a little (fade, pin wash, ect) This will add another layer of realism to your paint job. The type of paint you use isn't important. I tend to use Tamiya paint thinned with lacquer thinner for my base colors because of the smooth finish.

Step two: is optional, you can add a clear coat to protect your base color and weathering but it's not absolutely needed.

Step three: Spray a couple of light coats of hair spray over the model. Keep the coats as even and light as possible. I have experienced some issues from a to heavy application. You can spray right out of the can or decant the hairspray into your airbrush for even more control. It's up to you.

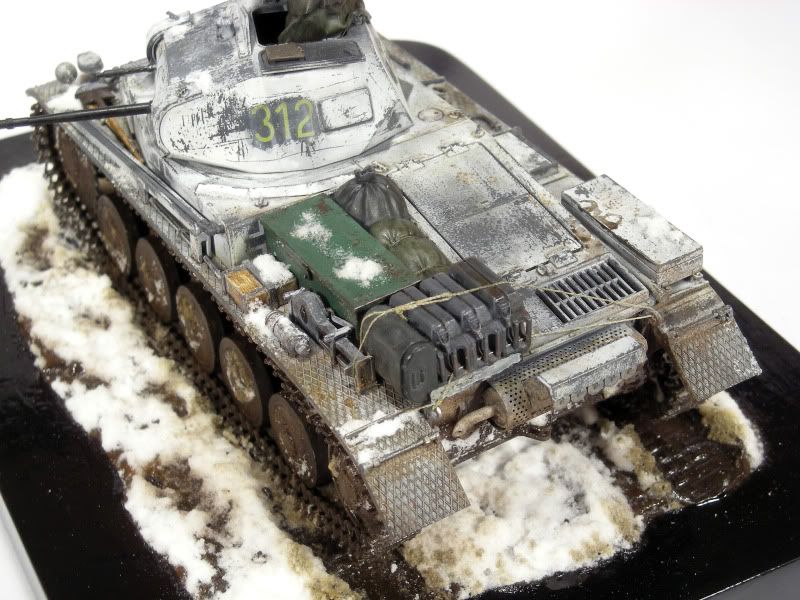
Step four: Your top color or secondary camo color. Tamiya acrylics thinned with water preform the best. It is possible to use Life Color with success and to a lesser degree Vallejo but I would stick to Tamiya. It produces much finer chipping and flaking. For your purposes of doing a white wash you can give yourself a head start with the next step by varying the density of the white paint coat. DON'T flood the surface with wet paint or you will disrupt the Hairspray. I have had issues with it cracking on it's own because of this. Your top color needs to be thin and dry as possible using multiple layers. As i was saying before. If you know you want a lot of the white was say worn off the glacis plate then just apply the white paint thinner there to give yourself a head start. Take a look at my Tamiya Pz II as an example.
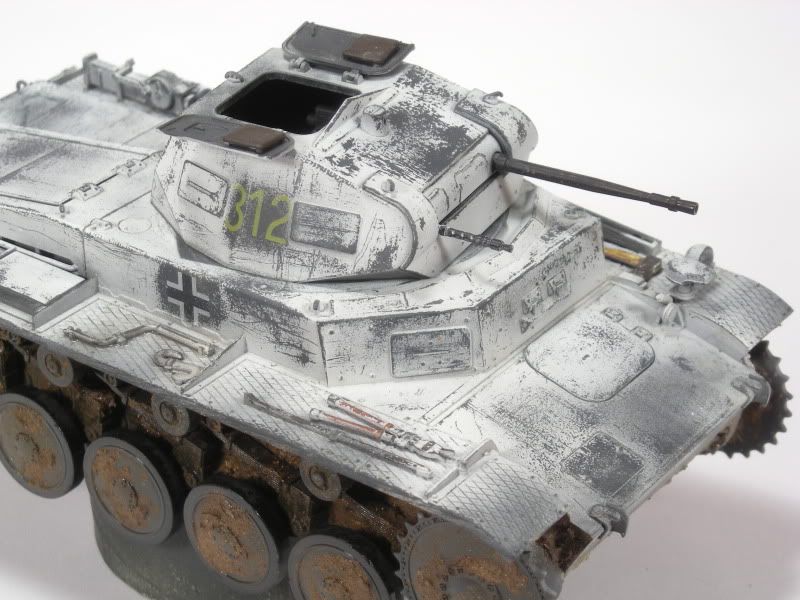
The areas of thinner white such as the glacis and around turret numbers were intentionally painted that way. The white will flake off in finer pieces the thinner the paint is. It makes for a beautiful worn effect.

Step 5: Take various short brushes and some water and begin GENTLY wearing away the white paint. You don't need to slosh water onto it, it may take a few seconds but a damp brush will start desolving the hair spray and thus the white paint... Be specific and thoughtful about where you remove paint. You can also use instruments such as toothpicks and wire brushes for various other effects.

Step: 6: If you are done with the hair spray portion of the paint job you can clear coat it to protect it but it's not strictly necessary. If you use water bases weathering agents then YES clear coat it but if you use oil paints or enamels for washes and such you don't have to. Enamel thinner will not desolve the hair spray further. If you are unsure then go ahead and clear coat it with a gentle overspray of flat or satin clear.

Step 7: Weather as usual

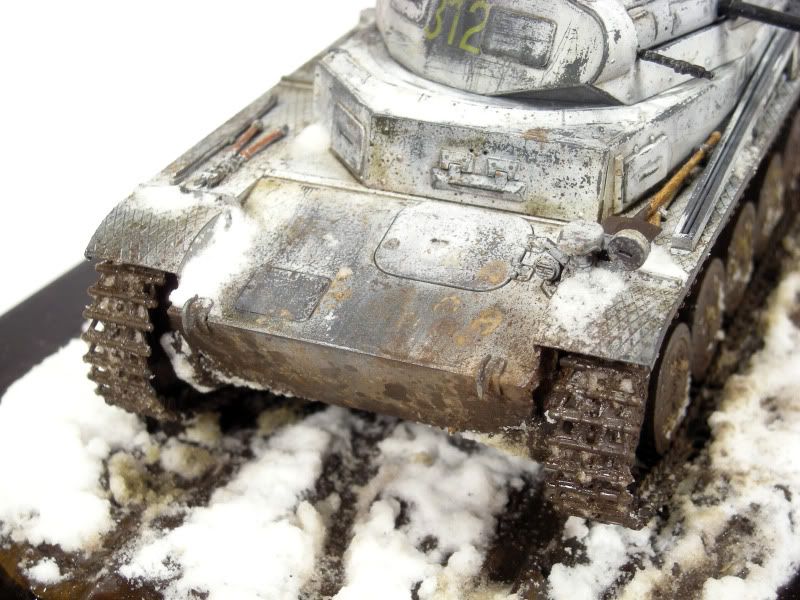
See finished Pz II
 

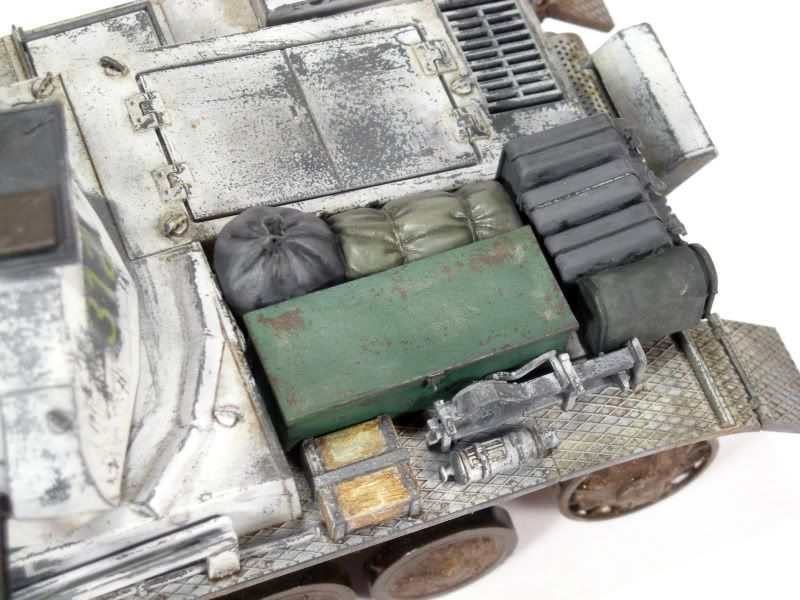
For more options, You can weather individual pieces with the HS technique as well. This green box was done that way by spraying a dark rusty color on first then HS and then the green. I cut it back with a damp fine brush.
 

I used the HS technique in MULTIPLE layers on this Croat M-47. Each camo color, chip color and degraded paint layer was done with the HS method.
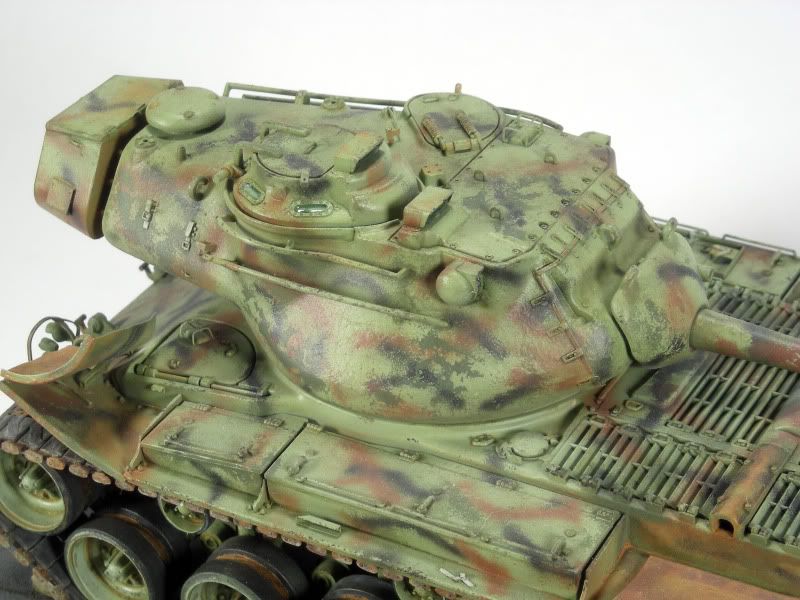
 

I hope this answers your questions. I'll be happy to elaborate on specific things if you want.

Kenneth Childres, Central Arkansas Scale Modelers

  • Member since
    June 2009
  • From: Netherlands
Posted by kermit on Wednesday, August 31, 2011 11:23 AM

Mitsdude, K-Dawg,

Thank you both so much for clearing all this up. Watching some video's and reading through K-dawgs elaborate tutorial (thanks!) i think i know enough to give it a go.

Theres just one thing bugging me that i dont get...

You are supposed to use water to apply to the top coat before you start scratching and brushing away... But how does the hairspray dissolve if the top coat is opaque?? Shouldn't the top coat block the water from reaching the hairspray or am i missing something?

Richard

"Success is the ability to go from one failure to another with no loss of enthusiasm." - Sir Winston Churchill

  • Member since
    August 2006
  • From: Arkansas
Posted by K-dawg on Wednesday, August 31, 2011 12:31 PM

Richard, The water will soak through the top layer no matter how thick it is because it's acrylic. You aren't really dissolving the top coat with this technique. You are instead dissolving the hair spray barrier that it is sitting on which in turn removes the paint on top.

One thing I forgot to mention. It doesn't really apply hear because of the nature of a white wash but if you were doing a different kind of chipping (say like the camo on my M-47) you should keep some tissues around to soak up the "slurry" that forms from scrubbing the paint away. If you leave the slurry on, even small amounts it will dry and stain the colors with a haze of sorts. On a white wash that's ok and even a little desirable because white wash for the most part is a water soluble paint in real life so the same effect would happen there. Does that make sense?

Kenneth Childres, Central Arkansas Scale Modelers

  • Member since
    June 2009
  • From: Netherlands
Posted by kermit on Sunday, September 4, 2011 4:51 AM

Hey guys,

Been experimenting away with my KV and this is what came out just now. I am not done by a long shot but i was so excited i wanted to share my accomplishments with everyone interested:

After spraying the initial russian armor green and adding a dab or rust paint here and there i coated with gloss, waited overnight....coated with the hairspray....left it overnight again before misting on an irregular flat white.  Just now i started brushing away with a very stiff short brush....

Initial conclusion is that using a softer brush should give softer chipping effect and waiting for half a minute after you brush on some water makes it really easy to wipe away.

Thanks to all who helped me get into this technique!Bow Down I will most certainly use it more in the future as it gives a very realistic worn/ chipped effect.

Richard

"Success is the ability to go from one failure to another with no loss of enthusiasm." - Sir Winston Churchill

  • Member since
    December 2002
  • From: Bury St Edmunds, Suffolk, England
Posted by Bish on Sunday, September 4, 2011 5:36 AM

Deffinatly want to try this method at a later date. Glad you had success with it Richard

I am a Norfolk man and i glory in being so


On the bench: Airfix 1/72nd Harrier GR.3/Fujimi 1/72nd Ju 87D-3

  • Member since
    August 2006
  • From: Arkansas
Posted by K-dawg on Tuesday, September 6, 2011 8:39 AM

You did a good job. I would suggest not using a gloss under the hairspray though. I'm sorry if I wasn't clear in that respect. A flat or at the most an egg shell (semi-gloss) is all you want. The Hairspray and white need something to bite into to help produce the small chips. The gloss is probably why it came off in large patches. A softer brush may not do what you think. It will take more water for a soft brush to do the same work thus softening the HS further. I think you'll find that less water and a stiff brush will give you the smaller chips. Again though. I'd suggest a clear flat over your base colors rather than a straight gloss.


Excellent work over all Kermit!

Kenneth Childres, Central Arkansas Scale Modelers

JOIN OUR COMMUNITY!

Our community is FREE to join. To participate you must either login or register for an account.

SEARCH FORUMS
FREE NEWSLETTER
By signing up you may also receive reader surveys and occasional special offers. We do not sell, rent or trade our email lists. View our Privacy Policy.