SEARCH FINESCALE.COM

Enter keywords or a search phrase below:

Waterline Blues? Build that bottom!

681 views
1 replies
1 rating 2 rating 3 rating 4 rating 5 rating
  • Member since
    January 2021
Posted by PFJN2 on Sunday, February 27, 2022 5:07 PM

Hi,

That not a bad isea and with a little care and understanding of what typical underwater hulls normally look like you could probably come up with a very reasonable approximation.

One smallissue that I have found on some full  hull kits, is in way of the stern.  Usually it is vary minor but sometimes, like on the Airfix HMS Tiger cruiser model and the Aurora USS Iwo Jima kit it appears that they taper in the hull just a little too much right brefore the stern, so that the design waterline ends up with a small "inflection"in it right before the stern, or even a "small tail shape" like shown below.

Waterline ShapAft

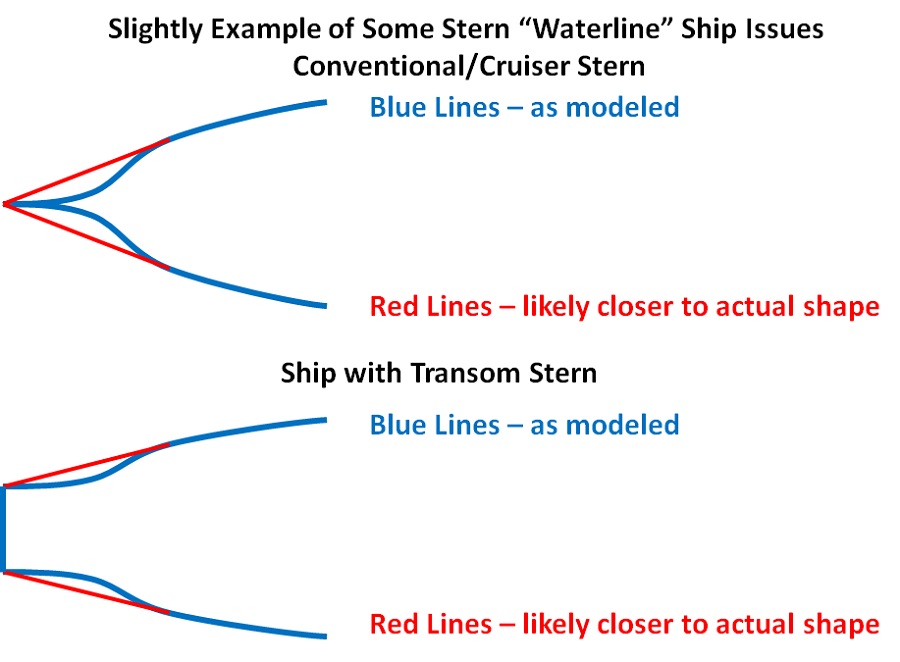
Usually, the inflection is so small on most models where I have noticed it that you can ignore it, and probably no one will notice, though you can also probably fill the inflection in with putty if you want to.  And if you are making the underwater hull from scratch it is ususally pretty simple to "fill in" the shapes there just a little to make the waterlines a little more (hopefully) "realistic" looking (I believe).

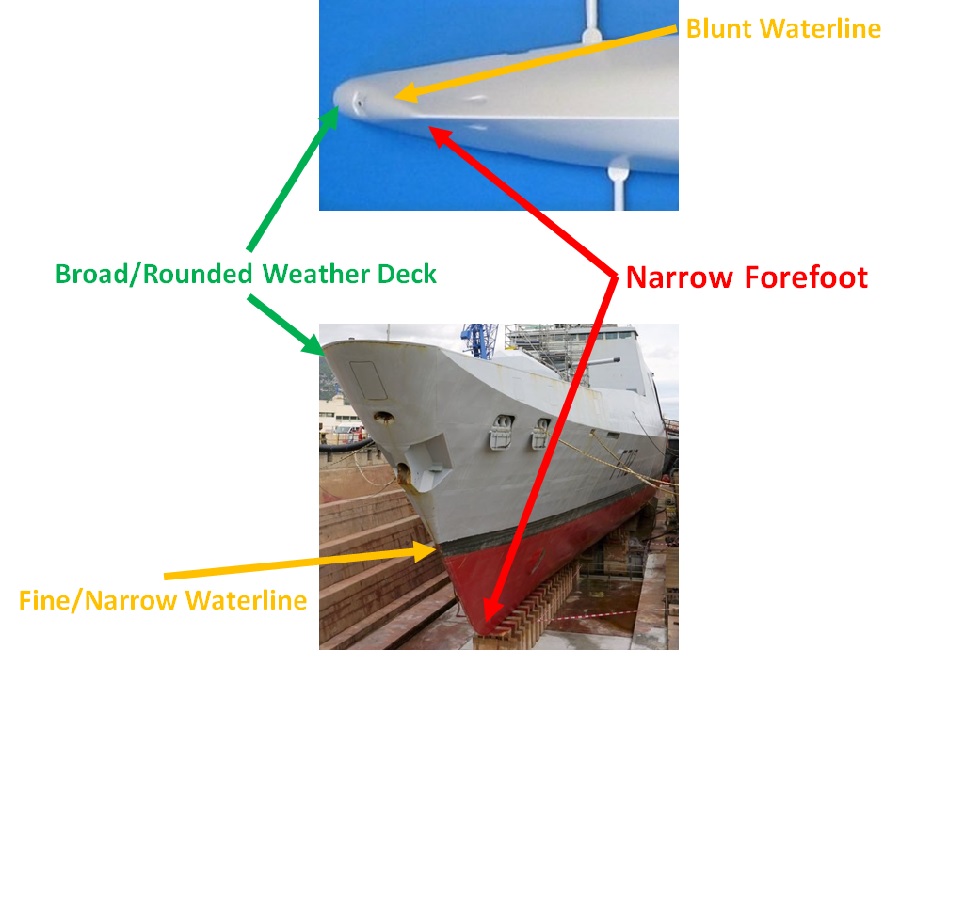
On the topice of models with potentially unrealistic underwater hulls, other than the Revell Flat Bottom models that you mentioned, the most unrealistic under water hull that I have seen on a kit recently is on the Heller 1/400 scale La Fayette class frigate model.  In profile and from the stern the shapes look reasonable but from any other angle you can readily see issues.  I don't know if they were in a rush to get the ship kitted (i heard another company was working on a reisn kits at the time but cancalled their plans when Heeler came out with their injection model kit.  

If you look at the bow, on the La Fayette, like most other concentional displacement hulls, the waterline will come to a fairly narrow shape before being rounded off (or more correctly I guess, tapered off in a very small elliptical shape).  On the Heller Kit though they do a fairly straight tapering of the bow shape from its fairly rounded deck down to the forefoot, leaving the "design waterline" end being very blunt, as shown below.

Bow

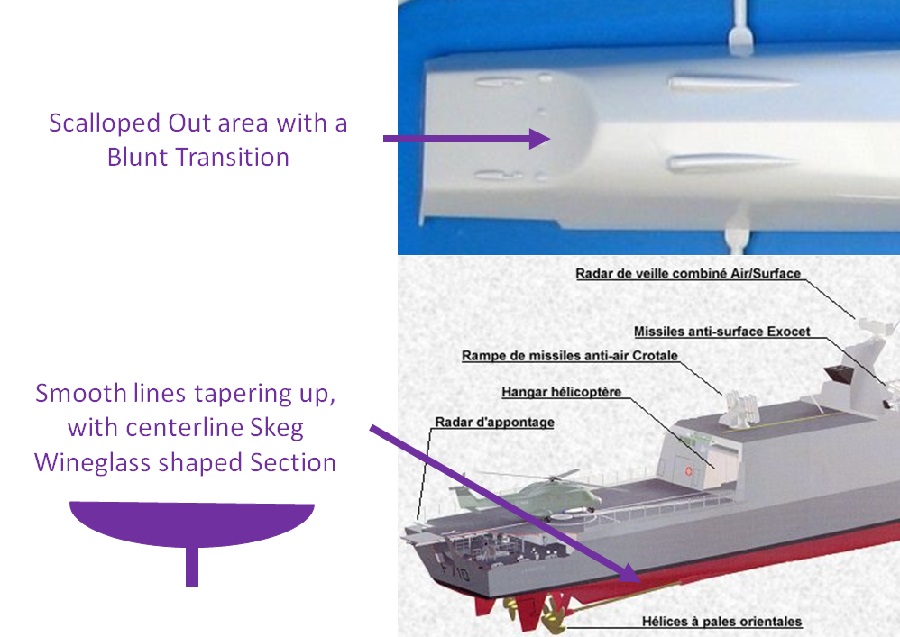
Near the stern the mold makers appear to have gotten the profile correct (showing a skeg) bu they appear to have just kind of "scalloped out" the rest of the stern aft of that, so that instead of a "skeg" they underwater hull is just very wide at one point and then just gets chopped away, as shown below.  From information that I have seen on the La Fayette as well as other similar ships the "sections aft here should really look more like a "wine glass" with a broad upper section and a narrow lower "stem"/skeg.

Stern

Sorry, hope  I didn't  derail the intent of your post.

Pat

  • Member since
    October 2019
  • From: New Braunfels, Texas
Waterline Blues? Build that bottom!
Posted by Tanker-Builder on Saturday, February 26, 2022 7:37 PM

Hey ya'll;

         Been readin all over da place and caught more comments on the Full Hull/Waterline Hull dilemna. What I started doing out of disgust . Thet is doing some research and getting a publication of ships and (At the Library) check for waterline and bottom drawings. Then I copy that page and take my little jewels home and anlarge them to the size I need.

         YUP ! this gives me the keel profile.That coupled with a few pieces of Donut Box( The Non Greasy side) I create frame patterns right on the ship. Now of course my education covered this part of ship design. So I just use common sense for above the waterline, but if the ship had an anti-Torpedo bulge it would be a flin ledge just above the waterline.In 1/350 a wee bit more.

           This feature would fade at the beginning of the Bilge curve.The curve of the ship from side to bottom. Bill Morrison and a few others know where I refer to. Revell's bottoms ( where they had them) are grossly innacurate where that curve is concerned.Especially on their warships! Trumpy gave us a good option with the U.S.S. North Carolina.But their instructions for that left me wondering where they had their heads when they edited it!

            You never build the upper works, then install the bottom! I hope this didn't carry over to their 1/700 models for goodness sake! This could result in some upset modelers! Try the Keel Frame build method.You can skin the bottom with strips( Evergreen H.O scale 2x4 and 2x8 strips set the edges well and you won't have to sand much . The biggest help is the bottom, if built Off the ship and then relocated to the hull will allow you to strengthen the seams with thin dribbles of Sproo-Gloo.

           The method is simple. Locate a .020 keel shape and make sure you install a few locator pins ( plastic) that keep it in a straight line. Make your frame patterns. Then remove the keel. Remove the locator pins after you have cut and numbered all the frames from the bow to stern( Both sides.) The numbering goes as follows Port bow 1, Starboard ( same frame) 2 and so on. The frames at the stern will come the last standard frame like a sunburst pattern gradually moving from center to full stern.

            Try it, You'll like it! Because with the locator pins removed the part touching the table will be perfectly straight.Especially if you build it on a piece of Glass( the one you use for other modeling will work.)


JOIN OUR COMMUNITY!

Our community is FREE to join. To participate you must either login or register for an account.

SEARCH FORUMS
FREE NEWSLETTER
By signing up you may also receive reader surveys and occasional special offers. We do not sell, rent or trade our email lists. View our Privacy Policy.