SEARCH FINESCALE.COM

Enter keywords or a search phrase below:

Drying box

2110 views
7 replies
1 rating 2 rating 3 rating 4 rating 5 rating
  • Member since
    November 2009
  • From: Twin Cities of Minnesota
Drying box
Posted by Don Stauffer on Tuesday, April 15, 2014 3:09 PM

I've had several questions about the dryer box that I built, so I thought I'd just take a couple of photos to explain it. I never completed drawings.  I start to, then found I could complete the box by winging it.  It is about 13 x 18 inches, sized to fit one of those plastic cases we take our models to shows in.  The box is mounted upside down from the normal position, so the main part becomes a cover, and I only use the lid to hold the box in the right place.

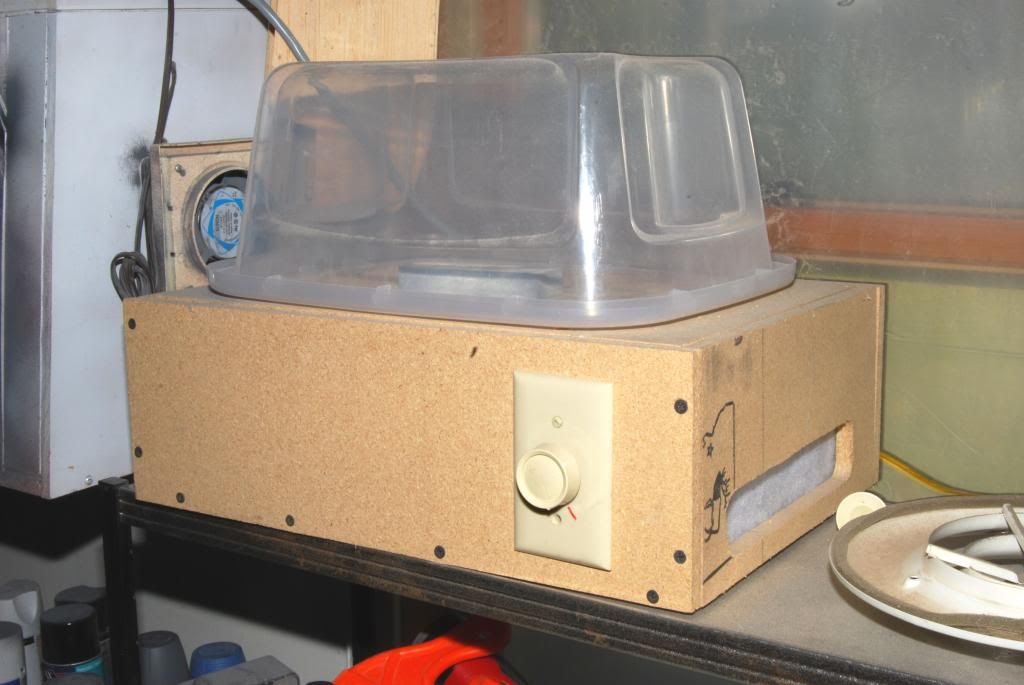
This is an overall shot of the dryer.

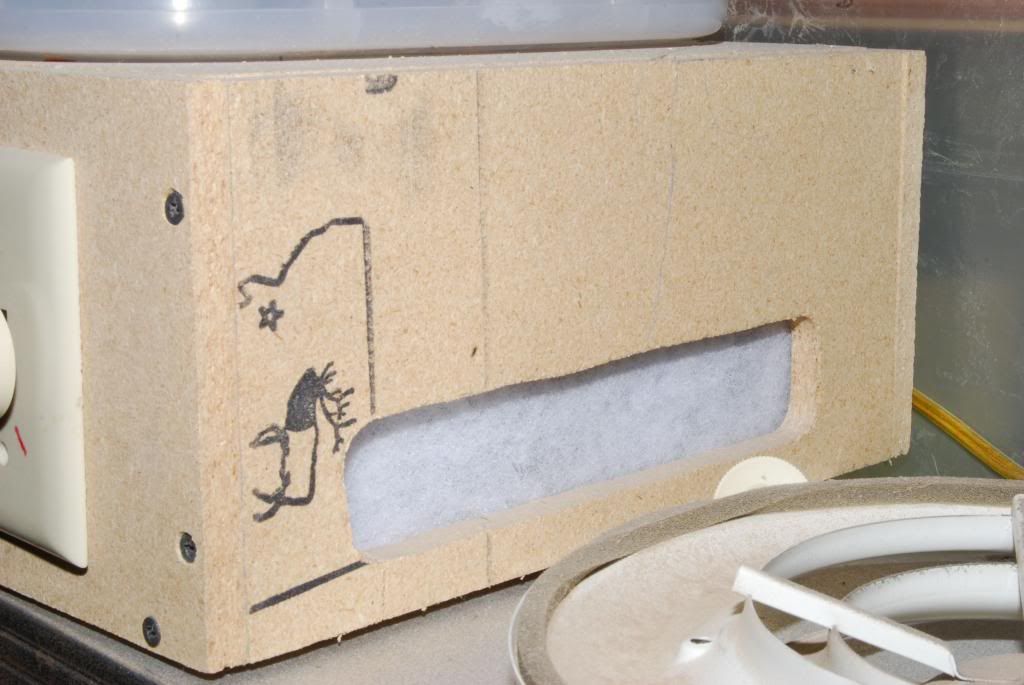
This next shot shows the opening I cut in one end of the box, to allow air to circulate into t he box.  The opening is covered with one of those cloth filters you buy to stick in your hot air registers to filter out dust.  We don't want dust making its way into the top chamber.

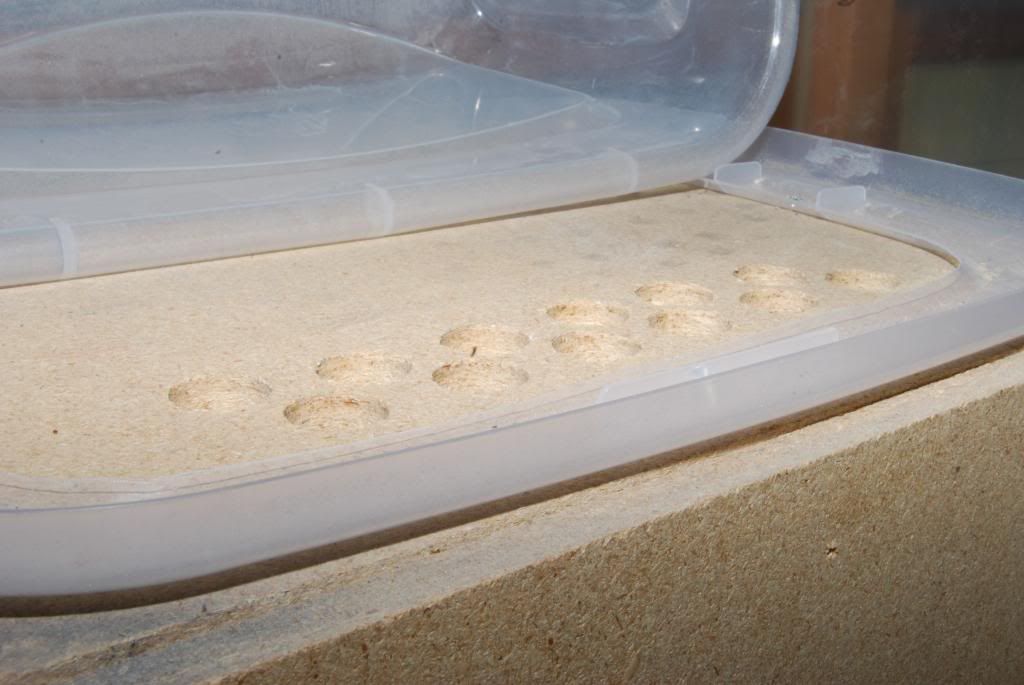
This shows the upper chamber, and how the lid of the storage box has its center cut out to allow heated air to flow up from the lower chamber.  Air flow is by convection- no fan needed.  The holes cut in the top of the lower box allows warm air to rise into the upper chamber. Again, one of those register filters is taped underneath the holes.  There is also a hole drilled in the top of the upper chamber (was the bottom of the storage box), which is also covered by a filter.  The filters are to prevent dust from my workshop (it is pretty dusty) to get onto the drying model.

I have had a few questions about how the light bulb is mounted. It is mounted to one of those porcelin light bulb sockets, which just screws down to a surface.  There are two screw contacts to attach electric wires to. I bought a lamp cord with plug attached, and ran it through a hole in end of box.  The ends of this are attached to the socket.  I seperated the wires, and cut one of them to hook it up to the switch/dimmer. I thought I would need a dimmer to get it to the right temperature, but that is not needed- with a 60 Watt light bulb it runs at 105F.  That is just about what I was shooting for, so a simple wall switch could substitute for the dimmer with switch.  I would not attempt this project if you are not familiar with electrical wiring, because a mistake in wiring can create a serious hazard, both shock and fire.

Don Stauffer in Minnesota

  • Member since
    August 2007
  • From: back country of SO-CAL, at the birth place of Naval Aviation
Posted by DUSTER on Thursday, April 17, 2014 8:19 AM

Well Done Don.

The incandescent heat and convection process are simple and reliable.  Good job of using nature to do the work instead of extraneous gizmos and "hi tech" gadgets   

Steve

Building the perfect model---just not quite yet  Confused

  • Member since
    September 2013
  • From: San Antonio, Texas
Posted by Marcus McBean on Thursday, April 17, 2014 9:39 AM

Don, so simple and practacial. I been keeping the dust off by laying a towel over the paint booth until the everything is dry.  I hope you don't mind if I copy it.

  • Member since
    November 2009
  • From: Twin Cities of Minnesota
Posted by Don Stauffer on Thursday, April 17, 2014 10:31 AM

Nope, that is why I posted it.

Don Stauffer in Minnesota

  • Member since
    January 2014
Posted by ssrc30 on Thursday, April 24, 2014 8:20 AM
Do you have a photo of the inside of the box? I'm interested to see how you've set things up in there.
  • Member since
    November 2009
  • From: Twin Cities of Minnesota
Posted by Don Stauffer on Thursday, April 24, 2014 9:20 AM

No, I don't.  Too busy to do one at the moment (I am laying a new floor in part of upstairs.  However, it is just a basic box with the lamp socket screwed to the floor, and a switch mounted to one side- bulb wired through switch with cord coming through hole in side.

Don Stauffer in Minnesota

  • Member since
    December 2011
Posted by Chrisk-k on Thursday, April 24, 2014 1:56 PM

@Don,

Where did you get the wooden box?  I'd like to improve my primitive dry booth consisting of only a Rubbermaid container.

Iwata HP-CS | Iwata HP-CR | Iwata HP-M2 | H&S Evolution | Iwata Smart Jet + Sparmax Tank

  • Member since
    November 2009
  • From: Twin Cities of Minnesota
Posted by Don Stauffer on Friday, April 25, 2014 9:31 AM

Made the box from particle board.

Don Stauffer in Minnesota

JOIN OUR COMMUNITY!

Our community is FREE to join. To participate you must either login or register for an account.

SEARCH FORUMS
FREE NEWSLETTER
By signing up you may also receive reader surveys and occasional special offers. We do not sell, rent or trade our email lists. View our Privacy Policy.