SEARCH FINESCALE.COM

Enter keywords or a search phrase below:

Final Details: What's your PSI -- and why?

8395 views
7 replies
1 rating 2 rating 3 rating 4 rating 5 rating
  • Member since
    August 2007
Posted by Mark Hembree on Monday, June 22, 2015 11:16 AM

Thanks, Patrick. For attribution, can you tell me your name and where you're from? Regards, Mark Hembree, mhembree@finescale.com

Mark Hembree Associate editor, FSM
  • Member since
    October 2007
  • From: Scotland
Posted by Milairjunkie on Tuesday, June 16, 2015 1:09 PM

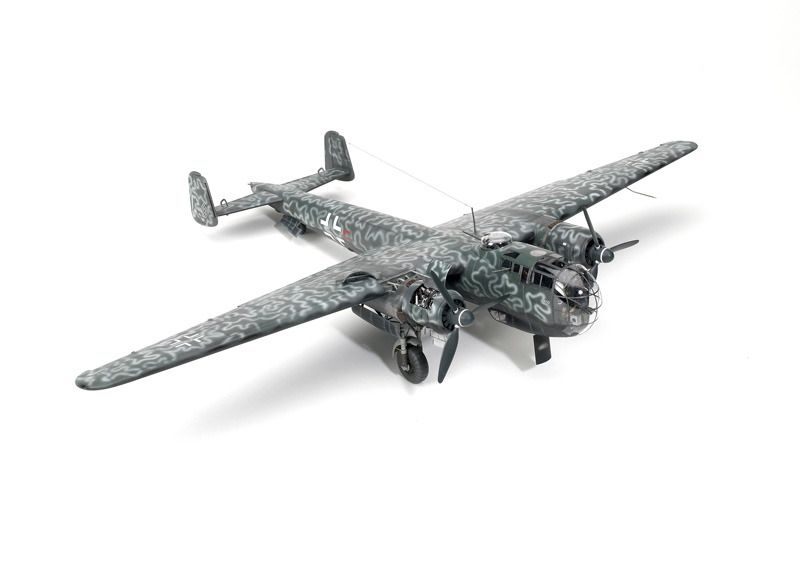
The majority of my airbrushing is done in the 15>20psi range with the exception of some work, like Bryans pattern on the Do 217 being done in the 40>50psi range;

I almost exclusively use Tamiya acrylics at 15>20psi thinned with X-20A at somewhere between 50:50 > 35:65 (paint:thinner) - the variation in ratio is generally colour specific due to differing pigmentation rather than anything task specific. The only other paint I use is Alclad, which I usually spray at around 15psi as it atomizes easily.

The only occasion that I will alter pressure to any degree is when I'm looking for fine lines / small detail with the minimum of overspray, where I will go up to 50psi. I appreciate that this goes against the traditional of low pressure for fine work, but I've found that higher pressure creates considerably less overspray. I assume this is because

1) The higher pressure optimises atomisation, which the traditionally used lower pressures may not

2) The higher pressure in the cone of air coming from the airbrush controls the paint pattern more tightly than lower pressure, almost acting like an air curtain.

3) Any paint that does spread into the air cone will dry very quickly due to the high air pressure & fine atomization (this is the paint that would normally cause overspray), but as it's so fine & dry it doesn't cause much if any issue with the finished job as it doesn't want to stick to the subject & the vast majority is carried away in the turbulence created in the higher pressure air cone.

Initially thinking that high pressure for fine work was the reverse of what I had expected I messed about & did some comparative testing, this was done from the same batch of identically thinned paint & with a distance cap fitted to the airbrush to keep everything as equal as possible, only the pressure being adjusted. This picture isn’t great, but the finer, cleaner line that the airbrush has stopped on was at 50 psi, the broader more over sprayed ones at 20ish;


Tricks;

In areas that can be difficult to get an decent or even paint coat on without flooding the surrounding area (like recessed areas or the internal joins & corners of a small box such as a landing gear bay),  I will build up paint in the corners with high pressure (40>50psi) – a couple of passes to lay down some paint, followed by a few passes of air only to surface dry the paint, so on & so forth to build up coverage (finger stays down constantly for air, going back/forth for paint as required), once the corners are painted normal painting at normal pressure resumes for the remainder.

  • Member since
    January 2006
  • From: NW Washington
Posted by dirkpitt77 on Saturday, June 13, 2015 1:20 AM

I use 15psi for everything.

Horseshoes and hand grenades, amirite?  LULZ

    "Some say the alien didn't die in the crash.  It survived and drank whiskey and played poker with the locals 'til the Texas Rangers caught wind of it and shot it dead."

  • Member since
    November 2008
  • From: Central Florida
Posted by plasticjunkie on Tuesday, June 9, 2015 7:25 AM

My psi is not set in stone. It depends on the application and paint being used. I try to stay away from acrylics but when I air brush them, I find that a higher psi is needed to get a good flow, usually 18-20's. For just about 95% of my air brushing is done with MM enamels thinned with paint thinner (quart size metal can)  from Home Depot.

Gloss paints I thin I would say 60-40 thinner/paint to get smooth glassy coverage and a psi of 10-12 or so. When spraying mottling as in German WWII schemes, I use a Badger Renegade gravity AB with an X-tra fine tip. The paint is heavily diluted  (70-30 or so) and the psi is reduced to 5-8 till I get the effect I'm after, getting in real close.

Here's an example of that low psi and heavily thinned paint on an Eduard late war 1/48 Dora-13. This particular scheme called for mottling all over the top and sides. I even had some silvering in the fuselage crosses and was able to spray over the decal carrier film to do away with the ugly silvering. Any slight over spray on the crosses were removed with a fine brush dampened in thinner.

The gun hood in the picture is a replacement made out of wine bottle foil because the kit's hood was too thick and out of scale.


 GIFMaker.org_jy_Ayj_O


Too many models to build, not enough time in a lifetime!!

  • Member since
    November 2009
  • From: Twin Cities of Minnesota
Posted by Don Stauffer on Friday, May 29, 2015 9:22 AM

I use 15 psi for gloss paint, 20 for matt.  I like low pressure for gloss paint as I can apply it quite wet without danger of runs.  If I use higher pressure and build up a thick (wet) coat, the airflow seems to push the paint around and promotes runs.  For matt paint I like a little more distance from surface, which calls for a bit higher pressure.  The paint seems to go on dryer, looks more matt, and more uniform because I am covering a bit larger area.  Much above 20 and I seem to risk a rough finish.

Don Stauffer in Minnesota

  • Member since
    March 2013
Posted by patrick206 on Thursday, May 28, 2015 8:17 PM

First, I thank wbill76 for a clear, well written response, I agree very much with his text. I use a variety of airbrushes, but primarily use the Badger 100G double action and 200G single action, with different size needle/nozzle sets as needs dictate. Mostly MM enamels, some Tamiya or Vallejo acrylics, even less Alclad ll.

I second the variables related to PSI, regardless of the paint type I generally spray between 12 and 18 PSI. For fine detail freehand camo with thinned MM enamel, I would likely use around 12 to 14 PSI, for Alclad and other extremely thin types as low as 10 to 12, for multiple light coats. Primers and single color base coats perhaps as high as 16 to 18 PSI.

Wbill76 nailed it in my view, I find temperature, paint type, needle size and particular job I'm doing, will determine how much pressure to use. Often I might somewhat ignore the gage and just rely on my test spray results, adjusting that value until I see the effect I'm looking for. Probably a rather sloppy way, but unless paint/thinner/additives are PRECISELY measured at mixing time, it seems a consistent PSI across the board would not be practical.

Thanks for putting this together, I see the potential for lots of good information to get flowing.

Patrick

  • Member since
    July 2004
  • From: Texas
Posted by wbill76 on Thursday, May 28, 2015 11:54 AM

I work almost exclusively in enamels and the PSI settings I use are largely dependent on three factors:

1) How thin the paint mix is

2) How broad or fine the coverage is I need (this dictates the nozzle needle I use which in turn influences the PSI)

3) Limitations on my 1/8 HP compressor w/moisture trap combo since it doesn't have a storage tank and caps out at 25 psi as a result

I should also note that I use an Aztek A470 (metal body) airbrush with interchangeable nozzles and the nozzle types have different 'ranges' of PSI they are rated for, so that is the main driver under #2 outlined above.

For base coat, primer coat, and other general applications I tend to paint at around 20-25 psi and rely on the double-action settings with the airbrush to get the desired paint flow with the trigger. For fine line or  camo applications I use finer nozzle tips and drop the psi down to around 10-15 psi and again adjust with the double-action settings to get what I'm after.  

I'll be honest and say that I don't devote a lot of precise attention to the psi setting, I've found that the paint/thinner ratio, nozzle/needle diameter, and spraying distance from the subject are the 'three amigos' when it comes to getting predictable and consistent results out of my airbrush when using enamels.  Wink  

For example, the line camo on this Tiger I Late was done freehand with a fine diameter tip at around 10-15 psi:
  • Member since
    August 2007
Final Details: What's your PSI -- and why?
Posted by Mark Hembree on Thursday, May 28, 2015 10:11 AM

Final Details: What’s your PSI — and why?

BY MARK HEMBREE

Bryan McDermott airbrushed the squiggly “wave mirror” pattern on his 1/48 scale Do 217K-2 (loosely based on the Monogram Pro Modeler kit), mixing automotive paints for RLM 76. The blend was about 95 percent thinner — and he sprayed the pattern freehand at 40 psi. (Do not try this at home.)


In the July 2015 FineScale Modeler, our “Final Details” column polled several editors here at Kalmbach Publishing Co. on their airbrushing habits — in particular, what pressure settings they customarily use, and why.

As with most airbrushing questions, this one received varied answers and differing opinions. I suspect that, when it comes to airbrushing, everyone goes as much by experience and feel as by the numbers. As skilled as the modelers may be, getting them to tell you exactly how or why they do what they do is a little like asking them to tie someone else’s tie.

Still, it's a useful and enlightening question — and, since everyone is obviously entitled to an opinion on this matter, it's time we ask you, the reader, to chime in.

So, tell us: What air pressure do you use for most airbrushing, and what psi settings do you assign to specific tasks such as pre- or post-shading, weathering, fading, etc.?

Please note:

• Whether you use acrylic paints, enamels, or lacquers

• What your usual setting is for each type of paint

• For what applications would you change those settings?

• Any personal tricks or practices involving air pressure

You may respond right here or e-mail me at mhembree@finescale.com. And, if you like, send along a high-resolution image of one of your models as an example.

If we quote you or use an image you sent, you'll see it in Final Details in the September 2015 FineScale Modeler.

We’ll need your answer by June 15. We look forward to hearing from you!

Mark Hembree Associate editor, FSM
JOIN OUR COMMUNITY!

Our community is FREE to join. To participate you must either login or register for an account.

SEARCH FORUMS
FREE NEWSLETTER
By signing up you may also receive reader surveys and occasional special offers. We do not sell, rent or trade our email lists. View our Privacy Policy.