SEARCH FINESCALE.COM

Enter keywords or a search phrase below:

Canopy painting

2561 views
5 replies
1 rating 2 rating 3 rating 4 rating 5 rating
  • Member since
    April 2020
Posted by Eaglecash867 on Monday, December 21, 2020 8:00 AM

Glad I could help, CliveEH.  I worked a little too quickly dabbing up the scraps of Blue Tack on this one and hit the big Wild Weasel badge on the right side of the fuselage with it.  Ended up tearing a pretty good chunk out of it.  The 1/32 scale version of the decals is no longer in print, so I had to improvise by up-scaling a 1/48 scale version.  Just be really careful about inadvertently touching decals with the stuff.

Had to do a quick canopy reattachment the other day on my first model after a 25 year break, a Tamiya A-10A.  With a bright light and magnifier on it, I was reminded of why I started using Blue Tack to seal the canopy before painting.  Lots of my simulated chromate primer snuck in and left a really fine splatter on the inside of the canopy.  Can't really see it without the bright light and magnifier, but its there.

"You can have my illegal fireworks when you pry them from my cold, dead fingers...which are...over there somewhere."

  • Member since
    November 2009
  • From: Twin Cities of Minnesota
Posted by Don Stauffer on Monday, December 21, 2020 7:27 AM

I often use blue tack too, especially when I intend to display with canopy or door open.

Don Stauffer in Minnesota

  • Member since
    September 2020
  • From: UK
Posted by CliveEH on Sunday, December 20, 2020 2:59 PM

Thank you Eaglecash867   This looks superb. I like the Blue Tack idea. I'm someway off a two colour exterior (!) Just finished the Airfix 1/72 Spitfire 1a that I did purely for canopy practice. Not quite where I want to be at the moment. It looks a bit of an 'add on' rather than integral

  • Member since
    April 2020
Posted by Eaglecash867 on Thursday, December 10, 2020 8:15 AM

Canopies are probably the only thing that I don't prime, due to the fact that the first color you put on the canopy is going to be visible from some angle.  Using the F-16 I'm building as an example, I started off by masking the front and rear canopies inside and outside for my first color, which is Tamiya X-18 semi-gloss black.  The inside of the real-world F-16 is black, and then the outside has kind of a rubber seal around the perimeter which is also black.  Once that was done, I left the masking on the inside (a combination of Tamiya vinyl tape on the edges of the frame, and liquid mask to cover the rest) to make absolutely sure that nothing gets on the clear part during the rest of the process.  On the outside, I removed the first mask for the "rubber" color (the Eduard mask kit has masks for the two color layers).  Then I applied the second mask for the fuselage color, using the liquid mask again to fill the areas not covered by the Eduard mask, per their instructions.  Once the outside of the two canopy pieces were remasked, I used tiny snakes of Blue Tack along the edges (including the mating edges of the canopy pieces) to both temporarily attach the canopy to the model and protect the detail work in the cockpit from any overspray which might sneak in under/around the canopy.  After that I started with decanted Tamiya grey primer for the whole model, checked/corrected any remaining microscopic seams and gaps, painted, gloss clear coated, decaled, weathered with Flory wash, and then flat clear coated.  After all of that was done, then I finally removed the canopy pieces, the masking, and then dabbed up the left-over chunks of Blue Tack.  I'm waiting to permanently attach the rear canopy piece until after all of the work on the bottom of the plane is done, just so I don't risk scratching or cracking it while the plane is on its back.  When I attach it permanently, I'll be using Devcon clear epoxy.  The forward canopy I'll be attaching to its rail the same way, once I attach my scratchbuilt JHMCS sensor (haven't made it yet...so hoping for the best) and get the assembly painted black.

WHEW!!!  As you can see, canopies can be quite a process, and they're definitely not an area to try to rush since they're the window to all that nice cockpit and interior work that you've already done.

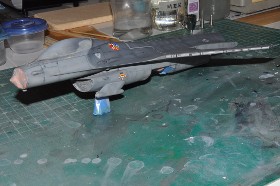
Here it is, all masked up.

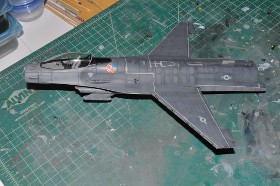
And here it is, the finished canopy just sitting on the model after unmasking.

"You can have my illegal fireworks when you pry them from my cold, dead fingers...which are...over there somewhere."

  • Member since
    September 2014
Posted by rooster513 on Thursday, December 10, 2020 8:12 AM

I like to mask and then attach the canopy if it's going to be closed anyway. Risk with this is dust and other bits gettng caught in there. I don't see why you couldn't prime if you want to. A good option is to mask the canopy and paint the interior color first and then the exterior color over that. 

-Andy

  • Member since
    September 2020
  • From: UK
Canopy painting
Posted by CliveEH on Thursday, December 10, 2020 7:34 AM

Hi all

Several related questions

1)When priming and painting the exterior I sometimes mask the cockpit with the canopy as a frame (lightly glued)with a general mask on top. I then remove the canopy and properly mask it for painting. I then glue it back on the fuselage. I never think to properly mask the canopy first, attach it to the fuselage and paint it all in one. Do people do this or only when the canopy frame is the same colour as the fuselage?

2) Does anyone prime the canopy?  I only see it top coated. It might reduce the translucent quality on larger scales without painting the inside as well

3) I tend to overpaint the canopy frame mainly because I worry about too little being applied. The last thing I want to do is remask and start again. Not my favourite aspect of the hobby. I struggle, sometimes, to assess when to stop airbrushing when viewing through thin strips of masking tape. Can anyone provide any pointers      

Thank you

 Clive


JOIN OUR COMMUNITY!

Our community is FREE to join. To participate you must either login or register for an account.

SEARCH FORUMS
FREE NEWSLETTER
By signing up you may also receive reader surveys and occasional special offers. We do not sell, rent or trade our email lists. View our Privacy Policy.